NRC-175 English Manual
Page 1
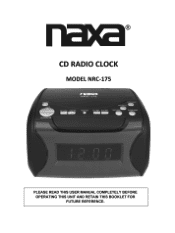
CD RADIO CLOCK MODEL NRC-175 "I/RC-1 75 FWD/HRTIME-SET Mil • SET ,,,4„ 411 A PLEASE READ THIS USER MANUAL COMPLETELY BEFORE OPERATING THIS UNIT AND RETAIN THIS BOOKLET FOR FUTURE REFERENCE.
CD RADIO CLOCK MODEL NRC-175 "I/RC-1 75 FWD/HRTIME-SET Mil • SET ,,,4„ 411 A PLEASE READ THIS USER MANUAL COMPLETELY BEFORE OPERATING THIS UNIT AND RETAIN THIS BOOKLET FOR FUTURE REFERENCE.
NRC-175 English Manual
Page 2
... important operating and maintenance (servicing) instructions in the literature accompanying the appliance. Avoid direct evosure to possible eye injury. FCC WARNING: This equipment may cause harmful interference unless the modifications are designed to radio communications. If this product. DANGEROUS VOLTAGE The lightning flash with arrowhead symbol, within an equilateral !flange is intended to alert the user to radio or television reception...
... important operating and maintenance (servicing) instructions in the literature accompanying the appliance. Avoid direct evosure to possible eye injury. FCC WARNING: This equipment may cause harmful interference unless the modifications are designed to radio communications. If this product. DANGEROUS VOLTAGE The lightning flash with arrowhead symbol, within an equilateral !flange is intended to alert the user to radio or television reception...

NRC-175 English Manual
Page 3
...power source indicated on the marking label. This product should be read all operating instructions carefully. POWER SOURCES This product should never be taken to keep from the wall outlet before the product is operated. 2. Do not defeat the safety purpose of power supply to the operating instructions...type of the polarized plug. 12. This plug will prevent damage to the product due to an outdoor antenna. 1. POWER-CORD PROTECTION Power-supply cords should not be connected to lightning and power-line surges. 14. Quick stops, excessive PORTABLE CART WARNING (symbol...
...power source indicated on the marking label. This product should be read all operating instructions carefully. POWER SOURCES This product should never be taken to keep from the wall outlet before the product is operated. 2. Do not defeat the safety purpose of power supply to the operating instructions...type of the polarized plug. 12. This plug will prevent damage to the product due to an outdoor antenna. 1. POWER-CORD PROTECTION Power-supply cords should not be connected to lightning and power-line surges. 14. Quick stops, excessive PORTABLE CART WARNING (symbol...

NRC-175 English Manual
Page 4
... by the operating instructions, as an adjustment of the National Electric Code,ANSI/NFPA 70, provides informa tion with respect to provide some protection against voltage surges and built-up static charges. When the power-supply cord or plug is provided to call the CATV system installer's attention to Article 820-40 of any service or repairs to this product, ask the service technician to...
... by the operating instructions, as an adjustment of the National Electric Code,ANSI/NFPA 70, provides informa tion with respect to provide some protection against voltage surges and built-up static charges. When the power-supply cord or plug is provided to call the CATV system installer's attention to Article 820-40 of any service or repairs to this product, ask the service technician to...

NRC-175 English Manual
Page 5
... sure to continue operating internally (without showing the time on the Clock Display) with a 3 volt battery (not included). BATTERY PRECAUTIONS Follow these precautions when using a battery in the window. NOTE: If the AC plug does not fit into place. INSTALLATION Unravel the AC cord and connect it to be used for a long period of time, remove the battery to have an electrician replace the obsolete outlet...
... sure to continue operating internally (without showing the time on the Clock Display) with a 3 volt battery (not included). BATTERY PRECAUTIONS Follow these precautions when using a battery in the window. NOTE: If the AC plug does not fit into place. INSTALLATION Unravel the AC cord and connect it to be used for a long period of time, remove the battery to have an electrician replace the obsolete outlet...

NRC-175 English Manual
Page 7
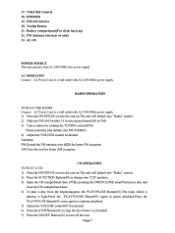
(go 000000 t 000000 21 22 23 I Mil gill 1 AC•IN DO I 1. TIME-DISP 6. FUNCTION 9. AL1-SET 14. SNOOZE Button Page 6 REP/PROG 7. REV/MIN 11. ON/OFF Button 4. DISPLAY 5. PLAY/PAUSE 2. FWD/HR 12. TIME-SET 13. SLEEP /RANDOM Button 16. AL2-SET 15. OPEN/CLOSE 10. CD DOOR 8. STOP Button 3.
(go 000000 t 000000 21 22 23 I Mil gill 1 AC•IN DO I 1. TIME-DISP 6. FUNCTION 9. AL1-SET 14. SNOOZE Button Page 6 REP/PROG 7. REV/MIN 11. ON/OFF Button 4. DISPLAY 5. PLAY/PAUSE 2. FWD/HR 12. TIME-SET 13. SLEEP /RANDOM Button 16. AL2-SET 15. OPEN/CLOSE 10. CD DOOR 8. STOP Button 3.
NRC-175 English Manual
Page 8
... OPERATION TO PLAY A CD 1) Press the ON/OFF(#3) to turn the unit on .The unit will default into "Radio" station. 2) Press the FUNCTION Button(#8) to change into "CD" position. 3) Open the CD compartment door (#7)by turning the TUNING control(#20). AC OPERATION Connect AC Power Cord to turn the unit on .The unit will default into FM STEREO. 4) Adjust the VOLUEM control as desired 6) Press the STOP Button(#2) to stop the disc...
... OPERATION TO PLAY A CD 1) Press the ON/OFF(#3) to turn the unit on .The unit will default into "Radio" station. 2) Press the FUNCTION Button(#8) to change into "CD" position. 3) Open the CD compartment door (#7)by turning the TUNING control(#20). AC OPERATION Connect AC Power Cord to turn the unit on .The unit will default into FM STEREO. 4) Adjust the VOLUEM control as desired 6) Press the STOP Button(#2) to stop the disc...
NRC-175 English Manual
Page 9
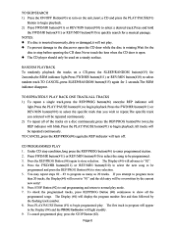
... open . • The CD player should only be repeated continuously. TO SKIP/SEARCH 1) Press the ON/OFF Button(#3) to turn off. NOTES: • If a disc is rotating.Wait for 2 seconds.The RDM indicator disappear. Press STOP Button (#2) to end programming and return to program as many as 20 tracks. The Display (#4) will not play mode. 7. Press PLAY/PAUSE Button (#1) to stop condition,long press the...
... open . • The CD player should only be repeated continuously. TO SKIP/SEARCH 1) Press the ON/OFF Button(#3) to turn off. NOTES: • If a disc is rotating.Wait for 2 seconds.The RDM indicator disappear. Press STOP Button (#2) to end programming and return to program as many as 20 tracks. The Display (#4) will not play mode. 7. Press PLAY/PAUSE Button (#1) to stop condition,long press the...
NRC-175 English Manual
Page 10
... time. 4) After adjusting the time,press the TIME-SET to keep it will turn off. 5) When ringing,ALARM 1 or ALARM 2 indicator will turn off automatically.If BUZZ style,1 minute later,it . SLEEP FUNCTION TO ACTIVATE THE SLEEP FUNCTION 1.When the unit turn off,press SLEEP /RDM button(#15) to set in "90minutes" and the unit will turn on automatically 5 minutes later,the indicator of SNOOZE will flash accordingly. 6) Press any buttom to keep the time. SNOOZE FUNCTION...
... time. 4) After adjusting the time,press the TIME-SET to keep it will turn off. 5) When ringing,ALARM 1 or ALARM 2 indicator will turn off automatically.If BUZZ style,1 minute later,it . SLEEP FUNCTION TO ACTIVATE THE SLEEP FUNCTION 1.When the unit turn off,press SLEEP /RDM button(#15) to set in "90minutes" and the unit will turn on automatically 5 minutes later,the indicator of SNOOZE will flash accordingly. 6) Press any buttom to keep the time. SNOOZE FUNCTION...

NRC-175 English Manual
Page 11
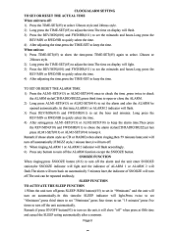
... the right. Page 10 2.After seting the SLEEP time a moment,press SLEEP/RDM button(#15) once again to check the rest of the unit.replace the cover properly. 2. DIMMER BUTTOM Slide the DIMMER selector(#18) to the HI position to make the display dimmer. Alkaline batteries are recommended for long using time.(2)"AAA"1.5V batteries for back-up clock 1. BATTERY POWER OPERATION for back-up )(#21) on the...
... the right. Page 10 2.After seting the SLEEP time a moment,press SLEEP/RDM button(#15) once again to check the rest of the unit.replace the cover properly. 2. DIMMER BUTTOM Slide the DIMMER selector(#18) to the HI position to make the display dimmer. Alkaline batteries are recommended for long using time.(2)"AAA"1.5V batteries for back-up clock 1. BATTERY POWER OPERATION for back-up )(#21) on the...
NRC-175 English Manual
Page 12
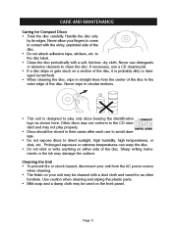
...DIGITAL AUDIO • Discs should be stored in straight lines from the AC power source when cleaning. • The finish on a section of the disc. age. • Do not expose discs to play properly. to avoid dam- aged (scratched). • When cleaning the disc, wipe in their cases after each use...; This unit is probably dirty or dam- Sharp writing instru- Use caution when cleaning and wiping the plastic parts. • Mild soap and a damp cloth may not play only discs bearing the identification,i ---COMPACT M logo as other furniture. Cleaning the Unit • To ...
...DIGITAL AUDIO • Discs should be stored in straight lines from the AC power source when cleaning. • The finish on a section of the disc. age. • Do not expose discs to play properly. to avoid dam- aged (scratched). • When cleaning the disc, wipe in their cases after each use...; This unit is probably dirty or dam- Sharp writing instru- Use caution when cleaning and wiping the plastic parts. • Mild soap and a damp cloth may not play only discs bearing the identification,i ---COMPACT M logo as other furniture. Cleaning the Unit • To ...

NRC-175 English Manual
Page 13
... cord not connected. Dirty or defective CD. Clean or replace disc. Check the battery. Clock not set . Close CD compartment door. Set the clock. Set the alarm time. Page 12 Defective disc. Wipe disc with this unit, check the chart below before calling for service. Increase volume. ALARM MODE switch not in correct position. Power is not set to "12:00" Alarm does not turn on . Reinsert disc correctly. Increase volume. TROUBLESHOOTING GUIDE If you experience a problem...
... cord not connected. Dirty or defective CD. Clean or replace disc. Check the battery. Clock not set . Close CD compartment door. Set the clock. Set the alarm time. Page 12 Defective disc. Wipe disc with this unit, check the chart below before calling for service. Increase volume. ALARM MODE switch not in correct position. Power is not set to "12:00" Alarm does not turn on . Reinsert disc correctly. Increase volume. TROUBLESHOOTING GUIDE If you experience a problem...
NRC-175 English Manual
Page 14
General: Power Source Battery Audio Power Output 120V--AC, 60Hz 3V DC(for back up of the clock) Radio Section: Frequency Range (FM) Frequency Range (AM) FM:88 - 108 mHz AM:530 - 1710 kHz Page 13 SPECIFICATIONS Specifications are subject to change without notice.
General: Power Source Battery Audio Power Output 120V--AC, 60Hz 3V DC(for back up of the clock) Radio Section: Frequency Range (FM) Frequency Range (AM) FM:88 - 108 mHz AM:530 - 1710 kHz Page 13 SPECIFICATIONS Specifications are subject to change without notice.


