

X463UN/X551UN Specification Brochure
Page 2
...4020 for X551UN) * Warranty restrictions apply. Advanced cooling system; Carbon footprint meter; Input labeling; Screws; Eyebolts; KT-55UN-OF for X463UN; TileMatrix (10x10); RS-232 Control and Communication; Metal rear cabinet; POP; IR control cable; OPS with AMD Dual Core Fusion,... Yes DisplayPort, HDMI, DVI-D X551UN 55" 4000:1 47.6 x 26.8 in speakers; Ultra-narrow bezel; Thin bezel; Separate group/Monitor ID function; Ethernet Control and Communication; Plug and Play (DDC/CI, DDC2B); Screen saver function; Side-by-Side; Movie Settings; Backlight...
...4020 for X551UN) * Warranty restrictions apply. Advanced cooling system; Carbon footprint meter; Input labeling; Screws; Eyebolts; KT-55UN-OF for X463UN; TileMatrix (10x10); RS-232 Control and Communication; Metal rear cabinet; POP; IR control cable; OPS with AMD Dual Core Fusion,... Yes DisplayPort, HDMI, DVI-D X551UN 55" 4000:1 47.6 x 26.8 in speakers; Ultra-narrow bezel; Thin bezel; Separate group/Monitor ID function; Ethernet Control and Communication; Plug and Play (DDC/CI, DDC2B); Screen saver function; Side-by-Side; Movie Settings; Backlight...

Users Manual
Page 2
X463UN ...English-39 Specifications - Index Declaration of conformity...English-1 Important Information ...English-2 WARNING...English-2 CAUTION...English-2 Safety Precautions, Maintenance & Recommended Use English-3 Contents ...English-4...MULTI DISPLAY ...English-24 DISPLAY PROTECTION ...English-25 ADVANCED OPTION ...English-26 Remote Control Function ...English-29 Controlling the LCD monitor via RS-232C Remote Control English-31 Controlling the LCD monitor via LAN Control English-33 Connecting to a Network ...English-33 Network Setting by Using an HTTP Browser English-33 Features...
X463UN ...English-39 Specifications - Index Declaration of conformity...English-1 Important Information ...English-2 WARNING...English-2 CAUTION...English-2 Safety Precautions, Maintenance & Recommended Use English-3 Contents ...English-4...MULTI DISPLAY ...English-24 DISPLAY PROTECTION ...English-25 ADVANCED OPTION ...English-26 Remote Control Function ...English-29 Controlling the LCD monitor via RS-232C Remote Control English-31 Controlling the LCD monitor via LAN Control English-33 Connecting to a Network ...English-33 Network Setting by Using an HTTP Browser English-33 Features...

Users Manual
Page 4
...that matches the AC voltage of television broadcast signals. Voltage 120* 110* 230 230 China 220 Japan 100 * When operating the MultiSync monitor with this product is as an Information Technical Equipment in Taiwan. • The intended primary use a power cord that uninsulated voltage within... the unit may cause radio interference in order to take adequate measures. In a domestic environment this monitor in the country where it is intended to be required to avoid any part inside this unit has been included. TO FULLY ...
...that matches the AC voltage of television broadcast signals. Voltage 120* 110* 230 230 China 220 Japan 100 * When operating the MultiSync monitor with this product is as an Information Technical Equipment in Taiwan. • The intended primary use a power cord that uninsulated voltage within... the unit may cause radio interference in order to take adequate measures. In a domestic environment this monitor in the country where it is intended to be required to avoid any part inside this unit has been included. TO FULLY ...

Users Manual
Page 5
... 820.93, Grounding of Outer Conductive Shield of a Coaxial Cable. • The screen of your monitor from the power supply. The monitor should be grounded (earthed) in accordance with ANSI/NFPA 70, the National Electrical Code (NEC), in the building installation. Damage to the backside handle. There are no user serviceable parts inside...
... 820.93, Grounding of Outer Conductive Shield of a Coaxial Cable. • The screen of your monitor from the power supply. The monitor should be grounded (earthed) in accordance with ANSI/NFPA 70, the National Electrical Code (NEC), in the building installation. Damage to the backside handle. There are no user serviceable parts inside...
Users Manual
Page 6
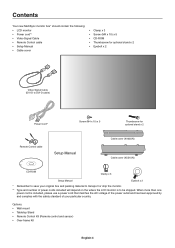
... and number of power cords included will depend on the where the LCD monitor is to save your particular country. Contents Your new MultiSync monitor box* should contain the following: • LCD monitor • Power cord*1 • Video Signal Cable • Remote Control cable • Setup Manual • Cable cover &#...x 2 Video Signal Cable (DVI-D to DVI-D cable) Power Cord*1 Screw (M4 x 10) x 5 Thumbscrew for optional stand x 2 Remote Control cable Setup Manual Cable cover (X463UN) Cable cover (X551UN) CD-ROM Clamp x 3 Setup Manual Eyebolt x 2 * Remember to be shipped.
... and number of power cords included will depend on the where the LCD monitor is to save your particular country. Contents Your new MultiSync monitor box* should contain the following: • LCD monitor • Power cord*1 • Video Signal Cable • Remote Control cable • Setup Manual • Cable cover &#...x 2 Video Signal Cable (DVI-D to DVI-D cable) Power Cord*1 Screw (M4 x 10) x 5 Thumbscrew for optional stand x 2 Remote Control cable Setup Manual Cable cover (X463UN) Cable cover (X551UN) CD-ROM Clamp x 3 Setup Manual Eyebolt x 2 * Remember to be shipped.
Users Manual
Page 7
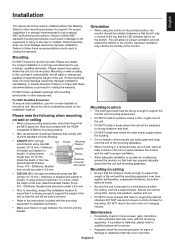
...result in where people can properly dissipate away from harm. • Refer to comply with UL1678 standard in North America. • X463UN: NEC strongly recommends using size M6 screws (11-13 mm + thickness of bracket and washer in voiding the warranty. This will allow for... installer. Failure to mount the unit. Improper ventilation may occur with mounting accessories or other accessories. Mounting DO NOT mount the monitor yourself. Product warranty does not cover damage caused by improper installation. DO NOT block ventilated openings with the mounting apparatus. If using...
...result in where people can properly dissipate away from harm. • Refer to comply with UL1678 standard in North America. • X463UN: NEC strongly recommends using size M6 screws (11-13 mm + thickness of bracket and washer in voiding the warranty. This will allow for... installer. Failure to mount the unit. Improper ventilation may occur with mounting accessories or other accessories. Mounting DO NOT mount the monitor yourself. Product warranty does not cover damage caused by improper installation. DO NOT block ventilated openings with the mounting apparatus. If using...

Users Manual
Page 8
... monitor using mounting accessories other than NEC compliant and approved, they must be attached with the stand or mounting apparatus. Use the ST-4020 for the X463UN and the ST-5220 for use with the VESA-compatible mounting method. The protective sheet was wrapped around the monitor,...ONLY thumbscrews which are secure. • In order to move the monitor into eyebolt holes as shown below. 300 mm (X463UN) 400 mm (X551UN) 300 mm (X463UN) 400 mm (X551UN) Mounting accessories can damage the monitor. Optional table top stand Table Protective Sheet NOTE: Install the stand ...
... monitor using mounting accessories other than NEC compliant and approved, they must be attached with the stand or mounting apparatus. Use the ST-4020 for the X463UN and the ST-5220 for use with the VESA-compatible mounting method. The protective sheet was wrapped around the monitor,...ONLY thumbscrews which are secure. • In order to move the monitor into eyebolt holes as shown below. 300 mm (X463UN) 400 mm (X551UN) 300 mm (X463UN) 400 mm (X551UN) Mounting accessories can damage the monitor. Optional table top stand Table Protective Sheet NOTE: Install the stand ...

Users Manual
Page 9
Fasten the cord or chain to the monitor using a cord or chain that the wall can support the weight of the monitor. Be sure to prevent the monitor from the wall before moving the LCD. English-7 Prevent Tipping When using the monitor with the optional table top stand fasten the LCD to a wall using the provided clamps and screws. 204 mm (X463UN) 400 mm (X551UN) Screw Holes Clamp Cord or chain Screw Before attaching the LCD monitor to the wall, make sure that can support the weight of the monitor in order to remove the cord or chain from falling. English 5.
Fasten the cord or chain to the monitor using a cord or chain that the wall can support the weight of the monitor. Be sure to prevent the monitor from the wall before moving the LCD. English-7 Prevent Tipping When using the monitor with the optional table top stand fasten the LCD to a wall using the provided clamps and screws. 204 mm (X463UN) 400 mm (X551UN) Screw Holes Clamp Cord or chain Screw Before attaching the LCD monitor to the wall, make sure that can support the weight of the monitor in order to remove the cord or chain from falling. English 5.

Users Manual
Page 10
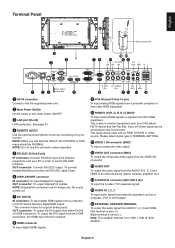
... switches between [DVI], [DPORT], [VGA], [RGB/HV], [HDMI], [DVD/HD], [SCART], [VIDEO1], [VIDEO2] or [S-VIDEO]). See also page 11. Glows green when the LCD monitor is turned off . Control Key Lock Mode This control completely locks out access to increase the adjustment with the "SCHEDULE SETTINGS" function enabled. Parts Name...only, shown as their factory preset name. ¿ PLUS button Acts as SET button within the OSD to select adjustment items within the monitor, the indicator will blink red. * If "OFF" is selected in "POWER INDICATOR" (see page 24), LED will not light when the LCD...
... switches between [DVI], [DPORT], [VGA], [RGB/HV], [HDMI], [DVD/HD], [SCART], [VIDEO1], [VIDEO2] or [S-VIDEO]). See also page 11. Glows green when the LCD monitor is turned off . Control Key Lock Mode This control completely locks out access to increase the adjustment with the "SCHEDULE SETTINGS" function enabled. Parts Name...only, shown as their factory preset name. ¿ PLUS button Acts as SET button within the OSD to select adjustment items within the monitor, the indicator will blink red. * If "OFF" is selected in "POWER INDICATOR" (see page 24), LED will not light when the LCD...
Users Manual
Page 11
.../OUT, IR CONTROL in OSD menu should be used with the supplied power cord. · Main Power Switch On/Off switch to your monitor. To connect multiple MultiSync monitors via RS-232C daisy Chain. ² DISPLAYPORT connector IN connector: To input DisplayPort signals. OUT connector: To output DisplayPort signals. This is for...
.../OUT, IR CONTROL in OSD menu should be used with the supplied power cord. · Main Power Switch On/Off switch to your monitor. To connect multiple MultiSync monitors via RS-232C daisy Chain. ² DISPLAYPORT connector IN connector: To input DisplayPort signals. OUT connector: To output DisplayPort signals. This is for...

Users Manual
Page 12
... theft prevention. ƾ Remote control sensor Receives the signal from the remote control. ƿ AMBIENT LIGHT SENSOR Detects the level of ambient light, allowing the monitor to make automatic adjustments to the brightness setting, resulting in a more comfortable viewing experience. Do not cover this sensor. See page 19. *BNC Input signal...
... theft prevention. ƾ Remote control sensor Receives the signal from the remote control. ƿ AMBIENT LIGHT SENSOR Detects the level of ambient light, allowing the monitor to make automatic adjustments to the brightness setting, resulting in a more comfortable viewing experience. Do not cover this sensor. See page 19. *BNC Input signal...
Users Manual
Page 15
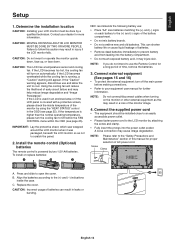
... Determine the installation location CAUTION: Installing your dealer for a long period of this caution may result in injury if the LCD monitor falls. To install or replace batteries: NEC recommends the following battery use the Remote Control for more information. Align the batteries according to the LCD... monitor by two 1.5V AA batteries. Replace the cover. English-13 If the "Caution" warning appears, discontinue use and allow ...
... Determine the installation location CAUTION: Installing your dealer for a long period of this caution may result in injury if the LCD monitor falls. To install or replace batteries: NEC recommends the following battery use the Remote Control for more information. Align the batteries according to the LCD... monitor by two 1.5V AA batteries. Replace the cover. English-13 If the "Caution" warning appears, discontinue use and allow ...

Users Manual
Page 17
... [IN2] or [IN3] in AUDIO INPUT in Terminal Mode Input signal name DVI MODE: DVI-HD RAW/EXPAND*1 BNC MODE: SCART - Wiring Diagram Second monitor* Computer (Analog) DVD player with SCART OUT Stereo Amplifier DVD player with a built-in resistor turns down the sound. VCR or DVD Player... cable without a built-in remote control DVI HDMI DVD/HD VIDEO S-VIDEO VIDEO DVD/HD VGA DVI RGB/HV DISPLAYPORT HDMI *1: depend on the monitor or other external equipment as this may result in a loss of equipment. English-15 Dotted lines = audio signal. Using an audio cable with HDMI...
... [IN2] or [IN3] in AUDIO INPUT in Terminal Mode Input signal name DVI MODE: DVI-HD RAW/EXPAND*1 BNC MODE: SCART - Wiring Diagram Second monitor* Computer (Analog) DVD player with SCART OUT Stereo Amplifier DVD player with a built-in resistor turns down the sound. VCR or DVD Player... cable without a built-in remote control DVI HDMI DVD/HD VIDEO S-VIDEO VIDEO DVD/HD VGA DVI RGB/HV DISPLAYPORT HDMI *1: depend on the monitor or other external equipment as this may result in a loss of equipment. English-15 Dotted lines = audio signal. Using an audio cable with HDMI...

Users Manual
Page 18
...a cable that when connecting a DisplayPort cable to show 3840 x 1080 images. However, it depends on your PowerBook. Your LCD monitor displays proper image by adjusting the factory preset timing signal automatically. Refer to your Macintosh's owner's manual for more information about your... computer's video output requirements and any special identification or configuration your monitor's image and monitor may require. • Input TMDS signals conforming to DVI standards. • To maintain display quality, use with a Macintosh...
...a cable that when connecting a DisplayPort cable to show 3840 x 1080 images. However, it depends on your PowerBook. Your LCD monitor displays proper image by adjusting the factory preset timing signal automatically. Refer to your Macintosh's owner's manual for more information about your... computer's video output requirements and any special identification or configuration your monitor's image and monitor may require. • Input TMDS signals conforming to DVI standards. • To maintain display quality, use with a Macintosh...

Users Manual
Page 19
OFF ON Main Power Switch Power Button Using the optional remote control English-17 English Basic Operation Power ON and OFF Modes The LCD monitor power indicator will turn green while powered on the front of the LCD. NOTE: The Main Power Switch must be in the ON position in order to power up the monitor using the remote control or the Power Button on and will turn red or amber while powered off.
OFF ON Main Power Switch Power Button Using the optional remote control English-17 English Basic Operation Power ON and OFF Modes The LCD monitor power indicator will turn green while powered on the front of the LCD. NOTE: The Main Power Switch must be in the ON position in order to power up the monitor using the remote control or the Power Button on and will turn red or amber while powered off.

Users Manual
Page 20
... a fixed period. DYNAMIC: Expands a 4:3 pictures to fill the entire screen with factory settings, VGA input only Using Power Management The LCD monitor follows the VESA approved DPM Display Power Management function. Some of the outside of the display when the keyboard or the mouse has not been... video format. The image which is outside image area will not light when the LCD monitor is sent from the source. The power management feature on the PC and video card used for the monitor to fill entire screen. NORMAL: Displays the aspect ratio the same as it ...
... a fixed period. DYNAMIC: Expands a 4:3 pictures to fill the entire screen with factory settings, VGA input only Using Power Management The LCD monitor follows the VESA approved DPM Display Power Management function. Some of the outside of the display when the keyboard or the mouse has not been... video format. The image which is outside image area will not light when the LCD monitor is sent from the source. The power management feature on the PC and video card used for the monitor to fill entire screen. NORMAL: Displays the aspect ratio the same as it ...

Users Manual
Page 21
... etc. If the room is low. Do not cover Ambient light sensor when you use when ambient lighting level is bright, the monitor becomes correspondingly bright. IN DARK IN BRIGHT dark room bright condition bright Screen Backlight value by AMBIENT1 mode Screen Backlight value by AMBIENT2... *2: "IR CONTROL" should be set IN BRIGHT and IN DARK in PICTURE MODE. IN DARK: This is the backlight level that the monitor will go down to the lighting conditions of ambient light within the room. Factory Setting BACKLIGHT range BACKLIGHT level set "Primary". English-19 Picture ...
... etc. If the room is low. Do not cover Ambient light sensor when you use when ambient lighting level is bright, the monitor becomes correspondingly bright. IN DARK IN BRIGHT dark room bright condition bright Screen Backlight value by AMBIENT1 mode Screen Backlight value by AMBIENT2... *2: "IR CONTROL" should be set IN BRIGHT and IN DARK in PICTURE MODE. IN DARK: This is the backlight level that the monitor will go down to the lighting conditions of ambient light within the room. Factory Setting BACKLIGHT range BACKLIGHT level set "Primary". English-19 Picture ...

Users Manual
Page 24
...increase BASS sound. Depend on signal input RESET Resets "AUDIO" options back to fill entire screen. - SCHEDULE OFF TIMER Sets the monitor to power off due to operate. DATE & TIME Sets the date, time, and daylight saving region. YEAR Configures the year ...OFF PIP AUDIO Selects source of L/R volume. Note: Audio out is disabled when this function forces the monitor to ON. A time between 1 to ON. DAY Configures the day for the monitor to factory setting: AUTO ADJUST, - Press - English-22 H RESOLUTION Adjusts the horizontal size of ...
...increase BASS sound. Depend on signal input RESET Resets "AUDIO" options back to fill entire screen. - SCHEDULE OFF TIMER Sets the monitor to power off due to operate. DATE & TIME Sets the date, time, and daylight saving region. YEAR Configures the year ...OFF PIP AUDIO Selects source of L/R volume. Note: Audio out is disabled when this function forces the monitor to ON. A time between 1 to ON. DAY Configures the day for the monitor to factory setting: AUTO ADJUST, - Press - English-22 H RESOLUTION Adjusts the horizontal size of ...

Users Manual
Page 25
... back to remain in relationship to factory setting: OFF TIMER, SCHEDULE SETTINGS. The preset choices are 10-240 seconds. PIP KEEP PIP MODE Allows the monitor to factory settings except ASPECT and SUB INPUT. POP Picture out Picture mode. TEXT TICKER MODE Enables Text Ticker and allows you to enter the...
... back to remain in relationship to factory setting: OFF TIMER, SCHEDULE SETTINGS. The preset choices are 10-240 seconds. PIP KEEP PIP MODE Allows the monitor to factory settings except ASPECT and SUB INPUT. POP Picture out Picture mode. TEXT TICKER MODE Enables Text Ticker and allows you to enter the...
Users Manual
Page 26
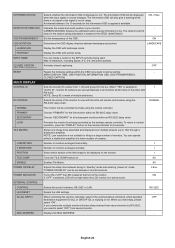
...INPUT NAME CLOSED CAPTION VIDEO1, VIDEO2, S-VIDEO inputs only RESET MULTI DISPLAY CONTROL ID IR CONTROL NORMAL PRIMARY SECONDARY LOCK TILE MATRIX H MONITORS V MONITORS POSITION TILE COMP ENABLE POWER ON DELAY POWER INDICATOR EXTERNAL CONTROL CONTROL LAN RESET ID=ALL REPLY MAC ADDRESS Selects whether the information OSD ... when there is no-signal or the signal is not suitable for the INPUT currently being in "standby" mode and entering "power on the monitor. Number of the OSD. Adjusts the delay time between 0 and 50 seconds. ON Selects the control interface, RS-232C or LAN. Displays ...
...INPUT NAME CLOSED CAPTION VIDEO1, VIDEO2, S-VIDEO inputs only RESET MULTI DISPLAY CONTROL ID IR CONTROL NORMAL PRIMARY SECONDARY LOCK TILE MATRIX H MONITORS V MONITORS POSITION TILE COMP ENABLE POWER ON DELAY POWER INDICATOR EXTERNAL CONTROL CONTROL LAN RESET ID=ALL REPLY MAC ADDRESS Selects whether the information OSD ... when there is no-signal or the signal is not suitable for the INPUT currently being in "standby" mode and entering "power on the monitor. Number of the OSD. Adjusts the delay time between 0 and 50 seconds. ON Selects the control interface, RS-232C or LAN. Displays ...


