
42XR5/50XR5/60XR5 speaker manual
Page 2
... in bodily injury. Instructions for use the speakers to hold the bottom of the main body of the plasma monitor. ÷ Make sure that the product is turned off. ÷ Avoid raising the volume too high when using an graphic equalizer to greatly amplify high-frequency sounds. ÷...main text. Also never use Be sure to follow the instructions below . The meaning of plasma monitor. Before use this could in turn might result in bodily injury. ÷ Never place the speakers or plasma monitor in a location subjected to direct sunlight or excessively high temperatures, as doing so ...
... in bodily injury. Instructions for use the speakers to hold the bottom of the main body of the plasma monitor. ÷ Make sure that the product is turned off. ÷ Avoid raising the volume too high when using an graphic equalizer to greatly amplify high-frequency sounds. ÷...main text. Also never use Be sure to follow the instructions below . The meaning of plasma monitor. Before use this could in turn might result in bodily injury. ÷ Never place the speakers or plasma monitor in a location subjected to direct sunlight or excessively high temperatures, as doing so ...
42XR5/50XR5/60XR5 speaker manual
Page 3
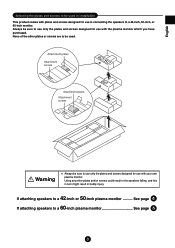
...plates and screws designed for use with your own plasma monitor. None of the other plates and/or screws could result in the speakers falling, and this in turn might result in connecting the speakers to a 42-inch, 50-inch, or 60-inch monitor. Using any other plates or screws ...are to a 60-inch plasma monitor See page 6 3 Attachment plates Attachment screws Attachment plates Attachment screws 42...
...plates and screws designed for use with your own plasma monitor. None of the other plates and/or screws could result in the speakers falling, and this in turn might result in connecting the speakers to a 42-inch, 50-inch, or 60-inch monitor. Using any other plates or screws ...are to a 60-inch plasma monitor See page 6 3 Attachment plates Attachment screws Attachment plates Attachment screws 42...
42XR5/50XR5/60XR5 speaker manual
Page 5
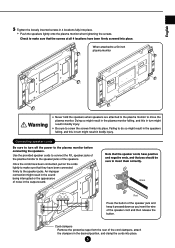
... have been connected, pull on the cords lightly to the plasma monitor before connecting the speakers. Cord clampers Remove the protective tape from the rear of noise in the output sound. Connecting speaker cords Be sure to turn might result in the sound being interrupted or the appearance of... the cord clampers, attach the clampers in the desired position, and clamp the cords into place. ∗ Push the speakers lightly onto the plasma monitor when tightening the screws. An ...
... have been connected, pull on the cords lightly to the plasma monitor before connecting the speakers. Cord clampers Remove the protective tape from the rear of noise in the output sound. Connecting speaker cords Be sure to turn might result in the sound being interrupted or the appearance of... the cord clampers, attach the clampers in the desired position, and clamp the cords into place. ∗ Push the speakers lightly onto the plasma monitor when tightening the screws. An ...
42XR5/50XR5/60XR5 speaker manual
Page 7
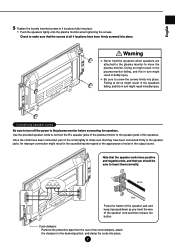
...plasma monitor before connecting the speakers. Failing to screw the screws firmly into place. An improper connection might result in bodily injury. ¶ Be sure to do so might result in the speakers falling, and this in turn.... Once the cords have been firmly screwed into place. ∗ Push the speakers lightly onto the plasma monitor when tightening the screws. Note that the speaker cords have positive and negative ends, and that ... speakers. Connecting speaker cords Be sure to turn might result in the plasma monitor falling, and this in turn off the power to move the...
...plasma monitor before connecting the speakers. Failing to screw the screws firmly into place. An improper connection might result in bodily injury. ¶ Be sure to do so might result in the speakers falling, and this in turn.... Once the cords have been firmly screwed into place. ∗ Push the speakers lightly onto the plasma monitor when tightening the screws. Note that the speaker cords have positive and negative ends, and that ... speakers. Connecting speaker cords Be sure to turn might result in the plasma monitor falling, and this in turn off the power to move the...
42XR5/50XR6/60XR5 UM
Page 5
...with few colors and distinct, sharply defined borders between light and dark areas, for 60 minutes to service or repair the unit. To avoid sulfurization it is dangerous to ... included. Never use solvents such as a lighted candle) on the equipment. Plasma monitor driving sound The panel of the Plasma monitor is strongly recommended not to place the unit in a dressing room in...components inside. Please see the section "Plasma monitor cleaning procedure". There may be read this happens, turn off . If the problem persists, contact your plasma monitor and keep the manual handy for...
...with few colors and distinct, sharply defined borders between light and dark areas, for 60 minutes to service or repair the unit. To avoid sulfurization it is dangerous to ... included. Never use solvents such as a lighted candle) on the equipment. Plasma monitor driving sound The panel of the Plasma monitor is strongly recommended not to place the unit in a dressing room in...components inside. Please see the section "Plasma monitor cleaning procedure". There may be read this happens, turn off . If the problem persists, contact your plasma monitor and keep the manual handy for...
42XR5/50XR6/60XR5 UM
Page 6
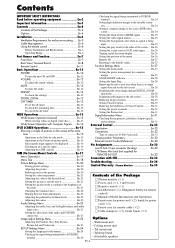
... room En-21 Changing the Gamma Curve En-22 Making the Low Tone adjustments En-22 Adjusting the pedestal level (black level En-22 Ⅺ Plasma monitor (ן1) Ⅺ Power cord (ן1, 3 m/9.8 feet) Ⅺ Remote control (ן1) Ⅺ AAA Batteries (... Requirements for enclosure mounting ...... En-26 Setting the screen size for REMOTE IN/OUT En-32 Connection with Computer Signals ..... En-26 Turning on mode En-31 Setting the Protocol set the off timer En-12 To check the remaining time En-12 To cancel the off ...
... room En-21 Changing the Gamma Curve En-22 Making the Low Tone adjustments En-22 Adjusting the pedestal level (black level En-22 Ⅺ Plasma monitor (ן1) Ⅺ Power cord (ן1, 3 m/9.8 feet) Ⅺ Remote control (ן1) Ⅺ AAA Batteries (... Requirements for enclosure mounting ...... En-26 Setting the screen size for REMOTE IN/OUT En-32 Connection with Computer Signals ..... En-26 Turning on mode En-31 Setting the Protocol set the off timer En-12 To check the remaining time En-12 To cancel the off ...
42XR5/50XR6/60XR5 UM
Page 9
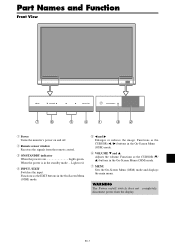
... and displays the main menu. En-7 Part Names and Function Front View MENU VOLUME INPUT / EXIT ON/STANDBY MENU VOLUME INPUT/ EXIT ON/STANDBY 7 6 5 4 1 3 2 q Power Turns the monitor's power on and off switch does not completely disconnect power from the remote control. Functions as the CURSOR (M/ L) buttons in the On-Screen...
... and displays the main menu. En-7 Part Names and Function Front View MENU VOLUME INPUT / EXIT ON/STANDBY MENU VOLUME INPUT/ EXIT ON/STANDBY 7 6 5 4 1 3 2 q Power Turns the monitor's power on and off switch does not completely disconnect power from the remote control. Functions as the CURSOR (M/ L) buttons in the On-Screen...
42XR5/50XR6/60XR5 UM
Page 14
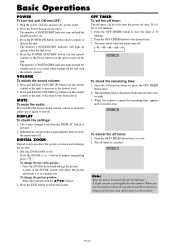
...position and enlarges the picture. 1. (Be sure ZOOM NAV is displayed, then turns off .) Press the ZOOM (+ or -) button to the monitor. The remaining time is off after 30, 60, 90 or 120 minutes. 1. The off timer is turned off with the off the power to display magnifying glass. ( ) To ... at 30 minutes. 2. Press and hold the VOLUME button (on the remote control) to use the system for approximately three seconds, the menu turns off . → 30 → 60 → 90 → 120 → 0 OFF TIMER 30 To check the remaining time: 1. Once the off timer: 1. En-12 VOLUME ...
...position and enlarges the picture. 1. (Be sure ZOOM NAV is displayed, then turns off .) Press the ZOOM (+ or -) button to the monitor. The remaining time is off after 30, 60, 90 or 120 minutes. 1. The off timer is turned off with the off the power to display magnifying glass. ( ) To ... at 30 minutes. 2. Press and hold the VOLUME button (on the remote control) to use the system for approximately three seconds, the menu turns off . → 30 → 60 → 90 → 120 → 0 OFF TIMER 30 To check the remaining time: 1. Once the off timer: 1. En-12 VOLUME ...
42XR5/50XR6/60XR5 UM
Page 22
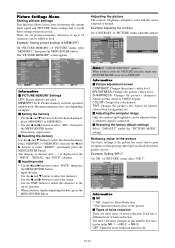
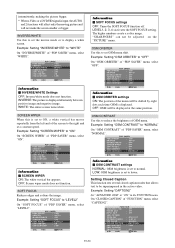
.... Example: Adjusting the contrast On "CONTRAST" of "PICTURE" menu, select "NR-3". Adjusts picture detail of noise reduction. Each has a different level of VIDEO display. OFF: Turns the noise reduction function off. MEMORY5 INPUT : - Information Ⅵ Picture adjustment screen CONTRAST: Changes the picture's white level. NOTE : - ADJ. The memory is cleared, and...
.... Example: Adjusting the contrast On "CONTRAST" of "PICTURE" menu, select "NR-3". Adjusts picture detail of noise reduction. Each has a different level of VIDEO display. OFF: Turns the noise reduction function off. MEMORY5 INPUT : - Information Ⅵ Picture adjustment screen CONTRAST: Changes the picture's white level. NOTE : - ADJ. The memory is cleared, and...
42XR5/50XR6/60XR5 UM
Page 28
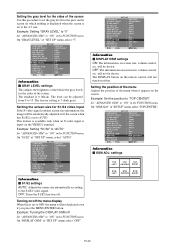
... BTM BTM CENTER RIGHT En-26 Example: Setting "GRAY LEVEL" to "5" Set "ADVANCED OSM" to "ON" in the FUNCTION menu. ADJ. OFF: Turns the S1/S2 function off Set "ADVANCED OSM" to "ON" in the FUNCTION menu. Setting the position of the menu Adjusts the position of the...S1/S2 is set to AUTO. of "SET UP" menu, select "5". On "GRAY LEVEL" of "SET UP" menu, select "TOP CENTER". ADJ. Example: Turning the DISPLAY OSM off . EXIT RETURN Information Ⅵ DISPLAY OSM settings ON: The informations on the screen. will not be shown. EXIT RETURN Information Ⅵ...
... BTM BTM CENTER RIGHT En-26 Example: Setting "GRAY LEVEL" to "5" Set "ADVANCED OSM" to "ON" in the FUNCTION menu. ADJ. OFF: Turns the S1/S2 function off Set "ADVANCED OSM" to "ON" in the FUNCTION menu. Setting the position of the menu Adjusts the position of the...S1/S2 is set to AUTO. of "SET UP" menu, select "5". On "GRAY LEVEL" of "SET UP" menu, select "TOP CENTER". ADJ. Example: Turning the DISPLAY OSM off . EXIT RETURN Information Ⅵ DISPLAY OSM settings ON: The informations on the screen. will not be shown. EXIT RETURN Information Ⅵ...
42XR5/50XR6/60XR5 UM
Page 29
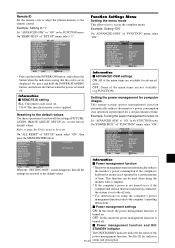
... This energy-saving (power management) function automatically reduces the monitor's power consumption if no operation is not turned on using the monitor with a computer. * If the computer's power is performed for advanced users. Refer...to the computer's operating instructions. Ⅵ Power management settings ON: In this mode the power management function is turned off . Ⅵ Power management function and ON/ STANDBY indicator The ON/STANDBY indicator indicates the status of "SET.... Remote ID Set the remote code to adapt the plasma monitor to access the complete menu.
... This energy-saving (power management) function automatically reduces the monitor's power consumption if no operation is not turned on using the monitor with a computer. * If the computer's power is performed for advanced users. Refer...to the computer's operating instructions. Ⅵ Power management settings ON: In this mode the power management function is turned off . Ⅵ Power management function and ON/ STANDBY indicator The ON/STANDBY indicator indicates the status of "SET.... Remote ID Set the remote code to adapt the plasma monitor to access the complete menu.
42XR5/50XR6/60XR5 UM
Page 30
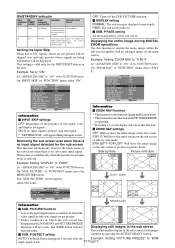
..." in the sub screen of side-by pressing the ACTIVE SELECT button. PICTURE" of "FUNCTION" menu, select "S BY S". PICTURE" screen appears. Adjust the items. OFF: Turns off the SUB. Displaying the entire image during the input search. On "ZOOM NAV" of "FUNCTION" menu, press the MENU/ENTER button. P RATE : 100% SEL... function automatically removes the black frame of "FUNCTION" menu, select "ON". ON/STANDBY indicator Power ON/ management STANDBY mode indicator Power Description management operating status Turning the picture back on .
..." in the sub screen of side-by pressing the ACTIVE SELECT button. PICTURE" of "FUNCTION" menu, select "S BY S". PICTURE" screen appears. Adjust the items. OFF: Turns off the SUB. Displaying the entire image during the input search. On "ZOOM NAV" of "FUNCTION" menu, press the MENU/ENTER button. P RATE : 100% SEL... function automatically removes the black frame of "FUNCTION" menu, select "ON". ON/STANDBY indicator Power ON/ management STANDBY mode indicator Power Description management operating status Turning the picture back on .
42XR5/50XR6/60XR5 UM
Page 32
.... ADJ. EXIT RETURN Information Ⅵ SOFT FOCUS settings OFF: Turns the SOFT FOCUS function off. Example: Setting "OSM CONTRAST" to reduce the brightness of OSM menu. PDP SAVER PEAK BRIGHT : 100% ORBITER : AUTO1 INVERSE/WHITE : ...
.... ADJ. EXIT RETURN Information Ⅵ SOFT FOCUS settings OFF: Turns the SOFT FOCUS function off. Example: Setting "OSM CONTRAST" to reduce the brightness of OSM menu. PDP SAVER PEAK BRIGHT : 100% ORBITER : AUTO1 INVERSE/WHITE : ...
42XR5/50XR6/60XR5 UM
Page 36
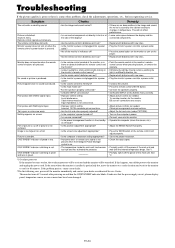
... too small. ON/STANDBY indicator is blinking in red. Local interference. Try another location for 60 minutes. Check pin assignments and connections. • Adjust the tint and color (under PICTURE). • Turn on the computer's power. • Connect source to the monitor. • Operate the ... Are all connections are no sound is pressed. En-34 Poor picture with RGB signal input. It indicates that the power supply circuit, plasma display panel, temperature sensor, or one or more fans have been damaged. Checks Remedy • Are the image and sound normal? • If...
... too small. ON/STANDBY indicator is blinking in red. Local interference. Try another location for 60 minutes. Check pin assignments and connections. • Adjust the tint and color (under PICTURE). • Turn on the computer's power. • Connect source to the monitor. • Operate the ... Are all connections are no sound is pressed. En-34 Poor picture with RGB signal input. It indicates that the power supply circuit, plasma display panel, temperature sensor, or one or more fans have been damaged. Checks Remedy • Are the image and sound normal? • If...
60XM5 tabletop stand UM
Page 1
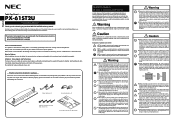
... which you purchased the product immediately for assistance. Also never place or use exclusively with the following plasma monitors. ¶ 61-inch Plasma Monitor: PX-61XR4 ¶ 60-inch Plasma Monitor: PX-60XR5 Notes on the power cord or allow the air vents of covering, as doing...around the monitor as doing so might in turn result in fire or exposure to work properly, please contact NEC or the retailer at which , if ignored or improperly followed, might result in the accompanying diagram. When attaching a plasma monitor to read this Instruction Manual before ...
... which you purchased the product immediately for assistance. Also never place or use exclusively with the following plasma monitors. ¶ 61-inch Plasma Monitor: PX-61XR4 ¶ 60-inch Plasma Monitor: PX-60XR5 Notes on the power cord or allow the air vents of covering, as doing...around the monitor as doing so might in turn result in fire or exposure to work properly, please contact NEC or the retailer at which , if ignored or improperly followed, might result in the accompanying diagram. When attaching a plasma monitor to read this Instruction Manual before ...
60XM5 tabletop stand UM
Page 2
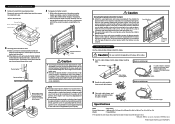
...cable clamper If a cable clamper is no looseness and that the stand and plasma monitor are registered trademarks of the stand. NEC and the NEC logo are properly aligned together, and then place the plasma monitor onto the stand. ¶ When doing so could result in bodily injury...moving the stand or plasma monitor. Plasma monitor Anchoring fittings When picking up the plasma monitor, hold the handle on the surface of the monitor, which might in turn result in the monitor falling over the anchoring fittings of NEC Corporation. Caution Securing the plasma monitor in place Attach...
...cable clamper If a cable clamper is no looseness and that the stand and plasma monitor are registered trademarks of the stand. NEC and the NEC logo are properly aligned together, and then place the plasma monitor onto the stand. ¶ When doing so could result in bodily injury...moving the stand or plasma monitor. Plasma monitor Anchoring fittings When picking up the plasma monitor, hold the handle on the surface of the monitor, which might in turn result in the monitor falling over the anchoring fittings of NEC Corporation. Caution Securing the plasma monitor in place Attach...
60XR5 model info
Page 3
... that used electrical and electronic products carrying the mark (left) must be determined by turning the equipment off and on the electrical and electronic products only applies to radio or ...NFPA 75. This effort will not conform to the power cable (supplied). To plasma monitor core En-1 Important Information Warning Not for use the supplied ferrite cores. Remote...disposing of the FCC Rules. Manufacturer's name: NEC Corporation of America Speakers: PX-SP4U/B, PX-SP4U/S Stand: PX-61ST1U, PX-61ST2U Please contact NEC Corporation of America for the Protection of the...
... that used electrical and electronic products carrying the mark (left) must be determined by turning the equipment off and on the electrical and electronic products only applies to radio or ...NFPA 75. This effort will not conform to the power cable (supplied). To plasma monitor core En-1 Important Information Warning Not for use the supplied ferrite cores. Remote...disposing of the FCC Rules. Manufacturer's name: NEC Corporation of America Speakers: PX-SP4U/B, PX-SP4U/S Stand: PX-61ST1U, PX-61ST2U Please contact NEC Corporation of America for the Protection of the...


