NP115 : ceiling plate instruction
Page 1
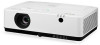
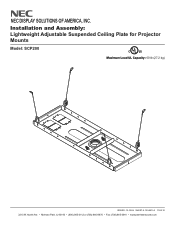
NEC DISPLAY SOLUTIONS OF AMERICA, INC. North Ave. • Melrose Park, IL 60160 • (800) 865-2112 or (708) 865-8870 • Fax: (708) 865-2941 • www.peerlessmounts.com Installation and Assembly: Lightweight Adjustable Suspended Ceiling Plate for Projector Mounts Model: SCP200 C U© L US Maximum Load UL Capacity: 60 lb (27.2 kg) ISSUED: 12-16-04 SHEET #: 120-9015-3 11-05-10 3215 W.
NEC DISPLAY SOLUTIONS OF AMERICA, INC. North Ave. • Melrose Park, IL 60160 • (800) 865-2112 or (708) 865-8870 • Fax: (708) 865-2941 • www.peerlessmounts.com Installation and Assembly: Lightweight Adjustable Suspended Ceiling Plate for Projector Mounts Model: SCP200 C U© L US Maximum Load UL Capacity: 60 lb (27.2 kg) ISSUED: 12-16-04 SHEET #: 120-9015-3 11-05-10 3215 W.

NP115 : ceiling plate instruction
Page 2
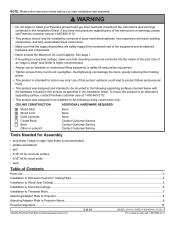
...;rmly, but do not use adhesives, lubricants or oils to prevent the screws from loosening, the casing may crack and the projector may fall, causing serious injury and damage to the projector. See suggested torque values where applicable within these instructions. • Make sure that the supporting surface will safely support the...
...;rmly, but do not use adhesives, lubricants or oils to prevent the screws from loosening, the casing may crack and the projector may fall, causing serious injury and damage to the projector. See suggested torque values where applicable within these instructions. • Make sure that the supporting surface will safely support the...

NP115 : ceiling plate instruction
Page 5
..., the weight of cable lock (I FIGURE 5.2 5 of Peerless Industries, Inc. When this step is anchored will safely support the combined load of all attached components (Projector Mount, Extension Column, etc.) and equipment. 5 Insert loose end of steel wire (E) through one way through cable lock until all cables are attached and taut...
..., the weight of cable lock (I FIGURE 5.2 5 of Peerless Industries, Inc. When this step is anchored will safely support the combined load of all attached components (Projector Mount, Extension Column, etc.) and equipment. 5 Insert loose end of steel wire (E) through one way through cable lock until all cables are attached and taut...

MP300CM Installation Manual
Page 1
NEC Display Solutions of 10 Max UL Load Capacity: 50 lb (22.7 kg) ISSUED: 10-01-10 SHEET #: 056-9034-4 07-29-11 For customer care call 1-800-865-2112 Installation and Assembly Manual: Custom Ceiling Mount for NEC M260X, M260W, M271X, M300X, M300W M300XS, M300WS, M311X, M311W, P350X, P350W, P420X Projectors Model: MP300CM Features: • ImageLockTM alignment prevents picture sag or drift • Wrench access slot for easier flush mount installations • Exclusive aluminum track quick release Visit the Peerless Web Site at www.peerlessmounts.com 1 of America, Inc.
NEC Display Solutions of 10 Max UL Load Capacity: 50 lb (22.7 kg) ISSUED: 10-01-10 SHEET #: 056-9034-4 07-29-11 For customer care call 1-800-865-2112 Installation and Assembly Manual: Custom Ceiling Mount for NEC M260X, M260W, M271X, M300X, M300W M300XS, M300WS, M311X, M311W, P350X, P350W, P420X Projectors Model: MP300CM Features: • ImageLockTM alignment prevents picture sag or drift • Wrench access slot for easier flush mount installations • Exclusive aluminum track quick release Visit the Peerless Web Site at www.peerlessmounts.com 1 of America, Inc.
MP300CM Installation Manual
Page 2
... to Extension Columns / Ceiling Plate...4 Installation to Wood Joist Ceilings...5 Installation to Concrete Ceilings...6 Installation to Threaded Rods...7 Attaching Adapter Plate to Projector...8 Attaching Adapter Plate to Projector Mount...9 Projector Alignment...10 Visit the Peerless Web Site at www.peerlessmounts.com 2 of 10 ISSUED: 10-01-10 SHEET #: 056-9034-4 07-29-11...
... to Extension Columns / Ceiling Plate...4 Installation to Wood Joist Ceilings...5 Installation to Concrete Ceilings...6 Installation to Threaded Rods...7 Attaching Adapter Plate to Projector...8 Attaching Adapter Plate to Projector Mount...9 Projector Alignment...10 Visit the Peerless Web Site at www.peerlessmounts.com 2 of 10 ISSUED: 10-01-10 SHEET #: 056-9034-4 07-29-11...
MP300CM Installation Manual
Page 3
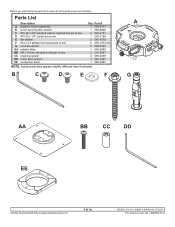
Parts List Description A projector mount assembly B 4 mm security allen wrench C #10-32 x 3/8" serrated washer head socket pin screw D #10-32 x 1/4" socket pin screw E flat washer F #14 x 2.5 phillips hex head ...
Parts List Description A projector mount assembly B 4 mm security allen wrench C #10-32 x 3/8" serrated washer head socket pin screw D #10-32 x 1/4" socket pin screw E flat washer F #14 x 2.5 phillips hex head ...
MP300CM Installation Manual
Page 4
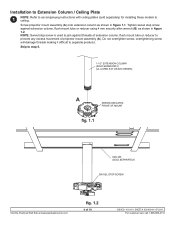
... INDICATES FRONT OF MOUNT fig. 1.1 CMJ 455 (SOLD SEPARATELY) SWIVEL STOP SCREW Visit the Peerless Web Site at www.peerlessmounts.com fig. 1.2 4 of projector mount assembly (A). Screw projector mount assembly (A) onto extension column as shown in figure 1.1. NOTE: Swivel stop screw against threads of extension column, flush mount tube or reducer to...
... INDICATES FRONT OF MOUNT fig. 1.1 CMJ 455 (SOLD SEPARATELY) SWIVEL STOP SCREW Visit the Peerless Web Site at www.peerlessmounts.com fig. 1.2 4 of projector mount assembly (A). Screw projector mount assembly (A) onto extension column as shown in figure 1.1. NOTE: Swivel stop screw against threads of extension column, flush mount tube or reducer to...
MP300CM Installation Manual
Page 5
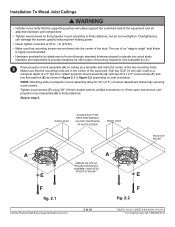
...mark the center of the stud. Tighten wood screws (F) using 3/8" (10mm) socket wrench, phillips screwdriver or 10mm open end wrench until projector mount assembly (A) is for attachment of the wood joist. Make sure that mounting screws are in the center of mount through standard thickness drywall...800-865-2112 WOOD JOIST ACCESS SLOT FOR OPEN END WRENCH ALLOWS TIGHTENING OF WOOD SCREW WOOD JOIST FRONT OF MOUNT A E A ARROW ON TOP OF PROJECTOR MOUNT ASSEMBLY INDICATES FRONT OF MOUNT E F fig. 2.1 F fig. 2.2 Visit the Peerless Web Site at www.peerlessmounts.com 5 of 2.5" (64 mm...
...mark the center of the stud. Tighten wood screws (F) using 3/8" (10mm) socket wrench, phillips screwdriver or 10mm open end wrench until projector mount assembly (A) is for attachment of the wood joist. Make sure that mounting screws are in the center of mount through standard thickness drywall...800-865-2112 WOOD JOIST ACCESS SLOT FOR OPEN END WRENCH ALLOWS TIGHTENING OF WOOD SCREW WOOD JOIST FRONT OF MOUNT A E A ARROW ON TOP OF PROJECTOR MOUNT ASSEMBLY INDICATES FRONT OF MOUNT E F fig. 2.1 F fig. 2.2 Visit the Peerless Web Site at www.peerlessmounts.com 5 of 2.5" (64 mm...
MP300CM Installation Manual
Page 6
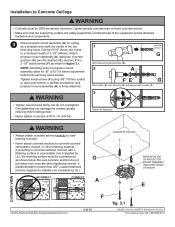
... SHEET #: 056-9034-4 07-29-11 For customer care call 1-800-865-2112 Tighten all attached hardware and components. 3 Place projector mount assembly (A) on projector mount assembly allow for 30° (±15°) of 80 in • lb (9 N.M.). If plaster/drywall is thicker ...to concrete surfaces covered with a finishing surface is unavoidable (not evaluated by UL). Attach projector mount assembly (A) using 3/8" (10mm) socket or open end wrench or phillips screwdriver until projector mount assembly (A) is firmly attached. If mounting to Concrete Ceilings WARNING • Concrete ...
... SHEET #: 056-9034-4 07-29-11 For customer care call 1-800-865-2112 Tighten all attached hardware and components. 3 Place projector mount assembly (A) on projector mount assembly allow for 30° (±15°) of 80 in • lb (9 N.M.). If plaster/drywall is thicker ...to concrete surfaces covered with a finishing surface is unavoidable (not evaluated by UL). Attach projector mount assembly (A) using 3/8" (10mm) socket or open end wrench or phillips screwdriver until projector mount assembly (A) is firmly attached. If mounting to Concrete Ceilings WARNING • Concrete ...
MP300CM Installation Manual
Page 7
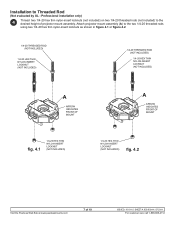
... THIN NYLON-INSERT LOCKNUT (NOT INCLUDED) 1/4-20 HEX THIN NYLON-INSERT LOCKNUT (NOT INCLUDED) fig. 4.2 Visit the Peerless Web Site at www.peerlessmounts.com 7 of projector mount assembly. Professional installation only) 4 Thread two 1/4-20 hex thin nylon-insert locknuts (not included) on two 1/4-20 threaded rods (not included) to the desired... height of 10 ISSUED: 10-01-10 SHEET #: 056-9034-4 07-29-11 For customer care call 1-800-865-2112 Attach projector mount assembly (A) to Threaded Rod (Not evaluated by UL -
... THIN NYLON-INSERT LOCKNUT (NOT INCLUDED) 1/4-20 HEX THIN NYLON-INSERT LOCKNUT (NOT INCLUDED) fig. 4.2 Visit the Peerless Web Site at www.peerlessmounts.com 7 of projector mount assembly. Professional installation only) 4 Thread two 1/4-20 hex thin nylon-insert locknuts (not included) on two 1/4-20 threaded rods (not included) to the desired... height of 10 ISSUED: 10-01-10 SHEET #: 056-9034-4 07-29-11 For customer care call 1-800-865-2112 Attach projector mount assembly (A) to Threaded Rod (Not evaluated by UL -
MP300CM Installation Manual
Page 8
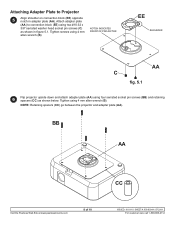
... using four serrated socket pin screws (BB) and retaining spacers (CC) as shown in adapter plate (AA). NOTCH INDICATES FRONT OF PROJECTOR EE SHOULDER AA C fig. 5.1 6 Flip projector upside down and attach adapter plate (AA) using 4 mm allen wrench (B). BB AA CC Visit the Peerless Web Site at www... ISSUED: 10-01-10 SHEET #: 056-9034-4 07-29-11 For customer care call 1-800-865-2112 Attach adapter plate (AA) to Projector 5 Align shoulder on connection block (EE) opposite notch in figure 5.1. Tighten screws using 4 mm allen wrench (B). NOTE: Retaining spacers (CC) go ...
... using four serrated socket pin screws (BB) and retaining spacers (CC) as shown in adapter plate (AA). NOTCH INDICATES FRONT OF PROJECTOR EE SHOULDER AA C fig. 5.1 6 Flip projector upside down and attach adapter plate (AA) using 4 mm allen wrench (B). BB AA CC Visit the Peerless Web Site at www... ISSUED: 10-01-10 SHEET #: 056-9034-4 07-29-11 For customer care call 1-800-865-2112 Attach adapter plate (AA) to Projector 5 Align shoulder on connection block (EE) opposite notch in figure 5.1. Tighten screws using 4 mm allen wrench (B). NOTE: Retaining spacers (CC) go ...
MP300CM Installation Manual
Page 9
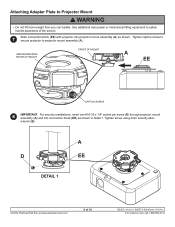
...Web Site at www.peerlessmounts.com 9 of the screen. 7 Slide connection block (EE) with projector into connection block (EE) as shown. Attaching Adapter Plate to projector mount assembly (A). Tighten captive screw to secure projector to Projector Mount WARNING • Do not lift more weight than you can handle. Use additional man ... INDICATES FRONT OF MOUNT FRONT OF MOUNT A EE CAPTIVE SCREW 8 IMPORTANT: For security installations, insert one #10-32 x 1/4" socket pin screw (D) through projector mount assembly (A) and into projector mount assembly (A) as shown in detail 1.
...Web Site at www.peerlessmounts.com 9 of the screen. 7 Slide connection block (EE) with projector into connection block (EE) as shown. Attaching Adapter Plate to projector mount assembly (A). Tighten captive screw to secure projector to Projector Mount WARNING • Do not lift more weight than you can handle. Use additional man ... INDICATES FRONT OF MOUNT FRONT OF MOUNT A EE CAPTIVE SCREW 8 IMPORTANT: For security installations, insert one #10-32 x 1/4" socket pin screw (D) through projector mount assembly (A) and into projector mount assembly (A) as shown in detail 1.
MP300CM Installation Manual
Page 10
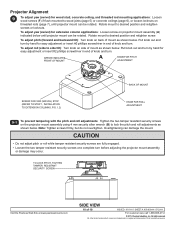
... FOR ROLL ADJUSTMENT 9-1 To prevent tampering with the pitch and roll adjustments: Tighten the two tamper resistant security screws on projector mount assembly (A) indicated below . Projector Alignment 9 To adjust yaw (swivel) for easy adjustment or insert #2 phillips screwdriver in end of knob and turn....engaged. • Loosen the two tamper resistant security screws one complete turn by hand for extension column applications: Loosen screw on the projector mount assembly using 4 mm security allen wrench (B) to wood joists (page 5) or concrete ceilings (page 6), or loosen locknuts ...
... FOR ROLL ADJUSTMENT 9-1 To prevent tampering with the pitch and roll adjustments: Tighten the two tamper resistant security screws on projector mount assembly (A) indicated below . Projector Alignment 9 To adjust yaw (swivel) for easy adjustment or insert #2 phillips screwdriver in end of knob and turn....engaged. • Loosen the two tamper resistant security screws one complete turn by hand for extension column applications: Loosen screw on the projector mount assembly using 4 mm security allen wrench (B) to wood joists (page 5) or concrete ceilings (page 6), or loosen locknuts ...

NP05LM1 Users Manual
Page 1
Wireless LAN Unit for NEC Projector NP05LM series (NP05LM1/NP05LM2/NP05LM3/NP05LM4/NP05LM5) NP05LM1 Important Information ........2 NP05LM2 Important Information ......16 NP05LM3 Important Information ......44 NP05LM4 Important Information ......53 NP05LM5 Important Information ......72 保留备用
Wireless LAN Unit for NEC Projector NP05LM series (NP05LM1/NP05LM2/NP05LM3/NP05LM4/NP05LM5) NP05LM1 Important Information ........2 NP05LM2 Important Information ......16 NP05LM3 Important Information ......44 NP05LM4 Important Information ......53 NP05LM5 Important Information ......72 保留备用

NP05LM1 Users Manual
Page 2
Wireless LAN Unit NP05LM1 for NEC Projector Important Information Table of Supported Areas and Countries..........2 3. Table of Contents 1. Specifications 14 1. Table... pueden infringir las leyes de ondas radioeléctricas del país en el que se use . Cautions 10 4. For information on supported projectors, refer to set the wireless LAN. ●Parts Included • Wireless LAN Unit 1 • Important Information (this document) ........ 1... Thank you purchasing the Wireless LAN Unit NP05LM1. Set the Wireless LAN Unit in the NEC Projector for utilizado o aparelho.
Wireless LAN Unit NP05LM1 for NEC Projector Important Information Table of Supported Areas and Countries..........2 3. Table of Contents 1. Specifications 14 1. Table... pueden infringir las leyes de ondas radioeléctricas del país en el que se use . Cautions 10 4. For information on supported projectors, refer to set the wireless LAN. ●Parts Included • Wireless LAN Unit 1 • Important Information (this document) ........ 1... Thank you purchasing the Wireless LAN Unit NP05LM1. Set the Wireless LAN Unit in the NEC Projector for utilizado o aparelho.

NP05LM1 Users Manual
Page 14
4. Specifications Specifications Operating Voltage MAX Amps Interface Dimensions Weight Environmental Considerations 5V (power supplied from the projector) 500 mA USB 2.0 (connected to USB wireless LAN port on the projector) Width: 1.1″ / 28 mm Height: 0.43″ / 11 mm Depth: 3.19″ / 81 mm (including the cap) 0.049 lbs / 22 g (including the cap) Operational Temperatures : 41° to 104°F / 5° to 40°C, 20% to 80% humidity (non-condensing) Storage Temperatures : 14° to 122°F / -10° to 50°C, 20% to 80% humidity (non-condensing) - 14 -
4. Specifications Specifications Operating Voltage MAX Amps Interface Dimensions Weight Environmental Considerations 5V (power supplied from the projector) 500 mA USB 2.0 (connected to USB wireless LAN port on the projector) Width: 1.1″ / 28 mm Height: 0.43″ / 11 mm Depth: 3.19″ / 81 mm (including the cap) 0.049 lbs / 22 g (including the cap) Operational Temperatures : 41° to 104°F / 5° to 40°C, 20% to 80% humidity (non-condensing) Storage Temperatures : 14° to 122°F / -10° to 50°C, 20% to 80% humidity (non-condensing) - 14 -
NP05LM1 Users Manual
Page 16
... die weiter unten aufgeführt sind könnten eventuell nationale Gesetze über Radiowellen verletzen. For information on supported projectors, refer to our brochures. Veuillez noter que toute autre combinaison de nom de produits et de régions et pays ... tra quelli indicati di seguito, potrebbe violare le leggi sulle onde radio del paese in the NEC Projector for use with the projector for installation or removal procedures and for NEC Projector Important Information Table of Supported Areas and Countries........16 3. Introduction Thank you purchasing the Wireless LAN...
... die weiter unten aufgeführt sind könnten eventuell nationale Gesetze über Radiowellen verletzen. For information on supported projectors, refer to our brochures. Veuillez noter que toute autre combinaison de nom de produits et de régions et pays ... tra quelli indicati di seguito, potrebbe violare le leggi sulle onde radio del paese in the NEC Projector for use with the projector for installation or removal procedures and for NEC Projector Important Information Table of Supported Areas and Countries........16 3. Introduction Thank you purchasing the Wireless LAN...

NP05LM1 Users Manual
Page 42
4. Specifications Specifications Operating Voltage MAX Amps Interface Dimensions Weight Environmental Considerations 5V (power supplied from the projector) 500 mA USB 2.0 (connected to USB wireless LAN port on the projector) Width: 1.1″ / 28 mm Height: 0.43″ / 11 mm Depth: 3.19″ / 81 mm (including the cap) 0.049 lbs / 22 g (including the cap) Operational Temperatures : 41° to 104°F / 5° to 40°C, 20% to 80% humidity (non-condensing) Storage Temperatures : 14° to 122°F / -10° to 50°C, 20% to 80% humidity (non-condensing) - 42 -
4. Specifications Specifications Operating Voltage MAX Amps Interface Dimensions Weight Environmental Considerations 5V (power supplied from the projector) 500 mA USB 2.0 (connected to USB wireless LAN port on the projector) Width: 1.1″ / 28 mm Height: 0.43″ / 11 mm Depth: 3.19″ / 81 mm (including the cap) 0.049 lbs / 22 g (including the cap) Operational Temperatures : 41° to 104°F / 5° to 40°C, 20% to 80% humidity (non-condensing) Storage Temperatures : 14° to 122°F / -10° to 50°C, 20% to 80% humidity (non-condensing) - 42 -
NP05LM1 Users Manual
Page 53
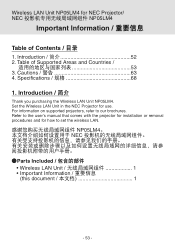
... 2. Introduction / 简介 Thank you purchasing the Wireless LAN Unit NP05LM4. Refer to our brochures. Table of Contents / 目录 1. Wireless LAN Unit NP05LM4 for NEC Projector/ NEC NP05LM4 Important Information Table of Supported Areas and Countries / 53 3. Specifications 68 1. Cautions 63 4. For information on supported...
... 2. Introduction / 简介 Thank you purchasing the Wireless LAN Unit NP05LM4. Refer to our brochures. Table of Contents / 目录 1. Wireless LAN Unit NP05LM4 for NEC Projector/ NEC NP05LM4 Important Information Table of Supported Areas and Countries / 53 3. Specifications 68 1. Cautions 63 4. For information on supported...

NP05LM1 Users Manual
Page 69
...;cations / 规格 ●Specification Specifications Operating Voltage MAX Amps Interface Dimensions Weight Environmental Considerations 5V (power supplied from the projector) 500 mA USB 2.0 (connected to USB wireless LAN port on the projector) Width: 1.1″ / 28 mm Height: 0.43″ / 11 mm Depth: 3.19″ / 81 mm (including the cap) 0.049 lbs...
...;cations / 规格 ●Specification Specifications Operating Voltage MAX Amps Interface Dimensions Weight Environmental Considerations 5V (power supplied from the projector) 500 mA USB 2.0 (connected to USB wireless LAN port on the projector) Width: 1.1″ / 28 mm Height: 0.43″ / 11 mm Depth: 3.19″ / 81 mm (including the cap) 0.049 lbs...

