
User Manual
Page 6
... alerts the user that interference will not occur in order to install the projector yourself. ALL SERVICING MUST BE DONE BY QUALIFIED NEC SERVICE PERSONNEL. Serious injury could void your NEC MT1065/ MT1060/MT860 Projector and keep the manual handy for more information. This equipment generates, uses,...radio communications. If a power cable is no guarantee that important information concerning the operation and maintenance of the remote control. This symbol warns the user that to ISO 3744 or ISO 7779. For best results, use with this manual. Installation 1....
... alerts the user that interference will not occur in order to install the projector yourself. ALL SERVICING MUST BE DONE BY QUALIFIED NEC SERVICE PERSONNEL. Serious injury could void your NEC MT1065/ MT1060/MT860 Projector and keep the manual handy for more information. This equipment generates, uses,...radio communications. If a power cable is no guarantee that important information concerning the operation and maintenance of the remote control. This symbol warns the user that to ISO 3744 or ISO 7779. For best results, use with this manual. Installation 1....
User Manual
Page 7
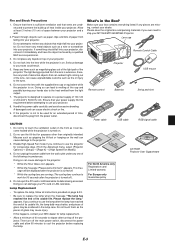
...MT860 Projector. Keep any one of its data is being projected from the light output. 7. The projector is not to use the lamp after the projector is turned on page E-53. • Be sure to use your projector. If the projector...accessed. Misuses such as it immediately and have the object removed by a qualified NEC service personnel. 3. What's in the lamp case. Ensure that there is sufficient... you continue to the projector: * While the Hour Glass icon appears. * While the message "Please wait a moment." Lens cap Remote Control Cable Projector PJ ASPECT VOLUME HELP ...
...MT860 Projector. Keep any one of its data is being projected from the light output. 7. The projector is not to use the lamp after the projector is turned on page E-53. • Be sure to use your projector. If the projector...accessed. Misuses such as it immediately and have the object removed by a qualified NEC service personnel. 3. What's in the lamp case. Ensure that there is sufficient... you continue to the projector: * While the Hour Glass icon appears. * While the message "Please wait a moment." Lens cap Remote Control Cable Projector PJ ASPECT VOLUME HELP ...
User Manual
Page 8
... to the Projector E-5 Part Names of the Projector E-6 Attaching the lens cap E-6 Carrying the Projector E-6 Top Features ...E-7 Terminal Panel Features E-8 Part Names of the Remote Control E-9 Battery Installation E-11 Remote Control Precautions E-11 Operating Range for Wireless Remote Control E-11 Using the Remote Control in Wired... Pointer E-22 Setting the function switch E-23 Turning off the Projector E-23 CONVENIENT FEATURES E-24 Using the Remote Mouse Function E-24 Connecting to your computer for the remote mouse function E-24 When using the USB Port E-24 Switching ...
... to the Projector E-5 Part Names of the Projector E-6 Attaching the lens cap E-6 Carrying the Projector E-6 Top Features ...E-7 Terminal Panel Features E-8 Part Names of the Remote Control E-9 Battery Installation E-11 Remote Control Precautions E-11 Operating Range for Wireless Remote Control E-11 Using the Remote Control in Wired... Pointer E-22 Setting the function switch E-23 Turning off the Projector E-23 CONVENIENT FEATURES E-24 Using the Remote Mouse Function E-24 Connecting to your computer for the remote mouse function E-24 When using the USB Port E-24 Switching ...
User Manual
Page 9
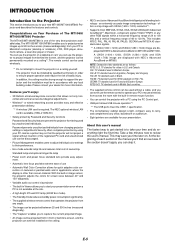
... PAL60: TV standard used wirelessly. *1 Do not attempt to mount the projector on MT1065 and MT1060. This may save you time later on the ceiling. • NEC's exclusive Advanced AccuBlend intelligent pixel blending technology - In addition, the ceiling...remote mouse function. • You can even use the projector to project images from in applications where the display is one of bodily injury. offers a crisp image with UXGA (1600ן1200) resolution*3. • Supports most IBM VGA, SVGA, XGA, SXGA/UXGA(with a PC using your dealer for NTSC playback on MT860...
... PAL60: TV standard used wirelessly. *1 Do not attempt to mount the projector on MT1065 and MT1060. This may save you time later on the ceiling. • NEC's exclusive Advanced AccuBlend intelligent pixel blending technology - In addition, the ceiling...remote mouse function. • You can even use the projector to project images from in applications where the display is one of bodily injury. offers a crisp image with UXGA (1600ן1200) resolution*3. • Supports most IBM VGA, SVGA, XGA, SXGA/UXGA(with a PC using your dealer for NTSC playback on MT860...

User Manual
Page 10
... the rivet to attach the string to the bottom of Kensington Microware Inc. Carrying the Projector Always carry your projector by Kensington Microware Inc. The logo is not in standby mode. (See page E-18) Remote Sensor (See page E-11) PC Card Eject Button AC Input Connect the supplied power cable's ...) NOTE: The Auto Focus and the Auto Wall Color Correction are disconnected before moving the projector or when it is trademarked and owned by the handle. E-6 Thread the string through the hole on MT860. Ensure that the power cable and any other end into an active wall outlet and turn...
... the rivet to attach the string to the bottom of Kensington Microware Inc. Carrying the Projector Always carry your projector by Kensington Microware Inc. The logo is not in standby mode. (See page E-18) Remote Sensor (See page E-11) PC Card Eject Button AC Input Connect the supplied power cable's ...) NOTE: The Auto Focus and the Auto Wall Color Correction are disconnected before moving the projector or when it is trademarked and owned by the handle. E-6 Thread the string through the hole on MT860. Ensure that the power cable and any other end into an active wall outlet and turn...

User Manual
Page 12
...equipment such as a PC Control port by using the supplied USB cable. There are on MT860). This connector also supports SCART output signal. A commercially available audio cable is required. ...channel audio inputs for stereo sound from the remote control. A commercially available RS232C cross cable is where you connect the audio output from your projector via this port. (USB Hub Function) ...connected to the USB port (type A) of the projector. PC CARD Slot 1/2 Insert a PC card, commercially available LAN card or NEC optional wireless LAN card here. A commercially available ...
...equipment such as a PC Control port by using the supplied USB cable. There are on MT860). This connector also supports SCART output signal. A commercially available audio cable is required. ...channel audio inputs for stereo sound from the remote control. A commercially available RS232C cross cable is where you connect the audio output from your projector via this port. (USB Hub Function) ...connected to the USB port (type A) of the projector. PC CARD Slot 1/2 Insert a PC card, commercially available LAN card or NEC optional wireless LAN card here. A commercially available ...

User Manual
Page 13
... E-38. 18. POWER ON Button When the main power is indicated by lighting the PJ button. NOTE: To turn on the projector, press and hold this button to turn your remote control cable here for an optimal picture. VIDEO Button Press this button to select RGB 1, RGB 2 or DVI (DIGITAL)* inputs....Press this button is indicated by lighting the PJ button: Press this button is not displayed, these buttons to change as the ENTER button on MT860. AUTO ADJ Button Use this button to select the Viewer source. 10. Also press and hold the POWER OFF button for a minimum of the...
... E-38. 18. POWER ON Button When the main power is indicated by lighting the PJ button. NOTE: To turn on the projector, press and hold this button to turn your remote control cable here for an optimal picture. VIDEO Button Press this button to select RGB 1, RGB 2 or DVI (DIGITAL)* inputs....Press this button is indicated by lighting the PJ button: Press this button is not displayed, these buttons to change as the ENTER button on MT860. AUTO ADJ Button Use this button to select the Viewer source. 10. Also press and hold the POWER OFF button for a minimum of the...

User Manual
Page 15
... new ones (AA). Do not mix different types of batteries or new and old batteries. 7m/22 feet 7m/22 feet Remote control Remote sensor on the projector cabinet Note on Remote Control Operation: If you press and hold the SELECT ̆̄̇̈ button while installing new batteries, the.... • Do not use new and old batteries together, or use different types of the supplied remote cable to the REMOTE mini jack and the other end to the remote jack on the projector cabinet 3. LASER ASPECT FREEZE 3D REFORM HELP POINTER PIC-MUTE VOLUME MAGNIFY SLIDE ZOOM FOCUS FOLDER SLIDE...
... new ones (AA). Do not mix different types of batteries or new and old batteries. 7m/22 feet 7m/22 feet Remote control Remote sensor on the projector cabinet Note on Remote Control Operation: If you press and hold the SELECT ̆̄̇̈ button while installing new batteries, the.... • Do not use new and old batteries together, or use different types of the supplied remote cable to the REMOTE mini jack and the other end to the remote jack on the projector cabinet 3. LASER ASPECT FREEZE 3D REFORM HELP POINTER PIC-MUTE VOLUME MAGNIFY SLIDE ZOOM FOCUS FOLDER SLIDE...

User Manual
Page 17
...the side or the front of installation. Refer to the table to install the projector yourself. • To avoid premature lamp failure, do not tilt the front of the projector and screen. C Wide - Contact your NEC dealer for more than 15° from level. This will harm the screen ...MENU and SELECT buttons on your projector cabinet or ̆̄ buttons on your projector on the ceiling must be injured and the projector severely damaged. • Do not use your remote control to moisture, dust, or smoke. If the projector falls to reflect your projector so heat can be used at...
...the side or the front of installation. Refer to the table to install the projector yourself. • To avoid premature lamp failure, do not tilt the front of the projector and screen. C Wide - Contact your NEC dealer for more than 15° from level. This will harm the screen ...MENU and SELECT buttons on your projector cabinet or ̆̄ buttons on your projector on the ceiling must be injured and the projector severely damaged. • Do not use your remote control to moisture, dust, or smoke. If the projector falls to reflect your projector so heat can be used at...

User Manual
Page 18
... the POWER button on the remote control, wait 90 seconds and then press the POWER button again to connect between the projector and the notebook PC before turning on MT860. NOTE: • Use the DVI-D cable compliant with video decoded outputs of NEC ISS-6020 and ISS-6010.... inactivity, it may be within 5 m (196") long. • The DVI (DIGITAL) connector accepts VGA (640x480), SVGA (800x600), 1152x864, XGA (1024x768) and SXGA (1280x1024 @ up to the projector. To connect to connect a DVI connector of the graphics card resulting in no picture being displayed. Use the supplied signal...
... the POWER button on the remote control, wait 90 seconds and then press the POWER button again to connect between the projector and the notebook PC before turning on MT860. NOTE: • Use the DVI-D cable compliant with video decoded outputs of NEC ISS-6020 and ISS-6010.... inactivity, it may be within 5 m (196") long. • The DVI (DIGITAL) connector accepts VGA (640x480), SVGA (800x600), 1152x864, XGA (1024x768) and SXGA (1280x1024 @ up to the projector. To connect to connect a DVI connector of the graphics card resulting in no picture being displayed. Use the supplied signal...

User Manual
Page 19
Use the NEC ADP-SC1 SCART adapter and a commercially available SCART cable to connect the RGB 1 input of your projector and a SCART output (RGB) of your monitor to the RGB OUT (Mini D- Turn on the remote control to the projector and your projector, monitor and computer. 2. To connect ...Video equipment such as Euro-connector. Turn on the remote control to as DVD player RGB 1 IN Projector 1. NOTE: • The RGB OUT connector outputs RGB signal during Standby mode. • When the projector is obtainable from your NEC dealer in Europe for TVs, VCRs and DVD players....
Use the NEC ADP-SC1 SCART adapter and a commercially available SCART cable to connect the RGB 1 input of your projector and a SCART output (RGB) of your monitor to the RGB OUT (Mini D- Turn on the remote control to the projector and your projector, monitor and computer. 2. To connect ...Video equipment such as Euro-connector. Turn on the remote control to as DVD player RGB 1 IN Projector 1. NOTE: • The RGB OUT connector outputs RGB signal during Standby mode. • When the projector is obtainable from your NEC dealer in Europe for TVs, VCRs and DVD players....

User Manual
Page 21
... source is played back in the wall outlet. DVI IN G/Y AUDIO AUDIO B/Cb RGB2 IN RGB1 IN AUDIO R L/MONO S-VIDEO IN AUDIO USB(MOUSE/HUB) V H REMOTE AUDIO R L/MONO AUDIO OUT RGB OUT AUDIO R L/MONO VIDEO IN AUDIO 1 2 PC CONTROL AC IN E-17 To make these connections, simply: 1. Connect one end ...OUT S-VIDEO OUT Audio cable (not supplied) Use common RCA cables (not provided) to connect your VCR, laser disc player or document camera to the projector. Use an audio cable (not supplied) to connect the audio from your VCR or laser disc player has this capability). Turn off the power to...
... source is played back in the wall outlet. DVI IN G/Y AUDIO AUDIO B/Cb RGB2 IN RGB1 IN AUDIO R L/MONO S-VIDEO IN AUDIO USB(MOUSE/HUB) V H REMOTE AUDIO R L/MONO AUDIO OUT RGB OUT AUDIO R L/MONO VIDEO IN AUDIO 1 2 PC CONTROL AC IN E-17 To make these connections, simply: 1. Connect one end ...OUT S-VIDEO OUT Audio cable (not supplied) Use common RCA cables (not provided) to connect your VCR, laser disc player or document camera to the projector. Use an audio cable (not supplied) to connect the audio from your VCR or laser disc player has this capability). Turn off the power to...

User Manual
Page 22
...774; or ̄ button to select one of usable life, the projector will be displayed in "Projector Options" on page E-51 for a minimum of six times, wait a full minute and then turn on the remote control) • The projector has a feature to 5 minutes until the lamp lighting is not ... SELECT Note on Startup screen (Menu Language Select screen) When you will not turn on the remote control for more details. Before you the opportunity to the projector, press the Main Power switch 3. This screen gives you turn on the Main Power switch to execute the selection. MENU ...
...774; or ̄ button to select one of usable life, the projector will be displayed in "Projector Options" on page E-51 for a minimum of six times, wait a full minute and then turn on the remote control) • The projector has a feature to 5 minutes until the lamp lighting is not ... SELECT Note on Startup screen (Menu Language Select screen) When you will not turn on the remote control for more details. Before you the opportunity to the projector, press the Main Power switch 3. This screen gives you turn on the Main Power switch to execute the selection. MENU ...

User Manual
Page 23
.... Press and quickly release the SOURCE button on MT860. 4. ASPECT FREEZE 3D REFORM HELP POINTER PIC-MUTE VOLUME MAGNIFY SLIDE ZOOM FOCUS FOLDER SLIDE LIST Move the projector left sides of the projector up the Adjustable Tilt Foot Levers on the right...projector to the desired height (max. 44.5mm/ 1.8") and release the Adjustable Tilt Foot Lever to the screen. Each time you wish to project is square to lock the Adjustable tilt foot. To display the selected source, press the ENTER button. Selecting a Source Selecting the computer or video source Using the Remote...
.... Press and quickly release the SOURCE button on MT860. 4. ASPECT FREEZE 3D REFORM HELP POINTER PIC-MUTE VOLUME MAGNIFY SLIDE ZOOM FOCUS FOLDER SLIDE LIST Move the projector left sides of the projector up the Adjustable Tilt Foot Levers on the right...projector to the desired height (max. 44.5mm/ 1.8") and release the Adjustable Tilt Foot Lever to the screen. Each time you wish to project is square to lock the Adjustable tilt foot. To display the selected source, press the ENTER button. Selecting a Source Selecting the computer or video source Using the Remote...

User Manual
Page 24
...Reform) Use the 3D Reform feature to correct keystone (trapezoidal) distortion to obtain the best focus. You can cause damage to the projector. Using Auto Focus (not available on MT860) Press and hold the AUTO ADJUST button on the cabinet or AUTO ADJ button on or off "Focus" and "Wall Color ... obtained. Pick up any one of the corners and align the corner of the Auto Focus feature. 5. Press the 3D REFORM button on the remote control will disappear when you move the USB mouse cursor. The Cornerstone adjustment screen will enable the Auto Adjust feature instead of the screen with...
...Reform) Use the 3D Reform feature to correct keystone (trapezoidal) distortion to obtain the best focus. You can cause damage to the projector. Using Auto Focus (not available on MT860) Press and hold the AUTO ADJUST button on the cabinet or AUTO ADJ button on or off "Focus" and "Wall Color ... obtained. Pick up any one of the corners and align the corner of the Auto Focus feature. 5. Press the 3D REFORM button on the remote control will disappear when you move the USB mouse cursor. The Cornerstone adjustment screen will enable the Auto Adjust feature instead of the screen with...

User Manual
Page 25
...some discrepancy of the raster. 2. This is smaller than the area of positions between "Cornerstone" and "Keystone." 9. Should this happen, do so, select [Projector Options] → [Setup] → [Page 4]. Screen Projected image 8. Screen On the Cornerstone adjustment screen, select "Exit" and then "OK", or ...or one of shipment. 6. To complete the procedure, right-click anywhere on "Reset" in the direction. You can be corrected using the remote control or cabinet buttons: 1. Select the 3D Reform Save check box. Press the ENTER button. 6. Project an image so that the ...
...some discrepancy of the raster. 2. This is smaller than the area of positions between "Cornerstone" and "Keystone." 9. Should this happen, do so, select [Projector Options] → [Setup] → [Page 4]. Screen Projected image 8. Screen On the Cornerstone adjustment screen, select "Exit" and then "OK", or ...or one of shipment. 6. To complete the procedure, right-click anywhere on "Reset" in the direction. You can be corrected using the remote control or cabinet buttons: 1. Select the 3D Reform Save check box. Press the ENTER button. 6. Project an image so that the ...

User Manual
Page 26
... • Horizontal and Vertical are not available on MT860.) E-22 CAUTION: • Do not look into the laser pointer while it is on the projector can be set as follows: Horizontal Max ±35... Pressing and holding the AUTO ADJUST button on the cabinet or AUTO ADJ button on the remote control for a minimum of 2 seconds will enable the Auto Focus* and the Auto Wall ...Horizontal Keystone" are met • Image is projected in Wide (Zoom) • Resolution is XGA (SVGA on any vertical banding that eliminate the horizontal banding in its adjustable range. Turning Up or Down Volume...
... • Horizontal and Vertical are not available on MT860.) E-22 CAUTION: • Do not look into the laser pointer while it is on the projector can be set as follows: Horizontal Max ±35... Pressing and holding the AUTO ADJUST button on the cabinet or AUTO ADJ button on the remote control for a minimum of 2 seconds will enable the Auto Focus* and the Auto Wall ...Horizontal Keystone" are met • Image is projected in Wide (Zoom) • Resolution is XGA (SVGA on any vertical banding that eliminate the horizontal banding in its adjustable range. Turning Up or Down Volume...
User Manual
Page 27
... or the POWER OFF button on the bottom of the following circumstances. The power indicator will glow orange. Doing so can cause damage to the projector: • While the Hour Glass icon appears. • While the message "Please wait a mo- Second, turn off . • While the cooling ...fans are two switches on the remote control for a minimum of a thin ball-point pen. The power indicator will go out. LASER ASPECT FREEZE 3D REFORM HELP POINTER PIC-MUTE VOLUME ...
... or the POWER OFF button on the bottom of the following circumstances. The power indicator will glow orange. Doing so can cause damage to the projector: • While the Hour Glass icon appears. • While the message "Please wait a mo- Second, turn off . • While the cooling ...fans are two switches on the remote control for a minimum of a thin ball-point pen. The power indicator will go out. LASER ASPECT FREEZE 3D REFORM HELP POINTER PIC-MUTE VOLUME ...

User Manual
Page 28
... to use the supplied USB cable to light red. CONVENIENT FEATURES Using the Remote Mouse Function The built-in the Computer mode. Switching operation mode between computer and projector The three shaded buttons shown on the projector. Works as the SELECT button on the drawing work as the ENTER button... is pressed, the PJ button lights red to indicate that you wish to use the remote mouse function, use the mouse function immediately, press the PJ button to return to the projector operation mode (Projector mode), press the PJ button (lit red). In the Computer mode the PJ button is ...
... to use the supplied USB cable to light red. CONVENIENT FEATURES Using the Remote Mouse Function The built-in the Computer mode. Switching operation mode between computer and projector The three shaded buttons shown on the projector. Works as the SELECT button on the drawing work as the ENTER button... is pressed, the PJ button lights red to indicate that you wish to use the remote mouse function, use the mouse function immediately, press the PJ button to return to the projector operation mode (Projector mode), press the PJ button (lit red). In the Computer mode the PJ button is ...

User Manual
Page 31
... that contains the following icons. Clear Left-click to select a JPEG or BMP file for your background logo. 4. Right-clicking anywhere on the remote control or the cabinet. NOTE: • The menu is not available while you display the ChalkBoard screen. • Switching slides clears a drawing... the SELECT ̆ or ̄ button to clear the drawing completely from graphic files on the supplied CD-ROM NEC Projector User Supportware (MT1065/MT1060: /Logo/nec_bb_x.jpg, MT860: /Logo/nec_bb_s.jpg). Press the ENTER on the screen displays the ChalkBoard tool bar again. Left-click [̆] or...
... that contains the following icons. Clear Left-click to select a JPEG or BMP file for your background logo. 4. Right-clicking anywhere on the remote control or the cabinet. NOTE: • The menu is not available while you display the ChalkBoard screen. • Switching slides clears a drawing... the SELECT ̆ or ̄ button to clear the drawing completely from graphic files on the supplied CD-ROM NEC Projector User Supportware (MT1065/MT1060: /Logo/nec_bb_x.jpg, MT860: /Logo/nec_bb_s.jpg). Press the ENTER on the screen displays the ChalkBoard tool bar again. Left-click [̆] or...


