
User Guide
Page 192
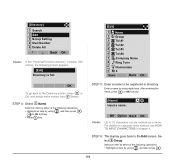
... OK Note: If the Personal/Terminal directory contains 500 entries, the following screen appears. [Edit] Directory is full. [[EEddiitt]] 1 NNaammee 2 Gr Group 3 Tel #1 4 Tel #2 5 Tel #3 6 Tel #4 7 Company Name 8 Ring Tone 9 Illumination 0 No 0 Save Back OK OK To go back to be entered as a name. STEP 5: Enter a... name to the Directory screen, press or OK, and delete some entries from 1 Search. BK Option Back OK Note: Up to the Edit screen. STEP 6: The display goes back to 32 characters can be registered in chapter 4. Select 2 Group. STEP 4: Select 1 Name. For...
... OK Note: If the Personal/Terminal directory contains 500 entries, the following screen appears. [Edit] Directory is full. [[EEddiitt]] 1 NNaammee 2 Gr Group 3 Tel #1 4 Tel #2 5 Tel #3 6 Tel #4 7 Company Name 8 Ring Tone 9 Illumination 0 No 0 Save Back OK OK To go back to be entered as a name. STEP 5: Enter a... name to the Directory screen, press or OK, and delete some entries from 1 Search. BK Option Back OK Note: Up to the Edit screen. STEP 6: The display goes back to 32 characters can be registered in chapter 4. Select 2 Group. STEP 4: Select 1 Name. For...
User Guide
Page 194
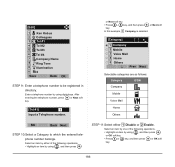
...Mobile 3 Voice Mail 4 Home 5 Others ↓ Prev Next Selectable categories are as follows: Category ICON Company Mobile Voice Mail Home Others BK Back Next STEP 10:Select a Category to be registered in directory. or Next soft key. • Press 0 - 5 key, and... then press or Next soft key. Select an item by either 1 Disable or 2 Enable. [Edit] 1 Ken Kobus 2 Gr Colleagues 3 Tel #1 4 Tel #2 5 Tel #3 6 Tel #4 7 Company Name 8 Ring Tone 9 Illumination 0 No 0 Save Back OK STEP 9: Enter a telephone number to which the entered telephone number belongs....
...Mobile 3 Voice Mail 4 Home 5 Others ↓ Prev Next Selectable categories are as follows: Category ICON Company Mobile Voice Mail Home Others BK Back Next STEP 10:Select a Category to be registered in directory. or Next soft key. • Press 0 - 5 key, and... then press or Next soft key. Select an item by either 1 Disable or 2 Enable. [Edit] 1 Ken Kobus 2 Gr Colleagues 3 Tel #1 4 Tel #2 5 Tel #3 6 Tel #4 7 Company Name 8 Ring Tone 9 Illumination 0 No 0 Save Back OK STEP 9: Enter a telephone number to which the entered telephone number belongs....
User Guide
Page 195
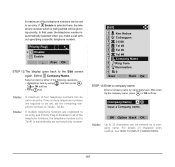
... a specific telephone number. [Priority Flag] 1 1 Disable 2 Enable ↓ Prev OK STEP 12:The display goes back to 32 characters can be entered as first priority number. [Edit] 1 Ken Kobus 2 Gr Colleagues 3 31300 4 Tel #2 5 Tel #3 6 Tel #4 7 Company Name 8 Ring Tone 9 Illumination 0 No 0 Save Back OK STEP 13:Enter a company...an entry and Priority Flag is disabled to all of the telephone numbers, the telephone number set to Tel #1 is being edited will be given top priority. BK Option Back OK Note: Up to the Edit screen again. A maximum of four telephone numbers can ...
... a specific telephone number. [Priority Flag] 1 1 Disable 2 Enable ↓ Prev OK STEP 12:The display goes back to 32 characters can be entered as first priority number. [Edit] 1 Ken Kobus 2 Gr Colleagues 3 31300 4 Tel #2 5 Tel #3 6 Tel #4 7 Company Name 8 Ring Tone 9 Illumination 0 No 0 Save Back OK STEP 13:Enter a company...an entry and Priority Flag is disabled to all of the telephone numbers, the telephone number set to Tel #1 is being edited will be given top priority. BK Option Back OK Note: Up to the Edit screen again. A maximum of four telephone numbers can ...
User Guide
Page 198
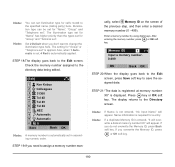
...After entering the memory number, press or OK soft key. [Memory ID] 1 Input a memory number. 0-499 BK Back OK STEP 20:When the display goes back to the Edit screen, press Save soft key to the Directory screen. If you do not overwrite ...display goes back to assign a memory number man- STEP 21:"The data is registered at memory number:XX" will appear. Note: If a duplicate Memory ID is automatically set in ascending numeric order. Check the memory number assigned to the directory data being edited. [Edit] 1 Ken Kobus 2 Gr Colleagues 3 31300 4 Tel #2 5 Tel #3 6 Tel #4 7 NEC...
...After entering the memory number, press or OK soft key. [Memory ID] 1 Input a memory number. 0-499 BK Back OK STEP 20:When the display goes back to the Edit screen, press Save soft key to the Directory screen. If you do not overwrite ...display goes back to assign a memory number man- STEP 21:"The data is registered at memory number:XX" will appear. Note: If a duplicate Memory ID is automatically set in ascending numeric order. Check the memory number assigned to the directory data being edited. [Edit] 1 Ken Kobus 2 Gr Colleagues 3 31300 4 Tel #2 5 Tel #3 6 Tel #4 7 NEC...
User Guide
Page 203
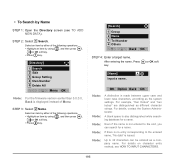
... Administorator. Note: If there is no entry corresponding to the entered name, "No data" is displayed instead of the following operations. • Highlight an item by using , and then press , or OK ...soft key. • Press 2 key. [Search] 1 Group 2 Name 3 Tel Number 4 Others ↓ Back OK ↓ STEP 4: Enter a target name. For details on character entry ...the firmware version earlier than 5.0.0.0, Back is issued. After entering the name, Press key. BK Option Back OK Note: A distinction is also distinguished while searching database for a name. Note...
... Administorator. Note: If there is no entry corresponding to the entered name, "No data" is displayed instead of the following operations. • Highlight an item by using , and then press , or OK ...soft key. • Press 2 key. [Search] 1 Group 2 Name 3 Tel Number 4 Others ↓ Back OK ↓ STEP 4: Enter a target name. For details on character entry ...the firmware version earlier than 5.0.0.0, Back is issued. After entering the name, Press key. BK Option Back OK Note: A distinction is also distinguished while searching database for a name. Note...
User Guide
Page 205
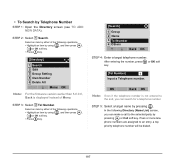
... or OK soft key. • Press 3 key. [Search] 1 Group 2 Name 3 Tel Number 4 Others ↓ Back OK ↓ STEP 4: Enter a target telephone number. BK Back OK Note: Even if the telephone number is displayed instead of the following Directory (Name List) screen, you can make a call to an entry... Note: For the firmware version earlier than 5.0.0.0, Back is not entered to the end, you can search for a telephone number. or OK soft [Tel Number] 1 Input a Telephone number. STEP 5: Select a target name by pressing or Call soft key. After entering the number, press key. &#...
... or OK soft key. • Press 3 key. [Search] 1 Group 2 Name 3 Tel Number 4 Others ↓ Back OK ↓ STEP 4: Enter a target telephone number. BK Back OK Note: Even if the telephone number is displayed instead of the following Directory (Name List) screen, you can make a call to an entry... Note: For the firmware version earlier than 5.0.0.0, Back is not entered to the end, you can search for a telephone number. or OK soft [Tel Number] 1 Input a Telephone number. STEP 5: Select a target name by pressing or Call soft key. After entering the number, press key. &#...
User Guide
Page 208
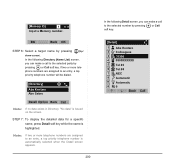
STEP 7: To display the detailed data for a specific name, press Detail soft key ... to the selected number by pressing or Call soft key. [Detail] 1 Abe Kentaro 2 Gr Colleagues 3 31300 4 0800XXXXXX 5 Tel #3 6 Tel #4 7 NEC 8 Automatic 9 Automatic 0 No 0 ↓ Back Call In the following Detail screen, you can make a call to the selected party... by pressing (Up/ down-cursor). BK Back OK STEP 6: Select a target name by pressing or Call soft key. Note: If two or more telephone numbers...
STEP 7: To display the detailed data for a specific name, press Detail soft key ... to the selected number by pressing or Call soft key. [Detail] 1 Abe Kentaro 2 Gr Colleagues 3 31300 4 0800XXXXXX 5 Tel #3 6 Tel #4 7 NEC 8 Automatic 9 Automatic 0 No 0 ↓ Back Call In the following Detail screen, you can make a call to the selected party... by pressing (Up/ down-cursor). BK Back OK STEP 6: Select a target name by pressing or Call soft key. Note: If two or more telephone numbers...
User Guide
Page 211
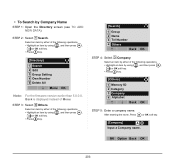
...3 Group Setting 4 Own Number 0 Delete All ↓ Menu OK Note: For the firmware version earlier than 5.0.0.0, Back is displayed instead of Menu. Select an item by either of the following operations. • Highlight an item by using , and then press... , or OK soft key. • Press 4 key. [Search] 1 Group 2 Name 3 Tel Number 4 Others Back OK ↓ ↓ STEP 4: Select 3 Company. • To Search by using , and then press , or ...Press or OK soft key. [Company] A Input a Company name. BK Option Back OK 203 STEP 2: Select 1 Search.
...3 Group Setting 4 Own Number 0 Delete All ↓ Menu OK Note: For the firmware version earlier than 5.0.0.0, Back is displayed instead of Menu. Select an item by either of the following operations. • Highlight an item by using , and then press... , or OK soft key. • Press 4 key. [Search] 1 Group 2 Name 3 Tel Number 4 Others Back OK ↓ ↓ STEP 4: Select 3 Company. • To Search by using , and then press , or ...Press or OK soft key. [Company] A Input a Company name. BK Option Back OK 203 STEP 2: Select 1 Search.
