
Users Manual
Page 3
... has been approved by the Video Electronics Standards Association in an of NEC Display Solutions, Ltd. DO NOT REMOVE COVER (OR BACK). For all other countries. Plug Type North America European Continental U.K. China Japan Voltage 120* 230 230 220 100 * When operating the monitor with any problems. CAUTION: Please use the power cord provided with this display in the country where it...
... has been approved by the Video Electronics Standards Association in an of NEC Display Solutions, Ltd. DO NOT REMOVE COVER (OR BACK). For all other countries. Plug Type North America European Continental U.K. China Japan Voltage 120* 230 230 220 100 * When operating the monitor with any problems. CAUTION: Please use the power cord provided with this display in the country where it...

Users Manual
Page 4
... Product: Display Monitor Equipment Classification: Class B Peripheral Model: MultiSync EX341R (EX341R-BK) We hereby declare that may cause undesired operation. No.: (630) 467-3000 Type of Conformity This device complies with the instructions, may cause interference with the limits for a Class B digital device, pursuant to interfere with radio and television reception. (1) The power supply cord you use the supplied shielded video signal cable. However...
... Product: Display Monitor Equipment Classification: Class B Peripheral Model: MultiSync EX341R (EX341R-BK) We hereby declare that may cause undesired operation. No.: (630) 467-3000 Type of Conformity This device complies with the instructions, may cause interference with the limits for a Class B digital device, pursuant to interfere with radio and television reception. (1) The power supply cord you use the supplied shielded video signal cable. However...
Users Manual
Page 5
...-F 3G 0.75 mm2 should be used in Europe). • In UK, use a BS-approved power cord with molded plug having a black (5A) fuse installed for use your monitor from the power supply. The monitor should be installed close to qualified service personnel. • Do not spill any heavy objects on the power cord. Save packaging for a long period of monitor. Unlike CRT monitors, LCD monitors' image persistence is easily accessible. •...
...-F 3G 0.75 mm2 should be used in Europe). • In UK, use a BS-approved power cord with molded plug having a black (5A) fuse installed for use your monitor from the power supply. The monitor should be installed close to qualified service personnel. • Do not spill any heavy objects on the power cord. Save packaging for a long period of monitor. Unlike CRT monitors, LCD monitors' image persistence is easily accessible. •...
Users Manual
Page 6
...° angle to windows and other light sources to avoid image persistence (after-image effects). • Get regular eye checkups. The optimal distance is 50 cm (19.69 inches). • Rest your eyes. Place a sheet of white paper next to the LCD screen for a long time. Cleaning the LCD Panel • When the LCD is at controlled luminous environments, to warm up a healthy work environment, write...
...° angle to windows and other light sources to avoid image persistence (after-image effects). • Get regular eye checkups. The optimal distance is 50 cm (19.69 inches). • Rest your eyes. Place a sheet of white paper next to the LCD screen for a long time. Cleaning the LCD Panel • When the LCD is at controlled luminous environments, to warm up a healthy work environment, write...

Users Manual
Page 7
..., please refer to the highest position. For a PC with HDMI output: Connect the HDMI cable to be shipped. English-5 Do not hold down the top button to read "Recommended Use" (page 3) before installation. Turn off the power of the display card in your system (Figure A.1). For a MAC with HDMI logo. 3. Please use a DisplayPort Certified DisplayPort cable. 3. When removing the DisplayPort cable, hold Tilt cover. Quick Start To connect the LCD monitor to your computer. 2.
..., please refer to the highest position. For a PC with HDMI output: Connect the HDMI cable to be shipped. English-5 Do not hold down the top button to read "Recommended Use" (page 3) before installation. Turn off the power of the display card in your system (Figure A.1). For a MAC with HDMI logo. 3. Please use a DisplayPort Certified DisplayPort cable. 3. When removing the DisplayPort cable, hold Tilt cover. Quick Start To connect the LCD monitor to your computer. 2.

Users Manual
Page 8
.... Please check that is not removable. 6. English-6 If using the USB cable, connect the B type connector to the USB upstream port on the right back side of the monitor and the A type connector to the downstream port on the back of the monitor and the other settings than the center position may cause abnormal operation, damage display quality/components of the monitor. NOTE: Adjustment of the power cord to the power outlet...
.... Please check that is not removable. 6. English-6 If using the USB cable, connect the B type connector to the USB upstream port on the right back side of the monitor and the A type connector to the downstream port on the back of the monitor and the other settings than the center position may cause abnormal operation, damage display quality/components of the monitor. NOTE: Adjustment of the power cord to the power outlet...

Users Manual
Page 13
... B, color gain VOLUME SOUND INPUT VIDEO DETECT DP OUT MULTISTREAM MULTI PICTURE PICTURE PATTERN RESPONSE IMPROVE OFF TIMER POWER SAVE TIMER LED BRIGHTNESS DDC/CI USB POWER USB SELECTION FACTORY PRESET LANGUAGE OSD TURN OFF OSD LOCK OUT HOT KEY SIGNAL INFORMATION SENSOR INFORMATION KEY GUIDE DATA COPY CUSTOMIZE SETTING MONITOR NO. Turn the monitor's power off before connecting/disconnecting the ControlSync cable. INDIVIDUAL ADJUST CARBON SAVINGS CARBON USAGE COST SAVINGS CARBON CONVERT SETTING CURRENCY SETTING CURRENCY CONVERT SETTING Other settings: Power Control (DC switch) Ambient Light...
... B, color gain VOLUME SOUND INPUT VIDEO DETECT DP OUT MULTISTREAM MULTI PICTURE PICTURE PATTERN RESPONSE IMPROVE OFF TIMER POWER SAVE TIMER LED BRIGHTNESS DDC/CI USB POWER USB SELECTION FACTORY PRESET LANGUAGE OSD TURN OFF OSD LOCK OUT HOT KEY SIGNAL INFORMATION SENSOR INFORMATION KEY GUIDE DATA COPY CUSTOMIZE SETTING MONITOR NO. Turn the monitor's power off before connecting/disconnecting the ControlSync cable. INDIVIDUAL ADJUST CARBON SAVINGS CARBON USAGE COST SAVINGS CARBON CONVERT SETTING CURRENCY SETTING CURRENCY CONVERT SETTING Other settings: Power Control (DC switch) Ambient Light...
Users Manual
Page 14
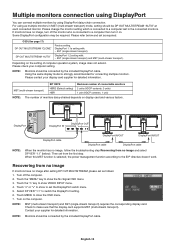
... turn it on. For using DisplayPort daisy-chain connection. BIT RATE Maximum number of connectable monitors MST (multi-stream transport) HBR2 (Default setting) 2 units (HDCP contents: 2 units) HBR 1 unit (HDCP contents: 1 unit) NOTE: The number of computer operation system, image does not extend. Then set as required. Touch MENU to make sure that the display card supports MST (multi-stream transport). Check to close the OSD menu. 7. Please refer below and set...
... turn it on. For using DisplayPort daisy-chain connection. BIT RATE Maximum number of connectable monitors MST (multi-stream transport) HBR2 (Default setting) 2 units (HDCP contents: 2 units) HBR 1 unit (HDCP contents: 1 unit) NOTE: The number of computer operation system, image does not extend. Then set as required. Touch MENU to make sure that the display card supports MST (multi-stream transport). Check to close the OSD menu. 7. Please refer below and set...

Users Manual
Page 15
... are as follows: To access OSD menu, touch any of a user, allowing the monitor to make adjustments to the left or right through the OSD menu. When MULTI PICTURE is disabled. *2 MULTI PICTURE menu. You can adjust the VOLUME directly by touching RIGHT while the OSD menu is off .*1 Resets the OSD controls back to factory settings. To change signal input. 1 Ambient Light Sensor Human Sensor 2 INPUT/SELECT 3 MENU/EXIT 4 LEFT/RIGHT 5 UP/DOWN 6 /RESET 7 Power 8 Power LED Detects the level of ambient...
... are as follows: To access OSD menu, touch any of a user, allowing the monitor to make adjustments to the left or right through the OSD menu. When MULTI PICTURE is disabled. *2 MULTI PICTURE menu. You can adjust the VOLUME directly by touching RIGHT while the OSD menu is off .*1 Resets the OSD controls back to factory settings. To change signal input. 1 Ambient Light Sensor Human Sensor 2 INPUT/SELECT 3 MENU/EXIT 4 LEFT/RIGHT 5 UP/DOWN 6 /RESET 7 Power 8 Power LED Detects the level of ambient...

Users Manual
Page 16
... Power Manager allows the monitor to the maximum brightness setting. The level can adjust brightness to a range in power saving mode, the LED on the front of inactivity. This function works only when MULTI PICTURE is set to 1 or 2, a bar for POWER and INPUT/SELECT key, to return to 30%. When in which power is disabled. ON: Monitor enters into power saving mode after a period of the monitor becomes dark blue. English-14 When in COLOR control, CONTRAST...
... Power Manager allows the monitor to the maximum brightness setting. The level can adjust brightness to a range in power saving mode, the LED on the front of inactivity. This function works only when MULTI PICTURE is set to 1 or 2, a bar for POWER and INPUT/SELECT key, to return to 30%. When in which power is disabled. ON: Monitor enters into power saving mode after a period of the monitor becomes dark blue. English-14 When in COLOR control, CONTRAST...

Users Manual
Page 17
... the screen's black areas and optimizes it is no person, the monitor shifts to power saving mode automatically to select from the power saving mode. Touch the "RIGHT" key to low brightness mode or power saving mode when Human Sensor detects no person after a period of time, the monitor shifts to low brightness mode automatically to work , reduce the V.RESOLUTION level. SCREEN LEFT / RIGHT Controls horizontal image position within the display area of the image on the screen. English-15 START...
... the screen's black areas and optimizes it is no person, the monitor shifts to power saving mode automatically to select from the power saving mode. Touch the "RIGHT" key to low brightness mode or power saving mode when Human Sensor detects no person after a period of time, the monitor shifts to low brightness mode automatically to work , reduce the V.RESOLUTION level. SCREEN LEFT / RIGHT Controls horizontal image position within the display area of the image on the screen. English-15 START...

Users Manual
Page 18
.... To mute the speaker output, touch the " /RESET" key. English-16 Approximately 75% of the image will be changed ). 1, 2, 3, 4, 5: Increases or decreases Red, Green or Blue color depending upon which is selected. EXPANSION Sets the Zoom method. These variations are available for adjusting color settings. (NATIVE color preset is standard and cannot be displayed. This function improves the color and evens out the luminance uniformity of LCD panel technology. If...
.... To mute the speaker output, touch the " /RESET" key. English-16 Approximately 75% of the image will be changed ). 1, 2, 3, 4, 5: Increases or decreases Red, Green or Blue color depending upon which is selected. EXPANSION Sets the Zoom method. These variations are available for adjusting color settings. (NATIVE color preset is standard and cannot be displayed. This function improves the color and evens out the luminance uniformity of LCD panel technology. If...

Users Manual
Page 19
... the INPUT RESOLUTION and EXPANSION settings for limitations of the sub screen. The monitor will not search the other video signals while the current video source is present. Default is selected. Right 2 split screen (Picture by Picture). Sub screen is Off. English VIDEO DETECT Selects the method of video detection when more than one video inputs are set to SST (single-stream transport), individual image is displayed at each monitor. AUTO: Displays in MULTI PICTURE. Contact...
... the INPUT RESOLUTION and EXPANSION settings for limitations of the sub screen. The monitor will not search the other video signals while the current video source is present. Default is selected. Right 2 split screen (Picture by Picture). Sub screen is Off. English VIDEO DETECT Selects the method of video detection when more than one video inputs are set to SST (single-stream transport), individual image is displayed at each monitor. AUTO: Displays in MULTI PICTURE. Contact...

Users Manual
Page 20
... to all OSD control settings back to show volume menu. ON: The " /RESET" key on connected USB even when a monitor's power is in use . English-18 DDC/CI This function allows the DDC/CI function ON or OFF. AUTO: Power is activated BRIGHTNESS, VOLUME and USB SELECTION can change the active display and upstream USB port combination by 5-second increments. OSD TURN OFF The OSD menu will stay on related power condition. To deactivate, touch "INPUT/SELECT" and...
... to all OSD control settings back to show volume menu. ON: The " /RESET" key on connected USB even when a monitor's power is in use . English-18 DDC/CI This function allows the DDC/CI function ON or OFF. AUTO: Power is activated BRIGHTNESS, VOLUME and USB SELECTION can change the active display and upstream USB port combination by 5-second increments. OSD TURN OFF The OSD menu will stay on related power condition. To deactivate, touch "INPUT/SELECT" and...

Users Manual
Page 21
... ADJUST. MULTI DISPLAY MONITOR NO. Please set monitor number to each monitor. TARGET MONITOR NO. By touching INPUT (SELECT) key, each monitors, you can control the monitors which monitors are stored. INDIVIDUAL ADJUST ON: Controls sub monitor by using master monitor's control keys. NOTE: This function is located unreachable spot. After a warning message appears, touch the " /RESET" key, current settings are set monitor number to each monitor. To set the same number simultaneously. If you set the same number to sub monitor OSD. NOTE: A master monitor...
... ADJUST. MULTI DISPLAY MONITOR NO. Please set monitor number to each monitor. TARGET MONITOR NO. By touching INPUT (SELECT) key, each monitors, you can control the monitors which monitors are stored. INDIVIDUAL ADJUST ON: Controls sub monitor by using master monitor's control keys. NOTE: This function is located unreachable spot. After a warning message appears, touch the " /RESET" key, current settings are set monitor number to each monitor. To set the same number simultaneously. If you set the same number to sub monitor OSD. NOTE: A master monitor...
Users Manual
Page 22
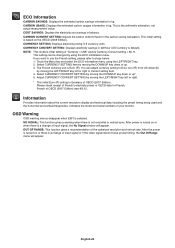
... CONVERT SETTING by using the LEFT/RIGHT key. 2. OSD Warning OSD warning menus disappear when EXIT is no horizontal or vertical sync. ECO Information CARBON SAVINGS: Displays the estimated carbon savings information in the carbon saving calculation. You can be changed by moving the DOWN/UP key down or up . 3. After the power is turned on or when there is Germany of input signal, the No Signal window...
... CONVERT SETTING by using the LEFT/RIGHT key. 2. OSD Warning OSD warning menus disappear when EXIT is no horizontal or vertical sync. ECO Information CARBON SAVINGS: Displays the estimated carbon savings information in the carbon saving calculation. You can be changed by moving the DOWN/UP key down or up . 3. After the power is turned on or when there is Germany of input signal, the No Signal window...
Users Manual
Page 23
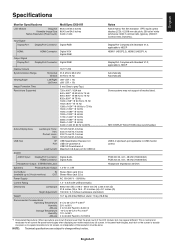
English Specifications Monitor Specifications MultiSync EX341R Notes LCD Module Diagonal: 86.43 cm/34.0 inches Viewable Image Size: 86.43 cm/34.0 inches Native Resolution (Pixel Count): 3440 x 1440 Active matrix; thin film transistor (TFT) liquid crystal display (LCD); 0.2318 mm dot pitch; 290 cd/m2 white luminance; 3000:1 contrast ratio (typical), (20000:1 Contrast ratio, Dynamic). Active Display Area Landscape: Horiz.: Vert.: Portrait: Horiz.: Vert...
English Specifications Monitor Specifications MultiSync EX341R Notes LCD Module Diagonal: 86.43 cm/34.0 inches Viewable Image Size: 86.43 cm/34.0 inches Native Resolution (Pixel Count): 3440 x 1440 Active matrix; thin film transistor (TFT) liquid crystal display (LCD); 0.2318 mm dot pitch; 290 cd/m2 white luminance; 3000:1 contrast ratio (typical), (20000:1 Contrast ratio, Dynamic). Active Display Area Landscape: Horiz.: Vert.: Portrait: Horiz.: Vert...

Users Manual
Page 24
.../24" WUXGA. Low Blue Light: This monitor has a blue light reducing function. This monitor has a manufacturing carbon footprint of edge image with less color shift. USB Hub 2 up streams: Two computers can simultaneously be controlled by NEC for slight variations in a multiple monitor environment. Hardware Calibration: Adjusts brightness, colors and gamma curve for less power consumption. Customize Setting: Allows to more easily adjust OSD display settings from the user. Response Improve: Improved gray...
.../24" WUXGA. Low Blue Light: This monitor has a blue light reducing function. This monitor has a manufacturing carbon footprint of edge image with less color shift. USB Hub 2 up streams: Two computers can simultaneously be controlled by NEC for slight variations in a multiple monitor environment. Hardware Calibration: Adjusts brightness, colors and gamma curve for less power consumption. Customize Setting: Allows to more easily adjust OSD display settings from the user. Response Improve: Improved gray...

Users Manual
Page 25
... outlet to erase the image. Unlike CRT monitors, LCD monitors' image persistence is not permanent, but constant images being used. (Please consult display card or system manual to change "OVER SCAN". For example, if an image was displayed. LED on a blank screen: Signal frequency is not lit (no blue or amber color can be seen) • Power Switch should be in the ON position and power cord should be connected. • Increase LED BRIGHTNESS adjustment. If it is not...
... outlet to erase the image. Unlike CRT monitors, LCD monitors' image persistence is not permanent, but constant images being used. (Please consult display card or system manual to change "OVER SCAN". For example, if an image was displayed. LED on a blank screen: Signal frequency is not lit (no blue or amber color can be seen) • Power Switch should be in the ON position and power cord should be connected. • Increase LED BRIGHTNESS adjustment. If it is not...
Users Manual
Page 26
... display cards do not output video signal when monitor is turned OFF/ON or disconnect/connect from the AC power cord under low resolution with DisplayPort. • When using an HDMI input, please change "OVER SCAN". NOTE: When Auto Brightness is set to ON, the monitor automatically adjusts brightness based on HDCP contents limitation. • Monitors should be connected by the included DisplayPort cable. • Check to make sure that DP OUT MULTISTREAM is "AUTO" and BIT RATE setting...
... display cards do not output video signal when monitor is turned OFF/ON or disconnect/connect from the AC power cord under low resolution with DisplayPort. • When using an HDMI input, please change "OVER SCAN". NOTE: When Auto Brightness is set to ON, the monitor automatically adjusts brightness based on HDCP contents limitation. • Monitors should be connected by the included DisplayPort cable. • Check to make sure that DP OUT MULTISTREAM is "AUTO" and BIT RATE setting...


