Owners Guide
Page 5
...the DTR-4R-1 4-4 Programming Mode 4-4 Switching Between the Desktop Multiline Telephone and the Cordless Telephone Using the Base Unit 4-5 Switching from Desk to Cordless Using a Softkey 4-6 Section 3 Using the Handset 4-7 Acquiring Link 4-7 Volume Low 4-8 Dialing 4-8 No Service 4-8 Section 4 Section 5 Answering a Call 4-9 Making a Call Using the Dterm Cordless II 4-10 Section 6 Dedicated Feature Operations 4-10 Placing a Call on Hold 4-11 Muting a Call 4-11 Transferring Calls 4-11 Setting up a Conference Call 4-12 Dterm ™ Cordless II Owner's Guide iii NEC Unified...
...the DTR-4R-1 4-4 Programming Mode 4-4 Switching Between the Desktop Multiline Telephone and the Cordless Telephone Using the Base Unit 4-5 Switching from Desk to Cordless Using a Softkey 4-6 Section 3 Using the Handset 4-7 Acquiring Link 4-7 Volume Low 4-8 Dialing 4-8 No Service 4-8 Section 4 Section 5 Answering a Call 4-9 Making a Call Using the Dterm Cordless II 4-10 Section 6 Dedicated Feature Operations 4-10 Placing a Call on Hold 4-11 Muting a Call 4-11 Transferring Calls 4-11 Setting up a Conference Call 4-12 Dterm ™ Cordless II Owner's Guide iii NEC Unified...

Owners Guide
Page 8
...Figure 5-2 Table 6-1 Attaching the Belt Clip to the Handset 3-12 Removing the Belt Clip 3-12 Removing the Battery Cover 3-13 Replacing the Battery Pack 3-13 Replacing the Battery Cover 3-14 Charging Unit 3-15 Charging the Battery Pack 3-16 Low Battery 3-17 Cleaning Battery Charge Contacts 3-18 Raising the Base Unit Antenna 3-18 Handset Controls 4-1 Handset Control Functions 4-2 Cordless and Desk Buttons 4-5 LCD Display Indicators 4-7 No Service Conditions 4-8 Optional Accessories and Replacement Parts 5-1 Installing the Headset 5-2 Troubleshooting 6-1 vi Table of Contents
...Figure 5-2 Table 6-1 Attaching the Belt Clip to the Handset 3-12 Removing the Belt Clip 3-12 Removing the Battery Cover 3-13 Replacing the Battery Pack 3-13 Replacing the Battery Cover 3-14 Charging Unit 3-15 Charging the Battery Pack 3-16 Low Battery 3-17 Cleaning Battery Charge Contacts 3-18 Raising the Base Unit Antenna 3-18 Handset Controls 4-1 Handset Control Functions 4-2 Cordless and Desk Buttons 4-5 LCD Display Indicators 4-7 No Service Conditions 4-8 Optional Accessories and Replacement Parts 5-1 Installing the Headset 5-2 Troubleshooting 6-1 vi Table of Contents
Owners Guide
Page 11
... the wall outlet before cleaning. Dterm ™ Cordless II Owner's Guide 1 - 3 SECTION 3 IMPORTANT SAFETY INSTRUCTIONS When using the telephone equipment, basic safety precautions should never be collected, recycled, or disposed of the battery pack in the instruction manual provided for other information regarding the environmentally sound collection, recycling and disposal of fire or electrical shock. for example, near a sink or in a builtin installation...
... the wall outlet before cleaning. Dterm ™ Cordless II Owner's Guide 1 - 3 SECTION 3 IMPORTANT SAFETY INSTRUCTIONS When using the telephone equipment, basic safety precautions should never be collected, recycled, or disposed of the battery pack in the instruction manual provided for other information regarding the environmentally sound collection, recycling and disposal of fire or electrical shock. for example, near a sink or in a builtin installation...
Owners Guide
Page 12
... open airways. The battery or conductor can cause electric shock when the appliance is required. Privacy Cordless telephones are accomplished by the operating instructions. Contact qualified service personnel when some service or repair work by radio receiving devices other controls can result in a risk of other than your own telephone unit, consequently, any kind on the product. Opening or removing covers may not...
... open airways. The battery or conductor can cause electric shock when the appliance is required. Privacy Cordless telephones are accomplished by the operating instructions. Contact qualified service personnel when some service or repair work by radio receiving devices other controls can result in a risk of other than your own telephone unit, consequently, any kind on the product. Opening or removing covers may not...
Owners Guide
Page 13
... transmitting and receiving according to the highest specifications set forth by the FCC. Range The new telephone is designed to include all electrical appliances when you time for making necessary arrangements to it is meant to be impossible to achieve a maximum range of your problem. Dterm ™ Cordless II Owner's Guide 1 - 5 Unplug all of your unit. Many factors limit range, and it is no exception. However...
... transmitting and receiving according to the highest specifications set forth by the FCC. Range The new telephone is designed to include all electrical appliances when you time for making necessary arrangements to it is meant to be impossible to achieve a maximum range of your problem. Dterm ™ Cordless II Owner's Guide 1 - 5 Unplug all of your unit. Many factors limit range, and it is no exception. However...
Owners Guide
Page 16
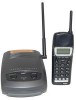
... Ringer Volume Control Handset Volume Control Mute Control Single Key Access to: Conference, Hold, Transfer, Channel and Redial features Four Programmable Keys: F1~F4 Separate Charging Stand with the, Electra Elite ®, and Dterm ® Series E Digital Multiline Telephones. 2 - 2 About the Dterm Cordless II Document Revision 3 NEC Unified Solutions, Inc. SECTION 2 FEATURES OF THE CORDLESS TELEPHONE The Dterm telephone provides a variety of Range Protection Low Battery Protection System Wall Mountable Separate Base Unit Wall Mountable Separate Charging Unit...
... Ringer Volume Control Handset Volume Control Mute Control Single Key Access to: Conference, Hold, Transfer, Channel and Redial features Four Programmable Keys: F1~F4 Separate Charging Stand with the, Electra Elite ®, and Dterm ® Series E Digital Multiline Telephones. 2 - 2 About the Dterm Cordless II Document Revision 3 NEC Unified Solutions, Inc. SECTION 2 FEATURES OF THE CORDLESS TELEPHONE The Dterm telephone provides a variety of Range Protection Low Battery Protection System Wall Mountable Separate Base Unit Wall Mountable Separate Charging Unit...

Owners Guide
Page 17
.../Cordless Softkey Switch Key 13. Hold (HOLD) Key 4. F4 16. Mute (MUTE) Key Figure 2-2 Handset Controls and Functions Dterm ™ Cordless II Owner's Guide 2 - 3 Before using the telephone for the first time, you should become familiar with the controls and functions of the handset and the base unit. Transfer (TRANSFER) Key 12. Ringer/Volume (R/VOL) Key 17. Ringer ON/OFF Switch 2. Talk (TALK) Key 5. Microphone 9. F3 15. Message Display 3. Channel (CHAN) Key 14. Document Revision 3 SECTION 3 Dterm CORDLESS II...
.../Cordless Softkey Switch Key 13. Hold (HOLD) Key 4. F4 16. Mute (MUTE) Key Figure 2-2 Handset Controls and Functions Dterm ™ Cordless II Owner's Guide 2 - 3 Before using the telephone for the first time, you should become familiar with the controls and functions of the handset and the base unit. Transfer (TRANSFER) Key 12. Ringer/Volume (R/VOL) Key 17. Ringer ON/OFF Switch 2. Talk (TALK) Key 5. Microphone 9. F3 15. Message Display 3. Channel (CHAN) Key 14. Document Revision 3 SECTION 3 Dterm CORDLESS II...

Owners Guide
Page 19
... the Dterm Cordless II to the vertical position. Each base unit must be mounted on a desk or tabletop near a standard 120 Vac outlet and telephone line jack. Place the base away from sources of a desk or on top of electrical noise (motors, fluorescent lighting, computers, PC monitor). Dterm ™ Cordless II Owner's Guide 3 - 1 Always place the base unit on higher shelves. SECTION 3 CONNECTING THE TELEPHONE CORDS When connecting the telephone cords, observe...
... the Dterm Cordless II to the vertical position. Each base unit must be mounted on a desk or tabletop near a standard 120 Vac outlet and telephone line jack. Place the base away from sources of a desk or on top of electrical noise (motors, fluorescent lighting, computers, PC monitor). Dterm ™ Cordless II Owner's Guide 3 - 1 Always place the base unit on higher shelves. SECTION 3 CONNECTING THE TELEPHONE CORDS When connecting the telephone cords, observe...

Owners Guide
Page 21
... without the handset being charged. The battery packs can charge a second battery with a polarized line plug (a plug having one way. Dterm ™ Cordless II Owner's Guide 3 - 3 The charging unit can automatically be equipped with or without the belt clip attached. If you cannot plug the AC adapter into the outlet, try reversing the plug. Refer to the Charging Unit Use only the supplied AC adapter for the charging unit. NEC Unified...
... without the handset being charged. The battery packs can charge a second battery with a polarized line plug (a plug having one way. Dterm ™ Cordless II Owner's Guide 3 - 3 The charging unit can automatically be equipped with or without the belt clip attached. If you cannot plug the AC adapter into the outlet, try reversing the plug. Refer to the Charging Unit Use only the supplied AC adapter for the charging unit. NEC Unified...

Owners Guide
Page 34
... Cordless II A battery low alert tone will not overcharge). When charging is not needed immediately, leave it in the charging compartment (it will be emitted every 15 seconds and lasts for standby mode and talk mode. SECTION 9 LOW BATTERY INDICATOR The handset has visual and audible indicators to warn of a low battery condition. The indicators are cleared. All keys are disabled. Document Revision 3 NEC Unified Solutions, Inc. Standby Mode The handset display turns...
... Cordless II A battery low alert tone will not overcharge). When charging is not needed immediately, leave it in the charging compartment (it will be emitted every 15 seconds and lasts for standby mode and talk mode. SECTION 9 LOW BATTERY INDICATOR The handset has visual and audible indicators to warn of a low battery condition. The indicators are cleared. All keys are disabled. Document Revision 3 NEC Unified Solutions, Inc. Standby Mode The handset display turns...

Owners Guide
Page 38
... handset to make a call . Redial Key or Desk/Cordless Softkey Switch REDIAL Press REDIAL to dial the number that was previously dialed or to the base. At system default, the redial function is available. 4 - 2 Dterm Cordless II Handset Desk/Cordless softkey switching must be programmed on hold. Channel Key (during a call to a different channel. Document Revision 3 NEC Unified Solutions, Inc. The telephone first acquires a line to perform desk/cordless softkey switching. Talk Key (Standby Mode...
... handset to make a call . Redial Key or Desk/Cordless Softkey Switch REDIAL Press REDIAL to dial the number that was previously dialed or to the base. At system default, the redial function is available. 4 - 2 Dterm Cordless II Handset Desk/Cordless softkey switching must be programmed on hold. Channel Key (during a call to a different channel. Document Revision 3 NEC Unified Solutions, Inc. The telephone first acquires a line to perform desk/cordless softkey switching. Talk Key (Standby Mode...

Owners Guide
Page 39
Volume/Ringer On/Off Key ON Slide the lever upward to turn the volume/ringer on the side of the following volume level settings: Volume Low Volume Medium Volume High Volume Maximum Mute Key MUTE Press mute on , slide the lever downward to mute a conversation. OFF Dterm ™ Cordless II Owner's Guide 4 - 3 NEC Unified Solutions, Inc. Document Revision 3 Table 4-1 Handset Control Functions (Continued) Condition Action Ringer Select (Standby Mode) R/VOL Press r/vol on the side of...
Volume/Ringer On/Off Key ON Slide the lever upward to turn the volume/ringer on the side of the following volume level settings: Volume Low Volume Medium Volume High Volume Maximum Mute Key MUTE Press mute on , slide the lever downward to mute a conversation. OFF Dterm ™ Cordless II Owner's Guide 4 - 3 NEC Unified Solutions, Inc. Document Revision 3 Table 4-1 Handset Control Functions (Continued) Condition Action Ringer Select (Standby Mode) R/VOL Press r/vol on the side of...
Owners Guide
Page 40
... on or off -hook ringing must be programmed as line keys 1~16 for function key F1. 3. SECTION 2 SETTING UP AND PROGRAMMING THE DTR-4R-1 Programming Mode 1. Press the MUTE key to advance to operate with off -hook ringing assignment. 7. Document Revision 3 NEC Unified Solutions, Inc. Press and hold down and #, then press the TALK key. After programming F4, press the MUTE key to advance to global off -hook ringing. 4 - 4 Dterm Cordless II Handset
... on or off -hook ringing must be programmed as line keys 1~16 for function key F1. 3. SECTION 2 SETTING UP AND PROGRAMMING THE DTR-4R-1 Programming Mode 1. Press the MUTE key to advance to operate with off -hook ringing assignment. 7. Document Revision 3 NEC Unified Solutions, Inc. Press and hold down and #, then press the TALK key. After programming F4, press the MUTE key to advance to global off -hook ringing. 4 - 4 Dterm Cordless II Handset
Owners Guide
Page 42
.... 3. The handset is displayed in desk mode, the REDIAL key can only be programmed to perform desk to Programming Mode on the handset. 4. If the handset is in the LCD. 7. Remove the battery pack. Press the TALK key once to restore the handset to cordless mode. Digital (Redial) is now in desk mode. 2. The LEDs will only change the first time the REDIAL key is in setup mode. 6. Ensure the base unit is pressed...
.... 3. The handset is displayed in desk mode, the REDIAL key can only be programmed to perform desk to Programming Mode on the handset. 4. If the handset is in the LCD. 7. Remove the battery pack. Press the TALK key once to restore the handset to cordless mode. Digital (Redial) is now in desk mode. 2. The LEDs will only change the first time the REDIAL key is in setup mode. 6. Ensure the base unit is pressed...

Owners Guide
Page 44
... make or answer calls (telephone may ring intermittently). Check power to the base Check power to the base unit, an error tone is emitted and NO SERVICE is displayed for two seconds on and displays the current volume settings for two seconds. Volume Low When connection is established, the TALK icon is canceled. When the NO SERVICE indication is prompting the user to enter the numbers to resolve the NO SERVICE condition. Dialing When the handset displays this time, the volume display...
... make or answer calls (telephone may ring intermittently). Check power to the base Check power to the base unit, an error tone is emitted and NO SERVICE is displayed for two seconds on and displays the current volume settings for two seconds. Volume Low When connection is established, the TALK icon is canceled. When the NO SERVICE indication is prompting the user to enter the numbers to resolve the NO SERVICE condition. Dialing When the handset displays this time, the volume display...

Owners Guide
Page 45
... phone. -OR- If the handset is not in the charging unit: 1. Dterm ™ Cordless II Owner's Guide 4 - 9 To answer a call is finished, place the handset back on the charging unit. When a call is finished, place the handset back in the charging unit: 1. If two or more calls come in order to hang up the telephone. -OR- AutoStandby automatically hangs up the telephone. Press TALK to a line key) flashes. 2. When the call is received, the handset rings...
... phone. -OR- If the handset is not in the charging unit: 1. Dterm ™ Cordless II Owner's Guide 4 - 9 To answer a call is finished, place the handset back on the charging unit. When a call is finished, place the handset back in the charging unit: 1. If two or more calls come in order to hang up the telephone. -OR- AutoStandby automatically hangs up the telephone. Press TALK to a line key) flashes. 2. When the call is received, the handset rings...

Owners Guide
Page 47
.... Wait for the party to answer, then press the TALK key to the holding call . Dterm ™ Cordless II Owner's Guide 4 - 11 The LED associated with the line key being used flashes. 2. Press the MUTE key on the handset during a call , press the associated line key. NEC Unified Solutions, Inc. The 'TALK' icon blinks on Hold 1. Transferring Calls Calls can now converse. Press the TRANSFER key and the telephone number of the transfer destination. 2. Muting a Call 1. To...
.... Wait for the party to answer, then press the TALK key to the holding call . Dterm ™ Cordless II Owner's Guide 4 - 11 The LED associated with the line key being used flashes. 2. Press the MUTE key on the handset during a call , press the associated line key. NEC Unified Solutions, Inc. The 'TALK' icon blinks on Hold 1. Transferring Calls Calls can now converse. Press the TRANSFER key and the telephone number of the transfer destination. 2. Muting a Call 1. To...
Owners Guide
Page 51
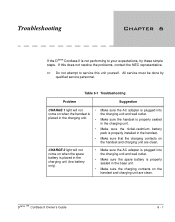
... charging unit and wall outlet. • Make sure the spare battery is the charging unit and wall outlet. Dterm ™ Cordless II Owner's Guide 6 - 1 Table 6-1 Troubleshooting Problem Suggestion CHARGE 1 light will not come on when the handset is properly seated in the base unit. • Make sure the charging contacts on the handset and charging unit are clean. Troubleshooting Chapter 6 If the Dterm Cordless II is properly installed in the handset. • Make sure that the charging contacts on the handset and charging unit...
... charging unit and wall outlet. • Make sure the spare battery is the charging unit and wall outlet. Dterm ™ Cordless II Owner's Guide 6 - 1 Table 6-1 Troubleshooting Problem Suggestion CHARGE 1 light will not come on when the handset is properly seated in the base unit. • Make sure the charging contacts on the handset and charging unit are clean. Troubleshooting Chapter 6 If the Dterm Cordless II is properly installed in the handset. • Make sure that the charging contacts on the handset and charging unit...

Owners Guide
Page 54
...message display 2-3 microphone 2-3 power requirements 1-1 receive frequency 1-1 ringer 2-3 ringer on/off switch 2-3 size 1-1 talk mode 1-1 transmit frequency 1-1 using 4-7 volume 2-2 weight 1-1 ii NEC Unified Solutions, Inc. headset 5-1 installing 5-2 jack 2-2, 2-3 hold key 2-3, 4-2 I indications acquiring link 4-7 batt low 3-17 battery low 3-16 low volume 4-8 no service 4-8 installation precautions 3-1 installing direct wall mounting 3-7 handset battery pack 3-13 headset 5-2 selecting location 3-1 standard wall plate 3-4 K keypad numeric 2-3 keypad buttons 4-1, 4-2 channel key 2-3 conference...
...message display 2-3 microphone 2-3 power requirements 1-1 receive frequency 1-1 ringer 2-3 ringer on/off switch 2-3 size 1-1 talk mode 1-1 transmit frequency 1-1 using 4-7 volume 2-2 weight 1-1 ii NEC Unified Solutions, Inc. headset 5-1 installing 5-2 jack 2-2, 2-3 hold key 2-3, 4-2 I indications acquiring link 4-7 batt low 3-17 battery low 3-16 low volume 4-8 no service 4-8 installation precautions 3-1 installing direct wall mounting 3-7 handset battery pack 3-13 headset 5-2 selecting location 3-1 standard wall plate 3-4 K keypad numeric 2-3 keypad buttons 4-1, 4-2 channel key 2-3 conference...

Owners Guide
Page 55
... 800 mAh battery 5-1 AC adapter 5-1 base unit adapter 5-1 wall mount 5-1 belt clip 5-1 charger 5-1 headset 5-1 leather case 5-1 telephone cords 5-1 out of range protection 2-2 output power 1-1 P phase lock loop 1-1 power requirements 1-1 privacy 1-4 programmable keys 2-2 programming mode 4-4 R r/vol key 4-3 radio interference 1-6 range 1-5 recycling 1-3 redial key 2-3, 4-2, 4-6 ringer Dterm ™ Cordless II Owner's Guide Document Revision 3 selection 4-3 volume control 2-2 S safety battery 1-2 electrical 1-5 general instructions 1-3 silent alarm 2-2 single access key 2-2 site location...
... 800 mAh battery 5-1 AC adapter 5-1 base unit adapter 5-1 wall mount 5-1 belt clip 5-1 charger 5-1 headset 5-1 leather case 5-1 telephone cords 5-1 out of range protection 2-2 output power 1-1 P phase lock loop 1-1 power requirements 1-1 privacy 1-4 programmable keys 2-2 programming mode 4-4 R r/vol key 4-3 radio interference 1-6 range 1-5 recycling 1-3 redial key 2-3, 4-2, 4-6 ringer Dterm ™ Cordless II Owner's Guide Document Revision 3 selection 4-3 volume control 2-2 S safety battery 1-2 electrical 1-5 general instructions 1-3 silent alarm 2-2 single access key 2-2 site location...


