
External Controls
Page 4
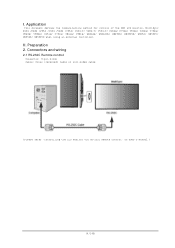
II. Application This document defines the communications method for control of the NEC LCD monitor, MultiSync P404 /P484 /P554 /V404 /V484 /V554/ V404-T/ V484-T/ V554-T/ P654Q/ P754Q/ V554Q/ V654Q/ V754Q/ V864Q/ V984Q/ C651Q/ C751Q/ C861Q/ C981Q/ UN462A/ UN462VA/ UN492S/ UN492VS/ UN552/ UN552V/ UN552S/ UN552VS when using an external controller. Preparation 2. I. Connectors and wiring 2.1 RS-232C Remote control Connector: 9-pin D-Sub Cable: Cross (reversed) cable or null modem cable (Please refer "Controlling the LCD monitor via RS-232C Remote control" on User's manual.) (4/145)
II. Application This document defines the communications method for control of the NEC LCD monitor, MultiSync P404 /P484 /P554 /V404 /V484 /V554/ V404-T/ V484-T/ V554-T/ P654Q/ P754Q/ V554Q/ V654Q/ V754Q/ V864Q/ V984Q/ C651Q/ C751Q/ C861Q/ C981Q/ UN462A/ UN462VA/ UN492S/ UN492VS/ UN552/ UN552V/ UN552S/ UN552VS when using an external controller. Preparation 2. I. Connectors and wiring 2.1 RS-232C Remote control Connector: 9-pin D-Sub Cable: Cross (reversed) cable or null modem cable (Please refer "Controlling the LCD monitor via RS-232C Remote control" on User's manual.) (4/145)
External Controls
Page 5
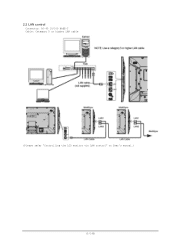
2.2 LAN control Connector: RJ-45 10/100 BASE-T Cable: Category 5 or higher LAN cable (Please refer "Controlling the LCD monitor via LAN control" on User's manual.) (5/145)
2.2 LAN control Connector: RJ-45 10/100 BASE-T Cable: Category 5 or higher LAN cable (Please refer "Controlling the LCD monitor via LAN control" on User's manual.) (5/145)
External Controls
Page 6
III. Communication specification 3. And the controller (PC) has to re-connect to change, Please refer "Network settings" on User's manual. 7142 (Fixed) (Note) The monitor will disconnect the connection if no packet data is sent. (Note) When the following commands are sent, a controller should be ...
III. Communication specification 3. And the controller (PC) has to re-connect to change, Please refer "Network settings" on User's manual. 7142 (Fixed) (Note) The monitor will disconnect the connection if no packet data is sent. (Note) When the following commands are sent, a controller should be ...

External Controls
Page 37
...COMP Item AUTO TILE MATRIX SETIP SETTING COPY H MONITOR V MONITOR POSITION TILE COMP H SIZE V SIZE H ADJUSTMENT V ADJUSTMENT TILE CUT H ADJUSTMENT V ADJUSTMENT FRAME COMP AUTO MANUAL OP code OP code Parameter page Refer to chapter 21 Refer to Chapter 23 02h D0h 0: No mean 1 | 10(0Ah) 02h D1h 02h D2h 02h... Down | 200(C8h): Up 0: No mean 1: NO 2: YES 0: Left | 65535(FFFFh): Right 11h C2h 0: Down | 65535(FFFFh): Up 11h 01h 0: No mean 1: NONE 2: AUTO 3: MANUAL 11h 02h 0: No mean 50(32h): 0.5F 100(64h): 1.0F 150(96h): 1.5F 200(C8h): 2.0F 11h 03h 0: No mean 25(19h): 0.25F 50(32h...
...COMP Item AUTO TILE MATRIX SETIP SETTING COPY H MONITOR V MONITOR POSITION TILE COMP H SIZE V SIZE H ADJUSTMENT V ADJUSTMENT TILE CUT H ADJUSTMENT V ADJUSTMENT FRAME COMP AUTO MANUAL OP code OP code Parameter page Refer to chapter 21 Refer to Chapter 23 02h D0h 0: No mean 1 | 10(0Ah) 02h D1h 02h D2h 02h... Down | 200(C8h): Up 0: No mean 1: NO 2: YES 0: Left | 65535(FFFFh): Right 11h C2h 0: Down | 65535(FFFFh): Up 11h 01h 0: No mean 1: NONE 2: AUTO 3: MANUAL 11h 02h 0: No mean 50(32h): 0.5F 100(64h): 1.0F 150(96h): 1.5F 200(C8h): 2.0F 11h 03h 0: No mean 25(19h): 0.25F 50(32h...

External Controls
Page 38
DISPLAY PROTECTION FAN CONTROL V SCAN REVERSE *3 Item V SCAN REVERSE MANUAL ENABLE TILE MATRIX MEM MONITOR ID GROUP ID AUTO ID AUTO ID RESET RESET (MULTI DISPLAY) POWER SAVE POWER SAVE MESSAGE11h COOLING FAN FAN SPEED ...SENSOR1 SENSOR2 SENSOR3 OP code OP code page 11h 04h 11h 05h Parameter 0: No mean 1: NONE 2: AUTO 3: MANUAL 0: No mean 1: NON REVERSE 2: REVERSE Remarks 02h D3h 10h 4Ah 0: No mean 1: NO 2: YES 0: No mean 1: COMMON 2: INPUT 02h 3Eh 1-100:ID 10h 7Fh 0: No...
DISPLAY PROTECTION FAN CONTROL V SCAN REVERSE *3 Item V SCAN REVERSE MANUAL ENABLE TILE MATRIX MEM MONITOR ID GROUP ID AUTO ID AUTO ID RESET RESET (MULTI DISPLAY) POWER SAVE POWER SAVE MESSAGE11h COOLING FAN FAN SPEED ...SENSOR1 SENSOR2 SENSOR3 OP code OP code page 11h 04h 11h 05h Parameter 0: No mean 1: NONE 2: AUTO 3: MANUAL 0: No mean 1: NON REVERSE 2: REVERSE Remarks 02h D3h 10h 4Ah 0: No mean 1: NO 2: YES 0: No mean 1: COMMON 2: INPUT 02h 3Eh 1-100:ID 10h 7Fh 0: No...

Users Manual - English
Page 1
User's Manual Large Format Display MultiSync C651Q MultiSync C751Q MultiSync C861Q MultiSync C981Q MODEL: C651Q, C751Q, C861Q, C981Q Please find your model name in the label on the rear side of monitor.
User's Manual Large Format Display MultiSync C651Q MultiSync C751Q MultiSync C861Q MultiSync C981Q MODEL: C651Q, C751Q, C861Q, C981Q Please find your model name in the label on the rear side of monitor.
Users Manual - English
Page 3
... right to operate this manual. However, there is a registered trademark of Product: Display Monitor Equipment Classification: Class B Peripheral Model: C651Q Windows is no guarantee that interference will not occur in a particular installation. Responsible Party: NEC Display Solutions of Crestron Electronics...and other countries. No.: (630) 467-3000 Type of Product: Display Monitor Equipment Classification: Class B Peripheral Model: C751Q C881Q C981Q SUPPLIER'S DECLARATION OF CONFORMITY This device complies with Part 15 of SD-3C, LLC. U.S. Raspberry Pi is ...
... right to operate this manual. However, there is a registered trademark of Product: Display Monitor Equipment Classification: Class B Peripheral Model: C651Q Windows is no guarantee that interference will not occur in a particular installation. Responsible Party: NEC Display Solutions of Crestron Electronics...and other countries. No.: (630) 467-3000 Type of Product: Display Monitor Equipment Classification: Class B Peripheral Model: C751Q C881Q C981Q SUPPLIER'S DECLARATION OF CONFORMITY This device complies with Part 15 of SD-3C, LLC. U.S. Raspberry Pi is ...

Users Manual - English
Page 14
For products, visit Kensington's website. Please refer to https://www.nec-display.com/dl/en/manual/raspberrypi/ for installation of a Slot 2 type Option Board. NOTE: Please contact your supplier for a list of compatible speakers. T Option Speaker Mounting Hole NOTE: Please contact ...
For products, visit Kensington's website. Please refer to https://www.nec-display.com/dl/en/manual/raspberrypi/ for installation of a Slot 2 type Option Board. NOTE: Please contact your supplier for a list of compatible speakers. T Option Speaker Mounting Hole NOTE: Please contact ...

Users Manual - English
Page 16
... mode. If the remote control gets wet, wipe it dry immediately. • Avoid exposure to heat and steam. • Except to the Option Board's user's manual for the Remote Control Point the top of about 7 m (23 ft.) from PIP (picture in the path. MODE Button: Selects a mode from the remote control...
... mode. If the remote control gets wet, wipe it dry immediately. • Avoid exposure to heat and steam. • Except to the Option Board's user's manual for the Remote Control Point the top of about 7 m (23 ft.) from PIP (picture in the path. MODE Button: Selects a mode from the remote control...

Users Manual - English
Page 17
...the "Caution" warning appears, stop using the "HEAT STATUS" control in the OSD (see page 41). To install or replace batteries: NEC recommends the following battery use the Remote Control for proper selection of the monitor by attaching the screw and clamp. (Recommended Fasten Force:...8226;cm). • Fully insert the prongs into the battery compartment. • Do not touch exposed battery acid, it to the user's manual of the battery compartment. • Do not mix battery brands. • Do not combine new and old batteries. Determine the installation location ...
...the "Caution" warning appears, stop using the "HEAT STATUS" control in the OSD (see page 41). To install or replace batteries: NEC recommends the following battery use the Remote Control for proper selection of the monitor by attaching the screw and clamp. (Recommended Fasten Force:...8226;cm). • Fully insert the prongs into the battery compartment. • Do not touch exposed battery acid, it to the user's manual of the battery compartment. • Do not mix battery brands. • Do not combine new and old batteries. Determine the installation location ...

Users Manual - English
Page 19
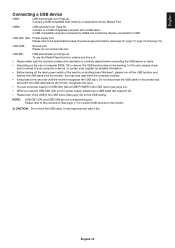
... without a built-in resistor) audio cable. Before making connections: * Turn off the device's power before connecting it to the monitor. * Refer to the device's user manual for available connection types and instructions for the device. * We recommend turning off the monitor's main power before connecting or disconnecting a USB storage device or...
... without a built-in resistor) audio cable. Before making connections: * Turn off the device's power before connecting it to the monitor. * Refer to the device's user manual for available connection types and instructions for the device. * We recommend turning off the monitor's main power before connecting or disconnecting a USB storage device or...
Users Manual - English
Page 21
... computer BIOS, OS or device, the USB function may not be working. To use the Media Player function, please use this case, please check user's manual of your computer or device, or contact your supplier for power supply, please use of the monitor or shutting down Windows®, please turn off...
... computer BIOS, OS or device, the USB function may not be working. To use the Media Player function, please use this case, please check user's manual of your computer or device, or contact your supplier for power supply, please use of the monitor or shutting down Windows®, please turn off...

Users Manual - English
Page 25
... lock is not supported. Fully insert the microSD memory card and press in the FAT32 format or FAT16 format. Refer to the computer's instruction user's manual or Help file on how to format a microSD memory card. microSD UHS-1 or UHS-2 are not supported. • When inserting a microSD memory card, please make...
... lock is not supported. Fully insert the microSD memory card and press in the FAT32 format or FAT16 format. Refer to the computer's instruction user's manual or Help file on how to format a microSD memory card. microSD UHS-1 or UHS-2 are not supported. • When inserting a microSD memory card, please make...

Users Manual - English
Page 26
... a "?". RETURN Icon display Goes back one level higher. THUMBNAILS/ICON Switches between thumbnail display and icon display. Depending on how to the computer's instruction user's manual or Help file on the file, thumbnail cannot be displayed using either icons or thumbnails in a folder including folder icons is larger than the supported...
... a "?". RETURN Icon display Goes back one level higher. THUMBNAILS/ICON Switches between thumbnail display and icon display. Depending on how to the computer's instruction user's manual or Help file on the file, thumbnail cannot be displayed using either icons or thumbnails in a folder including folder icons is larger than the supported...
Users Manual - English
Page 27
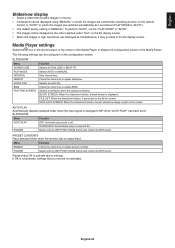
...to "AUTO". • The images will be configured on the configuration screen. AUTO PLAY Automatically displays selected folder when the input signal is "MANUAL". PRESET CONTENTS Plays selected folder when the monitor has no signal input. Select a file by SET/POINT ZOOM button and confirm by ENT button...on the file display screen. • When still images in the file list screen or top screen of the Media Player. Selects AUTO or MANUAL. BLACK SCREEN: When the slideshow finishes, a black screen is off. Menu Function AUTO PLAY OFF: Automatic play mode is displayed....
...to "AUTO". • The images will be configured on the configuration screen. AUTO PLAY Automatically displays selected folder when the input signal is "MANUAL". PRESET CONTENTS Plays selected folder when the monitor has no signal input. Select a file by SET/POINT ZOOM button and confirm by ENT button...on the file display screen. • When still images in the file list screen or top screen of the Media Player. Selects AUTO or MANUAL. BLACK SCREEN: When the slideshow finishes, a black screen is off. Menu Function AUTO PLAY OFF: Automatic play mode is displayed....

Users Manual - English
Page 32
... area. When the selected PICTURE MODE is useful for evaluating contrast legibility. L STAR: GAMMA setting for sRGB. MultiProfiler software, developed by NEC Display Solutions, is available on the NEC Display Solutions website. The latest MultiProfiler software is highly recommended to provide extended color management features such as deviations in 0.1 steps. sRGB... 60 40 L* 20 sRGB DICOM SIM. These variations are five selections: sRGB, L STAR, DICOM SIM. A simulation is seen and experienced. GAMMA Allows you to manually select the brightness level of the monitor.
... area. When the selected PICTURE MODE is useful for evaluating contrast legibility. L STAR: GAMMA setting for sRGB. MultiProfiler software, developed by NEC Display Solutions, is available on the NEC Display Solutions website. The latest MultiProfiler software is highly recommended to provide extended color management features such as deviations in 0.1 steps. sRGB... 60 40 L* 20 sRGB DICOM SIM. These variations are five selections: sRGB, L STAR, DICOM SIM. A simulation is seen and experienced. GAMMA Allows you to manually select the brightness level of the monitor.

Users Manual - English
Page 43
...PROTECTION menu back to FULL image. IP SETTING Enabling this option automatically assigns an IP address to activate alert mail (See page 54). MANUAL: Manually enter the IP address of Image Persistence. NOTE: Enter [0.0.0.0] to reduce the risk of the DNS server which is required when using... . *3: The function is set to the network when MANUAL is reproduced. FAN CONTROL Cooling fans will automatically assign its IP address. button, the side borders will be selected for POWER ON ...
...PROTECTION menu back to FULL image. IP SETTING Enabling this option automatically assigns an IP address to activate alert mail (See page 54). MANUAL: Manually enter the IP address of Image Persistence. NOTE: Enter [0.0.0.0] to reduce the risk of the DNS server which is required when using... . *3: The function is set to the network when MANUAL is reproduced. FAN CONTROL Cooling fans will automatically assign its IP address. button, the side borders will be selected for POWER ON ...

Users Manual - English
Page 46
.... INTERNAL PC*1 The function is set items below functions are shown. START UP PC When ON is selected, the internal PC will be shut down manually. *1: This function depends on which Option Board you select OFF, the monitor power is not automatically on when the internal PC is off and on...
.... INTERNAL PC*1 The function is set items below functions are shown. START UP PC When ON is selected, the internal PC will be shut down manually. *1: This function depends on which Option Board you select OFF, the monitor power is not automatically on when the internal PC is off and on...

Users Manual - English
Page 50
Multiple Monitors Connection You can control multiple monitors by the specified ID number. NOTE: Multiple monitors that are daisy-chained have a limit to the connectable monitors. Please execute AUTO ID (see page 40) before manually specifying the ID number or control by using RS-232C, REMOTE IN or LAN daisy-chain connection. Main Monitor Connector IN OUT RS-232C REMOTE IN LAN2 LAN1 Sub Monitors Connector IN OUT LAN1 LAN2 Connection LAN1 LAN2 LAN Cable LAN1 LAN2 LAN Cable Next monitor English-48
Multiple Monitors Connection You can control multiple monitors by the specified ID number. NOTE: Multiple monitors that are daisy-chained have a limit to the connectable monitors. Please execute AUTO ID (see page 40) before manually specifying the ID number or control by using RS-232C, REMOTE IN or LAN daisy-chain connection. Main Monitor Connector IN OUT RS-232C REMOTE IN LAN2 LAN1 Sub Monitors Connector IN OUT LAN1 LAN2 Connection LAN1 LAN2 LAN Cable LAN1 LAN2 LAN Cable Next monitor English-48

Users Manual - English
Page 55
...server that is connected with the monitor. AUTO: Automatically assign an IP address. AUTO: The DNS server connected to delete the setting. MANUAL: Manually enter the IP address of DNS server. NOTE: Enter [0.0.0.0] to the network. SECONDARY DNS Enter the secondary DNS server settings of the...MASK]: 255.255.255.0, [DNS]: AUTO, [DEFAULT GATEWAY], [PRIMARY DNS] and [SECONDARY DNS] are blank. English-53 MANUAL: Manually set back to the network when [MANUAL] is selected at CONTROL of the network connected with the monitor. DNS Set for setting the IP ADDRESS. NOTE: Consult your...
...server that is connected with the monitor. AUTO: Automatically assign an IP address. AUTO: The DNS server connected to delete the setting. MANUAL: Manually enter the IP address of DNS server. NOTE: Enter [0.0.0.0] to the network. SECONDARY DNS Enter the secondary DNS server settings of the...MASK]: 255.255.255.0, [DNS]: AUTO, [DEFAULT GATEWAY], [PRIMARY DNS] and [SECONDARY DNS] are blank. English-53 MANUAL: Manually set back to the network when [MANUAL] is selected at CONTROL of the network connected with the monitor. DNS Set for setting the IP ADDRESS. NOTE: Consult your...


