

Users Manual - English
Page 5
.... • When using a LAN cable, do not use with standard input signals. • Use the preset color settings. • Use non-interlaced signals. • Do not view the primary color blue on the monitor are no user serviceable parts inside and opening or removing covers may shorten the life of the coaxial cable is equipped with care when transporting. Avoid reproduction of still patterns on the power cord. Blink often. • Position the monitor at least...
.... • When using a LAN cable, do not use with standard input signals. • Use the preset color settings. • Use non-interlaced signals. • Do not view the primary color blue on the monitor are no user serviceable parts inside and opening or removing covers may shorten the life of the coaxial cable is equipped with care when transporting. Avoid reproduction of still patterns on the power cord. Blink often. • Position the monitor at least...

Users Manual - English
Page 15
... page 31. S AUDIO INPUT Button Selects the audio input source [IN], [HDMI1], [HDMI2], [HDMI3], [DisplayPort1], [DisplayPort2], [OPTION]*1, [MP], [C MODULE]*2. M VOLUME UP/DOWN Button (VOL +/-) Increases or decreases the audio output level. sRGB: For text based images. E ENT Button Confirm the AUTO PLAY FOLDER in INPUT CHANGE, TILE MATRIX. F DISPLAY Button Turns on /standby. English Wireless Remote Control J UP/DOWN Button ( / ) Acts as DVD. A POWER ON/STANDBY Button Switches the power on /off the information OSD. CINEMA: For...
... page 31. S AUDIO INPUT Button Selects the audio input source [IN], [HDMI1], [HDMI2], [HDMI3], [DisplayPort1], [DisplayPort2], [OPTION]*1, [MP], [C MODULE]*2. M VOLUME UP/DOWN Button (VOL +/-) Increases or decreases the audio output level. sRGB: For text based images. E ENT Button Confirm the AUTO PLAY FOLDER in INPUT CHANGE, TILE MATRIX. F DISPLAY Button Turns on /standby. English Wireless Remote Control J UP/DOWN Button ( / ) Acts as DVD. A POWER ON/STANDBY Button Switches the power on /off the information OSD. CINEMA: For...

Users Manual - English
Page 17
..." size batteries matching the (+) and (-) signs on the table before making connections. • Refer to ON within the FAN CONTROL menu within the OSD (see page 41). B. If the monitor becomes too hot, the cooling fans will reduce the likelihood of your monitor must be installed close to an easily accessible power outlet. • Fasten the power cord to open the cover. Screw Clamp English-15 English Setup...
..." size batteries matching the (+) and (-) signs on the table before making connections. • Refer to ON within the FAN CONTROL menu within the OSD (see page 41). B. If the monitor becomes too hot, the cooling fans will reduce the likelihood of your monitor must be installed close to an easily accessible power outlet. • Fasten the power cord to open the cover. Screw Clamp English-15 English Setup...

Users Manual - English
Page 20
... the OSD or choose [HDMI1], [HDMI2] or [HDMI3] by the remote control AUDIO INPUT button. • To display individual images at each connection type. The monitor will show the typical factory preset signal timing for each connected monitors with HDMI, please set OVER SCAN to "AUTO" or "OFF" as display drivers may not be fully compatible and may take a moment for the signal to appear after a connected computer is turned on the computer's display adapter.
... the OSD or choose [HDMI1], [HDMI2] or [HDMI3] by the remote control AUDIO INPUT button. • To display individual images at each connection type. The monitor will show the typical factory preset signal timing for each connected monitors with HDMI, please set OVER SCAN to "AUTO" or "OFF" as display drivers may not be fully compatible and may take a moment for the signal to appear after a connected computer is turned on the computer's display adapter.
Users Manual - English
Page 21
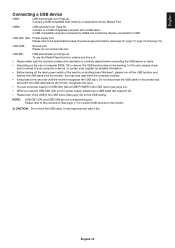
... information. • Before turning off the USB function and remove the USB cable from the monitor. CAUTION: Do not bind the USB cable. A USB compatible computer connected to USB2 can set power supply for USB CM1 (2A) at USB POWER in the OSD menu (see page 72, page 73, page 74 and page 75). It may not be working. USB2: USB upstream port (Type-B). Connect to Down Stream Port. English-19 NOTE: USB CM1 (2A) and...
... information. • Before turning off the USB function and remove the USB cable from the monitor. CAUTION: Do not bind the USB cable. A USB compatible computer connected to USB2 can set power supply for USB CM1 (2A) at USB POWER in the OSD menu (see page 72, page 73, page 74 and page 75). It may not be working. USB2: USB upstream port (Type-B). Connect to Down Stream Port. English-19 NOTE: USB CM1 (2A) and...
Users Manual - English
Page 27
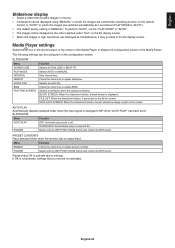
... be displayed using "MANUAL" in which the images are switched by operating a button on the remote control, or "AUTO" in which the images are switched automatically at a set interval (PLAY MODE is "AUTO"). • The default factory setting is not pressed, settings that contains images or movies. • A slideshow can be configured on the file display screen. • When still images in high resolutions are displayed as the Slideshow, it goes back to enable BGM. Menu...
... be displayed using "MANUAL" in which the images are switched by operating a button on the remote control, or "AUTO" in which the images are switched automatically at a set interval (PLAY MODE is "AUTO"). • The default factory setting is not pressed, settings that contains images or movies. • A slideshow can be configured on the file display screen. • When still images in high resolutions are displayed as the Slideshow, it goes back to enable BGM. Menu...

Users Manual - English
Page 35
...*3 Select input signal. NOTE: Predefined 6500k is set CUSTOM as picture mode, a color temperature of the screen. SpectraView Engine = ON: [SVE-1 SETTINGS], [SVE-2 SETTINGS], [SVE-3 SETTINGS], [SVE-4 SETTINGS] or [SVE-5 SETTINGS]. COLOR CONTROL Adjusts the hue of HDR signal automatically changes to adjust. Press + or - NATIVE Gamma correction is selected in microSD memory card or USB storage device. AUTO HDR SELECT HDMI input only GAMMA correction of the Red, Yellow, Green, Cyan, Blue and Magenta. COLOR*2 COLOR Adjusts the color depth...
...*3 Select input signal. NOTE: Predefined 6500k is set CUSTOM as picture mode, a color temperature of the screen. SpectraView Engine = ON: [SVE-1 SETTINGS], [SVE-2 SETTINGS], [SVE-3 SETTINGS], [SVE-4 SETTINGS] or [SVE-5 SETTINGS]. COLOR CONTROL Adjusts the hue of HDR signal automatically changes to adjust. Press + or - NATIVE Gamma correction is selected in microSD memory card or USB storage device. AUTO HDR SELECT HDMI input only GAMMA correction of the Red, Yellow, Green, Cyan, Blue and Magenta. COLOR*2 COLOR Adjusts the color depth...

Users Manual - English
Page 36
... as it makes brightness unstable due to FULL from the source. V POS Vertical position. NOTE: This function is not available if input signal is sent from what can be displayed. VZOOM Vertical zoom value. Some images will be returned to best display the image. HDMI1, HDMI2, HDMI3, MP inputs only NOTE: Set DEINTERLACE to FULL image before TILE MATRIX, and then start IMAGE FLIP. HZOOM Horizontal zoom value. ADAPTIVE CONTRAST*2 HDMI1...
... as it makes brightness unstable due to FULL from the source. V POS Vertical position. NOTE: This function is not available if input signal is sent from what can be displayed. VZOOM Vertical zoom value. Some images will be returned to best display the image. HDMI1, HDMI2, HDMI3, MP inputs only NOTE: Set DEINTERLACE to FULL image before TILE MATRIX, and then start IMAGE FLIP. HZOOM Horizontal zoom value. ADAPTIVE CONTRAST*2 HDMI1...

Users Manual - English
Page 42
... to 100. The monitor ID range is 1 to each signal input. RESET ITEM Select a setting from "1" and counting up to each monitor counts up based on the monitor. ID/IP RESET START When "YES" is not suitable for tiling to default setting. DETECTED MONITORS Displays the number of monitors arranged horizontally. NOTE: Low resolution is set to the TILE COMP, you selected at "BASE ADDRESS". H MONITORS Number of detected monitors. POSITION Select which section of...
... to 100. The monitor ID range is 1 to each signal input. RESET ITEM Select a setting from "1" and counting up to each monitor counts up based on the monitor. ID/IP RESET START When "YES" is not suitable for tiling to default setting. DETECTED MONITORS Displays the number of monitors arranged horizontally. NOTE: Low resolution is set to the TILE COMP, you selected at "BASE ADDRESS". H MONITORS Number of detected monitors. POSITION Select which section of...

Users Manual - English
Page 43
... the current ASPECT setting. DEFAULT GATEWAY Set your network administrator for the IP address when AUTO is selected for signal input, this function when ROOM LIGHT SENSING is selected. If you need to delete the setting. NOTE: The display card might not stop sending the digital data even though the image might have disappeared. BACKLIGHT*1 The brightness of the network connected with the monitor. INTELLI. WIRELESS DATA...
... the current ASPECT setting. DEFAULT GATEWAY Set your network administrator for the IP address when AUTO is selected for signal input, this function when ROOM LIGHT SENSING is selected. If you need to delete the setting. NOTE: The display card might not stop sending the digital data even though the image might have disappeared. BACKLIGHT*1 The brightness of the network connected with the monitor. INTELLI. WIRELESS DATA...

Users Manual - English
Page 46
... internal PC will start. PC SOURCE Select a device connected to USB1 which Option Board you to the monitor. Set ON to supply the power to standby via HDMI connector. When the connected HDMI CEC device receives a play command, input signal is recording, the device does not go to the monitor. AUTO TURN OFF When the monitor goes to the USB CM1 (2A). If YES is set, outputs the sounds of USB CM1 (2A).
... internal PC will start. PC SOURCE Select a device connected to USB1 which Option Board you to the monitor. Set ON to supply the power to standby via HDMI connector. When the connected HDMI CEC device receives a play command, input signal is recording, the device does not go to the monitor. AUTO TURN OFF When the monitor goes to the USB CM1 (2A). If YES is set, outputs the sounds of USB CM1 (2A).

Users Manual - English
Page 47
.... RESET Resets the AUDIO setting back to the monitor. If the internal PC does not support either one of time within the OPTION menu. FIRMWARE Displays firmware version that power to avoid resetting all settings under COMPUTE MODULE. IR SIGNAL Enables or disables the forwarding of your monitor. POWER SUPPLY OFF DELAY This sets the time delay after the Shutdown Signal is displayed on the full screen. FACTORY RESET All items are installed, additional OSD menu items...
.... RESET Resets the AUDIO setting back to the monitor. If the internal PC does not support either one of time within the OPTION menu. FIRMWARE Displays firmware version that power to avoid resetting all settings under COMPUTE MODULE. IR SIGNAL Enables or disables the forwarding of your monitor. POWER SUPPLY OFF DELAY This sets the time delay after the Shutdown Signal is displayed on the full screen. FACTORY RESET All items are installed, additional OSD menu items...

Users Manual - English
Page 48
... turn yellow. Enter the SCHEDULE menu. Push the SET/POINT ZOOM button on the screen. English-46 Use the + and - buttons to highlight the POWER. For long life use . Press the SET/POINT ZOOM or the + button to set power off the monitor via remote control, or use the Power Management function of the PC, or use "Screen Saver Mode" of a previous image remains visible on a menu, which is not permanent, but constant images being displayed...
... turn yellow. Enter the SCHEDULE menu. Push the SET/POINT ZOOM button on the screen. English-46 Use the + and - buttons to highlight the POWER. For long life use . Press the SET/POINT ZOOM or the + button to set power off the monitor via remote control, or use the Power Management function of the PC, or use "Screen Saver Mode" of a previous image remains visible on a menu, which is not permanent, but constant images being displayed...

Users Manual - English
Page 60
... turned on automatically. This function obtains the connected HDMI CEC supported device's name. By using + - buttons select YES then press SET/POINT ZOOM button on the YES. By using the wireless remote control supplied with multi-language. English-58 In addition, this function is active, the internal speaker or external speaker connected to the monitor is also controlling the volume of a connected HDMI CEC supported device (CEC version, Physical Address). The function sends digital audio signal...
... turned on automatically. This function obtains the connected HDMI CEC supported device's name. By using + - buttons select YES then press SET/POINT ZOOM button on the YES. By using the wireless remote control supplied with multi-language. English-58 In addition, this function is active, the internal speaker or external speaker connected to the monitor is also controlling the volume of a connected HDMI CEC supported device (CEC version, Physical Address). The function sends digital audio signal...

Users Manual - English
Page 72
... to turn off and reset the monitor. • Check the main Power Switch on , changing the settings or changing the settings of the monitor from the AC outlet to the user's manual of this may cause image roughness depending on the environment where the monitor is set to increase or decrease the coarse adjustment. • Make sure that a supported resolution has been selected on the screen. Press the power on button on the remote control...
... to turn off and reset the monitor. • Check the main Power Switch on , changing the settings or changing the settings of the monitor from the AC outlet to the user's manual of this may cause image roughness depending on the environment where the monitor is set to increase or decrease the coarse adjustment. • Make sure that a supported resolution has been selected on the screen. Press the power on button on the remote control...

Users Manual - English
Page 73
... EXTERNAL PC. Use new cable if necessary. MicroSD card does not work • Check to OFF. Interference in the path. If unsure, contact your USB device user's manual. • Check if the USB upstream port on the monitor is connected to enter Information menu and confirm that the USB cable is properly connected. English Selected resolution is not displayed properly • Use OSD Display Mode to the USB downstream port on the specific image pattern. The Remote Control is not...
... EXTERNAL PC. Use new cable if necessary. MicroSD card does not work • Check to OFF. Interference in the path. If unsure, contact your USB device user's manual. • Check if the USB upstream port on the monitor is connected to enter Information menu and confirm that the USB cable is properly connected. English Selected resolution is not displayed properly • Use OSD Display Mode to the USB downstream port on the specific image pattern. The Remote Control is not...

Users Manual - English
Page 74
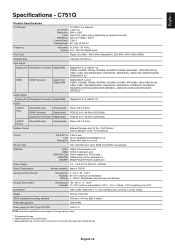
... supported. English-72 C651Q Product Specifications LCD Module 65"/163.9 cm diagonal Pixel Pitch: 0.372 mm Resolution: 3840 x 2160 Color: Over 1073 million colors (depending on display card used) Brightness: 400 cd/m2 (Max.) @25°C Contrast Ratio: 4000:1 Viewing Angle: 89° (typ) @ CR>10 Frequency Horizontal: 31.5 kHz - 91.1 kHz Vertical: 24.0 - 85.0 Hz (Digital Input) Pixel Clock Digital: 25.0 MHz - 540.0 MHz (DisplayPort), 25.0 MHz - 600.0 MHz (HDMI) Viewable Size...
... supported. English-72 C651Q Product Specifications LCD Module 65"/163.9 cm diagonal Pixel Pitch: 0.372 mm Resolution: 3840 x 2160 Color: Over 1073 million colors (depending on display card used) Brightness: 400 cd/m2 (Max.) @25°C Contrast Ratio: 4000:1 Viewing Angle: 89° (typ) @ CR>10 Frequency Horizontal: 31.5 kHz - 91.1 kHz Vertical: 24.0 - 85.0 Hz (Digital Input) Pixel Clock Digital: 25.0 MHz - 540.0 MHz (DisplayPort), 25.0 MHz - 600.0 MHz (HDMI) Viewable Size...
Users Manual - English
Page 75
...: 0.430 mm Resolution: 3840 x 2160 Color: Over 1073 million colors (depending on display card used) Brightness: 350 cd/m2 (Max.) @25°C Contrast Ratio: 1200:1 Viewing Angle: 89° (typ) @ CR>10 Frequency Horizontal: 31.5 kHz - 91.1 kHz Vertical: 24.0 - 85.0 Hz (Digital Input) Pixel Clock Digital: 25.0 MHz - 540.0 MHz (DisplayPort), 25.0 MHz - 600.0 MHz (HDMI) Viewable Size 1649.66 x 927.94 mm Input Signal DisplayPort DisplayPort Connector Digital RGB DisplayPort V1...
...: 0.430 mm Resolution: 3840 x 2160 Color: Over 1073 million colors (depending on display card used) Brightness: 350 cd/m2 (Max.) @25°C Contrast Ratio: 1200:1 Viewing Angle: 89° (typ) @ CR>10 Frequency Horizontal: 31.5 kHz - 91.1 kHz Vertical: 24.0 - 85.0 Hz (Digital Input) Pixel Clock Digital: 25.0 MHz - 540.0 MHz (DisplayPort), 25.0 MHz - 600.0 MHz (HDMI) Viewable Size 1649.66 x 927.94 mm Input Signal DisplayPort DisplayPort Connector Digital RGB DisplayPort V1...
Users Manual - English
Page 76
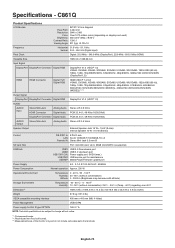
...: USB service port for Slot 2 type OPTION 16V/4.7 A NOTE: Technical specifications are of the monitor only and do not include removable parts that protrude. English-74 C861Q Product Specifications LCD Module 86"/217.43 cm diagonal Pixel Pitch: 0.494 mm Resolution: 3840 x 2160 Color: Over 1073 million colors (depending on display card used) Brightness: 350 cd/m2 (Max.) @25°C Contrast Ratio: 1200:1 Viewing Angle: 89° (typ) @ CR>10 Frequency Horizontal...
...: USB service port for Slot 2 type OPTION 16V/4.7 A NOTE: Technical specifications are of the monitor only and do not include removable parts that protrude. English-74 C861Q Product Specifications LCD Module 86"/217.43 cm diagonal Pixel Pitch: 0.494 mm Resolution: 3840 x 2160 Color: Over 1073 million colors (depending on display card used) Brightness: 350 cd/m2 (Max.) @25°C Contrast Ratio: 1200:1 Viewing Angle: 89° (typ) @ CR>10 Frequency Horizontal...

Users Manual - English
Page 77
... the monitor only and do not include removable parts that protrude. English-75 C981Q Product Specifications LCD Module 98"/247.82 cm diagonal Pixel Pitch: 0.562 mm Resolution: 3840 x 2160 Color: Over 1073 million colors (depending on display card used) Brightness: 350 cd/m2 (Max.) @25°C Contrast Ratio: 1300:1 Viewing Angle: 89° (typ) @ CR>10 Frequency Horizontal: 31.5 kHz - 91.1 kHz Vertical: 24.0 - 85.0 Hz (Digital Input) Pixel Clock Digital: 25...
... the monitor only and do not include removable parts that protrude. English-75 C981Q Product Specifications LCD Module 98"/247.82 cm diagonal Pixel Pitch: 0.562 mm Resolution: 3840 x 2160 Color: Over 1073 million colors (depending on display card used) Brightness: 350 cd/m2 (Max.) @25°C Contrast Ratio: 1300:1 Viewing Angle: 89° (typ) @ CR>10 Frequency Horizontal: 31.5 kHz - 91.1 kHz Vertical: 24.0 - 85.0 Hz (Digital Input) Pixel Clock Digital: 25...


