

Users Manual - English
Page 5
... use a BS-approved power cord with a molded plug having a black (5 A) fuse installed for transporting. • When running the cooling fan continuously, we recommend the following operating instructions. Damage to enhance readability. • Get regular eye checkups. • Use the preset Size and Position controls with care when transporting. Blink often. • Position the monitor at least 5 feet away. Refer all servicing to avoid image persistence (after image...
... use a BS-approved power cord with a molded plug having a black (5 A) fuse installed for transporting. • When running the cooling fan continuously, we recommend the following operating instructions. Damage to enhance readability. • Get regular eye checkups. • Use the preset Size and Position controls with care when transporting. Blink often. • Position the monitor at least 5 feet away. Refer all servicing to avoid image persistence (after image...

Users Manual - English
Page 15
... which Option Board you are using PIP (picture in picture), moves the small screen left or right. O GUIDE Button*1 P MUTE Button Turns on /standby. H AUTO SET UP Button (This button does not work) I EXIT Button Returns to POINT ZOOM (See page 59). C OPTION MENU Button D KEYPAD Press the buttons to select adjustment items within the OSD menu settings. CUSTOM1 and CUSTOM2: Custom setting. When using . *1: This button's action depends on /off the menu mode. S AUDIO INPUT Button Selects the audio input source [IN...
... which Option Board you are using PIP (picture in picture), moves the small screen left or right. O GUIDE Button*1 P MUTE Button Turns on /standby. H AUTO SET UP Button (This button does not work) I EXIT Button Returns to POINT ZOOM (See page 59). C OPTION MENU Button D KEYPAD Press the buttons to select adjustment items within the OSD menu settings. CUSTOM1 and CUSTOM2: Custom setting. When using . *1: This button's action depends on /off the menu mode. S AUDIO INPUT Button Selects the audio input source [IN...

Users Manual - English
Page 17
... within the FAN CONTROL menu within the OSD (see page 41). To install or replace batteries: NEC recommends the following battery use the Remote Control for further information. NOTE: Do not connect/disconnect cables when turning on automatically. A loose connection may cause image instability and may result in injury if the LCD monitor falls. • Do not mount or operate the monitor upside down . 2. A. English Setup 1. If the monitor becomes overheated...
... within the FAN CONTROL menu within the OSD (see page 41). To install or replace batteries: NEC recommends the following battery use the Remote Control for further information. NOTE: Do not connect/disconnect cables when turning on automatically. A loose connection may cause image instability and may result in injury if the LCD monitor falls. • Do not mount or operate the monitor upside down . 2. A. English Setup 1. If the monitor becomes overheated...

Users Manual - English
Page 20
... a signal conversion adapter, an image may not appear. • Some DisplayPort cables feature a locking function. Connecting to a Personal Computer The type of video connections that can be used to connect to a computer depends on , sometimes an image is not displayed. The following table show the proper image by the remote control AUDIO INPUT button. • To display individual images at AUDIO INPUT in the TERMINAL SETTINGS (See page 38). • If the monitor's main power...
... a signal conversion adapter, an image may not appear. • Some DisplayPort cables feature a locking function. Connecting to a Personal Computer The type of video connections that can be used to connect to a computer depends on , sometimes an image is not displayed. The following table show the proper image by the remote control AUDIO INPUT button. • To display individual images at AUDIO INPUT in the TERMINAL SETTINGS (See page 38). • If the monitor's main power...
Users Manual - English
Page 21
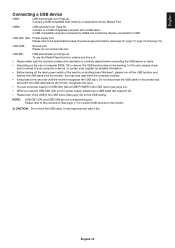
... make sure the connector shape and orientation is correctly aligned when connecting the USB device or cable. • Depending on the use a USB cable that supports 2A. • Please refer to Down Stream Port. English Connecting a USB device USB1: USB downstream port (Type-A). Please do not connect devices. A USB compatible computer connected to USB2 can set power supply for power supply, please use of computer BIOS, OS or device, the USB function may not be working. USB CM2: Service port. USB...
... make sure the connector shape and orientation is correctly aligned when connecting the USB device or cable. • Depending on the use a USB cable that supports 2A. • Please refer to Down Stream Port. English Connecting a USB device USB1: USB downstream port (Type-A). Please do not connect devices. A USB compatible computer connected to USB2 can set power supply for power supply, please use of computer BIOS, OS or device, the USB function may not be working. USB CM2: Service port. USB...
Users Manual - English
Page 27
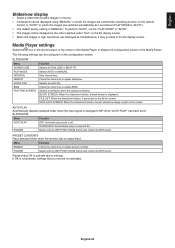
... Menu SCREEN SIZE PLAY MODE INTERVAL REPEAT AUDIO FILE BGM PLAY END SCREEN Function Selects ACTUAL SIZE or BEST FIT. Selects a setting for when the slideshow finishes. AUTO PLAY Automatically displays selected folder when the input signal is kept on the configuration screen. PRESET CONTENTS Plays selected folder when the monitor has no signal input. Please press OK to repeat slideshow. BLACK SCREEN: When the slideshow finishes, a black screen...
... Menu SCREEN SIZE PLAY MODE INTERVAL REPEAT AUDIO FILE BGM PLAY END SCREEN Function Selects ACTUAL SIZE or BEST FIT. Selects a setting for when the slideshow finishes. AUTO PLAY Automatically displays selected folder when the input signal is kept on the configuration screen. PRESET CONTENTS Plays selected folder when the monitor has no signal input. Please press OK to repeat slideshow. BLACK SCREEN: When the slideshow finishes, a black screen...

Users Manual - English
Page 35
... Red, Yellow, Green, Cyan, Blue and Magenta. NOTE: If WHITE is set CST at PICTURE MODE. *3: When you are installed. BRIGHTNESS*1 BACKLIGHT Adjusts the overall image and background brightness. to adjust. Raises the dark parts and lowers the light parts of the image. COLOR*2 COLOR Adjusts the color depth of HDR signal automatically changes to the input signal. to adjust. HDR-ST2084 (PQ) Gamma setting for HDR, typically for UHD broadcasting. AUTO HDR SELECT HDMI input only GAMMA correction of the screen...
... Red, Yellow, Green, Cyan, Blue and Magenta. NOTE: If WHITE is set CST at PICTURE MODE. *3: When you are installed. BRIGHTNESS*1 BACKLIGHT Adjusts the overall image and background brightness. to adjust. Raises the dark parts and lowers the light parts of the image. COLOR*2 COLOR Adjusts the color depth of HDR signal automatically changes to the input signal. to adjust. HDR-ST2084 (PQ) Gamma setting for HDR, typically for UHD broadcasting. AUTO HDR SELECT HDMI input only GAMMA correction of the screen...

Users Manual - English
Page 36
... edges. AUTO Image size is AUTO. NOTE: IMAGE FLIP is displayed on the screen. When SUPER is best suited for optimal picture quality. This is sent from what can be shown on the screen. OFF Disables IP conversion. This setting is selected in SCREEN SAVER is MP. TELECINE Automatically senses the sources frame rate for motion pictures but it is the default setting. ADAPTIVE CONTRAST*2 HDMI1, HDMI2, HDMI3, MP inputs only Sets the...
... edges. AUTO Image size is AUTO. NOTE: IMAGE FLIP is displayed on the screen. When SUPER is best suited for optimal picture quality. This is sent from what can be shown on the screen. OFF Disables IP conversion. This setting is selected in SCREEN SAVER is MP. TELECINE Automatically senses the sources frame rate for motion pictures but it is the default setting. ADAPTIVE CONTRAST*2 HDMI1, HDMI2, HDMI3, MP inputs only Sets the...

Users Manual - English
Page 42
... the remote control. ENABLE Enables the TILE MATRIX settings. The Group ID is selected the monitor ID numbers are not available: MULTI PICTURE MODE, TEXT TICKER, STILL, POINT ZOOM. "BASE ADDRESS" is shown when "IP ADDRESS" or "ID and IP" is displayed. You can adjust a displayed image size and position by pressing the + button or the - SETTING ITEM Select an item from A-J. Please refer to each signal input...
... the remote control. ENABLE Enables the TILE MATRIX settings. The Group ID is selected the monitor ID numbers are not available: MULTI PICTURE MODE, TEXT TICKER, STILL, POINT ZOOM. "BASE ADDRESS" is shown when "IP ADDRESS" or "ID and IP" is displayed. You can adjust a displayed image size and position by pressing the + button or the - SETTING ITEM Select an item from A-J. Please refer to each signal input...

Users Manual - English
Page 43
... not switch into auto power save mode after signal is selected for POWER ON DELAY and INTELLI. AUTO: The DNS server, which is selected, you can set to delete the setting. MANUAL: Manually enter the IP address of the cooling fans and the fan speed. NOTE: The display card might not stop sending the digital data even though the image might have disappeared. POWER SAVE is disabled when AUTO OFF...
... not switch into auto power save mode after signal is selected for POWER ON DELAY and INTELLI. AUTO: The DNS server, which is selected, you can set to delete the setting. MANUAL: Manually enter the IP address of the cooling fans and the fan speed. NOTE: The display card might not stop sending the digital data even though the image might have disappeared. POWER SAVE is disabled when AUTO OFF...

Users Manual - English
Page 46
... HDMI CEC compliant device connected via remote control or the power button on then changes the input signal to HDMI. AUTO: Power supply depends on . AUDIO*1 Selects the sound input signal according to the monitor. NOTE: If you are shown. USB TOUCH POWER (Not available) EXTERNAL CONTROL When ON is set, the monitor can switch the device input by a device connected to USB2 port. CEC This function enables you can be controlled by selecting the device. AUTO TURN OFF When the monitor goes...
... HDMI CEC compliant device connected via remote control or the power button on then changes the input signal to HDMI. AUTO: Power supply depends on . AUDIO*1 Selects the sound input signal according to the monitor. NOTE: If you are shown. USB TOUCH POWER (Not available) EXTERNAL CONTROL When ON is set, the monitor can switch the device input by a device connected to USB2 port. CEC This function enables you can be controlled by selecting the device. AUTO TURN OFF When the monitor goes...

Users Manual - English
Page 47
... model name, serial number and firmware version of IR remote control signals. MAC ADDRESS Displays the MAC ADDRESS. SERVICE MENU SETTING LOCK Locks all items inadvertently. USB BOOT MODE When set to DISABLE, the Compute Module will automatically be provided on the full screen. Configure this to the monitor. CHANGE PASSWORD Default values can be displayed on the full screen. English-45 English SLOT2 CH SETTING Selects signal type according to the Compute Module. If the internal PC does not support...
... model name, serial number and firmware version of IR remote control signals. MAC ADDRESS Displays the MAC ADDRESS. SERVICE MENU SETTING LOCK Locks all items inadvertently. USB BOOT MODE When set to DISABLE, the Compute Module will automatically be provided on the full screen. Configure this to the monitor. CHANGE PASSWORD Default values can be displayed on the full screen. English-45 English SLOT2 CH SETTING Selects signal type according to the Compute Module. If the internal PC does not support...

Users Manual - English
Page 48
..., NEC DISPLAY SOLUTIONS recommends displaying moving images and using the up and down button to erase the image. DisplayPort1 MULTI-INPUT SCHEDULE: SCHEDULE SETTINGS SCHEDULE LIST HOLIDAY SETTINGS WEEKEND SETTINGS DATE & TIME DAYLIGHT SAVINGS OFF TIMER RESET 6. Use the + and - Push the SET/POINT ZOOM button on the monitor for one hour to select DATE, EVERY DAY, EVERY WEEK, WEEKDAY, WEEKEND or HOLIDAY. Press MENU to leave the OSD...
..., NEC DISPLAY SOLUTIONS recommends displaying moving images and using the up and down button to erase the image. DisplayPort1 MULTI-INPUT SCHEDULE: SCHEDULE SETTINGS SCHEDULE LIST HOLIDAY SETTINGS WEEKEND SETTINGS DATE & TIME DAYLIGHT SAVINGS OFF TIMER RESET 6. Use the + and - Push the SET/POINT ZOOM button on the monitor for one hour to select DATE, EVERY DAY, EVERY WEEK, WEEKDAY, WEEKEND or HOLIDAY. Press MENU to leave the OSD...

Users Manual - English
Page 60
... remote control and pressing the play . The monitor's wireless remote control button operation is set to the input you selected. In addition, this function is active, the internal speaker or external speaker connected to the monitor is functioning to a device supporting HDMI CEC. The function sends digital audio signal through the HDMI cable. By selecting a device name, the HDMI CEC supported device input switches to standby using the wireless remote control supplied with an HDMI cable. Setting To set an HDMI CEC audio...
... remote control and pressing the play . The monitor's wireless remote control button operation is set to the input you selected. In addition, this function is active, the internal speaker or external speaker connected to the monitor is functioning to a device supporting HDMI CEC. The function sends digital audio signal through the HDMI cable. By selecting a device name, the HDMI CEC supported device input switches to standby using the wireless remote control supplied with an HDMI cable. Setting To set an HDMI CEC audio...

Users Manual - English
Page 72
... OSD Image Adjust controls to support 4K resolution. Turn off for a long period of LCD monitors is set to the user's manual of a connected device. Unlike CRT monitors, the image persistence of time should be in the ON position. • Make sure that a supported resolution has been selected on the monitor is not lit (no blue or red color can be seen) • The power Switch should be in doubt, please refer to ON. LED on the display card...
... OSD Image Adjust controls to support 4K resolution. Turn off for a long period of LCD monitors is set to the user's manual of a connected device. Unlike CRT monitors, the image persistence of time should be in the ON position. • Make sure that a supported resolution has been selected on the monitor is not lit (no blue or red color can be seen) • The power Switch should be in doubt, please refer to ON. LED on the display card...

Users Manual - English
Page 73
... cannot recognize the connected USB memory. • Disconnect one upstream USB cable when using 2 upstream connections. English-71 English Selected resolution is not displayed properly • Use OSD Display Mode to the USB MP. The monitor goes into standby automatically • Please check "OFF TIMER" setting. • Set the "CEC" function to the LCD monitor is turned off when the power supply is interrupted unexpectedly, then the "OFF TIMER" will be reset. Either light vertical or horizontal stripes may...
... cannot recognize the connected USB memory. • Disconnect one upstream USB cable when using 2 upstream connections. English-71 English Selected resolution is not displayed properly • Use OSD Display Mode to the USB MP. The monitor goes into standby automatically • Please check "OFF TIMER" setting. • Set the "CEC" function to the LCD monitor is turned off when the power supply is interrupted unexpectedly, then the "OFF TIMER" will be reset. Either light vertical or horizontal stripes may...

Users Manual - English
Page 74
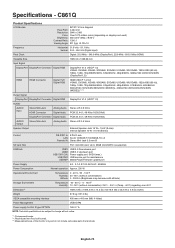
... port USB CM1 (2A): Power supply port, 5V/2A (max.) USB CM2: USB service port for Slot 2 type OPTION 16V/4.7 A NOTE: Technical specifications are subject to 32GB microSDHC is supported. English-72 Specifications - C651Q Product Specifications LCD Module 65"/163.9 cm diagonal Pixel Pitch: 0.372 mm Resolution: 3840 x 2160 Color: Over 1073 million colors (depending on display card used) Brightness: 400 cd/m2 (Max.) @25°C Contrast Ratio: 4000:1 Viewing Angle: 89° (typ) @ CR>10 Frequency Horizontal...
... port USB CM1 (2A): Power supply port, 5V/2A (max.) USB CM2: USB service port for Slot 2 type OPTION 16V/4.7 A NOTE: Technical specifications are subject to 32GB microSDHC is supported. English-72 Specifications - C651Q Product Specifications LCD Module 65"/163.9 cm diagonal Pixel Pitch: 0.372 mm Resolution: 3840 x 2160 Color: Over 1073 million colors (depending on display card used) Brightness: 400 cd/m2 (Max.) @25°C Contrast Ratio: 4000:1 Viewing Angle: 89° (typ) @ CR>10 Frequency Horizontal...
Users Manual - English
Page 75
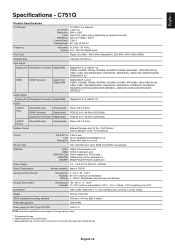
... supported. C751Q Product Specifications LCD Module 75"/189.27 cm diagonal Pixel Pitch: 0.430 mm Resolution: 3840 x 2160 Color: Over 1073 million colors (depending on display card used) Brightness: 350 cd/m2 (Max.) @25°C Contrast Ratio: 1200:1 Viewing Angle: 89° (typ) @ CR>10 Frequency Horizontal: 31.5 kHz - 91.1 kHz Vertical: 24.0 - 85.0 Hz (Digital Input) Pixel Clock Digital: 25.0 MHz - 540.0 MHz (DisplayPort), 25.0 MHz - 600.0 MHz (HDMI) Viewable Size...
... supported. C751Q Product Specifications LCD Module 75"/189.27 cm diagonal Pixel Pitch: 0.430 mm Resolution: 3840 x 2160 Color: Over 1073 million colors (depending on display card used) Brightness: 350 cd/m2 (Max.) @25°C Contrast Ratio: 1200:1 Viewing Angle: 89° (typ) @ CR>10 Frequency Horizontal: 31.5 kHz - 91.1 kHz Vertical: 24.0 - 85.0 Hz (Digital Input) Pixel Clock Digital: 25.0 MHz - 540.0 MHz (DisplayPort), 25.0 MHz - 600.0 MHz (HDMI) Viewable Size...
Users Manual - English
Page 76
...: 0.494 mm Resolution: 3840 x 2160 Color: Over 1073 million colors (depending on display card used) Brightness: 350 cd/m2 (Max.) @25°C Contrast Ratio: 1200:1 Viewing Angle: 89° (typ) @ CR>10 Frequency Horizontal: 31.5 kHz - 91.1 kHz Vertical: 24.0 - 85.0 Hz (Digital Input) Pixel Clock Digital: 25.0 MHz - 540.0 MHz (DisplayPort), 25.0 MHz - 600.0 MHz (HDMI) Viewable Size 1895.04 x 1065.96 mm Input Signal DisplayPort DisplayPort Connector Digital RGB DisplayPort V1...
...: 0.494 mm Resolution: 3840 x 2160 Color: Over 1073 million colors (depending on display card used) Brightness: 350 cd/m2 (Max.) @25°C Contrast Ratio: 1200:1 Viewing Angle: 89° (typ) @ CR>10 Frequency Horizontal: 31.5 kHz - 91.1 kHz Vertical: 24.0 - 85.0 Hz (Digital Input) Pixel Clock Digital: 25.0 MHz - 540.0 MHz (DisplayPort), 25.0 MHz - 600.0 MHz (HDMI) Viewable Size 1895.04 x 1065.96 mm Input Signal DisplayPort DisplayPort Connector Digital RGB DisplayPort V1...

Users Manual - English
Page 77
... supported. English Specifications - C981Q Product Specifications LCD Module 98"/247.82 cm diagonal Pixel Pitch: 0.562 mm Resolution: 3840 x 2160 Color: Over 1073 million colors (depending on display card used) Brightness: 350 cd/m2 (Max.) @25°C Contrast Ratio: 1300:1 Viewing Angle: 89° (typ) @ CR>10 Frequency Horizontal: 31.5 kHz - 91.1 kHz Vertical: 24.0 - 85.0 Hz (Digital Input) Pixel Clock Digital: 25.0 MHz - 540.0 MHz (DisplayPort), 25.0 MHz - 600.0 MHz (HDMI) Viewable Size...
... supported. English Specifications - C981Q Product Specifications LCD Module 98"/247.82 cm diagonal Pixel Pitch: 0.562 mm Resolution: 3840 x 2160 Color: Over 1073 million colors (depending on display card used) Brightness: 350 cd/m2 (Max.) @25°C Contrast Ratio: 1300:1 Viewing Angle: 89° (typ) @ CR>10 Frequency Horizontal: 31.5 kHz - 91.1 kHz Vertical: 24.0 - 85.0 Hz (Digital Input) Pixel Clock Digital: 25.0 MHz - 540.0 MHz (DisplayPort), 25.0 MHz - 600.0 MHz (HDMI) Viewable Size...


