
User Guide
Page 3
Contents Using This Guide Text Conventions viii Related Documents viii 1 Getting Started Welcome 1-2 Unpacking Your MobilePro 1-3 Getting to Know Your MobilePro 1-4 Installing the Main Battery 1-5 Installing the Backup Battery 1-7 Connecting the AC Adapter 1-10 Setting Up the System 1-12 Introducing the Software 1-13 Connecting to Your PC via USB Cable 1-14 Loading USB...
Contents Using This Guide Text Conventions viii Related Documents viii 1 Getting Started Welcome 1-2 Unpacking Your MobilePro 1-3 Getting to Know Your MobilePro 1-4 Installing the Main Battery 1-5 Installing the Backup Battery 1-7 Connecting the AC Adapter 1-10 Setting Up the System 1-12 Introducing the Software 1-13 Connecting to Your PC via USB Cable 1-14 Loading USB...

User Guide
Page 4
... 2-6 Around the Bottom of the System 2-7 Opening the Display Panel 2-8 Using the Stylus 2-9 Using Power Sources 2-10 Determining Battery Status 2-10 Recharging the Main Battery Pack 2-11 Managing MobilePro Power 2-12 Replacing the Main Battery 2-12 Taking Precautions 2-15 Caring for the MobilePro 2-15 Precautions 2-16 Storage Requirements 2-17 Routine Cleaning 2-17 3 Introducing...
... 2-6 Around the Bottom of the System 2-7 Opening the Display Panel 2-8 Using the Stylus 2-9 Using Power Sources 2-10 Determining Battery Status 2-10 Recharging the Main Battery Pack 2-11 Managing MobilePro Power 2-12 Replacing the Main Battery 2-12 Taking Precautions 2-15 Caring for the MobilePro 2-15 Precautions 2-16 Storage Requirements 2-17 Routine Cleaning 2-17 3 Introducing...

User Guide
Page 6
A Troubleshooting Solving Problems A-2 Replacing the Backup Battery A-6 B Specifications Base System B-2 Power ...B-4 Dimensions and Weights B-5 Recommended Environment B-5 Accessories B-6 Options ...B-6 vi Contents
A Troubleshooting Solving Problems A-2 Replacing the Backup Battery A-6 B Specifications Base System B-2 Power ...B-4 Dimensions and Weights B-5 Recommended Environment B-5 Accessories B-6 Options ...B-6 vi Contents

User Guide
Page 7
Chapter 4, "Using the MobilePro," shows you how to the MobilePro features, battery recharging, and general unit care. ! Appendix B, "Specifications," details the hardware specifications for each new service connection. ! For specific information, see the following descriptions...use of Microsoft® Windows® Handheld PC 2000. ! Chapter 3, "Introducing Windows H/PC 2000," provides an overview of your MobilePro 900 handheld PC. Read this guide to configure service connections for an Internet service provider and a remote access service. Using This Guide The MobilePro™...
Chapter 4, "Using the MobilePro," shows you how to the MobilePro features, battery recharging, and general unit care. ! Appendix B, "Specifications," details the hardware specifications for each new service connection. ! For specific information, see the following descriptions...use of Microsoft® Windows® Handheld PC 2000. ! Chapter 3, "Introducing Windows H/PC 2000," provides an overview of your MobilePro 900 handheld PC. Read this guide to configure service connections for an Internet service provider and a remote access service. Using This Guide The MobilePro™...

User Guide
Page 9
Getting to Your PC via USB Cable ! Installing the Backup Battery ! Connecting to Your PC via Infrared Port ! Synchronizing with Your Host PC ! Welcome ! Installing the Main Battery ! Introducing the Software ! Unpacking Your MobilePro ! Connecting to Your PC via Serial Cable ! Setting Up the System ! Connecting to Know Your MobilePro ! 1 Getting Started ! Connecting the AC Adapter ! Getting Help
Getting to Your PC via USB Cable ! Installing the Backup Battery ! Connecting to Your PC via Infrared Port ! Synchronizing with Your Host PC ! Welcome ! Installing the Main Battery ! Introducing the Software ! Unpacking Your MobilePro ! Connecting to Your PC via Serial Cable ! Setting Up the System ! Connecting to Know Your MobilePro ! 1 Getting Started ! Connecting the AC Adapter ! Getting Help

User Guide
Page 10
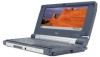
...send it to check inventory and place the order. During a few onscreen instructions to start using your MobilePro 900 can synchronize with colleagues back in the following situations: ! In addition, your device for the Microsoft®... development tools available for the first time, you need to install the main and backup batteries and connect the AC adapter to set the time and adjust the touch screen. 1-2 Getting Started Welcome Congratulations...matter where you synchronize all your unread e-mail onto your NEC MobilePro™ 900 handheld PC. Picture yourself in the office.
...send it to check inventory and place the order. During a few onscreen instructions to start using your MobilePro 900 can synchronize with colleagues back in the following situations: ! In addition, your device for the Microsoft®... development tools available for the first time, you need to install the main and backup batteries and connect the AC adapter to set the time and adjust the touch screen. 1-2 Getting Started Welcome Congratulations...matter where you synchronize all your unread e-mail onto your NEC MobilePro™ 900 handheld PC. Picture yourself in the office.
User Guide
Page 11
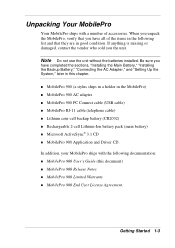
... you unpack the MobilePro, verify that they are in good condition. Note Do not use the unit without the batteries installed. MobilePro RJ-11 cable (telephone cable) ! MobilePro 900 User's Guide (this chapter. ! MobilePro 900 Release Notes ! If anything is missing or damaged, contact the vendor who sold you have all of accessories...
... you unpack the MobilePro, verify that they are in good condition. Note Do not use the unit without the batteries installed. MobilePro RJ-11 cable (telephone cable) ! MobilePro 900 User's Guide (this chapter. ! MobilePro 900 Release Notes ! If anything is missing or damaged, contact the vendor who sold you have all of accessories...

User Guide
Page 13
...Memory (RAM) on a RAM module. connect the AC adapter ! Installing the Main Battery Follow these steps to : ! Your MobilePro does not have a hard disk drive....click of the MobilePro carton and locate the MobilePro unit and the main battery. The touch, tap, and double tap act just like device that you can... use the MobilePro, you to your host PC. install the main battery ! synchronize with your host PC. Before you can edit, create, send... and synchronize data with your PC ! install the backup battery ! connect to touch, tap, or double tap objects on the MobilePro touch...
...Memory (RAM) on a RAM module. connect the AC adapter ! Installing the Main Battery Follow these steps to : ! Your MobilePro does not have a hard disk drive....click of the MobilePro carton and locate the MobilePro unit and the main battery. The touch, tap, and double tap act just like device that you can... use the MobilePro, you to your host PC. install the main battery ! synchronize with your host PC. Before you can edit, create, send... and synchronize data with your PC ! install the backup battery ! connect to touch, tap, or double tap objects on the MobilePro touch...

User Guide
Page 14
... (locks) into place. Continue to the next section to the locked position. Insert the main battery as follows: ! Press the battery into the connector until it is secure and locks (clicks) into the battery bay. Align the battery connector and tab with the rails in the unlocked position (slide the button towards the outside...
... (locks) into place. Continue to the next section to the locked position. Insert the main battery as follows: ! Press the battery into the connector until it is secure and locks (clicks) into the battery bay. Align the battery connector and tab with the rails in the unlocked position (slide the button towards the outside...

User Guide
Page 15
... the same type battery or an equivalent type when replacing the battery. Lithium acts as a catalyst when exposed to install the battery. Locating the backup battery cover and screw A - Backup Battery Cover Getting Started 1-7 Installing the Backup Battery A lithium coin-cell battery comes with the.... This is swallowed, see a doctor. 1. If the battery is a backup battery that ships with your MobilePro. Screw B - The battery can explode if you use a battery that is not the same type battery (or an equivalent type) that maintains system configuration information. Locate...
... the same type battery or an equivalent type when replacing the battery. Lithium acts as a catalyst when exposed to install the battery. Locating the backup battery cover and screw A - Backup Battery Cover Getting Started 1-7 Installing the Backup Battery A lithium coin-cell battery comes with the.... This is swallowed, see a doctor. 1. If the battery is a backup battery that ships with your MobilePro. Screw B - The battery can explode if you use a battery that is not the same type battery (or an equivalent type) that maintains system configuration information. Locate...

User Guide
Page 16
3. With the positive (+) side of the battery facing up ) Checking the backup battery installation 1-8 Getting Started Inserting the backup battery A - Backup Battery (+ side up , insert the battery into the battery socket as shown in the following figures.
3. With the positive (+) side of the battery facing up ) Checking the backup battery installation 1-8 Getting Started Inserting the backup battery A - Backup Battery (+ side up , insert the battery into the battery socket as shown in the following figures.

User Guide
Page 17
.... Do not recharge or disassemble the battery. Discard used battery. If the battery is not the same type battery (or an equivalent type) that ships with the MobilePro. Replacing the backup battery cover A - Do not dispose of the used batteries according to begin charging the main battery. Promptly dispose of the battery by burning it. Getting Started 1-9 Lithium...
.... Do not recharge or disassemble the battery. Discard used battery. If the battery is not the same type battery (or an equivalent type) that ships with the MobilePro. Replacing the backup battery cover A - Do not dispose of the used batteries according to begin charging the main battery. Promptly dispose of the battery by burning it. Getting Started 1-9 Lithium...

User Guide
Page 18
...the following figure). 1-10 Getting Started Follow these precautions whenever you : ! You must repeat this full 10-hour charge cycle only if the battery becomes fully discharged. Insert the plug on the AC adapter cable into the AC power port on AC power. ! Connecting the AC Adapter In ...: ! Before using the system for the first time, charge the MobilePro continuously for the first time, NEC Solutions America recommends using the AC adapter when you use the system until the battery is easily accessible. ! Allow the 6 to10 hours to pass even if the indicator light changes from ...
...the following figure). 1-10 Getting Started Follow these precautions whenever you : ! You must repeat this full 10-hour charge cycle only if the battery becomes fully discharged. Insert the plug on the AC adapter cable into the AC power port on AC power. ! Connecting the AC Adapter In ...: ! Before using the system for the first time, charge the MobilePro continuously for the first time, NEC Solutions America recommends using the AC adapter when you use the system until the battery is easily accessible. ! Allow the 6 to10 hours to pass even if the indicator light changes from ...

User Guide
Page 19
Connect the AC adapter to a working AC outlet. 3. The MobilePro features instant-on the go, ensures that the battery maintains its charge, and helps prevent data loss. Display Panel Latch Note Using AC power saves battery life when you are on power. If the system does not power on, press the Power button at the top right corner of the keyboard. Connecting the AC adapter A - AC Adapter Cable 2. AC Power Port B - Getting Started 1-11 Open the MobilePro display panel. Opening the display panel A -
Connect the AC adapter to a working AC outlet. 3. The MobilePro features instant-on the go, ensures that the battery maintains its charge, and helps prevent data loss. Display Panel Latch Note Using AC power saves battery life when you are on power. If the system does not power on, press the Power button at the top right corner of the keyboard. Connecting the AC adapter A - AC Adapter Cable 2. AC Power Port B - Getting Started 1-11 Open the MobilePro display panel. Opening the display panel A -

User Guide
Page 20
...calibrate the touch screen. For details, see "Adjusting MobilePro Settings" in Chapter 4. 1-12 Getting Started NEC Solutions America recommends that you wait ten seconds after the light turns green. Open the display panel ...to start automatically. 2. Press the Power button if the system does not start your MobilePro 900 for modem use. Note Before using the system for the first time, allow ten hours for ...Enter your name, local city, and set the clock for your system for the main battery to AC power after powering off before the full ten hours have connected the AC ...
...calibrate the touch screen. For details, see "Adjusting MobilePro Settings" in Chapter 4. 1-12 Getting Started NEC Solutions America recommends that you wait ten seconds after the light turns green. Open the display panel ...to start automatically. 2. Press the Power button if the system does not start your MobilePro 900 for modem use. Note Before using the system for the first time, allow ten hours for ...Enter your name, local city, and set the clock for your system for the main battery to AC power after powering off before the full ten hours have connected the AC ...

User Guide
Page 46
Display Panel C - Microphone J - Battery Charging LED I - CF Card Eject Button 2-2 Introducing the MobilePro front features A - MobilePro 900 - Earphone Microphone Jack K - Stylus D - Notification LED H - CF Card Slot L - Identifying System Features The NEC MobilePro 900 is compact with the features on every side. The next few sections provide figures and feature descriptions. Around the Front of the...
Display Panel C - Microphone J - Battery Charging LED I - CF Card Eject Button 2-2 Introducing the MobilePro front features A - MobilePro 900 - Earphone Microphone Jack K - Stylus D - Notification LED H - CF Card Slot L - Identifying System Features The NEC MobilePro 900 is compact with the features on every side. The next few sections provide figures and feature descriptions. Around the Front of the...

User Guide
Page 47
... screen that you eject an installed CF card. See "Making Display Panel Adjustments," in touch screen) - Suspend Switch - Lights amber when the battery is fully charged. ! Lets you record your voice. ! Display Panel Latch - Indicates the status of appointments, pages, etc. ! Lights green when the... battery is charging. - Lets you install one Type II CF card. ! Earphone Microphone Jack - CF Card Eject Button - You can adjust for the...
... screen that you eject an installed CF card. See "Making Display Panel Adjustments," in touch screen) - Suspend Switch - Lights amber when the battery is fully charged. ! Lets you record your voice. ! Display Panel Latch - Indicates the status of appointments, pages, etc. ! Lights green when the... battery is charging. - Lets you install one Type II CF card. ! Earphone Microphone Jack - CF Card Eject Button - You can adjust for the...

User Guide
Page 48
Around the Back of the System The back of the system A - Features on the back of the NEC MobilePro offers the features shown in the following figure. Allows the MobilePro to the MobilePro when you are described after the figure. Infrared Port B - Features are away from an AC power source. 2-4 Introducing the MobilePro Main Battery Pack ! Provides battery power to communicate without cables with similarly equipped devices, including other MobilePros. ! Infrared (IrDA) Port - Main Battery Pack -
Around the Back of the System The back of the system A - Features on the back of the NEC MobilePro offers the features shown in the following figure. Allows the MobilePro to the MobilePro when you are described after the figure. Infrared Port B - Features are away from an AC power source. 2-4 Introducing the MobilePro Main Battery Pack ! Provides battery power to communicate without cables with similarly equipped devices, including other MobilePros. ! Infrared (IrDA) Port - Main Battery Pack -

User Guide
Page 51
... is in the unlocked position. Battery Release Button - Provides access to install the backup battery. See "Installing the Backup Battery" in the following figure. Battery Lock Button B - Backup Battery Cover Screw - Battery Release Button E - Around the Bottom of the System The bottom of the system A - Features on the bottom of the NEC MobilePro offers the features shown...
... is in the unlocked position. Battery Release Button - Provides access to install the backup battery. See "Installing the Backup Battery" in the following figure. Battery Lock Button B - Backup Battery Cover Screw - Battery Release Button E - Around the Bottom of the System The bottom of the system A - Features on the bottom of the NEC MobilePro offers the features shown...

User Guide
Page 54
... icon in the control panel. The MobilePro also contains an internal data backup battery whenever the unit is fully charged. The icon on the taskbar, if present. ! Using Power Sources The MobilePro 900 can determine battery status by using the power icon on the lower right-hand side of the... following sections for 6 to10 hours to an AC power source. You must repeat this full 10-hour charge cycle only if the battery becomes fully discharged.
... icon in the control panel. The MobilePro also contains an internal data backup battery whenever the unit is fully charged. The icon on the taskbar, if present. ! Using Power Sources The MobilePro 900 can determine battery status by using the power icon on the lower right-hand side of the... following sections for 6 to10 hours to an AC power source. You must repeat this full 10-hour charge cycle only if the battery becomes fully discharged.