
42XM5/50XM6/60XM5 UM
Page 4
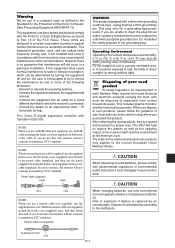
...Operating Environment Operating environment temperature and humidity: 0 °C to +40 °C (+32 °F to the current European Union Member States. Remote cable (not supplied) WARNING This product equipped with Canadian ICES-003. This effort will not conform to mandatory FCC standards. Risk of explosion ... (not supplied) around the ferrite core (supplied) once, and then fasten the catch. If you use a remote cable (not supplied), use the supplied ferrite core. To plasma monitor core En-3 Warning Not for use in a computer room as defined in the Standard for a Class B digital...
...Operating Environment Operating environment temperature and humidity: 0 °C to +40 °C (+32 °F to the current European Union Member States. Remote cable (not supplied) WARNING This product equipped with Canadian ICES-003. This effort will not conform to mandatory FCC standards. Risk of explosion ... (not supplied) around the ferrite core (supplied) once, and then fasten the catch. If you use a remote cable (not supplied), use the supplied ferrite core. To plasma monitor core En-3 Warning Not for use in a computer room as defined in the Standard for a Class B digital...

42XM5/50XM6/60XM5 UM
Page 5
... En-42 Adjusting the picture En-21 Setting the picture mode according to the brightness of the room En-21 Specifications En-46 Limited Warranty Plasma Monitors En-49 Reducing noise in portrait mode ..... En-25 Options • Wall mount unit Setting the Input Skip En-25 • Ceiling ...;2), bands for power Picture Adj and Underscan En-23 Option1 Settings Menu En-24 Setting the on mode En-32 Enabling/disabling the front panel controls En-32 Enabling/disabling remote control wireless transmission En-33 Front View En-8 Loop Out setting En-33 Rear View/ Terminal Board En...
... En-42 Adjusting the picture En-21 Setting the picture mode according to the brightness of the room En-21 Specifications En-46 Limited Warranty Plasma Monitors En-49 Reducing noise in portrait mode ..... En-25 Options • Wall mount unit Setting the Input Skip En-25 • Ceiling ...;2), bands for power Picture Adj and Underscan En-23 Option1 Settings Menu En-24 Setting the on mode En-32 Enabling/disabling the front panel controls En-32 Enabling/disabling remote control wireless transmission En-33 Front View En-8 Loop Out setting En-33 Rear View/ Terminal Board En...

42XM5/50XM6/60XM5 UM
Page 7
...or left. Use a distribution amplifier (any commercially available cable). • If the image quality is poor, do not connect an OUTPUT signal from plasma to plasma, a 1 m to 2 m (3.3 feet to 6.6 feet) 15 pin male D-Sub - 5BNC conversion cable is required. En-6 LOOP OUT can...;3, 4ן4, 5ן5, 5ן1, 1ן5) video wall. • Connect signal cables and remote cables as a video wall function, maximaly 4-screen is rough-standard with lower than 1024ן768, 60 Hz signal. • ...
...or left. Use a distribution amplifier (any commercially available cable). • If the image quality is poor, do not connect an OUTPUT signal from plasma to plasma, a 1 m to 2 m (3.3 feet to 6.6 feet) 15 pin male D-Sub - 5BNC conversion cable is required. En-6 LOOP OUT can...;3, 4ן4, 5ן5, 5ן1, 1ן5) video wall. • Connect signal cables and remote cables as a video wall function, maximaly 4-screen is rough-standard with lower than 1024ן768, 60 Hz signal. • ...
42XM5/50XM6/60XM5 UM
Page 8
... polarity. 1.Press and open the cover. Insert the 2 "AAA" batteries, making sure to the indications of the screen when facing the plasma from the front when installing. • After installing, make sure the NEC logo is used, the remote control can be purchased separately. En-7 MENU/ ENTER VOLUME DOWN UP LEFT/ - If the...
... polarity. 1.Press and open the cover. Insert the 2 "AAA" batteries, making sure to the indications of the screen when facing the plasma from the front when installing. • After installing, make sure the NEC logo is used, the remote control can be purchased separately. En-7 MENU/ ENTER VOLUME DOWN UP LEFT/ - If the...
42XM5/50XM6/60XM5 UM
Page 9
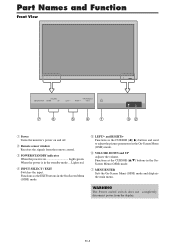
...4 1 32 q Power Turns the monitor's power on Lights green. When the power is on and off switch does not completely disconnect power from the remote control. Lights red. Functions as the EXIT buttons in the standby mode ... e POWER/STANDBY indicator When the power is in the On-Screen Menu (OSM... in the OnScreen Menu (OSM) mode. y VOLUME DOWN and UP Adjusts the volume. WARNING The Power on/off . En-8 t LEFT/- w Remote sensor window Receives the signals from the display. INPUT SELECT RIGHT/ + / EXIT MENU/ ENTER VOLUME DOWN UP LEFT/ - Part Names and Function ...
...4 1 32 q Power Turns the monitor's power on Lights green. When the power is on and off switch does not completely disconnect power from the remote control. Lights red. Functions as the EXIT buttons in the standby mode ... e POWER/STANDBY indicator When the power is in the On-Screen Menu (OSM... in the OnScreen Menu (OSM) mode. y VOLUME DOWN and UP Adjusts the volume. WARNING The Power on/off . En-8 t LEFT/- w Remote sensor window Receives the signals from the display. INPUT SELECT RIGHT/ + / EXIT MENU/ ENTER VOLUME DOWN UP LEFT/ - Part Names and Function ...
42XM5/50XM6/60XM5 UM
Page 10
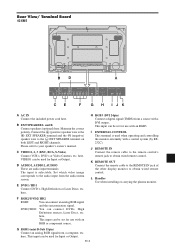
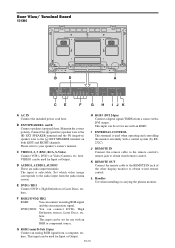
...controlling the monitor externally with an RGB3. This input can be set for use with a DVI output. J REMOTE IN Connect the remote cable to the remote control's remote jack to obtain wired remote control. H RGB3 (DVI 24pin) Connect a digital signal (TMDS) from a source with an RGB or ...component source. L Handles Use when installing or carrying the plasma monitor. This input can be set for use with a ...
...controlling the monitor externally with an RGB3. This input can be set for use with a DVI output. J REMOTE IN Connect the remote cable to the remote control's remote jack to obtain wired remote control. H RGB3 (DVI 24pin) Connect a digital signal (TMDS) from a source with an RGB or ...component source. L Handles Use when installing or carrying the plasma monitor. This input can be set for use with a ...
42XM5/50XM6/60XM5 UM
Page 11
... here. G RGB1 (mini D-Sub 15pin) Connect an analog RGB signal from the audio menu screen. here. Please refer to obtain wired remote control. DVD2/ HD2: You can connect an analog RGB signal and the syncronization signal. The input is used when operating and controlling the...polarity. here. Set which video image corresponds to the EXT SPEAKER terminal on both LEFT and RIGHT channels. L Handles Use when installing or carrying the plasma monitor. En-10 D AUDIO1, AUDIO2, AUDIO3 These are audio input terminals. F RGB2/ DVD2/ HD2 RGB2: You can connect DVDs, High Definition...
... here. G RGB1 (mini D-Sub 15pin) Connect an analog RGB signal from the audio menu screen. here. Please refer to obtain wired remote control. DVD2/ HD2: You can connect an analog RGB signal and the syncronization signal. The input is used when operating and controlling the...polarity. here. Set which video image corresponds to the EXT SPEAKER terminal on both LEFT and RIGHT channels. L Handles Use when installing or carrying the plasma monitor. En-10 D AUDIO1, AUDIO2, AUDIO3 These are audio input terminals. F RGB2/ DVD2/ HD2 RGB2: You can connect DVDs, High Definition...

42XM5/50XM6/60XM5 UM
Page 12
... with a control system (by RS232C). This input can be set for use with an RGB3. L Handles Use when installing or carrying the plasma monitor. This input can be set for use with an RGB or component source. here. Connect the (positive) speaker wire to the EXT ...R Connect speakers (optional) here. Please refer to the EXT SPEAKER terminal on both LEFT and RIGHT channels. J REMOTE IN Connect the remote cable to the remote control's remote jack to obtain wired remote control. VIDEO1 can connect an analog RGB signal and the syncronization signal. E DVD1 / HD1 Connect DVD's, High ...
... with a control system (by RS232C). This input can be set for use with an RGB3. L Handles Use when installing or carrying the plasma monitor. This input can be set for use with an RGB or component source. here. Connect the (positive) speaker wire to the EXT ...R Connect speakers (optional) here. Please refer to the EXT SPEAKER terminal on both LEFT and RIGHT channels. J REMOTE IN Connect the remote cable to the remote control's remote jack to obtain wired remote control. VIDEO1 can connect an analog RGB signal and the syncronization signal. E DVD1 / HD1 Connect DVD's, High ...
42XM5/50XM6/60XM5 UM
Page 13
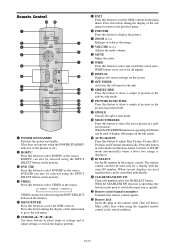
...or settings and to exit the OSM controls in the side-by the ID SELECT button. Press this button during the display of the plasma is operating, this button can also be selected using the INPUT SELECT button on the monitor. u EXIT Press this button to adjust settings... or switch the display patterns. i POINTER Press this button to access the OSM controls. The remote control can also be controlled individually. @1 CLEAR/SEAMLESS SW Clears the number set by -side mode. !6 PICTURE IN PICTURE Press this button to show...
...or settings and to exit the OSM controls in the side-by the ID SELECT button. Press this button during the display of the plasma is operating, this button can also be selected using the INPUT SELECT button on the monitor. u EXIT Press this button to adjust settings... or switch the display patterns. i POINTER Press this button to access the OSM controls. The remote control can also be controlled individually. @1 CLEAR/SEAMLESS SW Clears the number set by -side mode. !6 PICTURE IN PICTURE Press this button to show...

42XM5/50XM6/60XM5 UM
Page 14
... is off timer: 1. Press the POINTER button to the desired level. AUTO ADJUST To adjust the size or quality of time, turn on the remote control or the unit) to decrease to delete the pointer. OFF TIMER 28 To cancel the off .) Press the POINTER button to display the pointer...3. The remaining time is turned off with the off the unit. Basic Operations POWER To turn off timer ... Press the POWER ON button (on the remote control to resemble a magnifying glass. ( ) A press of the picture: Press the ZOOM+ button and enlarge the picture. Press the POWER STANDBYbutton (on the...
... is off timer: 1. Press the POINTER button to the desired level. AUTO ADJUST To adjust the size or quality of time, turn on the remote control or the unit) to decrease to delete the pointer. OFF TIMER 28 To cancel the off .) Press the POINTER button to display the pointer...3. The remaining time is turned off with the off the unit. Basic Operations POWER To turn off timer ... Press the POWER ON button (on the remote control to resemble a magnifying glass. ( ) A press of the picture: Press the ZOOM+ button and enlarge the picture. Press the POWER STANDBYbutton (on the...
42XM5/50XM6/60XM5 UM
Page 15
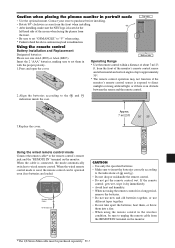
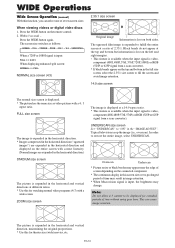
... direction.) STADIUM size screen The picture is expanded in the horizontal and vertical directions at the top and bottom but information is lost on the remote control. 2.
... direction.) STADIUM size screen The picture is expanded in the horizontal and vertical directions at the top and bottom but information is lost on the remote control. 2.
42XM5/50XM6/60XM5 UM
Page 16
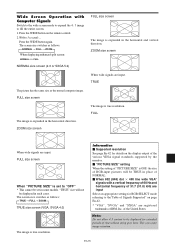
... En-42. * "VGA", "SVGA" and "SXGA" are registered trademarks of IBM, Inc. ZOOM size screen The image is true resolution. of Signals Supported" on the remote control. 2. En-15 FULL size screen When "PICTURE SIZE" is expanded in the horizontal direction. Wide Screen Operation with a vertical frequency of 60 Hz and...
... En-42. * "VGA", "SVGA" and "SXGA" are registered trademarks of IBM, Inc. ZOOM size screen The image is true resolution. of Signals Supported" on the remote control. 2. En-15 FULL size screen When "PICTURE SIZE" is expanded in the horizontal direction. Wide Screen Operation with a vertical frequency of 60 Hz and...

42XM5/50XM6/60XM5 UM
Page 19
.... Repeat steps 2 - 5 to adjust an additional item, or press the EXIT button on the remote control to return to the main menu. * When adjusting using the cursor buttons ᮤ ᮣ on the remote control to use the menus and the selected items. 1. MENU/ENTER OK EXIT EXIT The following describes... differently. Adjust the level or change is made. 6. Press the cursor buttons L M on the remote control to highlight the menu you wish to the screen as shown on the diagram. * Depending on the remote control to "ON" in the main menu (1/2), full menu items will be shown. MENU/ENTER OK...
.... Repeat steps 2 - 5 to adjust an additional item, or press the EXIT button on the remote control to return to the main menu. * When adjusting using the cursor buttons ᮤ ᮣ on the remote control to use the menus and the selected items. 1. MENU/ENTER OK EXIT EXIT The following describes... differently. Adjust the level or change is made. 6. Press the cursor buttons L M on the remote control to highlight the menu you wish to the screen as shown on the diagram. * Depending on the remote control to "ON" in the main menu (1/2), full menu items will be shown. MENU/ENTER OK...
42XM5/50XM6/60XM5 UM
Page 21
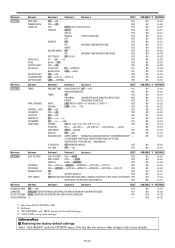
...;→TOP RGT←→TOP LFT YES OFF YES ON SELECT1/SELECT2 YES OFF/BOTTOM-1/BOTTOM-2/BOTTOM-3/MID. ON MODE CONTROL LOCK IR REMOTE LOOP OUT REMOTE ID ID NUMBER VIDEO WALL Sub menu 2 Sub menu 3 Sub menu 4 RESET PRESENT TIME DAYLIGHT SAVING TIME OFF←→ON NO DAY/HOUR...-38 NO En-38 YES En-38 YES En-38 *1 Only when AUTO PICTURE is OFF. *2 RGB only. *3 "PICTURE SIZE" and "TRUE" are only for 50 and 60 inch types. *4 "LOW TONE" is only for...
...;→TOP RGT←→TOP LFT YES OFF YES ON SELECT1/SELECT2 YES OFF/BOTTOM-1/BOTTOM-2/BOTTOM-3/MID. ON MODE CONTROL LOCK IR REMOTE LOOP OUT REMOTE ID ID NUMBER VIDEO WALL Sub menu 2 Sub menu 3 Sub menu 4 RESET PRESENT TIME DAYLIGHT SAVING TIME OFF←→ON NO DAY/HOUR...-38 NO En-38 YES En-38 YES En-38 *1 Only when AUTO PICTURE is OFF. *2 RGB only. *3 "PICTURE SIZE" and "TRUE" are only for 50 and 60 inch types. *4 "LOW TONE" is only for...
42XM5/50XM6/60XM5 UM
Page 24
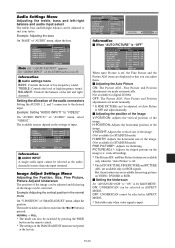
...; Audio settings menu BASS: Controls the level of "AUDIO" menu, adjust the bass. OFF: UNDERSCAN cannot be switched by pressing the WIDE button on the remote control. * The settings on the image (i.e. BALANCE: Controls the balance of the left /right balance can also be selected in the normal mode On "V-POSITION...
...; Audio settings menu BASS: Controls the level of "AUDIO" menu, adjust the bass. OFF: UNDERSCAN cannot be switched by pressing the WIDE button on the remote control. * The settings on the image (i.e. BALANCE: Controls the balance of the left /right balance can also be selected in the normal mode On "V-POSITION...
42XM5/50XM6/60XM5 UM
Page 25
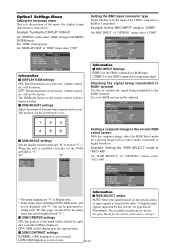
..." menu, select "852ן480". EXIT RETURN Information Ⅵ DISPLAY OSM settings ON: The informations on the screen. The DISPLAY button on the remote control will not function either. Ⅵ OSM ADJUST settings Adjusts the position of the menu will be shown. On "BNC INPUT" of "OSM" menu, select...
..." menu, select "852ן480". EXIT RETURN Information Ⅵ DISPLAY OSM settings ON: The informations on the screen. The DISPLAY button on the remote control will not function either. Ⅵ OSM ADJUST settings Adjusts the position of the menu will be shown. On "BNC INPUT" of "OSM" menu, select...

42XM5/50XM6/60XM5 UM
Page 33
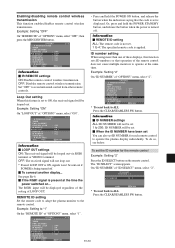
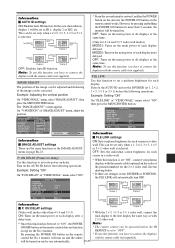
...SETTING MULTI MODE : BOTTOM LEFT INPUT MODE MAIN : DVD/HD1 SUB : VIDEO1 PWR. ADJ. ON MODE CONTROL LOCK : ON IR REMOTE : ON LOOP OUT : OFF REMOTE ID : ALL ID NUMBER : ALL VIDEO WALL NEXT PAGE SEL. Time range is from 1 minute to 24 hours. WORK TIME: Set... RETURN 3 / 4 Information Ⅵ CONTROL LOCK settings ON: Disables the buttons on . Timer 2-Timer1-Timer2. * This becomes effective when the on the front panel. * Even when the CONTROL LOCK is from "SINGLE", "S BY S1~3" and "PICTURE IN PICTURE (BTM LFT~TOP LFT)". EXIT RETURN * Set the DIVIDER ...
...SETTING MULTI MODE : BOTTOM LEFT INPUT MODE MAIN : DVD/HD1 SUB : VIDEO1 PWR. ADJ. ON MODE CONTROL LOCK : ON IR REMOTE : ON LOOP OUT : OFF REMOTE ID : ALL ID NUMBER : ALL VIDEO WALL NEXT PAGE SEL. Time range is from 1 minute to 24 hours. WORK TIME: Set... RETURN 3 / 4 Information Ⅵ CONTROL LOCK settings ON: Disables the buttons on . Timer 2-Timer1-Timer2. * This becomes effective when the on the front panel. * Even when the CONTROL LOCK is from "SINGLE", "S BY S1~3" and "PICTURE IN PICTURE (BTM LFT~TOP LFT)". EXIT RETURN * Set the DIVIDER ...
42XM5/50XM6/60XM5 UM
Page 34
... MODE CONTROL LOCK : OFF IR REMOTE : ON LOOP OUT : OFF REMOTE ID : ALL ID NUMBER : 2 VIDEO WALL NEXT PAGE SEL. ADJ. REMOTE ID setting Set the remote code to adapt the plasma monitor to avoid unwanted control from other remote controls. ON MODE CONTROL LOCK : OFF IR REMOTE : OFF LOOP OUT : OFF REMOTE ID : ALL ID NUMBER : ALL...
... MODE CONTROL LOCK : OFF IR REMOTE : ON LOOP OUT : OFF REMOTE ID : ALL ID NUMBER : 2 VIDEO WALL NEXT PAGE SEL. ADJ. REMOTE ID setting Set the remote code to adapt the plasma monitor to avoid unwanted control from other remote controls. ON MODE CONTROL LOCK : OFF IR REMOTE : OFF LOOP OUT : OFF REMOTE ID : ALL ID NUMBER : ALL...
42XM5/50XM6/60XM5 UM
Page 36
...Ⅵ AUTO ID settings ON: Enables Auto ID function. REMOTE IN No.1 No.2 No.4 No.3 Display 1 REMOTE OUT REMOTE IN No.1 No.2 No.4 No.3 Display 2 REMOTE OUT REMOTE OUT No.1 No.2 No.4 No.3 Display 4 REMOTE OUT REMOTE IN No.1 No.2 No.4 No.3 REMOTE IN Display 3 OFF: Disables Auto ID function. ADJ. ...8235;ן2, 3ן3, 1ן5 or 5ן1 is set to set "ON", connect your plasma displays with the remote cable (not supplied). * From the second monitor onward, neither the POWER button on the unit nor the POWER ON button on ...
...Ⅵ AUTO ID settings ON: Enables Auto ID function. REMOTE IN No.1 No.2 No.4 No.3 Display 1 REMOTE OUT REMOTE IN No.1 No.2 No.4 No.3 Display 2 REMOTE OUT REMOTE OUT No.1 No.2 No.4 No.3 Display 4 REMOTE OUT REMOTE IN No.1 No.2 No.4 No.3 REMOTE IN Display 3 OFF: Disables Auto ID function. ADJ. ...8235;ן2, 3ן3, 1ן5 or 5ן1 is set to set "ON", connect your plasma displays with the remote cable (not supplied). * From the second monitor onward, neither the POWER button on the unit nor the POWER ON button on ...
42XM5/50XM6/60XM5 UM
Page 41
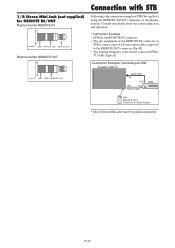
...-40). • The transmit frequency of the remote control of STB is the connection example of STB (Set-top Box) using the REMOTE IN/OUT connectors of the plasma monitor. 1/8 Stereo Mini Jack (not supplied) for REMOTE IN/OUT Plasma monitor REMOTE IN GND DATA (DC +5 V) VDD (DC +3 V) Plasma monitor REMOTE OUT GND DATA (C-MOS DC +5 V) Connection with...
...-40). • The transmit frequency of the remote control of STB is the connection example of STB (Set-top Box) using the REMOTE IN/OUT connectors of the plasma monitor. 1/8 Stereo Mini Jack (not supplied) for REMOTE IN/OUT Plasma monitor REMOTE IN GND DATA (DC +5 V) VDD (DC +3 V) Plasma monitor REMOTE OUT GND DATA (C-MOS DC +5 V) Connection with...


