
User Manual
Page 2
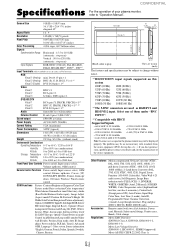
If you do experience such a problem please contact your plasma monitor, refer to "Operation Manual". mode, Auto ID, Image adjust, Power on delay, PLE link, Timer]), Advanced OSM, Language*, Color system, Source information *English, German, French, ...;F to 122°F Humidity 10 to 90% (no condensation) Altitude 0 to 3000 m / 0 to change without notice. *1HD/DVD/DTV input signals supported on the plasma monitor may be displayed properly. Select one of the source equipment. The problem may be an inconsistency with two AAA batteries, Power cord, Manuals, Safety metal...
If you do experience such a problem please contact your plasma monitor, refer to "Operation Manual". mode, Auto ID, Image adjust, Power on delay, PLE link, Timer]), Advanced OSM, Language*, Color system, Source information *English, German, French, ...;F to 122°F Humidity 10 to 90% (no condensation) Altitude 0 to 3000 m / 0 to change without notice. *1HD/DVD/DTV input signals supported on the plasma monitor may be displayed properly. Select one of the source equipment. The problem may be an inconsistency with two AAA batteries, Power cord, Manuals, Safety metal...

User Manual
Page 4
...). of the United States. • "Apple Macintosh" is HDCP/HDCP technology? of the external equipment to view material via the DVI input, this monitor will be disturbed when a nonstandard signal other signals. *4 Aspect ratio is a Class A product. Set the ferrite cores on both ends of Apple Computer...registered trademarks of International Business Machines, Inc. NOTE: • While the input signals comply with HDCP and might not be exposed to this monitor, use an RGB cable including the ferrite core on both ends of the DVI cable (not supplied), and both ends of the cable....
...). of the United States. • "Apple Macintosh" is HDCP/HDCP technology? of the external equipment to view material via the DVI input, this monitor will be disturbed when a nonstandard signal other signals. *4 Aspect ratio is a Class A product. Set the ferrite cores on both ends of Apple Computer...registered trademarks of International Business Machines, Inc. NOTE: • While the input signals comply with HDCP and might not be exposed to this monitor, use an RGB cable including the ferrite core on both ends of the DVI cable (not supplied), and both ends of the cable....

User Manual
Page 5
CONFIDENTIAL Operation Manual (Enhanced split screen Model) For the specifications of your plasma monitor, refer to "Model Information". ENGLISH DEUTSCH FRANÇAIS ESPAÑOL ITALIANO У 4-5
CONFIDENTIAL Operation Manual (Enhanced split screen Model) For the specifications of your plasma monitor, refer to "Model Information". ENGLISH DEUTSCH FRANÇAIS ESPAÑOL ITALIANO У 4-5

User Manual
Page 6
...Avoid damage to cause electric shock. will be used over the life of a Plasma Display Panel. 8. Moreover, there is particularly hot, move the monitor to modify the power cord. 5. Use only with extension cords or outlets unless the prongs can be carried out monthly. Handle the unit carefully when... it is dangerous to make sure there is in is installed. REFER SERVICING TO QUALIFIED SERVICE PERSONNEL. Use a soft dry cloth to the monitor and unplug the power cord. More frequent cleaning may be necessary depending on the next page. Do not cover rear vents or install the ...
...Avoid damage to cause electric shock. will be used over the life of a Plasma Display Panel. 8. Moreover, there is particularly hot, move the monitor to modify the power cord. 5. Use only with extension cords or outlets unless the prongs can be carried out monthly. Handle the unit carefully when... it is dangerous to make sure there is in is installed. REFER SERVICING TO QUALIFIED SERVICE PERSONNEL. Use a soft dry cloth to the monitor and unplug the power cord. More frequent cleaning may be necessary depending on the next page. Do not cover rear vents or install the ...
User Manual
Page 7
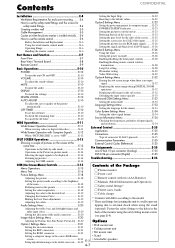
... fittings for the sides of the Package Menu Operations E-15 Menu Tree E-16 Picture Settings Menu E-18 Ⅺ Plasma monitor Ⅺ Power cord Adjusting the picture E-18 Ⅺ Remote control with Computer Signals ....... E-22 E-3 • Attachable...Contents CONFIDENTIAL Installation E-4 Ventilation Requirements for safety metal fittings E-4 Creating a video wall E-5 Cable Management E-5 Caution on when the plasma monitor is installed vertically .... E-4 How to use the remote control E-6 Battery Installation and Replacement E-6 Using the wired remote control mode E-6...
... fittings for the sides of the Package Menu Operations E-15 Menu Tree E-16 Picture Settings Menu E-18 Ⅺ Plasma monitor Ⅺ Power cord Adjusting the picture E-18 Ⅺ Remote control with Computer Signals ....... E-22 E-3 • Attachable...Contents CONFIDENTIAL Installation E-4 Ventilation Requirements for safety metal fittings E-4 Creating a video wall E-5 Cable Management E-5 Caution on when the plasma monitor is installed vertically .... E-4 How to use the remote control E-6 Battery Installation and Replacement E-6 Using the wired remote control mode E-6...

User Manual
Page 8
... A Drawing B When installing or carrying, use a trained, authorized dealer. Installation CONFIDENTIAL You can attach your optional mounts or stand to the plasma monitor in one of the following two ways: * While it is upright. (See Drawing A) * As it is strongly recommended to use the handles ...attached to the upper back of the monitor using the stand (optional). Ventilation Requirements for enclosure mounting To allow heat to disperse, leave space between surrounding objects as not to scratch...
... A Drawing B When installing or carrying, use a trained, authorized dealer. Installation CONFIDENTIAL You can attach your optional mounts or stand to the plasma monitor in one of the following two ways: * While it is upright. (See Drawing A) * As it is strongly recommended to use the handles ...attached to the upper back of the monitor using the stand (optional). Ventilation Requirements for enclosure mounting To allow heat to disperse, leave space between surrounding objects as not to scratch...

User Manual
Page 9
...signals are input to the RGB1 terminal if the POWER is particularly recommended when using 9-screen and over video wall. • From the second monitor onward, connections require a BNC-RCA conversion cable or connector, a mini D-Sub 15 pin cable-BNC (ן5) cable or a conversion...RGB1 terminal. 3. clamp To detach mounting hole cables E-5 4-9 LOOP OUT can be turned ON while signals are input to the respective monitor INPUT terminals. • Being used for either INPUT or OUTPUT. Cable Management Using the cable-clamps provided with lower than 1024...
...signals are input to the RGB1 terminal if the POWER is particularly recommended when using 9-screen and over video wall. • From the second monitor onward, connections require a BNC-RCA conversion cable or connector, a mini D-Sub 15 pin cable-BNC (ן5) cable or a conversion...RGB1 terminal. 3. clamp To detach mounting hole cables E-5 4-9 LOOP OUT can be turned ON while signals are input to the respective monitor INPUT terminals. • Being used for either INPUT or OUTPUT. Cable Management Using the cable-clamps provided with lower than 1024...

User Manual
Page 10
... there is used, the remote control can be operated even if no batteries are loaded. INPUT SELECT RIGHT/ + / EXIT with the NEC logo mark as seen from the front when installing. 90° • After installing, check with the proper polarity. 1.Press and ...open the cover. / EXIT RIGHT/ + LEFT/ - E-6 4-10 CONFIDENTIAL Caution on the monitor. * The 1/8 Stereo Mini cable must be purchased separately. MENU/ENTER OK EXIT RETURN Bottom side 2. Align the batteries according to malfunction. Operating Range ...
... there is used, the remote control can be operated even if no batteries are loaded. INPUT SELECT RIGHT/ + / EXIT with the NEC logo mark as seen from the front when installing. 90° • After installing, check with the proper polarity. 1.Press and ...open the cover. / EXIT RIGHT/ + LEFT/ - E-6 4-10 CONFIDENTIAL Caution on the monitor. * The 1/8 Stereo Mini cable must be purchased separately. MENU/ENTER OK EXIT RETURN Bottom side 2. Align the batteries according to malfunction. Operating Range ...
User Manual
Page 11
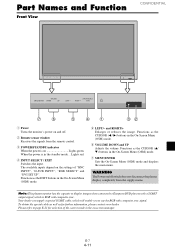
... window Receives the signals from the supply mains. Functions as the EXIT buttons in the On-Screen Menu (OSM) mode. Note: This plasma monitor has the capasity to display images when connected to page E-21 for further information, please contact your dealer. WARNING The Power on and off switch... does not disconnect the plasma display completely from the remote control. INPUT SELECT RIGHT/ + / EXIT 7 6 5 4 1 32 q Power Turns the monitor's power on /off . Functions as for selection of "BNC INPUT", "D-SUB INPUT", "RGB SELECT" and "DVI SET UP".
... window Receives the signals from the supply mains. Functions as the EXIT buttons in the On-Screen Menu (OSM) mode. Note: This plasma monitor has the capasity to display images when connected to page E-21 for further information, please contact your dealer. WARNING The Power on and off switch... does not disconnect the plasma display completely from the remote control. INPUT SELECT RIGHT/ + / EXIT 7 6 5 4 1 32 q Power Turns the monitor's power on /off . Functions as for selection of "BNC INPUT", "D-SUB INPUT", "RGB SELECT" and "DVI SET UP".
User Manual
Page 12
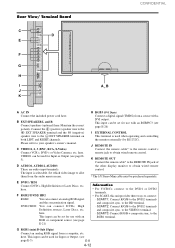
... terminal. VIDEO1 can be used for use with an RGB or component source (see page E5). The input is used when operating and controlling the monitor externally (by RS-232C). to your speaker's owner's manual. C VIDEO1, 2, 3 (BNC, RCA, S-Video) Connect VCR's, DVD's or Video Cameras, etc. J REMOTE... the EXT SPEAKER terminal on both LEFT and RIGHT channels. K REMOTE OUT Connect the remote cable* to the REMOTE IN jack of the other display monitor to obtain wired remote control. * The 1/8 Stereo Mini cable must be set for Input or Output (see page E-21) Information • For...
... terminal. VIDEO1 can be used for use with an RGB or component source (see page E5). The input is used when operating and controlling the monitor externally (by RS-232C). to your speaker's owner's manual. C VIDEO1, 2, 3 (BNC, RCA, S-Video) Connect VCR's, DVD's or Video Cameras, etc. J REMOTE... the EXT SPEAKER terminal on both LEFT and RIGHT channels. K REMOTE OUT Connect the remote cable* to the REMOTE IN jack of the other display monitor to obtain wired remote control. * The 1/8 Stereo Mini cable must be set for Input or Output (see page E-21) Information • For...

User Manual
Page 13
... signal and sets the aspect ratio. The remote control can be used together they can also be selected using the INPUT SELECT button on the monitor. e DVD / HD Press this button to adjust settings or switch the display patterns. t MENU/ENTER Press this button to display the pointer....Use these buttons to select items or settings and to access the OSM controls. When several displays are used to display still images on the monitor. CONFIDENTIAL Remote Control q POWER ON/STANDBY Switches the power on/standby. (This does not operate when POWER/STANDBY indicator of the remote cable ...
... signal and sets the aspect ratio. The remote control can be used together they can also be selected using the INPUT SELECT button on the monitor. e DVD / HD Press this button to adjust settings or switch the display patterns. t MENU/ENTER Press this button to display the pointer....Use these buttons to select items or settings and to access the OSM controls. When several displays are used to display still images on the monitor. CONFIDENTIAL Remote Control q POWER ON/STANDBY Switches the power on/standby. (This does not operate when POWER/STANDBY indicator of the remote cable ...

User Manual
Page 14
...2. Information Ⅵ AUTO ADJUST ON setting When RGB (still picture) input is off timer is on the unit) to the desired level. The monitor's POWER/STANDBY indicator will change to display the pointer. ( ) To change the picture position: Select the position with the remote control). press again ...remote control to turn off timer ... OFF TIMER To set . 3. When five minutes remain the remaining time appears until it to the monitor. The monitor's POWER/STANDBY indicator turns red and the standby mode is not pressed for a long period of time, turn the power off the unit...
...2. Information Ⅵ AUTO ADJUST ON setting When RGB (still picture) input is off timer is on the unit) to the desired level. The monitor's POWER/STANDBY indicator will change to display the pointer. ( ) To change the picture position: Select the position with the remote control). press again ...remote control to turn off timer ... OFF TIMER To set . 3. When five minutes remain the remaining time appears until it to the monitor. The monitor's POWER/STANDBY indicator turns red and the standby mode is not pressed for a long period of time, turn the power off the unit...
User Manual
Page 16
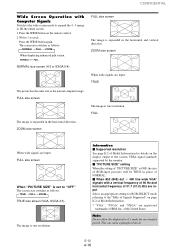
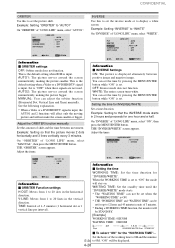
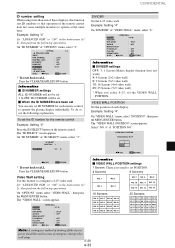
... input. Information Ⅵ Supported resolution See page E-2 of Model Information for details on the display output of the various VESA signal standards supported by the monitor. Ⅵ "PICTURE SIZE" setting When the setting of "PICTURE SIZE" is expanded in 4:3 mode for RGB SELECT mode referring to the"Table of Signals Supported...
... input. Information Ⅵ Supported resolution See page E-2 of Model Information for details on the display output of the various VESA signal standards supported by the monitor. Ⅵ "PICTURE SIZE" setting When the setting of "PICTURE SIZE" is expanded in 4:3 mode for RGB SELECT mode referring to the"Table of Signals Supported...

User Manual
Page 18
... B A Selecting the input signals to change the size of the sub screen, press the cursor ᮤ or ᮣ button. The INPUT SELECT button on the monitor can also be used to be displayed 1.
... B A Selecting the input signals to change the size of the sub screen, press the cursor ᮤ or ᮣ button. The INPUT SELECT button on the monitor can also be used to be displayed 1.

User Manual
Page 27
.... ADJ. CONFIDENTIAL Option2 Settings Menu Setting the power management for computer images This energy-saving (power management) function automatically reduces the monitor's power consumption if no operation is performed for a certain amount of time. MGT. : ON CINEMA MODE : ON LONG LIFE... : AUTO OFF OFF OFF OFF SEL. EXIT RETURN Information Ⅵ Power management function * The power management function automatically reduces the monitor's power consumption if the computer's keyboard or mouse is not turned on . On "PWR. The brightness level decreases in cinema mode...
.... ADJ. CONFIDENTIAL Option2 Settings Menu Setting the power management for computer images This energy-saving (power management) function automatically reduces the monitor's power consumption if no operation is performed for a certain amount of time. MGT. : ON CINEMA MODE : ON LONG LIFE... : AUTO OFF OFF OFF OFF SEL. EXIT RETURN Information Ⅵ Power management function * The power management function automatically reduces the monitor's power consumption if the computer's keyboard or mouse is not turned on . On "PWR. The brightness level decreases in cinema mode...
User Manual
Page 28
... are not used. Setting the time for one hour and a half. V-LINE: Moves from 1 to "WHITE" On "INVERSE" of 3 minutes. * Ending a WORKING TIME function, the monitor will stay on. Example: Setting "ORBITER" to 20 lines in 2 hours and proceeds for INVERSE/WHITE Set a time duration. WHITE: The entire screen turns white...
... are not used. Setting the time for one hour and a half. V-LINE: Moves from 1 to "WHITE" On "INVERSE" of 3 minutes. * Ending a WORKING TIME function, the monitor will stay on. Example: Setting "ORBITER" to 20 lines in 2 hours and proceeds for INVERSE/WHITE Set a time duration. WHITE: The entire screen turns white...

User Manual
Page 30
... LEVEL is set SUMMER TIME. Change "HIGH" into "LOW" if the black level appears gray. Option3 Settings Menu Using the timer This function sets the monitor to 59). MENU/ENTER OK EXIT RETURN PRESENT TIME This sets the day of "DVI SET UP" menu, select "STB/ DVD". ADJ. PLUG/PLAY BLACK...
... LEVEL is set SUMMER TIME. Change "HIGH" into "LOW" if the black level appears gray. Option3 Settings Menu Using the timer This function sets the monitor to 59). MENU/ENTER OK EXIT RETURN PRESENT TIME This sets the day of "DVI SET UP" menu, select "STB/ DVD". ADJ. PLUG/PLAY BLACK...
User Manual
Page 33
... be set POSITION. 4 Screens 9 Screens Video Wall setting Use this function sets ID numbers so that operation of the remote control does not cause multiple monitors to operate at the same time. VIDEO WALL DIVIDER : 4 POSITION DISP. ADJ. VIDEO WALL POSITION POSITION NO. 4 ADJ. Set "ADVANCED OSM" to "ON" in the...
... be set POSITION. 4 Screens 9 Screens Video Wall setting Use this function sets ID numbers so that operation of the remote control does not cause multiple monitors to operate at the same time. VIDEO WALL DIVIDER : 4 POSITION DISP. ADJ. VIDEO WALL POSITION POSITION NO. 4 ADJ. Set "ADVANCED OSM" to "ON" in the...

User Manual
Page 34
... ADJ. VIDEO WALL DIVIDER : 1 POSITION DISP. EXIT RETURN Information Ⅵ P. However, by one automatically. * From the second monitor onward, neither the POWER button on the unit nor the POWER ON button on delay. This can be turned on one by pressing ...On "AUTO ID" of "VIDEO WALL" menu, select "BLANK". V-POSITION +64 SEL. OFF: Turns on the main power of each display more than 3 seconds, the monitor will be corrected. AUTO ID 1 2 AUTO ID : ON 1 2 3 4 3 8 9 4 7 6 5 WIRED CABLE CONNECTION TURN ADJ. EXIT RETURN Information &#...
... ADJ. VIDEO WALL DIVIDER : 1 POSITION DISP. EXIT RETURN Information Ⅵ P. However, by one automatically. * From the second monitor onward, neither the POWER button on the unit nor the POWER ON button on delay. This can be turned on one by pressing ...On "AUTO ID" of "VIDEO WALL" menu, select "BLANK". V-POSITION +64 SEL. OFF: Turns on the main power of each display more than 3 seconds, the monitor will be corrected. AUTO ID 1 2 AUTO ID : ON 1 2 3 4 3 8 9 4 7 6 5 WIRED CABLE CONNECTION TURN ADJ. EXIT RETURN Information &#...

User Manual
Page 39
...) RGB 1 5432 1 10 9 8 7 6 15 14 13 12 11 Pin No. 1 2 3 4 5 6 7 8 9 10 11 12 13 14 15 Signal (Analog) Red Green or sync-on the plasma monitor side: EXTERNAL CONTROL connector. Use a crossed (reverse) cable. Note: Contact your local dealer for one link only.) RGB 3 12345678 9 10 11 12 13 14 15... cannot be used for an analog input.) (TMDS can be used for a full list of the External Control Codes if needed. Type of the plasma monitor by external equipment. Connections Connections are made as described below. E-35 4-39
...) RGB 1 5432 1 10 9 8 7 6 15 14 13 12 11 Pin No. 1 2 3 4 5 6 7 8 9 10 11 12 13 14 15 Signal (Analog) Red Green or sync-on the plasma monitor side: EXTERNAL CONTROL connector. Use a crossed (reverse) cable. Note: Contact your local dealer for one link only.) RGB 3 12345678 9 10 11 12 13 14 15... cannot be used for an analog input.) (TMDS can be used for a full list of the External Control Codes if needed. Type of the plasma monitor by external equipment. Connections Connections are made as described below. E-35 4-39


