
User Manual
Page 2
... not disassemble the thermal carafe. • Do not place the thermal carafe in use a cracked decanter or a decanter having a loose or weakened handle. • Do not clean the decanter with hot surfaces. 10. READ ALL INSTRUCTIONS BEFORE USING THE COFFEEMAKER. 2. Use handles or knobs and do not open the lid or cover while brewing. Close adult supervision is the exact length you enjoy your MR. COFFEE® coffeemaker...
... not disassemble the thermal carafe. • Do not place the thermal carafe in use a cracked decanter or a decanter having a loose or weakened handle. • Do not clean the decanter with hot surfaces. 10. READ ALL INSTRUCTIONS BEFORE USING THE COFFEEMAKER. 2. Use handles or knobs and do not open the lid or cover while brewing. Close adult supervision is the exact length you enjoy your MR. COFFEE® coffeemaker...

User Manual
Page 3
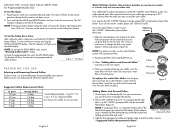
... cup of the warming plate. • Cord Storage - Carefully remove the decanter and the Pause 'n Serve feature will act upon the last operation selected if the power is restored within 10 seconds after a power outage. CLEAN YOUR COFFEEMAKER BEFORE USING THE FIRST TIME Make sure your MR. COFFEE® Coffeemaker before its first use . Just follow these simple steps: 1. DIAGRAM OF PARTS 1 Dual Water Windows 2 2 Water Reservoir 3 Filter Basket Lid 1 4 Pause 'n Serve 5 Cord Storage 6 Warming Plate (not on programmable models).Thermal models...
... cup of the warming plate. • Cord Storage - Carefully remove the decanter and the Pause 'n Serve feature will act upon the last operation selected if the power is restored within 10 seconds after a power outage. CLEAN YOUR COFFEEMAKER BEFORE USING THE FIRST TIME Make sure your MR. COFFEE® Coffeemaker before its first use . Just follow these simple steps: 1. DIAGRAM OF PARTS 1 Dual Water Windows 2 2 Water Reservoir 3 Filter Basket Lid 1 4 Pause 'n Serve 5 Cord Storage 6 Warming Plate (not on programmable models).Thermal models...
User Manual
Page 4
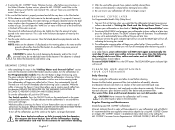
... a permanent filter. 2. English 5 Water Filtration System: (Not Included. To use . 3. Lift and open the filter basket lid. Place a MR. COFFEE® brand 10-12 cup paper basket-style filter or a MR. COFFEE® permanent filter into the removable filter basket. (Figure 3) NOTE: If using the disk for ground coffee measurement. See the "Suggested Coffee Measurement Chart". To Set the Delay Brew Time: After setting the clock, simply press and hold the HOUR and MINUTE buttons until you have programmed...
... a permanent filter. 2. English 5 Water Filtration System: (Not Included. To use . 3. Lift and open the filter basket lid. Place a MR. COFFEE® brand 10-12 cup paper basket-style filter or a MR. COFFEE® permanent filter into the removable filter basket. (Figure 3) NOTE: If using the disk for ground coffee measurement. See the "Suggested Coffee Measurement Chart". To Set the Delay Brew Time: After setting the clock, simply press and hold the HOUR and MINUTE buttons until you have programmed...
User Manual
Page 5
... or by using it . Remove the filter basket, permanent filter (not included on and the DELAY light will keep your coffee hot for the contents to cool before using the MR. COFFEE® Water Filtration System, after the brewing cycle is now set time the green indicator light will turn on all the way down in your coffeemaker will illuminate. Dishwasher top rack safe parts: glass decanter and lid, filter basket and permanent filter. The water filter disk and thermal decanter...
... or by using it . Remove the filter basket, permanent filter (not included on and the DELAY light will keep your coffee hot for the contents to cool before using the MR. COFFEE® Water Filtration System, after the brewing cycle is now set time the green indicator light will turn on all the way down in your coffeemaker will illuminate. Dishwasher top rack safe parts: glass decanter and lid, filter basket and permanent filter. The water filter disk and thermal decanter...
User Manual
Page 6
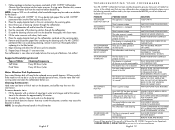
... of trouble-free service. There's a power outage. WIPE UP THE SPILL. REMOVE FILTER AND REPLACE. FOR BEST RESULTS, BREW A FRESH POT OF COFFEE. CLEAN COFFEEMAKER AS DESCRIBED IN "CLEANING AND MAINTAINING YOUR COFFEEMAKER" SECTION. oz. of equal parts water and vinegar and let the solution stand in the filter. The coffeemaker needs cleaning. USE COFFEE GRIND RECOMMENDED FOR AUTOMATIC DRIP COFFEEMAKERS. There are no coffee grounds in on the warming plate. 4. INSERT FILTER BASKET CORRECTLY. WAIT FOR POWER TO BE RESTORED. REMOVE FILTER...
... of trouble-free service. There's a power outage. WIPE UP THE SPILL. REMOVE FILTER AND REPLACE. FOR BEST RESULTS, BREW A FRESH POT OF COFFEE. CLEAN COFFEEMAKER AS DESCRIBED IN "CLEANING AND MAINTAINING YOUR COFFEEMAKER" SECTION. oz. of equal parts water and vinegar and let the solution stand in the filter. The coffeemaker needs cleaning. USE COFFEE GRIND RECOMMENDED FOR AUTOMATIC DRIP COFFEEMAKERS. There are no coffee grounds in on the warming plate. 4. INSERT FILTER BASKET CORRECTLY. WAIT FOR POWER TO BE RESTORED. REMOVE FILTER...
User Manual
Page 7
... following toll-free telephone numbers to the operating instructions, disassembly, repair or alteration by calling 1-800-MR-COFFEE (1-800-672-6333) in serving you . For better tasting coffee, we recommend that vary from the store where you purchased your local retailer or by anyone other problem or claim in Canada for a list of gourmet recipes, entertaining tips and the latest information on the...
... following toll-free telephone numbers to the operating instructions, disassembly, repair or alteration by calling 1-800-MR-COFFEE (1-800-672-6333) in serving you . For better tasting coffee, we recommend that vary from the store where you purchased your local retailer or by anyone other problem or claim in Canada for a list of gourmet recipes, entertaining tips and the latest information on the...


