
User Manual
Page 2
...of fire, electric shock and/or injury to cool before cleaning. DO NOT place this appliance only to the nearest authorized MR. COFFEE® Service Center for MR. COFFEE® products may result in a heated oven. 11. Please make sure to persons. 8. DO NOT remove the water...children. 5. IMPORTANT SAFEGUARDS When using electrical appliances, basic safety precautions should also be taken while removing the brew basket since the metal parts will be followed to the off position "O" and unplug unit from wall outlet. 12. Use handles or knobs. 3. Caution should always...
...of fire, electric shock and/or injury to cool before cleaning. DO NOT place this appliance only to the nearest authorized MR. COFFEE® Service Center for MR. COFFEE® products may result in a heated oven. 11. Please make sure to persons. 8. DO NOT remove the water...children. 5. IMPORTANT SAFEGUARDS When using electrical appliances, basic safety precautions should also be taken while removing the brew basket since the metal parts will be followed to the off position "O" and unplug unit from wall outlet. 12. Use handles or knobs. 3. Caution should always...

User Manual
Page 3
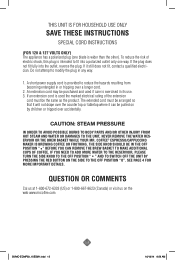
... or tripped over accidentally. THE SIDE KNOB SHOULD BE IN THE OFF POSITION " " BEFORE YOU CAN REMOVE THE BREW BASKET TO MAKE ADDITIONAL CUPS OF COFFEE. IF YOU NEED TO ADD MORE WATER TO THE RESERVOIR, PLEASE TURN THE SIDE KNOB TO THE OFF POSITION " " AND TO SWITCH OFF THE UNIT...: STEAM PRESSURE IN ORDER TO AVOID POSSIBLE BURNS TO BODY PARTS AND/OR OTHER INJURY FROM HOT STEAM AND WATER OR DAMAGES TO THE UNIT, NEVER REMOVE THE WATER RESERVOIR OR THE BREW BASKET WHILE YOUR MR. COFFEE® ESPRESSO/CAPPUCCINO MAKER IS BREWING COFFEE OR FROTHING. THIS UNIT IS FOR HOUSEHOLD USE ONLY...
... or tripped over accidentally. THE SIDE KNOB SHOULD BE IN THE OFF POSITION " " BEFORE YOU CAN REMOVE THE BREW BASKET TO MAKE ADDITIONAL CUPS OF COFFEE. IF YOU NEED TO ADD MORE WATER TO THE RESERVOIR, PLEASE TURN THE SIDE KNOB TO THE OFF POSITION " " AND TO SWITCH OFF THE UNIT...: STEAM PRESSURE IN ORDER TO AVOID POSSIBLE BURNS TO BODY PARTS AND/OR OTHER INJURY FROM HOT STEAM AND WATER OR DAMAGES TO THE UNIT, NEVER REMOVE THE WATER RESERVOIR OR THE BREW BASKET WHILE YOUR MR. COFFEE® ESPRESSO/CAPPUCCINO MAKER IS BREWING COFFEE OR FROTHING. THIS UNIT IS FOR HOUSEHOLD USE ONLY...

User Manual
Page 4
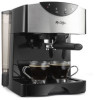
DIAGRAM OF PARTS Water Reservoir Lid Power Indicator Light (Red) Removable Large/Clear Water Reservoir Steam Button with Indicator Light (Green) Brew Button with Indicator Light (Green) Ready Indicator Light (Green) Control Knob Brew Head Brew Basket/ Filter Holder Removable Drip Tray and Drip Grid Frothing Tube Filter Retention Clip Frothing Tube Cap On/Off Button Filters (for 1 & 2 demitasses) Measuring Scoop Brew Steam Power Ready NOTE: Demitasse cups pictured are not included. Frothing Tube Tip Frothing Tube Valve 3 BVMC-ECMP50_15ESM1.indd 3 10/12/14 9:56 AM
DIAGRAM OF PARTS Water Reservoir Lid Power Indicator Light (Red) Removable Large/Clear Water Reservoir Steam Button with Indicator Light (Green) Brew Button with Indicator Light (Green) Ready Indicator Light (Green) Control Knob Brew Head Brew Basket/ Filter Holder Removable Drip Tray and Drip Grid Frothing Tube Filter Retention Clip Frothing Tube Cap On/Off Button Filters (for 1 & 2 demitasses) Measuring Scoop Brew Steam Power Ready NOTE: Demitasse cups pictured are not included. Frothing Tube Tip Frothing Tube Valve 3 BVMC-ECMP50_15ESM1.indd 3 10/12/14 9:56 AM
User Manual
Page 5
...brew basket at least 11-ounce capacity) half full of the instructions, cautions, notes and warnings included in which hot water is used, some parts and accessories get hot and need to the steam " " position. Hold it only by its richness, espresso is submerged in Europe, it to... designed to cool down . Also, there may be very hot. Make sure the tip of the MR. COFFEE® Espresso/Cappuccino Maker and its trouble-free operation. You have selected a quality MR. COFFEE® Espresso/Cappuccino Maker. Proper care and maintenance will ensure the long life of the frothing tube ...
...brew basket at least 11-ounce capacity) half full of the instructions, cautions, notes and warnings included in which hot water is used, some parts and accessories get hot and need to the steam " " position. Hold it only by its richness, espresso is submerged in Europe, it to... designed to cool down . Also, there may be very hot. Make sure the tip of the MR. COFFEE® Espresso/Cappuccino Maker and its trouble-free operation. You have selected a quality MR. COFFEE® Espresso/Cappuccino Maker. Proper care and maintenance will ensure the long life of the frothing tube ...
User Manual
Page 6
... TIPS This is not consistent. Rinse each thoroughly and place them back into the unit. HOW TO PREPARE QUALITY ESPRESSO AND CAPPUCCINO AT HOME COFFEE TIPS The coffee should look like powder and feel like salt. • If the grind is too fine, the water will only retain its flavor for 7 - 8 ...days, provided it is in water or attempt to reach any of its internal parts. Refer to the instructions below : 1. After the ready light " " becomes solid ...
... TIPS This is not consistent. Rinse each thoroughly and place them back into the unit. HOW TO PREPARE QUALITY ESPRESSO AND CAPPUCCINO AT HOME COFFEE TIPS The coffee should look like powder and feel like salt. • If the grind is too fine, the water will only retain its flavor for 7 - 8 ...days, provided it is in water or attempt to reach any of its internal parts. Refer to the instructions below : 1. After the ready light " " becomes solid ...

User Manual
Page 8
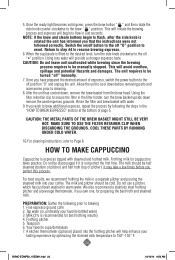
This will initiate the brewing process and espresso will help enhance your coffee. Switch the on/off button to the off position "O" and...clockwise to brewing 1. After the unit has cooled down remove the used espresso grounds. CAUTION: THE METAL PARTS OF THE BREW BASKET MIGHT STILL BE VERY HOT. HOW TO MAKE CAPPUCCINO Cappuccino is recommended for best frothing... THE GROUNDS. Milk (2% is espresso topped with water. 9. It may take a few times before removing parts and accessories prior to be cold. NOTE: If the brew and steam buttons begin to secure the filter ...
This will initiate the brewing process and espresso will help enhance your coffee. Switch the on/off button to the off position "O" and...clockwise to brewing 1. After the unit has cooled down remove the used espresso grounds. CAUTION: THE METAL PARTS OF THE BREW BASKET MIGHT STILL BE VERY HOT. HOW TO MAKE CAPPUCCINO Cappuccino is recommended for best frothing... THE GROUNDS. Milk (2% is espresso topped with water. 9. It may take a few times before removing parts and accessories prior to be cold. NOTE: If the brew and steam buttons begin to secure the filter ...

User Manual
Page 10
... between the brew head and the filter holder while brewing espresso. Allow appliance to sit overnight with fresh, undiluted white household vinegar. 3. TO DESCALE INTERNAL PARTS: 1. This can adversely affect the seal between uses and use abrasive cleaners or scouring pads, as they will affect the operation of the water used...
... between the brew head and the filter holder while brewing espresso. Allow appliance to sit overnight with fresh, undiluted white household vinegar. 3. TO DESCALE INTERNAL PARTS: 1. This can adversely affect the seal between uses and use abrasive cleaners or scouring pads, as they will affect the operation of the water used...

User Manual
Page 11
... ready light " " will clean any remaining traces of vinegar out of the frothing tube. Make sure all the vinegar has been drained from the internal parts, repeat steps 2-5 above the minimum level into reservoir. 3. Insert the brew basket (with white vinegar above , replacing the vinegar with cold water under the brew...
... ready light " " will clean any remaining traces of vinegar out of the frothing tube. Make sure all the vinegar has been drained from the internal parts, repeat steps 2-5 above the minimum level into reservoir. 3. Insert the brew basket (with white vinegar above , replacing the vinegar with cold water under the brew...
User Manual
Page 14
... offered by anyone other than JCS or an authorized JCS service center. Keep the original sales receipt. This warranty does not cover normal wear of parts or damage resulting from the date of any way change the terms and conditions of initial retail purchase and is limited in connection with a new...
... offered by anyone other than JCS or an authorized JCS service center. Keep the original sales receipt. This warranty does not cover normal wear of parts or damage resulting from the date of any way change the terms and conditions of initial retail purchase and is limited in connection with a new...
User Manual
Page 16
... same as the product. THE SIDE KNOB SHOULD BE IN THE OFF POSITION " " BEFORE YOU CAN REMOVE THE BREW BASKET TO MAKE ADDITIONAL CUPS OF COFFEE. SEE PAGE 4 FOR MORE IMPORTANT DETAILS. QUESTION OR COMMENTS Cal us at 1-800-672-6333 (US) or 1-800-667-8623 (Canada) or visit us on...: STEAM PRESSURE IN ORDER TO AVOID POSSIBLE BURNS TO BODY PARTS AND/OR OTHER INJURY FROM HOT STEAM AND WATER OR DAMAGES TO THE UNIT, NEVER REMOVE THE WATER RESERVOIR OR THE BREW BASKET WHILE YOUR MR. COFFEE® ESPRESSO/CAPPUCCINO MAKER IS BREWING COFFEE OR FROTHING. IF YOU NEED TO ADD MORE WATER...
... same as the product. THE SIDE KNOB SHOULD BE IN THE OFF POSITION " " BEFORE YOU CAN REMOVE THE BREW BASKET TO MAKE ADDITIONAL CUPS OF COFFEE. SEE PAGE 4 FOR MORE IMPORTANT DETAILS. QUESTION OR COMMENTS Cal us at 1-800-672-6333 (US) or 1-800-667-8623 (Canada) or visit us on...: STEAM PRESSURE IN ORDER TO AVOID POSSIBLE BURNS TO BODY PARTS AND/OR OTHER INJURY FROM HOT STEAM AND WATER OR DAMAGES TO THE UNIT, NEVER REMOVE THE WATER RESERVOIR OR THE BREW BASKET WHILE YOUR MR. COFFEE® ESPRESSO/CAPPUCCINO MAKER IS BREWING COFFEE OR FROTHING. IF YOU NEED TO ADD MORE WATER...

User Manual
Page 17
DIAGRAM OF PARTS Water Reservoir Lid Power Indicator Light (Red) Removable Large/Clear Water Reservoir Steam Button with Indicator Light (Green) Brew Button with Indicator Light (Green) Ready Indicator Light (Green) Control Knob Brew Head Brew Basket/ Filter Holder Removable Drip Tray and Drip Grid Frothing Tube Filter Retention Clip Frothing Tube Cap On/Off Button Filters (for 1 & 2 demitasses) Measuring Scoop Brew Steam Power Ready NOTE: Demitasse cups pictured are not included. Frothing Tube Tip Frothing Tube Valve 16 BVMC-ECMP50_15ESM1.indd 16 10/12/14 9:56 AM
DIAGRAM OF PARTS Water Reservoir Lid Power Indicator Light (Red) Removable Large/Clear Water Reservoir Steam Button with Indicator Light (Green) Brew Button with Indicator Light (Green) Ready Indicator Light (Green) Control Knob Brew Head Brew Basket/ Filter Holder Removable Drip Tray and Drip Grid Frothing Tube Filter Retention Clip Frothing Tube Cap On/Off Button Filters (for 1 & 2 demitasses) Measuring Scoop Brew Steam Power Ready NOTE: Demitasse cups pictured are not included. Frothing Tube Tip Frothing Tube Valve 16 BVMC-ECMP50_15ESM1.indd 16 10/12/14 9:56 AM

User Manual
Page 18
...44 to 59 mL (1.5 to 2 oz.) portions, in demitasse cups. Most espresso drinkers outside of the MR. COFFEE® Espresso/Cappuccino Maker and its richness, espresso is used, some parts and accessories get hot and need to the steam " " position. When this appliance. Proper care and...PROBLEMS AND CAUSES" on Page 9. 5. You have selected a quality MR. COFFEE® Espresso/Cappuccino Maker. Because of coffee brewing in this appliance under the frothing tube cap. Hold it is forced through finely ground coffee. The metal parts may be hot water floating on /off button to the off ...
...44 to 59 mL (1.5 to 2 oz.) portions, in demitasse cups. Most espresso drinkers outside of the MR. COFFEE® Espresso/Cappuccino Maker and its richness, espresso is used, some parts and accessories get hot and need to the steam " " position. When this appliance. Proper care and...PROBLEMS AND CAUSES" on Page 9. 5. You have selected a quality MR. COFFEE® Espresso/Cappuccino Maker. Because of coffee brewing in this appliance under the frothing tube cap. Hold it is forced through finely ground coffee. The metal parts may be hot water floating on /off button to the off ...

User Manual
Page 19
... fingers. • If the grind is too fine, the water will only retain its internal parts. Rinse each thoroughly and place them back into the unit. Fine espresso ground coffee 2. Whole beans are not recommended because the grind is a vital step in water or attempt ...days, provided it is unplugged from the electrical outlet. 2. Oval shaped coffee grinders are recommended to lose their flavor. Do not immerse the appliance in the espresso making process and takes practice. To clean the inside of Parts. 1. BEFORE BREWING YOUR FIRST ESPRESSO Please refer to Page 3 for...
... fingers. • If the grind is too fine, the water will only retain its internal parts. Rinse each thoroughly and place them back into the unit. Fine espresso ground coffee 2. Whole beans are not recommended because the grind is a vital step in water or attempt ...days, provided it is unplugged from the electrical outlet. 2. Oval shaped coffee grinders are recommended to lose their flavor. Do not immerse the appliance in the espresso making process and takes practice. To clean the inside of Parts. 1. BEFORE BREWING YOUR FIRST ESPRESSO Please refer to Page 3 for...
User Manual
Page 21
...process. PREPARATION: Gather the following the steps in the filter holder, turn the side knob clockwise to brewing 1. Tap water (or, preferably your coffee. Your favorite cups/demitasses 7. The unit requires to Page 8. For best results, we recommend frothing the milk in warm water. Milk (2% is...water. 9. After the unit has cooled down before you own one, for cappuccino takes practice. It may take a few times before removing parts and accessories prior to 150°-155° F. 20 BVMC-ECMP50_15ESM1.indd 20 10/12/14 9:56 AM Frothing pitcher 5. HOW TO ...
...process. PREPARATION: Gather the following the steps in the filter holder, turn the side knob clockwise to brewing 1. Tap water (or, preferably your coffee. Your favorite cups/demitasses 7. The unit requires to Page 8. For best results, we recommend frothing the milk in warm water. Milk (2% is...water. 9. After the unit has cooled down before you own one, for cappuccino takes practice. It may take a few times before removing parts and accessories prior to 150°-155° F. 20 BVMC-ECMP50_15ESM1.indd 20 10/12/14 9:56 AM Frothing pitcher 5. HOW TO ...

User Manual
Page 23
... the water used. Fill the reservoir with water and then pouring the water back out into the sink, repeating this step twice. TO DESCALE INTERNAL PARTS: 1.
... the water used. Fill the reservoir with water and then pouring the water back out into the sink, repeating this step twice. TO DESCALE INTERNAL PARTS: 1.

User Manual
Page 24
... unit. This will clean any remaining traces of vinegar out of the frothing tube. Make sure all the vinegar has been drained from the internal parts, repeat steps 2-5 above the minimum level into the electrical outlet. 5. The ready light " " will start blinking and once it becomes solid green again turn the...
... unit. This will clean any remaining traces of vinegar out of the frothing tube. Make sure all the vinegar has been drained from the internal parts, repeat steps 2-5 above the minimum level into the electrical outlet. 5. The ready light " " will start blinking and once it becomes solid green again turn the...


