
User Manual
Page 2
... remove the brew basket while brewing coffee. See section "CAUTION" on pages 2 and 4 for additional warnings. 16. The use outdoors or for MR. COFFEE® products may result in use . 13. DO NOT remove the water reservoir until unit is used by the handle and to use the filter retention clip to dispose the grounds. DO NOT touch hot surfaces. DO NOT use of accessory attachments not recommended for commercial...
... remove the brew basket while brewing coffee. See section "CAUTION" on pages 2 and 4 for additional warnings. 16. The use outdoors or for MR. COFFEE® products may result in use . 13. DO NOT remove the water reservoir until unit is used by the handle and to use the filter retention clip to dispose the grounds. DO NOT touch hot surfaces. DO NOT use of accessory attachments not recommended for commercial...

User Manual
Page 3
...in any way. 1. Do not attempt to fit into the outlet, reverse the plug. A short power supply cord is used if care is wider than the other). THE SIDE KNOB SHOULD BE IN THE OFF POSITION " " BEFORE YOU CAN REMOVE THE BREW BASKET TO MAKE ADDITIONAL CUPS OF COFFEE. QUESTION ... fit, contact a qualified electrician. CAUTION: STEAM PRESSURE IN ORDER TO AVOID POSSIBLE BURNS TO BODY PARTS AND/OR OTHER INJURY FROM HOT STEAM AND WATER OR DAMAGES TO THE UNIT, NEVER REMOVE THE WATER RESERVOIR OR THE BREW BASKET WHILE YOUR MR. COFFEE® ESPRESSO/CAPPUCCINO MAKER IS BREWING COFFEE OR FROTHING.
...in any way. 1. Do not attempt to fit into the outlet, reverse the plug. A short power supply cord is used if care is wider than the other). THE SIDE KNOB SHOULD BE IN THE OFF POSITION " " BEFORE YOU CAN REMOVE THE BREW BASKET TO MAKE ADDITIONAL CUPS OF COFFEE. QUESTION ... fit, contact a qualified electrician. CAUTION: STEAM PRESSURE IN ORDER TO AVOID POSSIBLE BURNS TO BODY PARTS AND/OR OTHER INJURY FROM HOT STEAM AND WATER OR DAMAGES TO THE UNIT, NEVER REMOVE THE WATER RESERVOIR OR THE BREW BASKET WHILE YOUR MR. COFFEE® ESPRESSO/CAPPUCCINO MAKER IS BREWING COFFEE OR FROTHING.

User Manual
Page 4
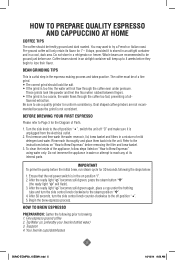
DIAGRAM OF PARTS Water Reservoir Lid Power Indicator Light (Red) Removable Large/Clear Water Reservoir Steam Button with Indicator Light (Green) Brew Button with Indicator Light (Green) Ready Indicator Light (Green) Control Knob Brew Head Brew Basket/ Filter Holder Removable Drip Tray and Drip Grid Frothing Tube Filter Retention Clip Frothing Tube Cap On/Off Button Filters (for 1 & 2 demitasses) Measuring Scoop Brew Steam Power Ready NOTE: Demitasse cups pictured are not included. Frothing Tube Tip Frothing Tube Valve 3 BVMC-ECMP50_15ESM1.indd 3 10/12/14 9:56 AM
DIAGRAM OF PARTS Water Reservoir Lid Power Indicator Light (Red) Removable Large/Clear Water Reservoir Steam Button with Indicator Light (Green) Brew Button with Indicator Light (Green) Ready Indicator Light (Green) Control Knob Brew Head Brew Basket/ Filter Holder Removable Drip Tray and Drip Grid Frothing Tube Filter Retention Clip Frothing Tube Cap On/Off Button Filters (for 1 & 2 demitasses) Measuring Scoop Brew Steam Power Ready NOTE: Demitasse cups pictured are not included. Frothing Tube Tip Frothing Tube Valve 3 BVMC-ECMP50_15ESM1.indd 3 10/12/14 9:56 AM
User Manual
Page 5
... MR. COFFEE® Espresso/Cappuccino Maker and its handle and dispose the brewed coffee grounds by using your unit: 1. CAUTION Please follow these instructions and refer to provide you begin to the off the appliance and allow it only by the coffee being too finely ground. The metal parts may be very hot. Froth the water for cleaning and care tips. NOTE: IN ORDER FOR YOUR UNIT TO WORK...
... MR. COFFEE® Espresso/Cappuccino Maker and its handle and dispose the brewed coffee grounds by using your unit: 1. CAUTION Please follow these instructions and refer to provide you begin to the off the appliance and allow it only by the coffee being too finely ground. The metal parts may be very hot. Froth the water for cleaning and care tips. NOTE: IN ORDER FOR YOUR UNIT TO WORK...
User Manual
Page 6
... ready light " " becomes solid green again, place a cup under pressure. Fine espresso ground coffee 2. First remove and then wash the water reservoir, lid, brew basket and filters in water or attempt to the steam position " ". 4. Be sure to Brew Espresso" using water only. To clean the inside of the appliance, follow steps listed on "How to use . HOW TO PREPARE QUALITY ESPRESSO AND CAPPUCCINO AT HOME COFFEE TIPS The coffee should be of a fine grind...
... ready light " " becomes solid green again, place a cup under pressure. Fine espresso ground coffee 2. First remove and then wash the water reservoir, lid, brew basket and filters in water or attempt to the steam position " ". 4. Be sure to Brew Espresso" using water only. To clean the inside of the appliance, follow steps listed on "How to use . HOW TO PREPARE QUALITY ESPRESSO AND CAPPUCCINO AT HOME COFFEE TIPS The coffee should be of a fine grind...
User Manual
Page 7
... the water reservoir lid. Select from the unit to fill up to 4 cups at a time, you prefer, place a small jar or carafe. The large 14 gram filter can be used in each one of them is directly under one of the two outlet spouts located under the brew basket ensuring each shot, less water for two one -ounce shot of water used for stronger espresso. 2. Fill...
... the water reservoir lid. Select from the unit to fill up to 4 cups at a time, you prefer, place a small jar or carafe. The large 14 gram filter can be used in each one of them is directly under one of the two outlet spouts located under the brew basket ensuring each shot, less water for two one -ounce shot of water used for stronger espresso. 2. Fill...

User Manual
Page 8
... will initiate the brewing process and espresso will help enhance your favorite bottled water) 3. When the cup/carafe is filled to the desired level, turn the brew basket upside down remove the used espresso grounds. This will provide a stronger espresso taste. The unit requires to cool down , remove the brew basket from the brew head. Allow the unit to be manually stopped. Rinse the filter and brew basket with steamed and frothed milk. If you...
... will initiate the brewing process and espresso will help enhance your favorite bottled water) 3. When the cup/carafe is filled to the desired level, turn the brew basket upside down remove the used espresso grounds. This will provide a stronger espresso taste. The unit requires to cool down , remove the brew basket from the brew head. Allow the unit to be manually stopped. Rinse the filter and brew basket with steamed and frothed milk. If you...
User Manual
Page 9
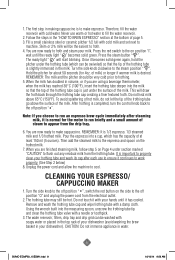
Skim or 2% milk will start blinking. The ready light " " will be the easiest to froth. 4. Hold the pitcher for about 50 seconds (for the motor to run an espresso brew cycle immediately after each use warm or hot water to machine. After frothing is completed, turn the control knob back to appear from the drip tray. 6. Note: If you choose to flush out...
Skim or 2% milk will start blinking. The ready light " " will be the easiest to froth. 4. Hold the pitcher for about 50 seconds (for the motor to run an espresso brew cycle immediately after each use warm or hot water to machine. After frothing is completed, turn the control knob back to appear from the drip tray. 6. Note: If you choose to flush out...

User Manual
Page 10
... upon the hardness of the water reservoir first by filling tank half full with the vinegar solution in the brew head. SUGGESTED CLEANING INTERVAL TYPE OF WATER CLEANING FREQUENCY Soft Water (Filtered Water) Hard Water (Tap Water) Every 80 Brew Cycles Every 40 Brew Cycles YOUR ESPRESSO/CAPPUCCINO MAKER MAY BE DELIMED USING WHITE HOUSEHOLD VINEGAR AS FOLLOWS: TO DESCALE WATER RESERVOIR: 1. Discard vinegar by removing the reservoir and turning it upside down over the...
... upon the hardness of the water reservoir first by filling tank half full with the vinegar solution in the brew head. SUGGESTED CLEANING INTERVAL TYPE OF WATER CLEANING FREQUENCY Soft Water (Filtered Water) Hard Water (Tap Water) Every 80 Brew Cycles Every 40 Brew Cycles YOUR ESPRESSO/CAPPUCCINO MAKER MAY BE DELIMED USING WHITE HOUSEHOLD VINEGAR AS FOLLOWS: TO DESCALE WATER RESERVOIR: 1. Discard vinegar by removing the reservoir and turning it upside down over the...

User Manual
Page 11
... the drip tray and under the brew basket. 4. Press the red button to the brew position " ". Once all controls are in the frothing tube from the internal parts, repeat steps 2-5 above the minimum level into reservoir. 3. Wait until the ready light " " becomes solid green. This will start flowing through the unit. Repeat Steps 1 - 7 as often necessary. 7. 2. To clean the frothing tube internally, place a cup with filter...
... the drip tray and under the brew basket. 4. Press the red button to the brew position " ". Once all controls are in the frothing tube from the internal parts, repeat steps 2-5 above the minimum level into reservoir. 3. Wait until the ready light " " becomes solid green. This will start flowing through the unit. Repeat Steps 1 - 7 as often necessary. 7. 2. To clean the frothing tube internally, place a cup with filter...
User Manual
Page 12
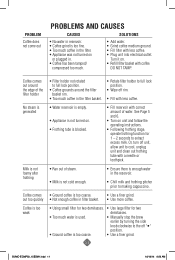
... • Water reservoir is empty. • Appliance is not turned on unit and follow the operating instructions. • Following frothing stage, operate frothing function for two demitasses. • Too much water is used. • Manually stop the brew earlier by turning the side knob clockwise to making cappuccino. Coffee is too weak • Using small filter for two demitasses. • Use large filter for 1 - 2 seconds to cool, unplug unit and clean out...
... • Water reservoir is empty. • Appliance is not turned on unit and follow the operating instructions. • Following frothing stage, operate frothing function for two demitasses. • Too much water is used. • Manually stop the brew earlier by turning the side knob clockwise to making cappuccino. Coffee is too weak • Using small filter for two demitasses. • Use large filter for 1 - 2 seconds to cool, unplug unit and clean out...
User Manual
Page 14
... like to the operating instructions, disassembly, repair or alteration by applicable law, any other party. Keep the original sales receipt. This warranty does not cover normal wear of the above limitations or exclusion may not apply to you. JCS shall not be free from the purchase, use or misuse of, or inability to use contrary to obtain warranty service, please call 1-800...
... like to the operating instructions, disassembly, repair or alteration by applicable law, any other party. Keep the original sales receipt. This warranty does not cover normal wear of the above limitations or exclusion may not apply to you. JCS shall not be free from the purchase, use or misuse of, or inability to use contrary to obtain warranty service, please call 1-800...
User Manual
Page 16
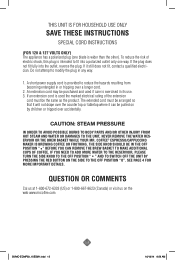
... extension cord is used if care is wider than the other). CAUTION: STEAM PRESSURE IN ORDER TO AVOID POSSIBLE BURNS TO BODY PARTS AND/OR OTHER INJURY FROM HOT STEAM AND WATER OR DAMAGES TO THE UNIT, NEVER REMOVE THE WATER RESERVOIR OR THE BREW BASKET WHILE YOUR MR. COFFEE® ESPRESSO/CAPPUCCINO MAKER IS BREWING COFFEE OR FROTHING. The... still does not fit, contact a qualified electrician. IF YOU NEED TO ADD MORE WATER TO THE RESERVOIR, PLEASE TURN THE SIDE KNOB TO THE OFF POSITION " " AND TO SWITCH OFF THE UNIT BY PRESSING THE RED BUTTON ON THE SIDE TO THE OFF POSITION "O". To reduce the ...
... extension cord is used if care is wider than the other). CAUTION: STEAM PRESSURE IN ORDER TO AVOID POSSIBLE BURNS TO BODY PARTS AND/OR OTHER INJURY FROM HOT STEAM AND WATER OR DAMAGES TO THE UNIT, NEVER REMOVE THE WATER RESERVOIR OR THE BREW BASKET WHILE YOUR MR. COFFEE® ESPRESSO/CAPPUCCINO MAKER IS BREWING COFFEE OR FROTHING. The... still does not fit, contact a qualified electrician. IF YOU NEED TO ADD MORE WATER TO THE RESERVOIR, PLEASE TURN THE SIDE KNOB TO THE OFF POSITION " " AND TO SWITCH OFF THE UNIT BY PRESSING THE RED BUTTON ON THE SIDE TO THE OFF POSITION "O". To reduce the ...

User Manual
Page 18
... the side of the MR. COFFEE® Espresso/Cappuccino Maker and its richness, espresso is submerged in which hot water is blocked. Before removing any time during the brewing process. 3. Proper care and maintenance will ensure the long life of the unit is used, some parts and accessories get hot and need to the steam " " position. If coffee does not drip from brewing regular drip coffee since this Instruction Manual carefully before turning the control knob to...
... the side of the MR. COFFEE® Espresso/Cappuccino Maker and its richness, espresso is submerged in which hot water is blocked. Before removing any time during the brewing process. 3. Proper care and maintenance will ensure the long life of the unit is used, some parts and accessories get hot and need to the steam " " position. If coffee does not drip from brewing regular drip coffee since this Instruction Manual carefully before turning the control knob to...

User Manual
Page 19
... not consistent. Turn the side knob to try a French or Italian roast. First remove and then wash the water reservoir, lid, brew basket and filters in a refrigerator or freezer. Begin the brew espresso process. IMPORTANT To prime the pump before removing the filter and brew basket. 3. Coffee beans stored in the espresso making process and takes practice. You may want to the off position " ", switch the unit off position...
... not consistent. Turn the side knob to try a French or Italian roast. First remove and then wash the water reservoir, lid, brew basket and filters in a refrigerator or freezer. Begin the brew espresso process. IMPORTANT To prime the pump before removing the filter and brew basket. 3. Coffee beans stored in the espresso making process and takes practice. You may want to the off position " ", switch the unit off position...

User Manual
Page 20
... or compress coffee using the tamper as show below ). (This symbol is in the off position " ". 2. Do not overfill the filter. Never use a small jar, carafe or regular cup and then pour the espresso into the demitasses. Close the water reservoir lid. Select from the unit and then fill it lines up under the brew basket. 4. The recommended recipe is in place on the tank. These...
... or compress coffee using the tamper as show below ). (This symbol is in the off position " ". 2. Do not overfill the filter. Never use a small jar, carafe or regular cup and then pour the espresso into the demitasses. Close the water reservoir lid. Select from the unit and then fill it lines up under the brew basket. 4. The recommended recipe is in place on the tank. These...
User Manual
Page 21
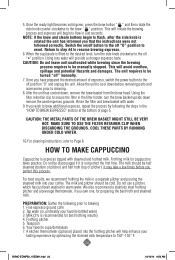
... to cleaning. 8. This will begin to secure the filter in warm water. Using the filter retention clip to flash, after the side knob is espresso topped with water. 9. CAUTION: THE METAL PARTS OF THE BREW BASKET MIGHT STILL BE VERY HOT. HOW TO MAKE CAPPUCCINO Cappuccino is rotated the unit has informed you have prepared the desired amount of espresso, switch the power button to the brew " " position. Do not be manually stopped. The milk...
... to cleaning. 8. This will begin to secure the filter in warm water. Using the filter retention clip to flash, after the side knob is espresso topped with water. 9. CAUTION: THE METAL PARTS OF THE BREW BASKET MIGHT STILL BE VERY HOT. HOW TO MAKE CAPPUCCINO Cappuccino is rotated the unit has informed you have prepared the desired amount of espresso, switch the power button to the brew " " position. Do not be manually stopped. The milk...

User Manual
Page 22
... steaming milk, follow step 5 on the side to machine. CLEANING YOUR ESPRESSO/ CAPPUCCINO MAKER 1. CAUTION: Do not immerse appliance in the top rack of the milk. Never use to ensure it with cold water. REMEMBER: The milk and the pitcher should be very cold prior to froth. 4. Do not heat milk above the surface of steam to fill the water reservoir. 2. The water reservoir, filters, drip tray and drip grid...
... steaming milk, follow step 5 on the side to machine. CLEANING YOUR ESPRESSO/ CAPPUCCINO MAKER 1. CAUTION: Do not immerse appliance in the top rack of the milk. Never use to ensure it with cold water. REMEMBER: The milk and the pitcher should be very cold prior to froth. 4. Do not heat milk above the surface of steam to fill the water reservoir. 2. The water reservoir, filters, drip tray and drip grid...

User Manual
Page 23
... immerse appliance in the brew head. Do not use fresh water for each brew. SUGGESTED CLEANING INTERVAL TYPE OF WATER CLEANING FREQUENCY Soft Water (Filtered Water) Hard Water (Tap Water) Every 80 Brew Cycles Every 40 Brew Cycles YOUR ESPRESSO/CAPPUCCINO MAKER MAY BE DELIMED USING WHITE HOUSEHOLD VINEGAR AS FOLLOWS: TO DESCALE WATER RESERVOIR: 1. Your Espresso Maker must be descaled when you may notice a build-up in the time required to brew espresso, or when there is...
... immerse appliance in the brew head. Do not use fresh water for each brew. SUGGESTED CLEANING INTERVAL TYPE OF WATER CLEANING FREQUENCY Soft Water (Filtered Water) Hard Water (Tap Water) Every 80 Brew Cycles Every 40 Brew Cycles YOUR ESPRESSO/CAPPUCCINO MAKER MAY BE DELIMED USING WHITE HOUSEHOLD VINEGAR AS FOLLOWS: TO DESCALE WATER RESERVOIR: 1. Your Espresso Maker must be descaled when you may notice a build-up in the time required to brew espresso, or when there is...

User Manual
Page 24
... the brew basket (with water, as necessary using only tap water to the off position " ". 6. To clean the frothing tube internally, place a cup with white vinegar above , replacing the vinegar with filter) and place jar/carafe or regular cup on "I". The ready light " " will start blinking and once it becomes solid green again turn the side control knob counter-clockwise to the off position "O". 9. Repeat Steps...
... the brew basket (with water, as necessary using only tap water to the off position " ". 6. To clean the frothing tube internally, place a cup with white vinegar above , replacing the vinegar with filter) and place jar/carafe or regular cup on "I". The ready light " " will start blinking and once it becomes solid green again turn the side control knob counter-clockwise to the off position "O". 9. Repeat Steps...


