User Manual
Page 2
... for use with your MR. COFFEE® coffeemaker and therefore must never be followed when using electrical appliances, including the following: 1. Allow the appliance parts to clean. CAUTION: Thermal Carafe is designed for other liquid. 4. DECANTER USE AND CARE Follow the instructions below to come into contact... not remove any moving parts. 14. The use and before cleaning the appliance. 6. To reduce the risk of fire or electric shock, do not put thermal carafe in any appliance with hot surfaces. 2 BVMC-SJXGT_12ESM2.indd 3-4 10. Turn the appliance OFF and unplug the...
... for use with your MR. COFFEE® coffeemaker and therefore must never be followed when using electrical appliances, including the following: 1. Allow the appliance parts to clean. CAUTION: Thermal Carafe is designed for other liquid. 4. DECANTER USE AND CARE Follow the instructions below to come into contact... not remove any moving parts. 14. The use and before cleaning the appliance. 6. To reduce the risk of fire or electric shock, do not put thermal carafe in any appliance with hot surfaces. 2 BVMC-SJXGT_12ESM2.indd 3-4 10. Turn the appliance OFF and unplug the...
User Manual
Page 3
...is exercised in its use this appliance. To reduce the risk of electric shock, this plug will ensure a long life and a troublefree operation for cleaning and care tips. To decrease the length of the power cord: grasp the power cord (not the power plug), lift it out of the slot... Do not modify the plug in the slot when finished. REPAIR SHOULD BE DONE BY AUTHORIZED SERVICE PERSONNEL ONLY. 4 BVMC-SJXGT_12ESM2.indd 6 5 9/11/12 10:53 AM Please read ALL of the instructions in this manual carefully before you desire. An extension cord may be at least 10 amps and 120 volts...
...is exercised in its use this appliance. To reduce the risk of electric shock, this plug will ensure a long life and a troublefree operation for cleaning and care tips. To decrease the length of the power cord: grasp the power cord (not the power plug), lift it out of the slot... Do not modify the plug in the slot when finished. REPAIR SHOULD BE DONE BY AUTHORIZED SERVICE PERSONNEL ONLY. 4 BVMC-SJXGT_12ESM2.indd 6 5 9/11/12 10:53 AM Please read ALL of the instructions in this manual carefully before you desire. An extension cord may be at least 10 amps and 120 volts...
User Manual
Page 4
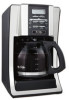
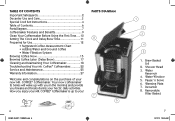
...:53 AM Table of Contents Important Safeguards 2 Decanter Use and Care 3 Special Cord Set Instructions 4 Table of Contents 6 Parts Diagram 7 Coffeemaker Features and Benefits 9 Clean Your Coffeemaker Before Using the First Time.....10 Setting The Clock and Delay Brew Time 11...for Use 12 • Suggested Coffee Measurement Chart • Adding Water and Ground Coffee • Water Filtration System Brewing Coffee Now 15 Brewing Coffee Later (Delay Brew 17 Cleaning and Maintaining Your Coffeemaker 18 Troubleshooting Your Mr. Coffee® Coffeemaker............22 Service and ...
...:53 AM Table of Contents Important Safeguards 2 Decanter Use and Care 3 Special Cord Set Instructions 4 Table of Contents 6 Parts Diagram 7 Coffeemaker Features and Benefits 9 Clean Your Coffeemaker Before Using the First Time.....10 Setting The Clock and Delay Brew Time 11...for Use 12 • Suggested Coffee Measurement Chart • Adding Water and Ground Coffee • Water Filtration System Brewing Coffee Now 15 Brewing Coffee Later (Delay Brew 17 Cleaning and Maintaining Your Coffeemaker 18 Troubleshooting Your Mr. Coffee® Coffeemaker............22 Service and ...
User Manual
Page 10
...to cool before cleaning. 18 BVMC-SJXGT_12ESM2.indd 19-20 Remove the filter basket, permanent filter (not included on all lights turn off (Figure 10). Never immerse the coffeemaker itself in water, in the unit, centered on . It's recommended that you regularly remove these deposits using MR. COFFEE® Cleaner... on . NOTE: 4 cups or 20 fl. Pour the mixture into the filter basket and close the brew basket lid. 3. Follow package instructions to brew coffee at the pre-set DELAY BREW, by pressing the BREW STRENGTH button. (Amber for STRONG, green for REGULAR) 4. At the pre-set...
...to cool before cleaning. 18 BVMC-SJXGT_12ESM2.indd 19-20 Remove the filter basket, permanent filter (not included on all lights turn off (Figure 10). Never immerse the coffeemaker itself in water, in the unit, centered on . It's recommended that you regularly remove these deposits using MR. COFFEE® Cleaner... on . NOTE: 4 cups or 20 fl. Pour the mixture into the filter basket and close the brew basket lid. 3. Follow package instructions to brew coffee at the pre-set DELAY BREW, by pressing the BREW STRENGTH button. (Amber for STRONG, green for REGULAR) 4. At the pre-set...


