User Guide
Page 1
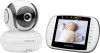
User's Guide Digital Video Baby Monitor Models: MBP36S, MBP36S-2, MBP36S-3, MBP36S-4 The features described in this User's Guide are subject to modifications without prior notice.
User's Guide Digital Video Baby Monitor Models: MBP36S, MBP36S-2, MBP36S-3, MBP36S-4 The features described in this User's Guide are subject to modifications without prior notice.

User Guide
Page 2
... one or more additional camera units with all the information you disconnect them from your new Motorola Digital Video Baby Monitor. For warranty service of your older children in the Baby Unit and Parent Unit, so that they continue to other locations. Please read the Safety ...MH battery pack • 1 x Power adapter for the Parent unit • 1 x Power adapter for your new Motorola Digital Video Baby Monitor! Please retain your original dated sales receipt for the Baby unit • 1 x StarGrip In multi-camera packs, you will need to get the most from the power supplies ...
... one or more additional camera units with all the information you disconnect them from your new Motorola Digital Video Baby Monitor. For warranty service of your older children in the Baby Unit and Parent Unit, so that they continue to other locations. Please read the Safety ...MH battery pack • 1 x Power adapter for the Parent unit • 1 x Power adapter for your new Motorola Digital Video Baby Monitor! Please retain your original dated sales receipt for the Baby unit • 1 x StarGrip In multi-camera packs, you will need to get the most from the power supplies ...

User Guide
Page 5
...up the Parent Unit Antenna, moving the Parent and/or the Baby Unit to different positions in the leaflet STAR GRIP LEGS MANAGEMENT) Important guidelines for installing your Baby Monitor • To use your Video Monitor Baby and Parent Units together, you must be able to establish a ...as wireless networks (Wi-Fi® routers), Bluetooth® systems, or microwave ovens, may cause interference with this product, so keep the baby monitor away at least 5ft (1.5m) from these types of Your Baby Unit 1 2 3 4 5 7 6 1. Power LED 5. Antenna 10. Photo Sensor (Night Vision Mode) 2. Pair Key 12....
...up the Parent Unit Antenna, moving the Parent and/or the Baby Unit to different positions in the leaflet STAR GRIP LEGS MANAGEMENT) Important guidelines for installing your Baby Monitor • To use your Video Monitor Baby and Parent Units together, you must be able to establish a ...as wireless networks (Wi-Fi® routers), Bluetooth® systems, or microwave ovens, may cause interference with this product, so keep the baby monitor away at least 5ft (1.5m) from these types of Your Baby Unit 1 2 3 4 5 7 6 1. Power LED 5. Antenna 10. Photo Sensor (Night Vision Mode) 2. Pair Key 12....

User Guide
Page 6
Using the Baby Monitor 13 3.1 Setting up 13 3.2 Pan and Tilt 13 3.3 Night Vision Mode 13 3.4 Talk Mode 13 3.5 Video ON/OFF 13 3.6 Temperature Display 14 4. Cleaning 20 7. Table ... Control 16 4.6.1 Add (pair) a camera 16 4.6.2 Delete a camera 17 4.6.3 View multiple cameras on screen 17 4.7 Temperature Setting 18 4.8 Power Saving mode 18 5. Getting Started 10 2.1 Baby Unit Power Supply 10 2.2 Parent Unit Battery Installation 10 2.3 Parent Unit Power Supply 11 2.4 Registration (Pairing 12 3. Disposal of contents 1. Safety Instructions 7 2. Help...21 8. General...
Using the Baby Monitor 13 3.1 Setting up 13 3.2 Pan and Tilt 13 3.3 Night Vision Mode 13 3.4 Talk Mode 13 3.5 Video ON/OFF 13 3.6 Temperature Display 14 4. Cleaning 20 7. Table ... Control 16 4.6.1 Add (pair) a camera 16 4.6.2 Delete a camera 17 4.6.3 View multiple cameras on screen 17 4.7 Temperature Setting 18 4.8 Power Saving mode 18 5. Getting Started 10 2.1 Baby Unit Power Supply 10 2.2 Parent Unit Battery Installation 10 2.3 Parent Unit Power Supply 11 2.4 Registration (Pairing 12 3. Disposal of contents 1. Safety Instructions 7 2. Help...21 8. General...

User Guide
Page 8
...• Keep the cords out of reach of your baby in his/her crib. ● Place the BABY UNIT on a flat surface, such as described in the User's Guide, safe to use the baby monitor near water. • Do not install the baby monitor in extreme cold or heat, direct sunlight or •...; Adult assembly is not a substitute for responsible adult supervision. • Keep this user's guide for the Baby Unit that you are familiar with power adapters. WARNING This digital video baby monitor is compliant with all its functions so that will provide the best view of children. • Do not ...
...• Keep the cords out of reach of your baby in his/her crib. ● Place the BABY UNIT on a flat surface, such as described in the User's Guide, safe to use the baby monitor near water. • Do not install the baby monitor in extreme cold or heat, direct sunlight or •...; Adult assembly is not a substitute for responsible adult supervision. • Keep this user's guide for the Baby Unit that you are familiar with power adapters. WARNING This digital video baby monitor is compliant with all its functions so that will provide the best view of children. • Do not ...

User Guide
Page 12
... for a camera unit. If the camera being paired was registered previously, it again unless the Baby Unit loses its link with the Parent Unit. 2.4 Registration (Pairing) The Baby monitor is pre-registered to your Baby Unit, or register a new Baby Unit, follow the procedure below: 1. You do not need to confirm. 4. Press the + ... to register it will flash rapidly while searching. 5. cam 1 / cam 2 / cam 3 / cam 4 will pop up . 3. Press and hold the PAIR button underneath the baby unit until is not already paired. Paired camera numbers are indicated by a *, such as cam*1.
... for a camera unit. If the camera being paired was registered previously, it again unless the Baby Unit loses its link with the Parent Unit. 2.4 Registration (Pairing) The Baby monitor is pre-registered to your Baby Unit, or register a new Baby Unit, follow the procedure below: 1. You do not need to confirm. 4. Press the + ... to register it will flash rapidly while searching. 5. cam 1 / cam 2 / cam 3 / cam 4 will pop up . 3. Press and hold the PAIR button underneath the baby unit until is not already paired. Paired camera numbers are indicated by a *, such as cam*1.
User Guide
Page 13
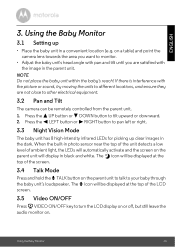
... T TALK button on the parent unit will be remotely controlled from the parent unit. 1. Using the Baby Monitor 3.1 Setting up clear images in the parent unit. NOTE Do not place the baby unit within the baby's reach! Using the Baby Monitor 13 If there is interference with the image in the dark. ENGLISH 3. on . The T icon...
... T TALK button on the parent unit will be remotely controlled from the parent unit. 1. Using the Baby Monitor 3.1 Setting up clear images in the parent unit. NOTE Do not place the baby unit within the baby's reach! Using the Baby Monitor 13 If there is interference with the image in the dark. ENGLISH 3. on . The T icon...

User Guide
Page 14
Min: 10-24ºC/50-76ºF). 14 Using the Baby Monitor If the temperature alarm is above or below the maximum or minimum temperature limits set for the alarm. (Max: 25-37ºC/77-99ºF. 3.6 Temperature Display The temperature reading from the temperature sensor at the back of the LCD screen, or at the Baby Unit is turned on, the Parent Unit will be displayed at the top of the Baby Unit will beep and display Temperature High or Temperature Low when the temperature at the bottom in split screen mode.
Min: 10-24ºC/50-76ºF). 14 Using the Baby Monitor If the temperature alarm is above or below the maximum or minimum temperature limits set for the alarm. (Max: 25-37ºC/77-99ºF. 3.6 Temperature Display The temperature reading from the temperature sensor at the back of the LCD screen, or at the Baby Unit is turned on, the Parent Unit will be displayed at the top of the Baby Unit will beep and display Temperature High or Temperature Low when the temperature at the bottom in split screen mode.
User Guide
Page 20
Cleaning and care • Do not clean any part of reliability for assistance. 20 Cleaning contact Customer Service for your baby monitor away from hot, humid areas or strong sunlight, and don't let it get wet. • Every effort has been made to repair it yourself -- 6. ...this may cause permanent damage to the product which is not covered by the warranty. • Keep your baby monitor. Never use cleaning agents or abrasive solvents. However, if something does go wrong, please do not try to ensure high standards of the product with...
Cleaning and care • Do not clean any part of reliability for assistance. 20 Cleaning contact Customer Service for your baby monitor away from hot, humid areas or strong sunlight, and don't let it get wet. • Every effort has been made to repair it yourself -- 6. ...this may cause permanent damage to the product which is not covered by the warranty. • Keep your baby monitor. Never use cleaning agents or abrasive solvents. However, if something does go wrong, please do not try to ensure high standards of the product with...

User Guide
Page 22
... parent units may cause interference with this product, so keep the baby monitor away at least 5ft (1.5m) from these types of other 2.4 GHz products, such as wireless networks (Wi-Fi® routers), Bluetooth® systems, or microwave ...ovens, may be causing interference. • If the signal is weak, try moving the Parent and/or Baby Unit to different positions in the rooms. 22 Help Move them farther apart. • Make sure there is at least 1m to 2m (3 to 6 feet...
... parent units may cause interference with this product, so keep the baby monitor away at least 5ft (1.5m) from these types of other 2.4 GHz products, such as wireless networks (Wi-Fi® routers), Bluetooth® systems, or microwave ...ovens, may be causing interference. • If the signal is weak, try moving the Parent and/or Baby Unit to different positions in the rooms. 22 Help Move them farther apart. • Make sure there is at least 1m to 2m (3 to 6 feet...
Quick Start Guide
Page 1
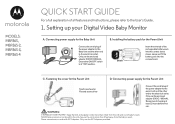
... your Digital Video Baby Monitor A. Installing the battery pack for the Baby Unit Connect the small plug of the rechargeable battery pack into the contact slot as shown above and fit the battery pack into the compartment. Recommend charging at "ON" position. Only use extension cords with AC Adapters. MODELS: MBP36S, MBP36S-2, MBP36S-3, MBP36S-4 QUICK START GUIDE...
... your Digital Video Baby Monitor A. Installing the battery pack for the Baby Unit Connect the small plug of the rechargeable battery pack into the contact slot as shown above and fit the battery pack into the compartment. Recommend charging at "ON" position. Only use extension cords with AC Adapters. MODELS: MBP36S, MBP36S-2, MBP36S-3, MBP36S-4 QUICK START GUIDE...
