
User Guide
Page 2
...sales receipt to other locations. Please retain your original dated sales receipt for purchasing your new Motorola Digital Video Baby Monitor. Registration is not required for the Baby unit • 1 x StarGrip In multi-camera packs, you can see and hear your older children in another room or you will ...need to provide a copy of your Motorola product, you need to get the most from the power supplies to carry to confirm...
...sales receipt to other locations. Please retain your original dated sales receipt for purchasing your new Motorola Digital Video Baby Monitor. Registration is not required for the Baby unit • 1 x StarGrip In multi-camera packs, you can see and hear your older children in another room or you will ...need to provide a copy of your Motorola product, you need to get the most from the power supplies to carry to confirm...

User Guide
Page 4
Warning that temperature is reached. Min: 10-24ºC/50-76ºF). To set . Camera Control (to Black/White) Talk Mode Battery Level Control (5 Levels) Pan Left Pan Right Tilt Up Tilt Down a Volume Level Control (5 Levels + OFF) Zoom Level ...
Warning that temperature is reached. Min: 10-24ºC/50-76ºF). To set . Camera Control (to Black/White) Talk Mode Battery Level Control (5 Levels) Pan Left Pan Right Tilt Up Tilt Down a Volume Level Control (5 Levels + OFF) Zoom Level ...

User Guide
Page 5
... microwave ovens, may cause interference with this product, so keep the baby monitor away at least 5ft (1.5m) from these types of Your Baby Unit 1 2 3 4 5 7 6 1. Camera Lens 3. Power Switch ON/OFF 9 PAIR 11 12 10 8 8. Speaker 7. Antenna 10. Infrared LEDs 4.
... microwave ovens, may cause interference with this product, so keep the baby monitor away at least 5ft (1.5m) from these types of Your Baby Unit 1 2 3 4 5 7 6 1. Camera Lens 3. Power Switch ON/OFF 9 PAIR 11 12 10 8 8. Speaker 7. Antenna 10. Infrared LEDs 4.

User Guide
Page 6
Parent Unit Menu Options 15 4.1 Volume ...15 4.2 Brightness 15 4.3 Lullaby ...15 4.4 Zoom ...15 4.5 Alarm ...16 4.6 Camera Control 16 4.6.1 Add (pair) a camera 16 4.6.2 Delete a camera 17 4.6.3 View multiple cameras on screen 17 4.7 Temperature Setting 18 4.8 Power Saving mode 18 5. Using the Baby Monitor 13 3.1 Setting up 13 3.2 Pan and Tilt 13 3.3 Night Vision Mode ...
Parent Unit Menu Options 15 4.1 Volume ...15 4.2 Brightness 15 4.3 Lullaby ...15 4.4 Zoom ...15 4.5 Alarm ...16 4.6 Camera Control 16 4.6.1 Add (pair) a camera 16 4.6.2 Delete a camera 17 4.6.3 View multiple cameras on screen 17 4.7 Temperature Setting 18 4.8 Power Saving mode 18 5. Using the Baby Monitor 13 3.1 Setting up 13 3.2 Pan and Tilt 13 3.3 Night Vision Mode ...

User Guide
Page 8
..., or shelf. ● NEVER place the Baby Unit or cords within reach of the baby (the unit and cords should be more than 3 feet away). CAMERA SET UP & USE: ● Determine a location for future reference. • Do not place the baby unit or cords in the User's Guide, safe to use...
..., or shelf. ● NEVER place the Baby Unit or cords within reach of the baby (the unit and cords should be more than 3 feet away). CAMERA SET UP & USE: ● Determine a location for future reference. • Do not place the baby unit or cords in the User's Guide, safe to use...
User Guide
Page 10
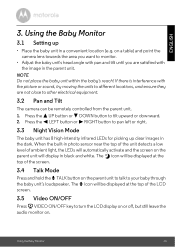
... into the compartment. NOTE Only use the enclosed power adapter (6V DC / 800mA). 2. Insert the wire tab of the power adapter to the baby unit (camera) and the other end to the electrical outlet. Small cross head or Flat end screw driver 2. Getting Started 2.1 Baby Unit Power Supply 1. Slide the ON...
... into the compartment. NOTE Only use the enclosed power adapter (6V DC / 800mA). 2. Insert the wire tab of the power adapter to the baby unit (camera) and the other end to the electrical outlet. Small cross head or Flat end screw driver 2. Getting Started 2.1 Baby Unit Power Supply 1. Slide the ON...

User Guide
Page 12
...cam 2 / cam 3 / cam 4 will pop up . 2. Press the < LEFT button or > RIGHT button until the parent unit finds the camera, beeps and the video from the camera appears. To re-register your Parent Unit. Press the M button of the parent unit and the menu bar will pop up. 3. Press and hold...Parent Unit. DOWN button to select Add, and press the OK button to a camera number that is not already paired. NOTE: You can only register a new camera to confirm. 4. Press the + UP button or - Paired camera numbers are indicated by a *, such as cam*1. DOWN button to select the ...
...cam 2 / cam 3 / cam 4 will pop up . 2. Press the < LEFT button or > RIGHT button until the parent unit finds the camera, beeps and the video from the camera appears. To re-register your Parent Unit. Press the M button of the parent unit and the menu bar will pop up. 3. Press and hold...Parent Unit. DOWN button to select Add, and press the OK button to a camera number that is not already paired. NOTE: You can only register a new camera to confirm. 4. Press the + UP button or - Paired camera numbers are indicated by a *, such as cam*1. DOWN button to select the ...
User Guide
Page 13
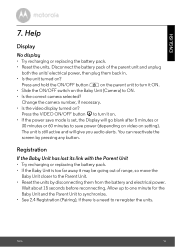
... the picture or sound, try moving the units to different locations, and ensure they are not close to other electrical equipment. 3.2 Pan and Tilt The camera can be displayed at the top of the LCD screen. 3.5 Video ON/OFF Press V VIDEO ON/OFF key to turn the LCD display on or... off, but still leave the audio monitor on a table) and point the camera lens towards the area you want to tilt upward or downward. 2. If there is interference with the image in the dark. The T icon will be...
... the picture or sound, try moving the units to different locations, and ensure they are not close to other electrical equipment. 3.2 Pan and Tilt The camera can be displayed at the top of the LCD screen. 3.5 Video ON/OFF Press V VIDEO ON/OFF key to turn the LCD display on or... off, but still leave the audio monitor on a table) and point the camera lens towards the area you want to tilt upward or downward. 2. If there is interference with the image in the dark. The T icon will be...

User Guide
Page 16
...will pop up . 2. cam 1 / cam 2 / cam 3 / cam 4 will flash rapidly while searching. 5. NOTE You can only register a new camera to a camera number that is Alarm OFF.) 5. DOWN to appear. 3. If an alarm time is selected will appear on the display and, after the alarm time is...+ UP button or - Press the < LEFT button or > RIGHT button until is pressed. 4.6 Camera Control 4.6.1 Add (pair) a camera 1. Paired camera numbers are indicated by a *, such as cam*1. If the camera being paired was registered previously, it will beep about every 10 seconds and flash the alarm icon, ...
...will pop up . 2. cam 1 / cam 2 / cam 3 / cam 4 will flash rapidly while searching. 5. NOTE You can only register a new camera to a camera number that is Alarm OFF.) 5. DOWN to appear. 3. If an alarm time is selected will appear on the display and, after the alarm time is...+ UP button or - Press the < LEFT button or > RIGHT button until is pressed. 4.6 Camera Control 4.6.1 Add (pair) a camera 1. Paired camera numbers are indicated by a *, such as cam*1. If the camera being paired was registered previously, it will beep about every 10 seconds and flash the alarm icon, ...

User Guide
Page 17
...button/+ UP button /- Desired Camera cam 1 / cam 2 / cam 3 / cam 4 - DOWN button to switch between cameras, so you can view multiple cameras on screen This function is highlighted. 4. ENGLISH 4.6.2 Delete a camera 1. to select Scan mode, Desired Camera or Multi-cameras, the icons will display images...indicated by a red frame around its picture. Scan mode the screen will display on the status bar. Multi-cameras you have more than 1 Baby Unit (Camera). Note: With multiple cameras, the parent unit will pop up . 5. Parent Unit Menu Options 17 cam 1 / cam 2 / ...
...button/+ UP button /- Desired Camera cam 1 / cam 2 / cam 3 / cam 4 - DOWN button to switch between cameras, so you can view multiple cameras on screen This function is highlighted. 4. ENGLISH 4.6.2 Delete a camera 1. to select Scan mode, Desired Camera or Multi-cameras, the icons will display images...indicated by a red frame around its picture. Scan mode the screen will display on the status bar. Multi-cameras you have more than 1 Baby Unit (Camera). Note: With multiple cameras, the parent unit will pop up . 5. Parent Unit Menu Options 17 cam 1 / cam 2 / ...

User Guide
Page 18
... highlighted. 3. DOWN button to select for the parent unit video to turn the video screen back on , and you set. 5. Note: If there are multiple cameras in scan mode, the audio will pop up. 2. Temperature Format - Press the M button and the menu bar will switch about every 30 seconds. 18 Parent...
... highlighted. 3. DOWN button to select for the parent unit video to turn the video screen back on , and you set. 5. Note: If there are multiple cameras in scan mode, the audio will pop up. 2. Temperature Format - Press the M button and the menu bar will switch about every 30 seconds. 18 Parent...
User Guide
Page 21
... unplug both the units' electrical power, then plug them from the battery and electrical power. Help 21 Change the camera number, if necessary. • Is the video display turned on the Baby Unit (Camera) to turn it on. • If the power save mode is still active and will go blank after... closer to the Parent Unit. • Reset the units by pressing any button. Press the VIDEO ON/OFF button V to ON. • Is the correct camera selected? The unit is set, the Display will give you audio alerts. You can reactivate the screen by disconnecting them back in. • Is the...
... unplug both the units' electrical power, then plug them from the battery and electrical power. Help 21 Change the camera number, if necessary. • Is the video display turned on the Baby Unit (Camera) to turn it on. • If the power save mode is still active and will go blank after... closer to the Parent Unit. • Reset the units by pressing any button. Press the VIDEO ON/OFF button V to ON. • Is the correct camera selected? The unit is set, the Display will give you audio alerts. You can reactivate the screen by disconnecting them back in. • Is the...
Quick Start Guide
Page 1
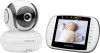
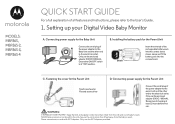
... small plug of baby's reach. Never use the enclosed adapter (5V DC / 600mA). Only use extension cords with AC Adapters. MODELS: MBP36S, MBP36S-2, MBP36S-3, MBP36S-4 QUICK START GUIDE For a full explanation of the rechargeable battery pack into the contact slot as shown above and fit the battery pack into...Ensure the ON/OFF switch is at least 12 hours before first use. Connecting power supply for the Parent Unit D. NEVER place camera or cords within the crib. Fastening the cover for the Parent Unit Small cross head or Flat end screw driver WARNING: STRANGULATION ...
... small plug of baby's reach. Never use the enclosed adapter (5V DC / 600mA). Only use extension cords with AC Adapters. MODELS: MBP36S, MBP36S-2, MBP36S-3, MBP36S-4 QUICK START GUIDE For a full explanation of the rechargeable battery pack into the contact slot as shown above and fit the battery pack into...Ensure the ON/OFF switch is at least 12 hours before first use. Connecting power supply for the Parent Unit D. NEVER place camera or cords within the crib. Fastening the cover for the Parent Unit Small cross head or Flat end screw driver WARNING: STRANGULATION ...

Quick Start Guide
Page 2
...switch to the left or right. All rights reserved. Press to pan the camera left to switch off the LCD display. Press to switch on /off the unit. 3. General Information If your baby. MOTOROLA and the Stylized M Logo, are used under license. Press to confirm a... selection. Press to tilt the camera upward or downward. Contact Customer Service: US and Canada 1-888-331-3383 Email: motorola@encompass.com Manufactured, distributed or sold by Binatone Electronics International LTD., official licensee for this Quick...
...switch to the left or right. All rights reserved. Press to pan the camera left to switch off the LCD display. Press to switch on /off the unit. 3. General Information If your baby. MOTOROLA and the Stylized M Logo, are used under license. Press to confirm a... selection. Press to tilt the camera upward or downward. Contact Customer Service: US and Canada 1-888-331-3383 Email: motorola@encompass.com Manufactured, distributed or sold by Binatone Electronics International LTD., official licensee for this Quick...
