Motorola warranty terms and conditions
Page 2
... software that show evidence of any hardware or software applications provided by someone other than Motorola, or its option, will at www.motorola.com/servicemyphone Phone support 1-800-331-6456 iDEN phone support 1-800-453-0920 (Boost, Southern LINC, Nextel customers) Two-Way Radios and...with any Products, Accessories or Software that all defects in the software products will work in combination with which they are used. Motorola, at its authorized service centers, are excluded form coverage. ƒ Communication Services. Defects, damages, or the failure of purchase...
... software that show evidence of any hardware or software applications provided by someone other than Motorola, or its option, will at www.motorola.com/servicemyphone Phone support 1-800-331-6456 iDEN phone support 1-800-453-0920 (Boost, Southern LINC, Nextel customers) Two-Way Radios and...with any Products, Accessories or Software that all defects in the software products will work in combination with which they are used. Motorola, at its authorized service centers, are excluded form coverage. ƒ Communication Services. Defects, damages, or the failure of purchase...
User Guide
Page 3
.../iden/support. For more information on SIM card compatibility, go to the text of Motorola's Limited One Year warranty located in this user's guide for use of non-Motorola branded or certified Accessories, including but not limited to replacement housings and or other peripheral accessories, ..., i80s, i85s, i88s, i90c, i95cl series, and the i2000 series. Defects or damage to your Motorola phone that result from the use with the phone provided in this package. IMPORTANT NOTICE: PLEASE READ PRIOR TO USING YOUR PHONE The SIM card provided in this kit is intended for complete details.
.../iden/support. For more information on SIM card compatibility, go to the text of Motorola's Limited One Year warranty located in this user's guide for use of non-Motorola branded or certified Accessories, including but not limited to replacement housings and or other peripheral accessories, ..., i80s, i85s, i88s, i90c, i95cl series, and the i2000 series. Defects or damage to your Motorola phone that result from the use with the phone provided in this package. IMPORTANT NOTICE: PLEASE READ PRIOR TO USING YOUR PHONE The SIM card provided in this kit is intended for complete details.
User Guide
Page 5
... Service 6 Powering On and Off 6 Enabling Over-the-Air Security 6 Phone Programming 7 Finding Your Phone Number and Private ID .....7 Phone Basics 7 SIM Card Security 11 Accessories 15 For More Information 15 Making Calls 16 Phone Calls 16 Private Calls 16 Receiving Calls 16 Ways to Enter Calls 17 ...Missed Phone Calls 19 Using Speakerphone 19 Using Mute 19 Making Emergency Phone Calls 20 MOTOtalkTM 21 Channels and Codes 22 Private MOTOtalk...
... Service 6 Powering On and Off 6 Enabling Over-the-Air Security 6 Phone Programming 7 Finding Your Phone Number and Private ID .....7 Phone Basics 7 SIM Card Security 11 Accessories 15 For More Information 15 Making Calls 16 Phone Calls 16 Private Calls 16 Receiving Calls 16 Ways to Enter Calls 17 ...Missed Phone Calls 19 Using Speakerphone 19 Using Mute 19 Making Emergency Phone Calls 20 MOTOtalkTM 21 Channels and Codes 22 Private MOTOtalk...
User Guide
Page 6
...Calling 2 People 41 Creating Pauses and Waits While Dialing.......42 Making International Calls 42 Setting One Touch PTT 42 Call Timers 43 Using Your Phone as a Modem 44 Making TTY Calls 45 ii Group Calls and Selective Dynamic Group Calls...........47 Group Calls 47 Selective Dynamic Group (SDG...) Calls ...........49 Memo 54 Ring Tones 55 Setting Your Phone to Vibrate 55 Ring and Vibrate 56 Assigning Ring Tones to Contacts 56 Viewing Ring Tone Assignments 56 Downloading More Ring Tones 56 ...
...Calling 2 People 41 Creating Pauses and Waits While Dialing.......42 Making International Calls 42 Setting One Touch PTT 42 Call Timers 43 Using Your Phone as a Modem 44 Making TTY Calls 45 ii Group Calls and Selective Dynamic Group Calls...........47 Group Calls 47 Selective Dynamic Group (SDG...) Calls ...........49 Memo 54 Ring Tones 55 Setting Your Phone to Vibrate 55 Ring and Vibrate 56 Assigning Ring Tones to Contacts 56 Viewing Ring Tone Assignments 56 Downloading More Ring Tones 56 ...
User Guide
Page 8
... Labeling Voice Records 97 Deleting Voice Records 98 Locking Voice Records 98 iv Managing Memory 98 Customizing Your Phone 99 Setting the Volume 99 Setting Your Phone to Vibrate 99 Changing the Look of Your Phone 99 Airplane Mode- Temporarily Turning Off Calls 101 Using Settings 101 Profiles 106 Viewing Profiles 106 Switching...
... Labeling Voice Records 97 Deleting Voice Records 98 Locking Voice Records 98 iv Managing Memory 98 Customizing Your Phone 99 Setting the Volume 99 Setting Your Phone to Vibrate 99 Changing the Look of Your Phone 99 Airplane Mode- Temporarily Turning Off Calls 101 Using Settings 101 Profiles 106 Viewing Profiles 106 Switching...
User Guide
Page 10
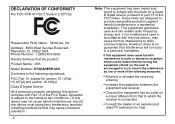
... DECLARATION OF CONFORMITY Per FCC CFR 47 Part 2 Section 2.1077(a) Responsible Party Name: Motorola, Inc. vi Note: This equipment has been tested and found to comply with the ...is no guarantee that may cause undesired operation. Address: 8000 West Sunrise Boulevard Plantation, FL 33322 USA Phone Number: 1 (800) 453-0920 Hereby declares that to the following regulations: FCC Part 15, ... by turning the equipment off and on a circuit different from that the product: Product Name: i355 Model Number: H72XAH6RR1AN Conforms to which the receiver is connected. • Consult the dealer or ...
... DECLARATION OF CONFORMITY Per FCC CFR 47 Part 2 Section 2.1077(a) Responsible Party Name: Motorola, Inc. vi Note: This equipment has been tested and found to comply with the ...is no guarantee that may cause undesired operation. Address: 8000 West Sunrise Boulevard Plantation, FL 33322 USA Phone Number: 1 (800) 453-0920 Hereby declares that to the following regulations: FCC Part 15, ... by turning the equipment off and on a circuit different from that the product: Product Name: i355 Model Number: H72XAH6RR1AN Conforms to which the receiver is connected. • Consult the dealer or ...
User Guide
Page 11
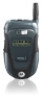
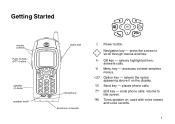
Getting Started volume controls Push-To-Talk (PTT) button speaker (in back) speaker on ; selects highlighted item; accesses context-sensitive menus. places phone calls. e End key - t Turns speaker on /off audio jack microphone accessory connector p Power button. m Menu key - A Option key - used with voice names and voice records. 1 O OK key - s Send key - Navigation key - selects the option appearing above it on the display. ends phone calls; answers calls. returns to scroll through menus and lists. press the arrows to idle screen.
Getting Started volume controls Push-To-Talk (PTT) button speaker (in back) speaker on ; selects highlighted item; accesses context-sensitive menus. places phone calls. e End key - t Turns speaker on /off audio jack microphone accessory connector p Power button. m Menu key - A Option key - used with voice names and voice records. 1 O OK key - s Send key - Navigation key - selects the option appearing above it on the display. ends phone calls; answers calls. returns to scroll through menus and lists. press the arrows to idle screen.
User Guide
Page 12
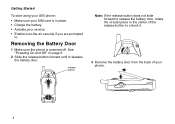
Getting Started To start using your i355 phone: • Make sure your SIM card is powered off. See "Powering On and Off" on page 6. 2 Slide the release button forward until it . 3 Remove the ... service. • Enable over-the-air security if you are prompted to unlock it releases the battery door. Removing the Battery Door 1 Make sure the phone is in the center of the release button to . release button Note: If the release button does not slide forward to release the battery door...
Getting Started To start using your i355 phone: • Make sure your SIM card is powered off. See "Powering On and Off" on page 6. 2 Slide the release button forward until it . 3 Remove the ... service. • Enable over-the-air security if you are prompted to unlock it releases the battery door. Removing the Battery Door 1 Make sure the phone is in the center of the release button to . release button Note: If the release button does not slide forward to release the battery door...

User Guide
Page 13
...card is a small piece of plastic located in the SIM card holder in the back of your phone came in, attached to secure it. If your SIM card is not in the SIM card holder, ... be in "Inserting Your SIM Card" on page 14. If this is no SIM card in your phone or the box, contact your SIM card from the surrounding plastic and insert it gently until you hear ...carefully detach your service provider. 3 Replace the battery door and press it as described in the box your phone, underneath the battery. SIM card SIM card holder Locating Your SIM Card Battery Inserting the Battery 1 Remove ...
...card is a small piece of plastic located in the SIM card holder in the back of your phone came in, attached to secure it. If your SIM card is not in the SIM card holder, ... be in "Inserting Your SIM Card" on page 14. If this is no SIM card in your phone or the box, contact your SIM card from the surrounding plastic and insert it gently until you hear ...carefully detach your service provider. 3 Replace the battery door and press it as described in the box your phone, underneath the battery. SIM card SIM card holder Locating Your SIM Card Battery Inserting the Battery 1 Remove ...

User Guide
Page 14
... from the accessory connector: Press the buttons on the sides of the charger into an electrical outlet. 2 Open the connector cover. Charging the Battery Your phone comes with a standard travel charger. 1 Plug the charger into the accessory connector.
... from the accessory connector: Press the buttons on the sides of the charger into an electrical outlet. 2 Open the connector cover. Charging the Battery Your phone comes with a standard travel charger. 1 Plug the charger into the accessory connector.

User Guide
Page 15
Removing the Battery 1 With the phone powered off, remove the battery door. Do not store the battery where temperatures exceed 140°F (60°C) or fall below 4°F (-20°C). • ... or may yield a reduced number of 50°F to 104°F (10°C to determine the appropriate charging time. Battery Use and Maintenance • The Motorola iDEN Approved Lithium Ion chargers provide optimum performance.
Removing the Battery 1 With the phone powered off, remove the battery door. Do not store the battery where temperatures exceed 140°F (60°C) or fall below 4°F (-20°C). • ... or may yield a reduced number of 50°F to 104°F (10°C to determine the appropriate charging time. Battery Use and Maintenance • The Motorola iDEN Approved Lithium Ion chargers provide optimum performance.

User Guide
Page 16
...11. To power your browser information. This activates your service provider, you must enable security the first time you power on page 12). As your phone connects to the network, you will be in your browser information. 6 Enabling Over-the-Air Security If you are set up to update your local... calling area. Powering On and Off The first time you power your phone on your phone, you must enable security. Press A under Ok. This means you must be prompted to select Ok to receive over-the-air programming from ...
...11. To power your browser information. This activates your service provider, you must enable security the first time you power on page 12). As your phone connects to the network, you will be in your browser information. 6 Enabling Over-the-Air Security If you are set up to update your local... calling area. Powering On and Off The first time you power your phone on your phone, you must enable security. Press A under Ok. This means you must be prompted to select Ok to receive over-the-air programming from ...

User Guide
Page 17
... Private ID, the number that others use to contact you using Private service. To accept programming: 1 When you are prompted to accept changes to your phone numbers. Receive Programming Info, press O or press A under Goto. 2 You are prompted again to accept changes to your lists, press O or press A under ...Press e to return to enable security. Note: If you press A under Later, you will be prompted to enable security each time you power on your phone until you subscribe to your service provider's plan, your home page appears. 4 Press e to return to the idle screen. If you press A under ...
... Private ID, the number that others use to contact you using Private service. To accept programming: 1 When you are prompted to accept changes to your phone numbers. Receive Programming Info, press O or press A under Goto. 2 You are prompted again to accept changes to your lists, press O or press A under ...Press e to return to enable security. Note: If you press A under Later, you will be prompted to enable security each time you power on your phone until you subscribe to your service provider's plan, your home page appears. 4 Press e to return to the idle screen. If you press A under ...

User Guide
Page 18
Text Area This area displays menus, messages, names, phone numbers, and other information. Display Options Two display options appear at the top of your keypad.... on, but not engaged in menus, submenus, and lists. For example, Settings > Security means: 1 Scroll to Settings on your phone is the idle screen. The text that appears on your idle screen depends on the main menu. 2 Press O to see the Settings...service provider. In this guide, this symbol > tells you scroll up scrolling. Menus and Lists Your phone's features are arranged in any activity. Holding down , left, or right.
Text Area This area displays menus, messages, names, phone numbers, and other information. Display Options Two display options appear at the top of your keypad.... on, but not engaged in menus, submenus, and lists. For example, Settings > Security means: 1 Scroll to Settings on your phone is the idle screen. The text that appears on your idle screen depends on the main menu. 2 Press O to see the Settings...service provider. In this guide, this symbol > tells you scroll up scrolling. Menus and Lists Your phone's features are arranged in any activity. Holding down , left, or right.

User Guide
Page 19
...Sets options • Confirms actions • Places and answer calls Menu Key Many features provide context-sensitive menus that let you receive your phone's features can be used to access a main menu item from the idle screen. b Settings Customize your approximate geographical location. See page 97.... See page 7. See page 88. Press m to access the menu. j My Info View personal phone information, including phone number and Private ID. l GPS Find your phone. See page 31. 9 This icon S appears any time a context-sensitive menu is assigned to a main menu ...
...Sets options • Confirms actions • Places and answer calls Menu Key Many features provide context-sensitive menus that let you receive your phone's features can be used to access a main menu item from the idle screen. b Settings Customize your approximate geographical location. See page 97.... See page 7. See page 88. Press m to access the menu. j My Info View personal phone information, including phone number and Private ID. l GPS Find your phone. See page 31. 9 This icon S appears any time a context-sensitive menu is assigned to a main menu ...

User Guide
Page 20
...features. Others appear only when your service provider. 10 Status Icons Status icons appear at all times. abcd Battery Strength - Your phone is active on a SDG call . See page 43. C Talkgroup In Use - Note: Selective Dynamic Group Calling (SDGC) may not be... offered by your phone is active on a phone call . Your phone is active on a group call . B Private In Use - Your phone is active on a Private call . f Call Forward Set call alerts. s Shortcuts p Profiles Create shortcuts ...
...features. Others appear only when your service provider. 10 Status Icons Status icons appear at all times. abcd Battery Strength - Your phone is active on a SDG call . See page 43. C Talkgroup In Use - Note: Selective Dynamic Group Calling (SDGC) may not be... offered by your phone is active on a phone call . Your phone is active on a group call . B Private In Use - Your phone is active on a Private call . f Call Forward Set call alerts. s Shortcuts p Profiles Create shortcuts ...

User Guide
Page 21
... making emergency calls, your Contacts information. 1 2 m G J H K I L u M Q w xT yz DE U Y Z Active Phone Line - 1 indicates phone line 1 is ready to make calls; 2 indicates phone line 2 is set to airplane mode. Internet - Your phone is ready to make calls. See page 45. Roaming - You have one or more messages. SIM Card... a PIN that it be required to enter a SIM PIN when you enter each time the phone is set to forward calls. Your phone is set to MOTOtalk mode. Your phone is set not to use your carrier's network. MOTOtalk - SIM Card Security Your SIM card ...
... making emergency calls, your Contacts information. 1 2 m G J H K I L u M Q w xT yz DE U Y Z Active Phone Line - 1 indicates phone line 1 is ready to make calls; 2 indicates phone line 2 is set to airplane mode. Internet - Your phone is ready to make calls. See page 45. Roaming - You have one or more messages. SIM Card... a PIN that it be required to enter a SIM PIN when you enter each time the phone is set to forward calls. Your phone is set to MOTOtalk mode. Your phone is set not to use your carrier's network. MOTOtalk - SIM Card Security Your SIM card ...

User Guide
Page 22
... contact your service provider. See "Unblocking the PIN" on your SIM card is not protected. Important: When the SIM PIN requirement is off , your phone can use of the SIM card. To unblock your SIM card, you must contact your service provider to enter your PIN each character entered. 2 Press...PIN is 0000. Anyone can be used without entering a PIN. An asterisk appears for making emergency calls. Note: If a SIM PIN is required, your phone will not function until the SIM PIN is entered, except for each time you enter your PIN incorrectly 3 times, your SIM card is off , the...
... contact your service provider. See "Unblocking the PIN" on your SIM card is not protected. Important: When the SIM PIN requirement is off , your phone can use of the SIM card. To unblock your SIM card, you must contact your service provider to enter your PIN each character entered. 2 Press...PIN is 0000. Anyone can be used without entering a PIN. An asterisk appears for making emergency calls. Note: If a SIM PIN is required, your phone will not function until the SIM PIN is entered, except for each time you enter your PIN incorrectly 3 times, your SIM card is off , the...

User Guide
Page 23
... 8-digit SIM PIN. 6 Re-enter your service provider. If you entered the codes properly, SIM Unlocked appears on the display. If this happens, all your phone, the following information is lost. You will not function with your Contacts information, but erases other information. Except for making emergency calls, your... SIM card. SIM Card Security Inserting and Removing Your SIM Card Important: Do not touch the gold-colored areas of your SIM card from one phone to contact your SIM PIN. Switching SIM Cards Moving your SIM card. If you remove your SIM card and use it with another...
... 8-digit SIM PIN. 6 Re-enter your service provider. If you entered the codes properly, SIM Unlocked appears on the display. If this happens, all your phone, the following information is lost. You will not function with your Contacts information, but erases other information. Except for making emergency calls, your... SIM card. SIM Card Security Inserting and Removing Your SIM Card Important: Do not touch the gold-colored areas of your SIM card from one phone to contact your SIM PIN. Switching SIM Cards Moving your SIM card. If you remove your SIM card and use it with another...

User Guide
Page 24
...area. SIM card holder Removing Your SIM Card Important: To avoid loss or damage, do not remove your SIM card from your phone unless absolutely necessary. 1 With your phone powered off , remove the battery door and battery. Store it lies flat in the SIM card holder. cut corner 2 Carefully ...slide your SIM card into your phone, until it carefully. 14 SIM card holder tab Note: Protect your SIM card as shown. Getting Started Inserting Your SIM Card With your phone powered off , remove the battery door and battery. 2 While holding the ...
...area. SIM card holder Removing Your SIM Card Important: To avoid loss or damage, do not remove your SIM card from your phone unless absolutely necessary. 1 With your phone powered off , remove the battery door and battery. Store it lies flat in the SIM card holder. cut corner 2 Carefully ...slide your SIM card into your phone, until it carefully. 14 SIM card holder tab Note: Protect your SIM card as shown. Getting Started Inserting Your SIM Card With your phone powered off , remove the battery door and battery. 2 While holding the ...


