

User Manual
Page 4
Contents Section 1:Overview 1-1 Features ...1-2 Understanding Your User Guide 1-3 Box Contents ...1-3 Understanding Functions 1-4 Router ...1-4 TCP/IP...1-4 Static IP Address...1-4 Dynamic IP Address...1-4 DHCP Server ...1-5 Simple Home Network Diagram 1-5 Router Physical Description 1-6 Back of Router ...1-6 Front of Router ...1-8 LED Description 1-8 Section 2:Installation 2-1 Hardware Setup ...2-1 Router... 2000 2-11 Configuring Windows XP 2-13 Log In...2-16 Configure Your Basic Internet Settings 2-17 DHCP Configuration 2-17 PPPoE...2-17 Static IP...2-18 PPTP ...2-18 CONTENTS I
Contents Section 1:Overview 1-1 Features ...1-2 Understanding Your User Guide 1-3 Box Contents ...1-3 Understanding Functions 1-4 Router ...1-4 TCP/IP...1-4 Static IP Address...1-4 Dynamic IP Address...1-4 DHCP Server ...1-5 Simple Home Network Diagram 1-5 Router Physical Description 1-6 Back of Router ...1-6 Front of Router ...1-8 LED Description 1-8 Section 2:Installation 2-1 Hardware Setup ...2-1 Router... 2000 2-11 Configuring Windows XP 2-13 Log In...2-16 Configure Your Basic Internet Settings 2-17 DHCP Configuration 2-17 PPPoE...2-17 Static IP...2-18 PPTP ...2-18 CONTENTS I

User Manual
Page 9
... or randomly generated by your router require some explanation so you use when configuring your network with an IP address. Static IP addresses must be unique and cannot be thought of a day or two. Dynamic IP Address A dynamic IP address is assigned manually to server. Every device you will use when configuring your ISP might have assigned you...
... or randomly generated by your router require some explanation so you use when configuring your network with an IP address. Static IP addresses must be unique and cannot be thought of a day or two. Dynamic IP Address A dynamic IP address is assigned manually to server. Every device you will use when configuring your ISP might have assigned you...

User Manual
Page 10
The client (PC, gaming device, etc.) is automatically assigned an IP address every time a device is added to your network, freeing you to share files, printers, and the Internet connection. A sample Local Area Network (LAN)... router serves as the gateway to the router. OVERVIEW SECTION 1 DHCP Server A Dynamic Host Configuration Protocol (DHCP) Server assigns IP addresses to clients connected to your network from manually assigning IP addresses. SECTION 1, OVERVIEW 1-5 Client is shown below: The Internet communicates with the modem which in turn communicates with your network, ...
The client (PC, gaming device, etc.) is automatically assigned an IP address every time a device is added to your network, freeing you to share files, printers, and the Internet connection. A sample Local Area Network (LAN)... router serves as the gateway to the router. OVERVIEW SECTION 1 DHCP Server A Dynamic Host Configuration Protocol (DHCP) Server assigns IP addresses to clients connected to your network from manually assigning IP addresses. SECTION 1, OVERVIEW 1-5 Client is shown below: The Internet communicates with the modem which in turn communicates with your network, ...

User Manual
Page 11
... unit or resets the unit to reset the router. This retains the router's configuration information. This clears the router's user settings, including User ID, Password, IP Address, and Subnet mask. SECTION 1 OVERVIEW Router Physical Description The following illustration shows the BR700 back panel: 1 2 3 4 5 6 7 Reset Power LAN 4 3 2 1 WAN Feature Description 1 Power The receptacle...
... unit or resets the unit to reset the router. This retains the router's configuration information. This clears the router's user settings, including User ID, Password, IP Address, and Subnet mask. SECTION 1 OVERVIEW Router Physical Description The following illustration shows the BR700 back panel: 1 2 3 4 5 6 7 Reset Power LAN 4 3 2 1 WAN Feature Description 1 Power The receptacle...

User Manual
Page 13
... the firmware is corrupted, indicating the firmware needs to blink and the router's default user name, password, private LAN IP address, and private subnet mask address will be restored. 2. Red The WAN interface has been disabled by the firmware. Amber 10BaseT link detected/active traffic present.... Red The WAN connection has lost IP connectivity with its operational status. Or the WAN connection repair procedure is still in ...
... the firmware is corrupted, indicating the firmware needs to blink and the router's default user name, password, private LAN IP address, and private subnet mask address will be restored. 2. Red The WAN interface has been disabled by the firmware. Amber 10BaseT link detected/active traffic present.... Red The WAN connection has lost IP connectivity with its operational status. Or the WAN connection repair procedure is still in ...

User Manual
Page 21
..., you have now completed the hardware installation. Windows 98SE ! Windows ME ! Windows XP Determine the operating system for that is going to automatically obtain an IP address. The next section, Configure Your Computers, steps you are including in your network and follow the steps to configure the network settings for each PC...
..., you have now completed the hardware installation. Windows 98SE ! Windows ME ! Windows XP Determine the operating system for that is going to automatically obtain an IP address. The next section, Configure Your Computers, steps you are including in your network and follow the steps to configure the network settings for each PC...
User Manual
Page 23
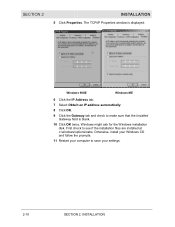
Windows might ask for the Windows installation disk. SECTION 2 INSTALLATION 5 Click Properties. First check to save your settings. 2-10 SECTION 2, INSTALLATION Otherwise, install your Windows CD and follow the prompts. 11 Restart your computer to see if the installation files are installed at c:\windows\options\cabs. The TCP/IP Properties window is displayed: Windows 98SE Windows ME 6 Click the IP Address tab. 7 Select Obtain an IP address automatically. 8 Click OK. 9 Click the Gateway tab and check to make sure that the Installed Gateway field is blank. 10 Click OK twice.
Windows might ask for the Windows installation disk. SECTION 2 INSTALLATION 5 Click Properties. First check to save your settings. 2-10 SECTION 2, INSTALLATION Otherwise, install your Windows CD and follow the prompts. 11 Restart your computer to see if the installation files are installed at c:\windows\options\cabs. The TCP/IP Properties window is displayed: Windows 98SE Windows ME 6 Click the IP Address tab. 7 Select Obtain an IP address automatically. 8 Click OK. 9 Click the Gateway tab and check to make sure that the Installed Gateway field is blank. 10 Click OK twice.

User Manual
Page 26
INSTALLATION SECTION 2 6 Highlight Internet Protocol (TCP/IP) and click the Properties button. 7 Select Obtain an IP address automatically. SECTION 2, INSTALLATION 2-13 If you have retained the default interface for Windows 2000. 1 Click Start. 2 Select Settings. 3 Select Control Panel. 4 Double-click Network and Dial-Up Connections. Configuring Windows XP This configuration assumes you are running the 'Classic' interface, please follow the instructions for Windows XP. Click OK twice to exit and save your settings. 8 Restart your computer to save your settings.
INSTALLATION SECTION 2 6 Highlight Internet Protocol (TCP/IP) and click the Properties button. 7 Select Obtain an IP address automatically. SECTION 2, INSTALLATION 2-13 If you have retained the default interface for Windows 2000. 1 Click Start. 2 Select Settings. 3 Select Control Panel. 4 Double-click Network and Dial-Up Connections. Configuring Windows XP This configuration assumes you are running the 'Classic' interface, please follow the instructions for Windows XP. Click OK twice to exit and save your settings. 8 Restart your computer to save your settings.

User Manual
Page 28
Click OK twice to highlight Internet Protocol (TCP/IP) and click the Properties button. 9 Click Obtain an IP address automatically. INSTALLATION SECTION 2 8 Click to exit and save your settings. SECTION 2, INSTALLATION 2-15
Click OK twice to highlight Internet Protocol (TCP/IP) and click the Properties button. 9 Click Obtain an IP address automatically. INSTALLATION SECTION 2 8 Click to exit and save your settings. SECTION 2, INSTALLATION 2-15

User Manual
Page 29
... In INSTALLATION Log into the URL field http://192.168.20.1 (the router's default IP address) and Enter. 2 The login screen appears. 3 Enter the USER ID. Enter into the router using the following procedure: 1 Once the router is "motorola", without the quotation marks. 4 Enter the PASSWORD. The default factory setting is connected, open...
... In INSTALLATION Log into the URL field http://192.168.20.1 (the router's default IP address) and Enter. 2 The login screen appears. 3 Enter the USER ID. Enter into the router using the following procedure: 1 Once the router is "motorola", without the quotation marks. 4 Enter the PASSWORD. The default factory setting is connected, open...

User Manual
Page 31
... if you wish to start over , click Cancel. 2-18 SECTION 2, INSTALLATION SECTION 2 INSTALLATION Static IP If you are required to use . 1 From Connection Mode, select Static IP. 2 In the IP Address field, enter the IP Address supplied by your ISP. 3 In the Subnet Mask field, enter the Subnet Mask supplied by your ...Password field, enter the PPP Password supplied by your ISP. 4 In the PPTP Client IP field, enter the PPTP Client IP address supplied by your ISP. 5 In the PPTP Server IP field, enter the PPTP Server IP address supplied by your ISP. 6 Click Apply to save the setting, or, if you ...
... if you wish to start over , click Cancel. 2-18 SECTION 2, INSTALLATION SECTION 2 INSTALLATION Static IP If you are required to use . 1 From Connection Mode, select Static IP. 2 In the IP Address field, enter the IP Address supplied by your ISP. 3 In the Subnet Mask field, enter the Subnet Mask supplied by your ...Password field, enter the PPP Password supplied by your ISP. 4 In the PPTP Client IP field, enter the PPTP Client IP address supplied by your ISP. 5 In the PPTP Server IP field, enter the PPTP Server IP address supplied by your ISP. 6 Click Apply to save the setting, or, if you ...

User Manual
Page 32
...(the router's default IP address). Press Enter. The default factory setting is connected, open your user name or password, view the status of the network, and more. SECTION 3, CONFIGURATION 3-1 Using the Configuration Utility Log In 1 Once the router is "motorola", without the quotation ...marks. 3 Enter the PASSWORD. Section 3:Configuration You can customize features for your home network, change settings such as your web browser. Enter into the URL field the router's IP address.
...(the router's default IP address). Press Enter. The default factory setting is connected, open your user name or password, view the status of the network, and more. SECTION 3, CONFIGURATION 3-1 Using the Configuration Utility Log In 1 Once the router is "motorola", without the quotation ...marks. 3 Enter the PASSWORD. Section 3:Configuration You can customize features for your home network, change settings such as your web browser. Enter into the URL field the router's IP address.
User Manual
Page 35
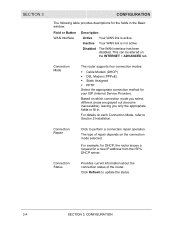
... in the Basic window: Field or Button WAN Interface Description Active Your WAN link is not active. PPTP Select the appropriate connection method for a new IP address from the ISP's DHCP server. For example, for DHCP, the router issues a request for your ISP (Internet Service Provider). Inactive Your WAN link is active...
... in the Basic window: Field or Button WAN Interface Description Active Your WAN link is not active. PPTP Select the appropriate connection method for a new IP address from the ISP's DHCP server. For example, for DHCP, the router issues a request for your ISP (Internet Service Provider). Inactive Your WAN link is active...

User Manual
Page 36
... to connect to your ISP. It is currently using Static Assigned, then you would enter the IP Address here. Obtain DNS Server Address Automatically Select Yes to obtain the DNS information automatically, or No to access the Internet. If using to enter the ... Is either automatically displayed or manually entered from information provided by your ISP. For example, if DHCP is selected, this is the IP Address that your router is either automatically displayed or manually entered from information provided by your ISP. Default Gateway Is either automatically displayed or ...
... to connect to your ISP. It is currently using Static Assigned, then you would enter the IP Address here. Obtain DNS Server Address Automatically Select Yes to obtain the DNS information automatically, or No to access the Internet. If using to enter the ... Is either automatically displayed or manually entered from information provided by your ISP. For example, if DHCP is selected, this is the IP Address that your router is either automatically displayed or manually entered from information provided by your ISP. Default Gateway Is either automatically displayed or ...
User Manual
Page 40
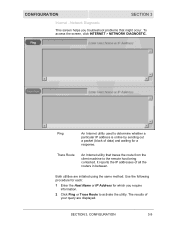
...SECTION 3, CONFIGURATION 3-9 The results of all the routers in between. Use the following procedure for each: 1 Enter the Host Name or IP Address for which you troubleshoot problems that traces the route from the client machine to the remote host being contacted. It reports the... that might occur. Network Diagnostic This screen helps you require information. 2 Click Ping or Trace Route to determine whether a particular IP address is online by sending out a packet (block of data) and waiting for a response. To access the screen, click INTERNET > NETWORK DIAGNOSTIC.
...SECTION 3, CONFIGURATION 3-9 The results of all the routers in between. Use the following procedure for each: 1 Enter the Host Name or IP Address for which you troubleshoot problems that traces the route from the client machine to the remote host being contacted. It reports the... that might occur. Network Diagnostic This screen helps you require information. 2 Click Ping or Trace Route to determine whether a particular IP address is online by sending out a packet (block of data) and waiting for a response. To access the screen, click INTERNET > NETWORK DIAGNOSTIC.
User Manual
Page 45
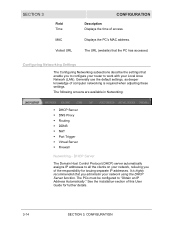
... your Local Area Network (LAN). Generally use the default settings, as deeper knowledge of this User Guide for issuing separate IP addresses. The following screens are available in Networking: ! Port Trigger ! It is required when adjusting these settings. Configuring Networking Settings... The Configuring Networking subsections describe the settings that you of access. DDNS ! Displays the PC's MAC address. The URL (website) that the PC has accessed. SECTION 3 Field Time MAC Visited URL CONFIGURATION Description Displays the time...
... your Local Area Network (LAN). Generally use the default settings, as deeper knowledge of this User Guide for issuing separate IP addresses. The following screens are available in Networking: ! Port Trigger ! It is required when adjusting these settings. Configuring Networking Settings... The Configuring Networking subsections describe the settings that you of access. DDNS ! Displays the PC's MAC address. The URL (website) that the PC has accessed. SECTION 3 Field Time MAC Visited URL CONFIGURATION Description Displays the time...
User Manual
Page 46
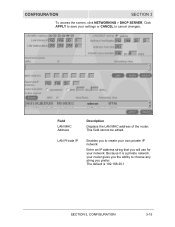
LAN Private IP Enables you prefer. This field cannot be edited. Because it is 192.168.20.1 SECTION 3, CONFIGURATION 3-15 Click APPLY to save your network. Field LAN MAC Address Description Displays the LAN MAC address of the router. The default is a private network, your router gives you the ability to choose any string you to cancel changes. Enter an IP address string that you will use for your settings or CANCEL to create your own private IP network. CONFIGURATION SECTION 3 To access the screen, click NETWORKING > DHCP SERVER.
LAN Private IP Enables you prefer. This field cannot be edited. Because it is 192.168.20.1 SECTION 3, CONFIGURATION 3-15 Click APPLY to save your network. Field LAN MAC Address Description Displays the LAN MAC address of the router. The default is a private network, your router gives you the ability to choose any string you to cancel changes. Enter an IP address string that you will use for your settings or CANCEL to create your own private IP network. CONFIGURATION SECTION 3 To access the screen, click NETWORKING > DHCP SERVER.

User Manual
Page 47
... what is entered in a new duration. The default is 253. Address Pool Begins Based on your network. The default is enabled. Default Lease Duration Displays the Hours and Minutes of a destination LAN IP address is the network portion and which portion is where the router starts ...handing out IP numbers. If you want to make available every number, enter 253. Enter in the LAN ...
... what is entered in a new duration. The default is 253. Address Pool Begins Based on your network. The default is enabled. Default Lease Duration Displays the Hours and Minutes of a destination LAN IP address is the network portion and which portion is where the router starts ...handing out IP numbers. If you want to make available every number, enter 253. Enter in the LAN ...

User Manual
Page 48
... This feature is most useful for a specific device, such as a print server: To reserve a lease: 1 Enter a new MAC Address. 2 Enter the reserved IP Address. 3 Choose the duration type. To update or remove a lease, select it and then click Update or Remove. Networking - This is...list. CONFIGURATION SECTION 3 Field Reserved Leases Description The DHCP reserves a set IP addresses. This feature can be used only on your Private network. Displaying only active leases with the following: MAC Address, IP address, Host Name, and the duration of its lease. The feature translates domain...
... This feature is most useful for a specific device, such as a print server: To reserve a lease: 1 Enter a new MAC Address. 2 Enter the reserved IP Address. 3 Choose the duration type. To update or remove a lease, select it and then click Update or Remove. Networking - This is...list. CONFIGURATION SECTION 3 Field Reserved Leases Description The DHCP reserves a set IP addresses. This feature can be used only on your Private network. Displaying only active leases with the following: MAC Address, IP address, Host Name, and the duration of its lease. The feature translates domain...

User Manual
Page 49
... a Host Name, select it and then click Update or Remove the Host Name assignment. The default is the Host Name to be assigned to the IP address. Click Add to cancel changes. 3-18 Field LAN Private Host Name Description Displays the current Host name for the LAN device. Click APPLY to save... your settings or CANCEL to assign the Host Name and IP address. SECTION 3 CONFIGURATION To access the screen, click NETWORKING > DNS PROXY. Host Table Displays the Host Name assignments.
... a Host Name, select it and then click Update or Remove the Host Name assignment. The default is the Host Name to be assigned to the IP address. Click Add to cancel changes. 3-18 Field LAN Private Host Name Description Displays the current Host name for the LAN device. Click APPLY to save... your settings or CANCEL to assign the Host Name and IP address. SECTION 3 CONFIGURATION To access the screen, click NETWORKING > DNS PROXY. Host Table Displays the Host Name assignments.


