

User Manual
Page 4
... 2-1 Horizontal Installation ...2-1 Vertical Installation ...2-2 Wall Mount Installation 2-2 Electrical Connection to Router 2-6 Easy Software Setup 2-6 Manual Software Setup 2-6 Connection to Router 2-7 Configure Your Computers 2-8 Configuring Windows 98SE and ME 2-9 Configuring Windows 2000 2-11 Configuring Windows XP 2-13 Log In...2-16 Configure Your Basic Internet Settings 2-17 DHCP Configuration 2-17 PPPoE...2-17 Static IP...2-18 PPTP ...2-18 CONTENTS I
... 2-1 Horizontal Installation ...2-1 Vertical Installation ...2-2 Wall Mount Installation 2-2 Electrical Connection to Router 2-6 Easy Software Setup 2-6 Manual Software Setup 2-6 Connection to Router 2-7 Configure Your Computers 2-8 Configuring Windows 98SE and ME 2-9 Configuring Windows 2000 2-11 Configuring Windows XP 2-13 Log In...2-16 Configure Your Basic Internet Settings 2-17 DHCP Configuration 2-17 PPPoE...2-17 Static IP...2-18 PPTP ...2-18 CONTENTS I

User Manual
Page 5
... 4-1 My broadband modem already uses a built-in router 4-2 Software Solutions 4-2 I would like to test to see if my Internet connection is alive 4-2 I cannot access the Configuration Utility for the router 4-3 Section 5:Glossary 5-1 II CONTENTS UPnP 3-31 Control Panel - Port Trigger 3-23 Networking - Device Security 3-27 Control Panel - Firmware Update 3-29 Control...
... 4-1 My broadband modem already uses a built-in router 4-2 Software Solutions 4-2 I would like to test to see if my Internet connection is alive 4-2 I cannot access the Configuration Utility for the router 4-3 Section 5:Glossary 5-1 II CONTENTS UPnP 3-31 Control Panel - Port Trigger 3-23 Networking - Device Security 3-27 Control Panel - Firmware Update 3-29 Control...
User Manual
Page 7
... through allowing remote connection with only those whom you by sharing your networked PCs to share files and printers as well. Your Motorola Ethernet Broadband Router BR700 protects and connects you designate. CD-ROM based Installation Wizard to stay current with NAT translation, IP and...and the built-in DHCP server to connect when you the freedom to easily configure a private Local Area Network (LAN) ! Also supported are the NAT and MAC filtering protocols, giving you . Web-based configuration of up to share your Internet connection with your corporate network 1-2 SECTION ...
... through allowing remote connection with only those whom you by sharing your networked PCs to share files and printers as well. Your Motorola Ethernet Broadband Router BR700 protects and connects you designate. CD-ROM based Installation Wizard to stay current with NAT translation, IP and...and the built-in DHCP server to connect when you the freedom to easily configure a private Local Area Network (LAN) ! Also supported are the NAT and MAC filtering protocols, giving you . Web-based configuration of up to share your Internet connection with your corporate network 1-2 SECTION ...

User Manual
Page 8
... details for using the Configuration Utility to manage your unit. Box Contents Glossary List of technology used, and recommended practices for using it. Installation It is subdivided into the following ...
... details for using the Configuration Utility to manage your unit. Box Contents Glossary List of technology used, and recommended practices for using it. Installation It is subdivided into the following ...

User Manual
Page 9
...SECTION 1 OVERVIEW Understanding Functions The various technologies and features utilized by your router require some explanation so you use when configuring your router. Routers provide bandwidth security by a DHCP server. You are used in the space of your home network... IP number, dynamically or randomly generated by keeping data out of a day or two. See more information in Configuration. See more information in Configuration. 1-4 SECTION 1, OVERVIEW This is assigned manually to the appropriate PC. TCP/IP Transmission Control Protocol/Internet Protocol ...
...SECTION 1 OVERVIEW Understanding Functions The various technologies and features utilized by your router require some explanation so you use when configuring your router. Routers provide bandwidth security by a DHCP server. You are used in the space of your home network... IP number, dynamically or randomly generated by keeping data out of a day or two. See more information in Configuration. See more information in Configuration. 1-4 SECTION 1, OVERVIEW This is assigned manually to the appropriate PC. TCP/IP Transmission Control Protocol/Internet Protocol ...

User Manual
Page 10
SECTION 1, OVERVIEW 1-5 The router acts as the centerpiece of your network, allowing you from the public domain. OVERVIEW SECTION 1 DHCP Server A Dynamic Host Configuration Protocol (DHCP) Server assigns IP addresses to clients connected to multiplayer games. A sample Local Area Network (LAN) is shown below: The Internet communicates with the ...
SECTION 1, OVERVIEW 1-5 The router acts as the centerpiece of your network, allowing you from the public domain. OVERVIEW SECTION 1 DHCP Server A Dynamic Host Configuration Protocol (DHCP) Server assigns IP addresses to clients connected to multiplayer games. A sample Local Area Network (LAN) is shown below: The Internet communicates with the ...

User Manual
Page 11
Back of your unit or resets the unit to the factory defaults, press and hold the Reset button for re-configuring the router. 1-6 SECTION 1, OVERVIEW To reset the unit to the default login settings. Refer to reset the router. This ... the router is experiencing trouble connecting to the Internet, briefly press and release the Reset button to Section3:Configuration for more than 5 seconds. This retains the router's configuration information. SECTION 1 OVERVIEW Router Physical Description The following sections describe the physical characteristics of Router The following ...
Back of your unit or resets the unit to the factory defaults, press and hold the Reset button for re-configuring the router. 1-6 SECTION 1, OVERVIEW To reset the unit to the default login settings. Refer to reset the router. This ... the router is experiencing trouble connecting to the Internet, briefly press and release the Reset button to Section3:Configuration for more than 5 seconds. This retains the router's configuration information. SECTION 1 OVERVIEW Router Physical Description The following sections describe the physical characteristics of Router The following ...

User Manual
Page 14
... detailed instructions for Product Setup. Router Physical Installation You can install the router in the desired location and follow the procedures below for connecting and configuring the unit. Section 2:Installation To get your hardware. ! Follow the prompts. Setup your network up and running: ! Insert the CD-ROM for completing these tasks...
... detailed instructions for Product Setup. Router Physical Installation You can install the router in the desired location and follow the procedures below for connecting and configuring the unit. Section 2:Installation To get your hardware. ! Follow the prompts. Setup your network up and running: ! Insert the CD-ROM for completing these tasks...

User Manual
Page 15
... base. Locate the unit as specified by the local or national codes governing residential or business communications services. ! Follow all local standards for connecting and configuring the unit. Use anchors if necessary; Wall Mount Installation If you mount the router on drywall. 2-2 SECTION 2, INSTALLATION for example if you must mount the...
... base. Locate the unit as specified by the local or national codes governing residential or business communications services. ! Follow all local standards for connecting and configuring the unit. Use anchors if necessary; Wall Mount Installation If you mount the router on drywall. 2-2 SECTION 2, INSTALLATION for example if you must mount the...

User Manual
Page 18
... mounting screws. 12 Slide the router down until it stops against the top of the keyhole opening. 13 Follow the installation procedures for connecting and configuring the unit. SECTION 2, INSTALLATION 2-5 There must be 4.0 mm (.16 inches) between the wall and the underside of the screw head. ! INSTALLATION SECTION 2 9 Using a screwdriver, turn...
... mounting screws. 12 Slide the router down until it stops against the top of the keyhole opening. 13 Follow the installation procedures for connecting and configuring the unit. SECTION 2, INSTALLATION 2-5 There must be 4.0 mm (.16 inches) between the wall and the underside of the screw head. ! INSTALLATION SECTION 2 9 Using a screwdriver, turn...

User Manual
Page 19
... to manually setup your network: ! Manual Software Setup If you don't want to use this section to configure it. For advanced configurations, refer to Section 3:Configuration. 2-6 SECTION 2, INSTALLATION This section details the physical connection of the unit. 2 Then plug the power ...adapter into a grounded and surge protected power outlet. ! To set up and running, refer to Section 3:Configuration for advanced configuration. Physically connect and power on the front panel lights green when connected properly. SECTION 2 INSTALLATION Electrical Connection to Router...
... to manually setup your network: ! Manual Software Setup If you don't want to use this section to configure it. For advanced configurations, refer to Section 3:Configuration. 2-6 SECTION 2, INSTALLATION This section details the physical connection of the unit. 2 Then plug the power ...adapter into a grounded and surge protected power outlet. ! To set up and running, refer to Section 3:Configuration for advanced configuration. Physically connect and power on the front panel lights green when connected properly. SECTION 2 INSTALLATION Electrical Connection to Router...

User Manual
Page 20
... SECTION 2, INSTALLATION 2-7 B. You have now connected your PC to the router. 5 To connect more devices, repeat steps 4 and 5. 6 To configure the router, refer to the router, your PC must be installed first with an Ethernet adapter. You have now connected the router to the modem... PPPPMMYJJJSSSSSCAABBCCCC HFC MAC ID: ABCDEF012345 USB CPE MACID:ABDCEF012345 +12VDC Reset Power LAN 4 3 2 1 WAN When connecting your PC to Section 3: Configuration. If you have been running broadband to the router, use a different Ethernet cable and plug it into your Ethernet port on your PC. 4...
... SECTION 2, INSTALLATION 2-7 B. You have now connected your PC to the router. 5 To connect more devices, repeat steps 4 and 5. 6 To configure the router, refer to the router, your PC must be installed first with an Ethernet adapter. You have now connected the router to the modem... PPPPMMYJJJSSSSSCAABBCCCC HFC MAC ID: ABCDEF012345 USB CPE MACID:ABDCEF012345 +12VDC Reset Power LAN 4 3 2 1 WAN When connecting your PC to Section 3: Configuration. If you have been running broadband to the router, use a different Ethernet cable and plug it into your Ethernet port on your PC. 4...

User Manual
Page 21
...Windows ME ! The next section, Configure Your Computers, steps you through the various configuration options needed for your network needs to "talk" to the router. Windows 98SE ! Configure Your Computers Each computer that PC. 2-8 SECTION 2, INSTALLATION SECTION 2 INSTALLATION You have to configure each PC's network setting to be ...part of your PCs. To do this, you are including in your network and follow the steps to configure the network settings for each computer you have now completed the hardware installation. Windows XP Determine the operating system for that...
...Windows ME ! The next section, Configure Your Computers, steps you through the various configuration options needed for your network needs to "talk" to the router. Windows 98SE ! Configure Your Computers Each computer that PC. 2-8 SECTION 2, INSTALLATION SECTION 2 INSTALLATION You have to configure each PC's network setting to be ...part of your PCs. To do this, you are including in your network and follow the steps to configure the network settings for each computer you have now completed the hardware installation. Windows XP Determine the operating system for that...
User Manual
Page 22
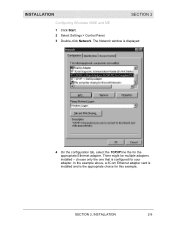
There might be multiple adapters installed - SECTION 2, INSTALLATION 2-9 choose only the one that is configured for the appropriate Ethernet adapter. The Network window is the appropriate choice for this example. INSTALLATION SECTION 2 Configuring Windows 98SE and ME 1 Click Start. 2 Select Settings > Control Panel. 3 Double-click Network. In the example above, a 3Com Ethernet adapter card is installed and is displayed: 4 On the configuration tab, select the TCP/IP line the for your adapter.
There might be multiple adapters installed - SECTION 2, INSTALLATION 2-9 choose only the one that is configured for the appropriate Ethernet adapter. The Network window is the appropriate choice for this example. INSTALLATION SECTION 2 Configuring Windows 98SE and ME 1 Click Start. 2 Select Settings > Control Panel. 3 Double-click Network. In the example above, a 3Com Ethernet adapter card is installed and is displayed: 4 On the configuration tab, select the TCP/IP line the for your adapter.

User Manual
Page 24
Double-click Network and Dial-Up Connections. INSTALLATION SECTION 2 Configuring Windows 2000 1 Click Start. 2 Select Settings. 3 Select Control Panel. Double-click Local Area Connection. 4 Click the Properties button. SECTION 2, INSTALLATION 2-11
Double-click Network and Dial-Up Connections. INSTALLATION SECTION 2 Configuring Windows 2000 1 Click Start. 2 Select Settings. 3 Select Control Panel. Double-click Local Area Connection. 4 Click the Properties button. SECTION 2, INSTALLATION 2-11

User Manual
Page 26
INSTALLATION SECTION 2 6 Highlight Internet Protocol (TCP/IP) and click the Properties button. 7 Select Obtain an IP address automatically. Click OK twice to exit and save your settings. 8 Restart your computer to save your settings. If you have retained the default interface for Windows 2000. 1 Click Start. 2 Select Settings. 3 Select Control Panel. 4 Double-click Network and Dial-Up Connections. Configuring Windows XP This configuration assumes you are running the 'Classic' interface, please follow the instructions for Windows XP. SECTION 2, INSTALLATION 2-13
INSTALLATION SECTION 2 6 Highlight Internet Protocol (TCP/IP) and click the Properties button. 7 Select Obtain an IP address automatically. Click OK twice to exit and save your settings. 8 Restart your computer to save your settings. If you have retained the default interface for Windows 2000. 1 Click Start. 2 Select Settings. 3 Select Control Panel. 4 Double-click Network and Dial-Up Connections. Configuring Windows XP This configuration assumes you are running the 'Classic' interface, please follow the instructions for Windows XP. SECTION 2, INSTALLATION 2-13

User Manual
Page 29
The default factory setting is "motorola", without the quotation marks. 4 Enter the PASSWORD. Enter into the router using the following procedure: 1 Once the router is "admin", without the quotation marks. The .... Once you have logged in, for security reasons you should change the User ID and Password. 5 Click Log In to enter the Router's Web-based Configuration Utility. 2-16 SECTION 2, INSTALLATION SECTION 2 Log In INSTALLATION Log into the URL field http://192.168.20.1 (the router's default IP address) and Enter. 2 The...
The default factory setting is "motorola", without the quotation marks. 4 Enter the PASSWORD. Enter into the router using the following procedure: 1 Once the router is "admin", without the quotation marks. The .... Once you have logged in, for security reasons you should change the User ID and Password. 5 Click Log In to enter the Router's Web-based Configuration Utility. 2-16 SECTION 2, INSTALLATION SECTION 2 Log In INSTALLATION Log into the URL field http://192.168.20.1 (the router's default IP address) and Enter. 2 The...

User Manual
Page 30
...) setting is most commonly used for DSL modem connections. Your ISP informs you want to use. 1 Verify that DHCP is no configuration necessary for this is most commonly used for using the web-based utility follow this field. Enter the information supplied by your ISP...., click Cancel. SECTION 2, INSTALLATION 2-17 PPPoE PPPoE (Point-to enter the PPP Service Name into this section. 1 Log into the router's Configuration Utility. You are presented with the Internet > Basic screen. 2 Starting at the Basic screen, select the Connection Mode your ISP has indicated you...
...) setting is most commonly used for DSL modem connections. Your ISP informs you want to use. 1 Verify that DHCP is no configuration necessary for this is most commonly used for using the web-based utility follow this field. Enter the information supplied by your ISP...., click Cancel. SECTION 2, INSTALLATION 2-17 PPPoE PPPoE (Point-to enter the PPP Service Name into this section. 1 Log into the router's Configuration Utility. You are presented with the Internet > Basic screen. 2 Starting at the Basic screen, select the Connection Mode your ISP has indicated you...

User Manual
Page 32
...is "motorola", without the quotation marks. 3 Enter the PASSWORD. Press Enter. SECTION 3, CONFIGURATION 3-1 The default factory setting is connected, open your user name or password, view the status of the network, and more. Enter into the URL field the router's IP address. Section 3:Configuration You ...can customize features for your home network, change settings such as your web browser. Using the Configuration Utility Log In 1 Once the router is "admin", without the quotation marks....
...is "motorola", without the quotation marks. 3 Enter the PASSWORD. Press Enter. SECTION 3, CONFIGURATION 3-1 The default factory setting is connected, open your user name or password, view the status of the network, and more. Enter into the URL field the router's IP address. Section 3:Configuration You ...can customize features for your home network, change settings such as your web browser. Using the Configuration Utility Log In 1 Once the router is "admin", without the quotation marks....

User Manual
Page 33
... Restart. Parental Control ! The Web-based Configuration Utility uses Javascript. Help, Restart, and Log Out Click on Log Out. 3-2 SECTION 3, CONFIGURATION Internet ! Help Restart Log Out If assistance is recommended that you finish all of the router's Configuration Utility - These sections include: ! For... convenience, it is required in using the router, click on the right. SECTION 3 CONFIGURATION 4 Click LOG IN to be enabled. To logout out of the router's Configuration Utility, click on the appropriate command to adjust the time setting, click CONTROL PANEL on the...
... Restart. Parental Control ! The Web-based Configuration Utility uses Javascript. Help, Restart, and Log Out Click on Log Out. 3-2 SECTION 3, CONFIGURATION Internet ! Help Restart Log Out If assistance is recommended that you finish all of the router's Configuration Utility - These sections include: ! For... convenience, it is required in using the router, click on the right. SECTION 3 CONFIGURATION 4 Click LOG IN to be enabled. To logout out of the router's Configuration Utility, click on the appropriate command to adjust the time setting, click CONTROL PANEL on the...


