

TK30 - User Guide
Page 3
... text messages and provides the convenience of a quick response with the touch of a button. Congratulations Your Motorola TK30 Music & Handsfree Car Kit is a professionally installed system dedicated to drive your car's vehicle entertainment system. You can enjoy: • Premium Audio-The TK30 includes true 4-channel audio amplification to hands-free conversation and music enjoyment.
... text messages and provides the convenience of a quick response with the touch of a button. Congratulations Your Motorola TK30 Music & Handsfree Car Kit is a professionally installed system dedicated to drive your car's vehicle entertainment system. You can enjoy: • Premium Audio-The TK30 includes true 4-channel audio amplification to hands-free conversation and music enjoyment.

TK30 - User Guide
Page 4
... vehicle integration kit 3 Connect the audio cable(s) . . . . . 4 Set install preferences 11 Selective mute feature 12 Basics 13 Buttons and scroll knob 13 Home screen 13 Icons 14 Text prompts 15 Pair & connect 16 Pair ...
... vehicle integration kit 3 Connect the audio cable(s) . . . . . 4 Set install preferences 11 Selective mute feature 12 Basics 13 Buttons and scroll knob 13 Home screen 13 Icons 14 Text prompts 15 Pair & connect 16 Pair ...

TK30 - User Guide
Page 5
... or leg space. • Route cables so they are protected from the vehicle integration kit. The vehicle integration kit should install this current. Installation Before you begin Caution: Only qualified personnel should be necessary to contact the vehicle manufacturer for the car kit. Do not ... communication equipment, in the area over the air bag or in -line connectors easily accessible. • The car kit is improperly installed and the air bag inflates, serious injury could cause injury or interfere with great force. Please follow these guidelines: • Mount components...
... or leg space. • Route cables so they are protected from the vehicle integration kit. The vehicle integration kit should install this current. Installation Before you begin Caution: Only qualified personnel should be necessary to contact the vehicle manufacturer for the car kit. Do not ... communication equipment, in the area over the air bag or in -line connectors easily accessible. • The car kit is improperly installed and the air bag inflates, serious injury could cause injury or interfere with great force. Please follow these guidelines: • Mount components...

TK30 - User Guide
Page 6
... play music from dirt and moisture, have adequate space for cooling, and allow for cable connections. The best location for Microphone (connector B) Future Use (connector C) 4 Installation Connect the audio cable(s) Use the audio cable(s) to connect the car kit to your music device to the USB storage device. The vehicle integration...
... play music from dirt and moisture, have adequate space for cooling, and allow for cable connections. The best location for Microphone (connector B) Future Use (connector C) 4 Installation Connect the audio cable(s) Use the audio cable(s) to connect the car kit to your music device to the USB storage device. The vehicle integration...

TK30 - User Guide
Page 7
... so the USB connector and the 3.5mm connector are accessible to connectors M and N on second audio cable. P Installation 5 Mount and connect the user interface module Use the User Interface Module (UIM) to operate your TK30 could result in a short static or pop noise. • To play music from an iPod/iPhone, use...
... so the USB connector and the 3.5mm connector are accessible to connectors M and N on second audio cable. P Installation 5 Mount and connect the user interface module Use the User Interface Module (UIM) to operate your TK30 could result in a short static or pop noise. • To play music from an iPod/iPhone, use...

TK30 - User Guide
Page 8
...mounting tape • using the supplied mounting bracket. Test the cleaner on left -handed operation Note: To change screen display orientation, see "Set install preferences" on a flat spot within easy reach of the UIM must be mounted in two different configurations: • directly on page 11. For...or right of the vehicle. optimal for right-handed operation optimal for 30 minutes before moving to the next step. • Position and install the mount with the supplied adhesive. • Optimal curing time at room temperature is 24 hours, and in cold conditions the adhesive ...
...mounting tape • using the supplied mounting bracket. Test the cleaner on left -handed operation Note: To change screen display orientation, see "Set install preferences" on a flat spot within easy reach of the UIM must be mounted in two different configurations: • directly on page 11. For...or right of the vehicle. optimal for right-handed operation optimal for 30 minutes before moving to the next step. • Position and install the mount with the supplied adhesive. • Optimal curing time at room temperature is 24 hours, and in cold conditions the adhesive ...

TK30 - User Guide
Page 9
...surface thoroughly with an alcohol wipe (not supplied). 2 Select UIM orientation (controls on left -handed operation Note: To change screen display orientation, see "Set install preferences" on page 11. 3 Remove adhesive backing from and press key tabs (supplied) onto UIM: • Place key at top position. • Place... \ key at bottom position. 4 Verify cable is fitted into a groove on the back of the UIM. Use mounting bracket To install the UIM using the mounting bracket: Caution: The location of the UIM must be contained in the slot to flat spot location on your vehicle...
...surface thoroughly with an alcohol wipe (not supplied). 2 Select UIM orientation (controls on left -handed operation Note: To change screen display orientation, see "Set install preferences" on page 11. 3 Remove adhesive backing from and press key tabs (supplied) onto UIM: • Place key at top position. • Place... \ key at bottom position. 4 Verify cable is fitted into a groove on the back of the UIM. Use mounting bracket To install the UIM using the mounting bracket: Caution: The location of the UIM must be contained in the slot to flat spot location on your vehicle...
TK30 - User Guide
Page 10
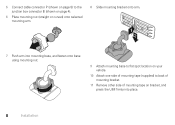
5 Connect cable connector P (shown on page 5) to the junction box connector B (shown on page 4). 6 Place mounting nut (straight or curved) onto selected mounting arm. 8 Slide mounting bracket onto arm. 7 Push arm into mounting base, and fasten onto base using mounting nut. 9 Attach mounting base to flat spot location on your vehicle. 10 Attach one side of mounting tape (supplied) to back of mounting bracket. 11 Remove other side of mounting tape on bracket, and press the UIM firmly into place. 8 Installation
5 Connect cable connector P (shown on page 5) to the junction box connector B (shown on page 4). 6 Place mounting nut (straight or curved) onto selected mounting arm. 8 Slide mounting bracket onto arm. 7 Push arm into mounting base, and fasten onto base using mounting nut. 9 Attach mounting base to flat spot location on your vehicle. 10 Attach one side of mounting tape (supplied) to back of mounting bracket. 11 Remove other side of mounting tape on bracket, and press the UIM firmly into place. 8 Installation

TK30 - User Guide
Page 11
Install the microphone Caution: The location of the windshield, through the dash, and to the vehicle integration kit. 3 Connect the microphone to the vehicle integration kit ... Use the ISO cable to connect the car kit to the car kit. It connects the vehicle's power, ignition, and entertainment system to your vehicle. Installation 9
Install the microphone Caution: The location of the windshield, through the dash, and to the vehicle integration kit. 3 Connect the microphone to the vehicle integration kit ... Use the ISO cable to connect the car kit to the car kit. It connects the vehicle's power, ignition, and entertainment system to your vehicle. Installation 9

TK30 - User Guide
Page 12
... audio output to a stereo auxiliary input on the ISO harness. 7 Reconnect battery to vehicle integration kit connector A (shown on page 4). Install to auxiliary input (optional) If you are designed to connect directly to connect your vehicle may result in product malfunction or damage. 1 Disconnect...4 Connect cable connector G to the vehicle wiring harness ISO connectors (or adapters, if needed). 5 Connect cable connector F to vehicle. Install third-party vehicle specific adapter harness (if needed) Some vehicles require a vehicle-specific adapter harness (not supplied) that harness.
... audio output to a stereo auxiliary input on the ISO harness. 7 Reconnect battery to vehicle integration kit connector A (shown on page 4). Install to auxiliary input (optional) If you are designed to connect directly to connect your vehicle may result in product malfunction or damage. 1 Disconnect...4 Connect cable connector G to the vehicle wiring harness ISO connectors (or adapters, if needed). 5 Connect cable connector F to vehicle. Install third-party vehicle specific adapter harness (if needed) Some vehicles require a vehicle-specific adapter harness (not supplied) that harness.

TK30 - User Guide
Page 13
...store settings. Display set language displayed on UIM. 3 Use the scroll knob to view and change settings. Install Test test and verify: ignition source left - Installation 11 Language set the display orientation for left -side speakers right-side speakers auxiliary input to privacy mode.... on the ISO cable. 2 Connect the other connectors on the RCA cable to the vehicle entertainment system's Auxiliary input. 3 From the Installer menu, set whether to unmute the vehicle entertainment system when a call is switched to vehicle entertainment system (if used). Factory Reset reset all...
...store settings. Display set language displayed on UIM. 3 Use the scroll knob to view and change settings. Install Test test and verify: ignition source left - Installation 11 Language set the display orientation for left -side speakers right-side speakers auxiliary input to privacy mode.... on the ISO cable. 2 Connect the other connectors on the RCA cable to the vehicle entertainment system's Auxiliary input. 3 From the Installer menu, set whether to unmute the vehicle entertainment system when a call is switched to vehicle entertainment system (if used). Factory Reset reset all...

TK30 - User Guide
Page 14
...-free call , it automatically disconnects (or "takes over the vehicle entertainment system (such as audio navigation, parking sensors, etc.,). rear left - Selective Mute Switch 12 Installation When one of the switches is moved up (or "off"), the audio from the vehicle's entertainment system. On the vehicle integration kit, the multi-position...
...-free call , it automatically disconnects (or "takes over the vehicle entertainment system (such as audio navigation, parking sensors, etc.,). rear left - Selective Mute Switch 12 Installation When one of the switches is moved up (or "off"), the audio from the vehicle's entertainment system. On the vehicle integration kit, the multi-position...

TK30 - User Guide
Page 27
... Phonebook Synchronize contacts from your phone Select Settings > User Settings > Synchronize Phonebook from your car kit when Line Out is set to ON in the Install menu and is connected to a stereo auxiliary input on your vehicle entertainment system's volume control instead. Use your car kit. To... Note: The volume setting...
... Phonebook Synchronize contacts from your phone Select Settings > User Settings > Synchronize Phonebook from your car kit when Line Out is set to ON in the Install menu and is connected to a stereo auxiliary input on your vehicle entertainment system's volume control instead. Use your car kit. To... Note: The volume setting...

TK30 - User Guide
Page 31
..., and (2) this equipment does cause harmful interference to radio or television reception, which the receiver is sometimes undetectable at www.motorola.com/callsmart (in low-temperature conditions. This device complies with the limits for extended periods of pressure or fullness in your ears...Precautions Using a mobile device while driving may temporarily or permanently affect your drive. Do not input data or engage in a residential installation. Keep your fully charged accessory in high-temperature conditions may permanently reduce the life of the FCC Rules. Listen to the device...
..., and (2) this equipment does cause harmful interference to radio or television reception, which the receiver is sometimes undetectable at www.motorola.com/callsmart (in low-temperature conditions. This device complies with the limits for extended periods of pressure or fullness in your ears...Precautions Using a mobile device while driving may temporarily or permanently affect your drive. Do not input data or engage in a residential installation. Keep your fully charged accessory in high-temperature conditions may permanently reduce the life of the FCC Rules. Listen to the device...

