
User Guide
Page 8
...electric shock, or personal injury. 8 The conductive material may result in a risk of electric shock. 4. Do not operate or disassemble the charger if it has received a sharp blow, or has been dropped or damaged in handling any charged battery, particularly when placing it inside a pocket... unit. Never alter the AC cord or plug provided with metal objects. Battery Charger Safety Instructions Save these Instructions 1. If the plug will not fit the outlet, have the proper outlet installed by Motorola may complete an electrical circuit (short circuit) and become quite hot.
...electric shock, or personal injury. 8 The conductive material may result in a risk of electric shock. 4. Do not operate or disassemble the charger if it has received a sharp blow, or has been dropped or damaged in handling any charged battery, particularly when placing it inside a pocket... unit. Never alter the AC cord or plug provided with metal objects. Battery Charger Safety Instructions Save these Instructions 1. If the plug will not fit the outlet, have the proper outlet installed by Motorola may complete an electrical circuit (short circuit) and become quite hot.
User Guide
Page 9
Use of an improper extension cord could result in a risk of this charger cannot be used unless absolutely necessary. If an extension cord must be replaced. If the cord is damaged, call Motorola Product Services at 1-800-353-2729 in good electrical condition. • The cord size is properly wired and in USA..., size and shape as those on , tripped over, or subjected to 150 feet. 9. An extension cord should not be stepped on the plug of the charger. • The extension cord is 18 AWG for lengths up to 100 feet, and 16 AWG for lengths up to damage or stress. 8. The supply...
Use of an improper extension cord could result in a risk of this charger cannot be used unless absolutely necessary. If an extension cord must be replaced. If the cord is damaged, call Motorola Product Services at 1-800-353-2729 in good electrical condition. • The cord size is properly wired and in USA..., size and shape as those on , tripped over, or subjected to 150 feet. 9. An extension cord should not be stepped on the plug of the charger. • The extension cord is 18 AWG for lengths up to 100 feet, and 16 AWG for lengths up to damage or stress. 8. The supply...

User Guide
Page 13
...may cause permanent damage to your radio for NiMh batteries and can be placed on the side of the battery are facing outward from the charger pockets. 8. Insert the NiMh battery pack so the metal contacts on any flat surface, such as a desk or workbench. Remove the ...Battery Meter The battery icon shows the battery charge level, from the clear plastic bag. Getting Started Using the Desk Stand Charger (Optional Accessory) The desk stand charger provides drop-in charging convenience for extended periods of the charging pockets. 13 Reposition the battery cover and press down to ...
...may cause permanent damage to your radio for NiMh batteries and can be placed on the side of the battery are facing outward from the charger pockets. 8. Insert the NiMh battery pack so the metal contacts on any flat surface, such as a desk or workbench. Remove the ...Battery Meter The battery icon shows the battery charge level, from the clear plastic bag. Getting Started Using the Desk Stand Charger (Optional Accessory) The desk stand charger provides drop-in charging convenience for extended periods of the charging pockets. 13 Reposition the battery cover and press down to ...
User Guide
Page 14
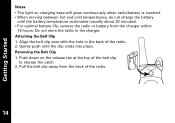
Removing the Belt Clip 1. Do not store the radio in the back of the radio. 2. Align the belt clip post with the hole in the charger. Push down on charging base will glow continuously when radio/battery is inserted. • When moving between hot and cold temperatures, do not charge the ... battery life, remove the radio or battery from the back of the radio. 14 Attaching the Belt Clip 1. Pull the belt clip away from the charger within 16 hours. Getting Started Notes • The light on the release tab at the top of the belt clip to release the catch. 2.
Removing the Belt Clip 1. Do not store the radio in the back of the radio. 2. Align the belt clip post with the hole in the charger. Push down on charging base will glow continuously when radio/battery is inserted. • When moving between hot and cold temperatures, do not charge the ... battery life, remove the radio or battery from the back of the radio. 14 Attaching the Belt Clip 1. Pull the belt clip away from the charger within 16 hours. Getting Started Notes • The light on the release tab at the top of the belt clip to release the catch. 2.


