User Guide
Page 3
T3101 User Guide Table of Contents Regulatory Information ...v Important Safety Instructions...xi Welcome...1 Handset Overview ...2 Standby Menu Overview ...3 Main Menu Overview ...3 Getting Started ...4 Battery Safety Instructions ...4 Installing the Battery...5 Charging the Handset Battery...6 Registering and Deregistering Handsets 7 Registering a Handset to a Base Unit 7 Deregistering a Handset from a Base Unit 8 Testing Your Connections...9 Paging Your Handset ...9 Check Your PC Connection with Your Handset 10 Finding a Location for Your Handset Charger 11 i
T3101 User Guide Table of Contents Regulatory Information ...v Important Safety Instructions...xi Welcome...1 Handset Overview ...2 Standby Menu Overview ...3 Main Menu Overview ...3 Getting Started ...4 Battery Safety Instructions ...4 Installing the Battery...5 Charging the Handset Battery...6 Registering and Deregistering Handsets 7 Registering a Handset to a Base Unit 7 Deregistering a Handset from a Base Unit 8 Testing Your Connections...9 Paging Your Handset ...9 Check Your PC Connection with Your Handset 10 Finding a Location for Your Handset Charger 11 i

User Guide
Page 17
... sign in status 2. Battery icon (only appears during charging) 1 10 9 2 8 3 HANDSET(2) 4 12:08AM Jan 2 7 5 Menu Ph Bk 6 Main Menu Overview 1. Right softkey option 1 Phone Book 2 3 4 ...Select Back 5 3 3 Left softkey option 6. Date 8. Ringer status 10. Menu Name 2. Time of day 5. Selected menu 3. Left softkey option 5. Wallpaper 3. Right softkey option 7. Voicemail waiting 9. Menu icons • Phonebook • Call log • Alarm clock • Audio setup • Settings 4. T3101 User Guide Standby Menu Overview 1. Handset...
... sign in status 2. Battery icon (only appears during charging) 1 10 9 2 8 3 HANDSET(2) 4 12:08AM Jan 2 7 5 Menu Ph Bk 6 Main Menu Overview 1. Right softkey option 1 Phone Book 2 3 4 ...Select Back 5 3 3 Left softkey option 6. Date 8. Ringer status 10. Menu Name 2. Time of day 5. Selected menu 3. Left softkey option 5. Wallpaper 3. Right softkey option 7. Voicemail waiting 9. Menu icons • Phonebook • Call log • Alarm clock • Audio setup • Settings 4. T3101 User Guide Standby Menu Overview 1. Handset...
User Guide
Page 18
Use only the battery that came with your phone or an authorized replacement recommended by the manufacturer. • Keep batteries out of the reach of explosion if you replace the battery with an incorrect battery type. Contact your battery's label for proper disposal methods. 4 Refer to be released, .../or explosion. • CAUTION: There is a risk of children. • Remove batteries if storing over 30 days. • The rechargeable batteries that could be recycled. The battery contains toxic materials that power this product must be disposed of properly and may need to...
Use only the battery that came with your phone or an authorized replacement recommended by the manufacturer. • Keep batteries out of the reach of explosion if you replace the battery with an incorrect battery type. Contact your battery's label for proper disposal methods. 4 Refer to be released, .../or explosion. • CAUTION: There is a risk of children. • Remove batteries if storing over 30 days. • The rechargeable batteries that could be recycled. The battery contains toxic materials that power this product must be disposed of properly and may need to...
User Guide
Page 19
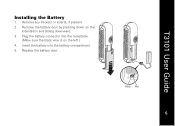
Remove any stickers or inserts, if present. 2. T3101 User Guide Installing the Battery 1. Plug the battery connector into the battery compartment. 5. Remove the battery door by pressing down on the left.) 4. Black Red 5 5 Insert the battery into the receptacle. (Make sure the black wire is on the indentation and sliding downward. 3. Replace the battery door.
Remove any stickers or inserts, if present. 2. T3101 User Guide Installing the Battery 1. Plug the battery connector into the battery compartment. 5. Remove the battery door by pressing down on the left.) 4. Black Red 5 5 Insert the battery into the receptacle. (Make sure the black wire is on the indentation and sliding downward. 3. Replace the battery door.
User Guide
Page 20
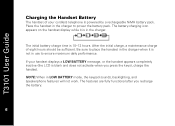
If your cordless telephone is not in the charger. The battery-charging icon appears on the handset display while it is powered by a rechargeable NiMH battery pack. After the initial charge, a maintenance charge of your handset displays a LOW BATTERY message, or the handset appears completely ... you press the keys), charge the handset. Place the handset in the charger to place the handset in LOW BATTERY mode, the keypad sounds, backlighting, and speakerphone features will not work. T3101 User Guide Charging the Handset Battery The handset of eight hours should be sufficient....
If your cordless telephone is not in the charger. The battery-charging icon appears on the handset display while it is powered by a rechargeable NiMH battery pack. After the initial charge, a maintenance charge of your handset displays a LOW BATTERY message, or the handset appears completely ... you press the keys), charge the handset. Place the handset in the charger to place the handset in LOW BATTERY mode, the keypad sounds, backlighting, and speakerphone features will not work. T3101 User Guide Charging the Handset Battery The handset of eight hours should be sufficient....
User Guide
Page 21
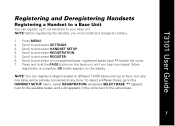
... can be actively connected at any time. T3101 User Guide Registering and Deregistering Handsets Registering a Handset to a Base Unit You can register up to four), but only one base can register a single handset to different T3150 base units (up to six handsets to your base unit. When registration is complete..., OK briefly appears on the base unit until you must install and charge the battery. 1. NOTE: Before registering the handset, you hear two beeps. Press MENU. 2. Scroll to and select SETTINGS. 3. Press and hold the PAGE button on ...
... can be actively connected at any time. T3101 User Guide Registering and Deregistering Handsets Registering a Handset to a Base Unit You can register up to four), but only one base can register a single handset to different T3150 base units (up to six handsets to your base unit. When registration is complete..., OK briefly appears on the base unit until you must install and charge the battery. 1. NOTE: Before registering the handset, you hear two beeps. Press MENU. 2. Scroll to and select SETTINGS. 3. Press and hold the PAGE button on ...

User Guide
Page 23
... you receive a "Please start phone software" message, you PC. Should your system is plugged into an electrical outlet. 2. Verify that is included with your handset fail to respond to PC connection. Press the PAGE button located on Registering and Deregistering Your Handset. Charge the battery - See the section on your handset or the base unit...
... you receive a "Please start phone software" message, you PC. Should your system is plugged into an electrical outlet. 2. Verify that is included with your handset fail to respond to PC connection. Press the PAGE button located on Registering and Deregistering Your Handset. Charge the battery - See the section on your handset or the base unit...
User Guide
Page 51
...electrical outlet). • Charge the battery - If you receive a Check PC Phone Driver message, you still don't hear a dial tone, disconnect the base unit from the telephone jack and connect a different phone. The system does not respond at www.motorola.com/cordless. There is no dial tone &#... • Make sure the phone cord is plugged firmly into an electrical outlet (or a surge protector that is no dial tone on that you have difficulty after trying these suggestions, visit us on Registering and Deregistering Your Handset. T3101 User Guide Troubleshooting The suggestions below...
...electrical outlet). • Charge the battery - If you receive a Check PC Phone Driver message, you still don't hear a dial tone, disconnect the base unit from the telephone jack and connect a different phone. The system does not respond at www.motorola.com/cordless. There is no dial tone &#... • Make sure the phone cord is plugged firmly into an electrical outlet (or a surge protector that is no dial tone on that you have difficulty after trying these suggestions, visit us on Registering and Deregistering Your Handset. T3101 User Guide Troubleshooting The suggestions below...
User Guide
Page 53
Wait a few minutes. 4. Disconnect the handset battery. 3. Disconnect the power to re-establish its base. Wait approximately 60 seconds for Your Cordless Phone If the handset or base unit does not seem to be responding normally, then try putting the handset in the order listed): 1. If it does not seem to the base unit. 5. Connect power to respond, do the following (in its link with the base. 39 39 T3101 User Guide Common Troubleshooting Steps for the handset to the base. 2. Re-install the battery. 6.
Wait a few minutes. 4. Disconnect the handset battery. 3. Disconnect the power to re-establish its base. Wait approximately 60 seconds for Your Cordless Phone If the handset or base unit does not seem to be responding normally, then try putting the handset in the order listed): 1. If it does not seem to the base unit. 5. Connect power to respond, do the following (in its link with the base. 39 39 T3101 User Guide Common Troubleshooting Steps for the handset to the base. 2. Re-install the battery. 6.

User Guide
Page 55
T3101 User Guide Exclusions Normal Wear and Tear. Periodic maintenance, repair, and replacement of Motorola, are not the fault of parts due to abnormal usage or conditions; Abuse & Misuse. or (d) other acts which are excluded from coverage. Use of their rated capacity and batteries that ...leak are covered by someone other peripheral equipment are excluded from coverage. 41 41 Only batteries whose fully charged capacity falls below 80% of Non-Motorola Products and Accessories. Defects or damage that show ...
T3101 User Guide Exclusions Normal Wear and Tear. Periodic maintenance, repair, and replacement of Motorola, are not the fault of parts due to abnormal usage or conditions; Abuse & Misuse. or (d) other acts which are excluded from coverage. Use of their rated capacity and batteries that ...leak are covered by someone other peripheral equipment are excluded from coverage. 41 41 Only batteries whose fully charged capacity falls below 80% of Non-Motorola Products and Accessories. Defects or damage that show ...


