
User Guide
Page 6
Table of Contents Welcome i Handset Overview ii Base Unit iii Soft Keys iii Important Safety Instructions xi Getting Started 1 Battery Safety Instructions 1 Installing the Batteries 2 Installing the Base Unit 4 Removing the Wall Mount Bracket 4 Setting Up Your Phone 5 Removing the Wall Mount and Base Unit . . . . . 6 Removing the Base Unit from the Wall Bracket 6 Handset Overview 7 Standby Screen Information 7 iv
Table of Contents Welcome i Handset Overview ii Base Unit iii Soft Keys iii Important Safety Instructions xi Getting Started 1 Battery Safety Instructions 1 Installing the Batteries 2 Installing the Base Unit 4 Removing the Wall Mount Bracket 4 Setting Up Your Phone 5 Removing the Wall Mount and Base Unit . . . . . 6 Removing the Base Unit from the Wall Bracket 6 Handset Overview 7 Standby Screen Information 7 iv
User Guide
Page 14
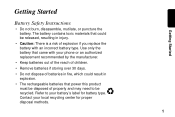
... not burn, disassemble, mutilate, or puncture the battery. Use only the battery that came with your phone or an authorized replacement recommended by the manufacturer. • Keep batteries out of the reach of children. • Remove batteries if storing over 30 days. • Do not dispose of batteries in fire, which could be released, resulting in...
... not burn, disassemble, mutilate, or puncture the battery. Use only the battery that came with your phone or an authorized replacement recommended by the manufacturer. • Keep batteries out of the reach of children. • Remove batteries if storing over 30 days. • Do not dispose of batteries in fire, which could be released, resulting in...
User Guide
Page 15
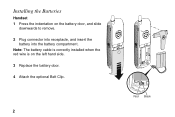
Installing the Batteries Handset 1 Press the indentation on the left hand side. 3 Replace the battery door. 4 Attach the optional Belt Clip. 2 Red Black Note: The battery cable is correctly installed when the red wire is on the battery door, and slide downwards to remove. 2 Plug connector into receptacle, and insert the battery into the battery compartment.
Installing the Batteries Handset 1 Press the indentation on the left hand side. 3 Replace the battery door. 4 Attach the optional Belt Clip. 2 Red Black Note: The battery cable is correctly installed when the red wire is on the battery door, and slide downwards to remove. 2 Plug connector into receptacle, and insert the battery into the battery compartment.

User Guide
Page 16
Getting Started Base Unit The base station uses 4 AAA alkaline batteries (not included) for optional backup power. 1 Press the cover latch with a screwdriver to lift and remove the battery cover. 2 Insert 4 AAA alkaline batteries into the battery compartment. 3 Insert the tabs of the cover into the slots on the base station and press down until the cover clicks into place. 3
Getting Started Base Unit The base station uses 4 AAA alkaline batteries (not included) for optional backup power. 1 Press the cover latch with a screwdriver to lift and remove the battery cover. 2 Insert 4 AAA alkaline batteries into the battery compartment. 3 Insert the tabs of the cover into the slots on the base station and press down until the cover clicks into place. 3
User Guide
Page 20
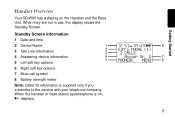
When the handset or base station speakerphone is supplied only if you subscribe to the service with your telephone company. Standby Screen Information 1 Date and time 2 Device Name 1 8 3 Talk Line Information 2 3 4 Answering device information 4 7 5 6 5 Left soft key options 6 Right soft key options 7 Mute call symbol 8 Battery strength meter Note: Caller ID information is on the Handset and the Base Unit. When they are not in use, the display shows the Standby Screen. Getting Started Handset Overview Your SD4580 has a display on , V displays. 7
When the handset or base station speakerphone is supplied only if you subscribe to the service with your telephone company. Standby Screen Information 1 Date and time 2 Device Name 1 8 3 Talk Line Information 2 3 4 Answering device information 4 7 5 6 5 Left soft key options 6 Right soft key options 7 Mute call symbol 8 Battery strength meter Note: Caller ID information is on the Handset and the Base Unit. When they are not in use, the display shows the Standby Screen. Getting Started Handset Overview Your SD4580 has a display on , V displays. 7

User Guide
Page 67
... limited warranty. 57 This limited warranty is longer. • Software. Applies only to new Motorola Products, Accessories and Software purchased by this Warranty Cover? Only batteries whose fully charged capacity falls below 80% of the product. • Monaural Headsets. Length ... • Decorative Accessories and Cases. Length of the software (e.g. warrants its cordless telephones ("Products"), Motorolabranded or certified accessories sold for use with these Products ("Accessories"), and Motorola software contained on CD-ROMs or other tangible media and sold for use with...
... limited warranty. 57 This limited warranty is longer. • Software. Applies only to new Motorola Products, Accessories and Software purchased by this Warranty Cover? Only batteries whose fully charged capacity falls below 80% of the product. • Monaural Headsets. Length ... • Decorative Accessories and Cases. Length of the software (e.g. warrants its cordless telephones ("Products"), Motorolabranded or certified accessories sold for use with these Products ("Accessories"), and Motorola software contained on CD-ROMs or other tangible media and sold for use with...


