User Guide
Page 3
CONTENTS Contents 1 Safety 4 Introduction 5 Package Contents 5 Batteries and Chargers Safety Information 7 Operational Safety Guidelines 8 FCC Licensing Information 9 Interference Information 9 Radio Overview 11 Parts of the Radio 11 On/Off/Volume Knob 12 Channel Selector Knob 12 Accessory Connector... 12 Model Label 12 Microphone 12 Antenna 12 LED Indicator 12 Side Buttons 12 The Lithium-Ion (Li-Ion) Battery 12 Battery Features 14 About the Li-Ion Battery 14 Battery...
CONTENTS Contents 1 Safety 4 Introduction 5 Package Contents 5 Batteries and Chargers Safety Information 7 Operational Safety Guidelines 8 FCC Licensing Information 9 Interference Information 9 Radio Overview 11 Parts of the Radio 11 On/Off/Volume Knob 12 Channel Selector Knob 12 Accessory Connector... 12 Model Label 12 Microphone 12 Antenna 12 LED Indicator 12 Side Buttons 12 The Lithium-Ion (Li-Ion) Battery 12 Battery Features 14 About the Li-Ion Battery 14 Battery...
User Guide
Page 4
...Channel 29 Talking and Monitoring 29 Receiving a Call 30 Talk Range 30 Radio LED Indicators 32 Hands-Free Use/VOX 33 With Compatible VOX Accessories. . . . .33 Setting VOX Sensitivity 34 Microphone Gain 34 Battery Save 34 Reset to Factory Defaults 34 End of Transmission Tone (Roger ...Beep Tone 35 Programming Features 36 Programming Mode 36 Learning to Read the Values the Radio Signals You 36 Entering Programming Mode 39 Reading Frequencies Values...
...Channel 29 Talking and Monitoring 29 Receiving a Call 30 Talk Range 30 Radio LED Indicators 32 Hands-Free Use/VOX 33 With Compatible VOX Accessories. . . . .33 Setting VOX Sensitivity 34 Microphone Gain 34 Battery Save 34 Reset to Factory Defaults 34 End of Transmission Tone (Roger ...Beep Tone 35 Programming Features 36 Programming Mode 36 Learning to Read the Values the Radio Signals You 36 Entering Programming Mode 39 Reading Frequencies Values...
User Guide
Page 5
VHF Default Frequencies Chart 65 RDX UHF Frequencies Chart 66 RDU2020 - Quick Instructions 64 RDV5100 - VHF Default Frequencies Chart 63 Making XTN Compatible with a Multi Unit Charger (MUC 51 Cloning Radio using the Radio to Radio (R2R) Cloning Cable (...RDX VHF Frequencies Chart 61 RDV2020 - UHF Default Frequencies Chart 70 RDU4100 - UHF Default Frequencies Chart 71 CTCSS and PL/DPL Codes 72 Programming Customized Frequencies on 4W/5W RDX models 75 Motorola Limited Warranty for the United States and Canada 76 Accessories 80 Antennas 80 Audio Accessories 80 Battery...
VHF Default Frequencies Chart 65 RDX UHF Frequencies Chart 66 RDU2020 - Quick Instructions 64 RDV5100 - VHF Default Frequencies Chart 63 Making XTN Compatible with a Multi Unit Charger (MUC 51 Cloning Radio using the Radio to Radio (R2R) Cloning Cable (...RDX VHF Frequencies Chart 61 RDV2020 - UHF Default Frequencies Chart 70 RDU4100 - UHF Default Frequencies Chart 71 CTCSS and PL/DPL Codes 72 Programming Customized Frequencies on 4W/5W RDX models 75 Motorola Limited Warranty for the United States and Canada 76 Accessories 80 Antennas 80 Audio Accessories 80 Battery...
User Guide
Page 6
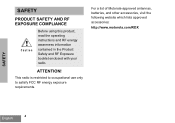
This radio is restricted to occupational use only to satisfy FCC RF energy exposure requirements. C a u t i o n Before using this product, read the operating instructions and RF energy awareness information contained in the Product Safety and RF Exposure booklet enclosed with your radio. SAFETY PRODUCT SAFETY AND RF EXPOSURE COMPLIANCE ! For a list of Motorola-approved antennas, batteries, and other accessories, visit the following website which lists approved accessories: http://www.motorola.com/RDX SAFETY English 4 ATTENTION!
This radio is restricted to occupational use only to satisfy FCC RF energy exposure requirements. C a u t i o n Before using this product, read the operating instructions and RF energy awareness information contained in the Product Safety and RF Exposure booklet enclosed with your radio. SAFETY PRODUCT SAFETY AND RF EXPOSURE COMPLIANCE ! For a list of Motorola-approved antennas, batteries, and other accessories, visit the following website which lists approved accessories: http://www.motorola.com/RDX SAFETY English 4 ATTENTION!

User Guide
Page 7
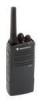
...Ion Battery • Power Supply • User Guide • Warranty Card • Drop-in the designing and manufacturing of communications equipment. INTRODUCTION Thank you know how to ensure you for purchasing the Motorola® RDX Series™ Radio. This radio is a product of Motorola's 75... plus years of today's fast-paced industries. The RDX Series™ radios provide cost-effective communications for businesses such as a world leader...
...Ion Battery • Power Supply • User Guide • Warranty Card • Drop-in the designing and manufacturing of communications equipment. INTRODUCTION Thank you know how to ensure you for purchasing the Motorola® RDX Series™ Radio. This radio is a product of Motorola's 75... plus years of today's fast-paced industries. The RDX Series™ radios provide cost-effective communications for businesses such as a world leader...
User Guide
Page 9
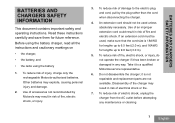
... electric shock, or injury, do not operate the charger if it to the electric plug and cord, pull by Motorola may result in risk of electric shock, unplug the charger from the AC outlet before attempting any way. Disassembly of damage to ... and replacement parts are not available. Before using the battery charger, read all the instructions and cautionary markings on • the charger, • the battery, and • the radio using the battery 1. BATTERIES AND CHARGERS SAFETY INFORMATION BATTERIES AND CHARGERS SAFETY INFORMATION This document contains important safety and...
... electric shock, or injury, do not operate the charger if it to the electric plug and cord, pull by Motorola may result in risk of electric shock, unplug the charger from the AC outlet before attempting any way. Disassembly of damage to ... and replacement parts are not available. Before using the battery charger, read all the instructions and cautionary markings on • the charger, • the battery, and • the radio using the battery 1. BATTERIES AND CHARGERS SAFETY INFORMATION BATTERIES AND CHARGERS SAFETY INFORMATION This document contains important safety and...
User Guide
Page 10
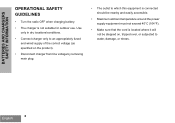
... SAFETY INFORMATION OPERATIONAL SAFETY GUIDELINES • Turn the radio OFF when charging battery. • The charger is located where it will not be nearby and easily accessible. • Maximum ambient temperature around the power supply equipment must not ...
... SAFETY INFORMATION OPERATIONAL SAFETY GUIDELINES • Turn the radio OFF when charging battery. • The charger is located where it will not be nearby and easily accessible. • Maximum ambient temperature around the power supply equipment must not ...
User Guide
Page 14
...connect compatible audio accessories. CPS. The Lithium-Ion (Li-Ion) Battery RDX Series™ provides different types of the radio. Accessory Connector Used to different channels. For RDV5100, RDU4100 antennas are non-removable. Antenna For models RDU2020, and RDV2020 the antennas are removable. Side Button 1 (SB1... The default setting of SB1 is 'Scan/Nuisance Channel Delete'. For more information, see "Battery Features" on page 14. LED Indicator Used to adjust the radio's volume. RADIO OVERVIEW English 12 Side Buttons Push-to-Talk (PTT) Button • Press and hold ...
...connect compatible audio accessories. CPS. The Lithium-Ion (Li-Ion) Battery RDX Series™ provides different types of the radio. Accessory Connector Used to different channels. For RDV5100, RDU4100 antennas are non-removable. Antenna For models RDU2020, and RDV2020 the antennas are removable. Side Button 1 (SB1... The default setting of SB1 is 'Scan/Nuisance Channel Delete'. For more information, see "Battery Features" on page 14. LED Indicator Used to adjust the radio's volume. RADIO OVERVIEW English 12 Side Buttons Push-to-Talk (PTT) Button • Press and hold ...
User Guide
Page 16
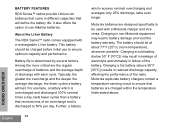
... the Li-Ion Battery The RDX Series™ radio comes equipped with each cycle. This battery should be used with a Motorola charger and vice versa. Motorola rapid-rate battery chargers contain a temperature-sensing circuit to ensure optimum capacity and performance. Battery life is discharged to battery damage and void the battery warranty. BATTERY FEATURES RDX Series™ radios provide Lithium-Ion batteries that come...
... the Li-Ion Battery The RDX Series™ radio comes equipped with each cycle. This battery should be used with a Motorola charger and vice versa. Motorola rapid-rate battery chargers contain a temperature-sensing circuit to ensure optimum capacity and performance. Battery life is discharged to battery damage and void the battery warranty. BATTERY FEATURES RDX Series™ radios provide Lithium-Ion batteries that come...
User Guide
Page 17
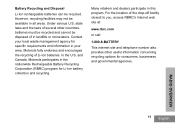
...RADIO OVERVIEW 15 English For the location of Li-Ion batteries. In the U.S. state laws and the laws of several other useful information concerning recycling options for consumers, businesses and governmental agencies. and Canada, Motorola participates in landfills or incinerators. Battery Recycling and Disposal Li-Ion rechargeable batteries... local waste management agency for Li-Ion battery collection and recycling. Many retailers and dealers participate in your area. However, recycling facilities may not be recycled. Motorola fully endorses and encourages the recycling of ...
...RADIO OVERVIEW 15 English For the location of Li-Ion batteries. In the U.S. state laws and the laws of several other useful information concerning recycling options for consumers, businesses and governmental agencies. and Canada, Motorola participates in landfills or incinerators. Battery Recycling and Disposal Li-Ion rechargeable batteries... local waste management agency for Li-Ion battery collection and recycling. Many retailers and dealers participate in your area. However, recycling facilities may not be recycled. Motorola fully endorses and encourages the recycling of ...
User Guide
Page 18
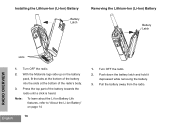
With the Motorola logo side up on page 14 English 16 1. Press the top part of the radio's body. 3. Push down the battery latch and hold it depressed while removing the battery. 3. Turn OFF the radio. 2. Installing the Lithium-Ion (Li-Ion) Battery Battery Latch Removing the Lithium-Ion (Li-Ion) Battery Battery Latch slots RADIO OVERVIEW 1. Note: To learn about...
With the Motorola logo side up on page 14 English 16 1. Press the top part of the radio's body. 3. Push down the battery latch and hold it depressed while removing the battery. 3. Turn OFF the radio. 2. Installing the Lithium-Ion (Li-Ion) Battery Battery Latch Removing the Lithium-Ion (Li-Ion) Battery Battery Latch slots RADIO OVERVIEW 1. Note: To learn about...
User Guide
Page 19
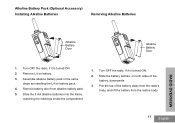
... batteries into the frame, matching the markings inside the compartment 1. Pull the top of the battery, downwards. 3. Remove Li-Ion battery. 3. Remove battery door from the radio's body. 17 English Assemble alkaline battery pack in the same steps as installing the Li-Ion battery pack. 4. Alkaline Battery Pack (Optional Accessory) Installing Alkaline Batteries Removing Alkaline Batteries RADIO OVERVIEW Alkaline Battery Door Alkaline Battery...
... batteries into the frame, matching the markings inside the compartment 1. Pull the top of the battery, downwards. 3. Remove Li-Ion battery. 3. Remove battery door from the radio's body. 17 English Assemble alkaline battery pack in the same steps as installing the Li-Ion battery pack. 4. Alkaline Battery Pack (Optional Accessory) Installing Alkaline Batteries Removing Alkaline Batteries RADIO OVERVIEW Alkaline Battery Door Alkaline Battery...
User Guide
Page 21
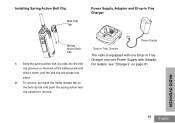
... Action Belt Clip 1. Slide the spring action belt clip rails into place. 2. To remove, pull back the metal release tab on the back of the battery pack and slide it down until the belt clip tab snaps into the belt clip grooves on the belt clip tab and push the spring... action belt clip upward to remove. For details, see "Chargers" on page 81. Power Supply Drop-in Tray Charger The radio is equipped with one Power Supply with Adaptor...
... Action Belt Clip 1. Slide the spring action belt clip rails into place. 2. To remove, pull back the metal release tab on the back of the battery pack and slide it down until the belt clip tab snaps into the belt clip grooves on the belt clip tab and push the spring... action belt clip upward to remove. For details, see "Chargers" on page 81. Power Supply Drop-in Tray Charger The radio is equipped with one Power Supply with Adaptor...
User Guide
Page 22
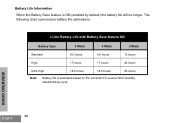
The following chart summarizes battery life estimations: Li-Ion Battery Life with Battery Save feature ON Battery Type 5 Watts 4 Watts 2 Watts Standard 8.5 hours 8.5 hours 12 hours High 17 hours 17 hours 24 hours Ultra High 18.5 hours 18.5 hours 26 hours Note: Battery life is ON (enabled by default) the battery life will be longer. Battery Life Information When the Battery Save feature is estimated based on 5% transmit/ 5% receive/ 90% standby standard duty cycle RADIO OVERVIEW English 20
The following chart summarizes battery life estimations: Li-Ion Battery Life with Battery Save feature ON Battery Type 5 Watts 4 Watts 2 Watts Standard 8.5 hours 8.5 hours 12 hours High 17 hours 17 hours 24 hours Ultra High 18.5 hours 18.5 hours 26 hours Note: Battery life is ON (enabled by default) the battery life will be longer. Battery Life Information When the Battery Save feature is estimated based on 5% transmit/ 5% receive/ 90% standby standard duty cycle RADIO OVERVIEW English 20
User Guide
Page 23
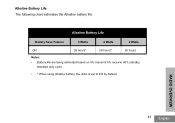
Alkaline Battery Life The following chart estimates the Alkaline battery life: Alkaline Battery Life Battery Save Feature 5 Watts 4 Watts 2 Watts ON 26 hours* 26 hours* 26 hours Notes: • Battery life are being estimated based on 5% transmit/ 5% receive/ 90% standby standard duty cycle. • * When using Alkaline battery, the radio is set to 2W by default RADIO OVERVIEW 21 English
Alkaline Battery Life The following chart estimates the Alkaline battery life: Alkaline Battery Life Battery Save Feature 5 Watts 4 Watts 2 Watts ON 26 hours* 26 hours* 26 hours Notes: • Battery life are being estimated based on 5% transmit/ 5% receive/ 90% standby standard duty cycle. • * When using Alkaline battery, the radio is set to 2W by default RADIO OVERVIEW 21 English
User Guide
Page 24
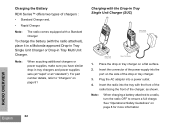
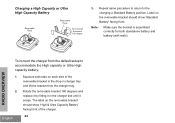
..." on a flat surface. 2. Note: When charging a battery attached to a radio, turn the radio OFF to "Chargers" on the side of the charger, as shown. Plug the AC adaptor into the tray with the radio attached), place it in a Motorola-approved Drop-in Tray Single Unit Charger or Drop-in tray... the front of the drop-in tray chargers and power supplies sets (all "rapid" or all "standard"). Insert the radio into a power outlet. 4. Charging the Battery RDX Series™ offers two types of chargers : • Standard Charger and, • Rapid Charger. Place the drop-in Tray ...
..." on a flat surface. 2. Note: When charging a battery attached to a radio, turn the radio OFF to "Chargers" on the side of the charger, as shown. Plug the AC adaptor into the tray with the radio attached), place it in a Motorola-approved Drop-in Tray Single Unit Charger or Drop-in tray... the front of the drop-in tray chargers and power supplies sets (all "rapid" or all "standard"). Insert the radio into a power outlet. 4. Charging the Battery RDX Series™ offers two types of chargers : • Standard Charger and, • Rapid Charger. Place the drop-in Tray ...

User Guide
Page 25
...Note: Ensure that needs to the correct position for each battery: Adjustable bracket Adjustable bracket Standard High and Ultra High Capacity Figure 1: Identifying the Drop-In Charger's Position Before Charging the Battery RADIO OVERVIEW 23 English The drop-in the charger is designed... to charge either Standard or High capacity battery. Charging a Standalone Battery To charge only the battery - at step 4, insert the battery into the tray, with the...
...Note: Ensure that needs to the correct position for each battery: Adjustable bracket Adjustable bracket Standard High and Ultra High Capacity Figure 1: Identifying the Drop-In Charger's Position Before Charging the Battery RADIO OVERVIEW 23 English The drop-in the charger is designed... to charge either Standard or High capacity battery. Charging a Standalone Battery To charge only the battery - at step 4, insert the battery into the tray, with the...
User Guide
Page 26
... setup to the charging a Standard Battery position. The label on the removable bracket should show 'Standard Battery' facing front. Charging a High Capacity or Ultra High Capacity Battery Removable Piece Removable Piece Turn around horizontal 180 degree 3. Squeeze both standalone battery and battery (with radio) To convert the charger from the... each side of the charger. Repeat same procedure to return to accommodate the High capacity or Ultra High capacity battery: RADIO OVERVIEW 1. Rotate the removable bracket 180 degrees and replace it by fitting it snaps. English 24
... setup to the charging a Standard Battery position. The label on the removable bracket should show 'Standard Battery' facing front. Charging a High Capacity or Ultra High Capacity Battery Removable Piece Removable Piece Turn around horizontal 180 degree 3. Squeeze both standalone battery and battery (with radio) To convert the charger from the... each side of the charger. Repeat same procedure to return to accommodate the High capacity or Ultra High capacity battery: RADIO OVERVIEW 1. Rotate the removable bracket 180 degrees and replace it by fitting it snaps. English 24
User Guide
Page 27
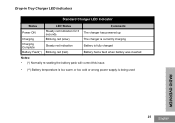
Drop-in Tray Charger LED Indicators Standard Charger LED Indicator Status Power ON Charging Charging Complete Battery Fault(*) LED Status Steady red indication for 3 seconds Blinking red (slow) Steady red indication Blinking red (fast) Comments The charger has powered up The charger is currently charging Battery is fully charged Battery had a fault when battery was inserted Notes: • (*) Normally re-seating the battery pack will correct this issue. • (**) Battery temperature is too warm or too cold or wrong power supply is being used RADIO OVERVIEW 25 English
Drop-in Tray Charger LED Indicators Standard Charger LED Indicator Status Power ON Charging Charging Complete Battery Fault(*) LED Status Steady red indication for 3 seconds Blinking red (slow) Steady red indication Blinking red (fast) Comments The charger has powered up The charger is currently charging Battery is fully charged Battery had a fault when battery was inserted Notes: • (*) Normally re-seating the battery pack will correct this issue. • (**) Battery temperature is too warm or too cold or wrong power supply is being used RADIO OVERVIEW 25 English
User Guide
Page 28
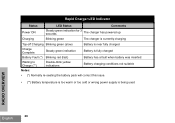
... fully charged Battery Fault (*) Blinking red (fast) Battery has a fault when battery was inserted Waiting to Charge (**) Double-blink yellow indications Battery charging conditions not suitable Notes: • (*) Normally re-seating the battery pack will correct this issue. • (**) Battery temperature is too warm or too cold or wrong power supply is being used RADIO OVERVIEW English...
... fully charged Battery Fault (*) Blinking red (fast) Battery has a fault when battery was inserted Waiting to Charge (**) Double-blink yellow indications Battery charging conditions not suitable Notes: • (*) Normally re-seating the battery pack will correct this issue. • (**) Battery temperature is too warm or too cold or wrong power supply is being used RADIO OVERVIEW English...


