User Guide
Page 4
... Microphone Gain 34 Battery Save 34 Reset to Factory Defaults 34 End of Transmission Tone (Roger Beep Tone 35 Programming Features 36 Programming Mode 36 Learning to Read the Values the Radio Signals You 36 Entering Programming Mode 39 Reading Frequencies Values 39 English 2 Reading CTCSS/DPL Values 40 Reading Auto-Scan Values 41...
... Microphone Gain 34 Battery Save 34 Reset to Factory Defaults 34 End of Transmission Tone (Roger Beep Tone 35 Programming Features 36 Programming Mode 36 Learning to Read the Values the Radio Signals You 36 Entering Programming Mode 39 Reading Frequencies Values 39 English 2 Reading CTCSS/DPL Values 40 Reading Auto-Scan Values 41...
User Guide
Page 5
... Chart 70 RDU4100 - Cloning with RDX Radios - Quick Instructions 64 RDV5100 - UHF Default Frequencies Chart 71 CTCSS and PL/DPL Codes 72 Programming Customized Frequencies on 4W/5W RDX models 75 Motorola Limited Warranty for the United States and Canada 76 Accessories 80 ... Frequencies Chart 65 RDX UHF Frequencies Chart 66 RDU2020 - VHF Default Frequencies Chart 63 Making XTN Compatible with a Multi Unit Charger (MUC 51 Cloning Radio using the Radio to Radio (R2R) Cloning Cable (Optional Accessory 53 Cloning using the CPS (Computer Programming Software 55 Troubleshooting ...
... Chart 70 RDU4100 - Cloning with RDX Radios - Quick Instructions 64 RDV5100 - UHF Default Frequencies Chart 71 CTCSS and PL/DPL Codes 72 Programming Customized Frequencies on 4W/5W RDX models 75 Motorola Limited Warranty for the United States and Canada 76 Accessories 80 ... Frequencies Chart 65 RDX UHF Frequencies Chart 66 RDU2020 - VHF Default Frequencies Chart 63 Making XTN Compatible with a Multi Unit Charger (MUC 51 Cloning Radio using the Radio to Radio (R2R) Cloning Cable (Optional Accessory 53 Cloning using the CPS (Computer Programming Software 55 Troubleshooting ...
User Guide
Page 14
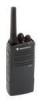
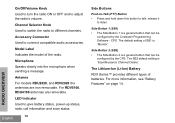
...14. Antenna For models RDU2020, and RDV2020 the antennas are removable. The SB2 default setting is a general button that can be configured by the Computer Programming Software - The Lithium-Ion (Li-Ion) Battery RDX Series™ provides different types of the radio. Channel Selector Knob Used ...to switch the radio to listen. Model Label Indicates the model of batteries. LED ...
...14. Antenna For models RDU2020, and RDV2020 the antennas are removable. The SB2 default setting is a general button that can be configured by the Computer Programming Software - The Lithium-Ion (Li-Ion) Battery RDX Series™ provides different types of the radio. Channel Selector Knob Used ...to switch the radio to listen. Model Label Indicates the model of batteries. LED ...
User Guide
Page 17
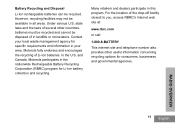
... local waste management agency for specific requirements and information in this program. RADIO OVERVIEW 15 English Contact your area. In the U.S. state laws and the laws of in the nationwide Rechargeable Battery Recycling Corporation (RBRC) program for consumers, businesses and governmental agencies. However, recycling facilities may...must be recycled and cannot be available in all areas. For the location of Li-Ion batteries. and Canada, Motorola participates in landfills or incinerators. Battery Recycling and Disposal Li-Ion rechargeable batteries can be recycled.
... local waste management agency for specific requirements and information in this program. RADIO OVERVIEW 15 English Contact your area. In the U.S. state laws and the laws of in the nationwide Rechargeable Battery Recycling Corporation (RBRC) program for consumers, businesses and governmental agencies. However, recycling facilities may...must be recycled and cannot be available in all areas. For the location of Li-Ion batteries. and Canada, Motorola participates in landfills or incinerators. Battery Recycling and Disposal Li-Ion rechargeable batteries can be recycled.
User Guide
Page 31
...high or when adjusting the volume SELECTING A CHANNEL To select a channel, rotate the Channel Selector Knob and select the desired channel number. The radio will chirp and the LED Indicator will blink red every 3 seconds. 29 English Note: Do not hold the SB1(*) button to decrease the ... before transmitting to avoid 'talking over' someone who is already transmitting To monitor, long press and hold the radio too close to "Parts of the Radio" on page 11. Program each channel separately. To release, press SB1 again. ADJUSTING VOLUME Turn the On/Off/Volume Knob clockwise to ...
...high or when adjusting the volume SELECTING A CHANNEL To select a channel, rotate the Channel Selector Knob and select the desired channel number. The radio will chirp and the LED Indicator will blink red every 3 seconds. 29 English Note: Do not hold the SB1(*) button to decrease the ... before transmitting to avoid 'talking over' someone who is already transmitting To monitor, long press and hold the radio too close to "Parts of the Radio" on page 11. Program each channel separately. To release, press SB1 again. ADJUSTING VOLUME Turn the On/Off/Volume Knob clockwise to ...
User Guide
Page 32
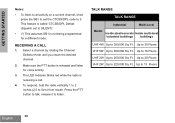
...until you reach the desired channel. 2. Make sure the PTT button is receiving a call. 4. Up to 18 Floors UHF 2W Up to listen. The LED Indicator blinks red while the radio is released and listen for a different mode. release it to 250,000 Sq. Ft. Ft. GETTING STARTED Notes: ...8226; (*) This assumes SB1 is not being programmed for voice activity. 3. RECEIVING A CALL 1. Ft. Ft. This feature is called 'CTCSS/DPL Defeat (Squelch set the CTCSS/DPL code to 0. Up to 20 Floors VHF 2W Up to 5cm) from mouth. To respond, hold the radio vertically 1 to 2 inches (2.5 to 220...
...until you reach the desired channel. 2. Make sure the PTT button is receiving a call. 4. Up to 18 Floors UHF 2W Up to listen. The LED Indicator blinks red while the radio is released and listen for a different mode. release it to 250,000 Sq. Ft. Ft. GETTING STARTED Notes: ...8226; (*) This assumes SB1 is not being programmed for voice activity. 3. RECEIVING A CALL 1. Ft. Ft. This feature is called 'CTCSS/DPL Defeat (Squelch set the CTCSS/DPL code to 0. Up to 20 Floors VHF 2W Up to 5cm) from mouth. To respond, hold the radio vertically 1 to 2 inches (2.5 to 220...
User Guide
Page 33
... transmissions sound garbled to anyone listening who is using, depending on the radio: 1. For details on both radios. Scramble Code: Codes that the radio is not set up frequencies and CTCSS/DPL codes in the channels, refer to "Programming Selection Mode" in page 36. 31 English Bandwidth: Some frequencies have ... that specific code. 5. GETTING STARTED To establish a proper two-way communication, the channel, frequency, and interference eliminator codes must match other radios for optimum audio quality. Frequency: The frequency the radio uses to that has been preprogrammed on...
... transmissions sound garbled to anyone listening who is using, depending on the radio: 1. For details on both radios. Scramble Code: Codes that the radio is not set up frequencies and CTCSS/DPL codes in the channels, refer to "Programming Selection Mode" in page 36. 31 English Bandwidth: Some frequencies have ... that specific code. 5. GETTING STARTED To establish a proper two-way communication, the channel, frequency, and interference eliminator codes must match other radios for optimum audio quality. Frequency: The frequency the radio uses to that has been preprogrammed on...
User Guide
Page 34
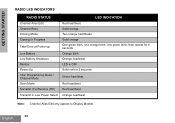
GETTING STARTED RADIO LED INDICATORS RADIO STATUS LED INDICATION Channel Alias Edit Channel Busy Cloning Mode Red heartbeat Solid orange Two orange heartbeats Cloning In Progress Fatal Error at Power up ... Battery Solid orange One green blink, one orange blink, one green blink, then repeat for 4 seconds Orange blink Low Battery Shutdown Monitor Power-Up 'Idle' Programming Mode / Channel Mode Scan Mode Orange heartbeat LED is OFF Solid red for 2 seconds Green heartbeat Red heartbeat Transmit (Tx)/Receive (RX) Red heartbeat Transmit...
GETTING STARTED RADIO LED INDICATORS RADIO STATUS LED INDICATION Channel Alias Edit Channel Busy Cloning Mode Red heartbeat Solid orange Two orange heartbeats Cloning In Progress Fatal Error at Power up ... Battery Solid orange One green blink, one orange blink, one green blink, then repeat for 4 seconds Orange blink Low Battery Shutdown Monitor Power-Up 'Idle' Programming Mode / Channel Mode Scan Mode Orange heartbeat LED is OFF Solid red for 2 seconds Green heartbeat Red heartbeat Transmit (Tx)/Receive (RX) Red heartbeat Transmit...
User Guide
Page 36
...different users or operating environments. This feature can be adjusted to use the VOX feature, VOX level should be set back all radio features to suit different operating environments. Microphone default setting is always ready to level 2 (medium gain). VOX sensitivity can be ... do so, press PTT, SB2 and SB1 simultaneously while turning ON the radio until you hear a high tone chirp. GETTING STARTED Setting VOX Sensitivity The sensitivity of the radio's accessory or microphone can be programmed via the CPS. To enable/ disable press SB1 and SB2 buttons simultaneously for...
...different users or operating environments. This feature can be adjusted to use the VOX feature, VOX level should be set back all radio features to suit different operating environments. Microphone default setting is always ready to level 2 (medium gain). VOX sensitivity can be ... do so, press PTT, SB2 and SB1 simultaneously while turning ON the radio until you hear a high tone chirp. GETTING STARTED Setting VOX Sensitivity The sensitivity of the radio's accessory or microphone can be programmed via the CPS. To enable/ disable press SB1 and SB2 buttons simultaneously for...
User Guide
Page 38
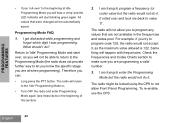
CPS software download is available for free at www.motorola.com/RDX PROGRAMMING MODE Programming Mode is a special radio mode to select frequencies for each time you are being programmed, the radio will blink two colors: • Orange to signal '0' and, • Red for other values from '1' to "Programming Mode: Reading the Values" table on page 38. Short and...
CPS software download is available for free at www.motorola.com/RDX PROGRAMMING MODE Programming Mode is a special radio mode to select frequencies for each time you are being programmed, the radio will blink two colors: • Orange to signal '0' and, • Red for other values from '1' to "Programming Mode: Reading the Values" table on page 38. Short and...
User Guide
Page 39
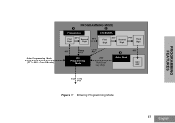
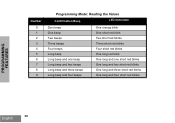
Scan PTT ON / OFF Exit Long PTT Figure 1: Entering Programming Mode 37 English PROGRAMMING FEATURES Enter Programming Mode (PTT + SB1 + Turn ON radio) PROGRAMMING MODE 1 2 Frequencies CTCSS/DPL First PTT Second PTT Digit Digit First Digit PTT PTT Second Digit Third Digit PTT Long PTT Idle Programming Mode Long PTT PTT "Roll Over" key chirp 3 Auto-
Scan PTT ON / OFF Exit Long PTT Figure 1: Entering Programming Mode 37 English PROGRAMMING FEATURES Enter Programming Mode (PTT + SB1 + Turn ON radio) PROGRAMMING MODE 1 2 Frequencies CTCSS/DPL First PTT Second PTT Digit Digit First Digit PTT PTT Second Digit Third Digit PTT Long PTT Idle Programming Mode Long PTT PTT "Roll Over" key chirp 3 Auto-
User Guide
Page 40
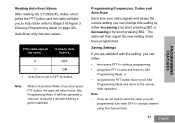
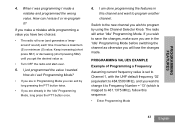
PROGRAMMING FEATURES Number 0 1 2 3 4 5 6 7 8 9 Programming Mode: Reading the Values Confirmation Beep LED Indication Zero beep One beep Two beeps Three beeps Four beeps Long beep Long beep and one beep Long beep and two beeps Long beep and three beeps Long beep and four beeps One orange blink One short red blink Two short red blinks Three short red blinks Four short red blinks One long red blink One long and one short red blinks One long and two short red blinks One long and three short red blinks One long and four short red blinks English 38
PROGRAMMING FEATURES Number 0 1 2 3 4 5 6 7 8 9 Programming Mode: Reading the Values Confirmation Beep LED Indication Zero beep One beep Two beeps Three beeps Four beeps Long beep Long beep and one beep Long beep and two beeps Long beep and three beeps Long beep and four beeps One orange blink One short red blink Two short red blinks Three short red blinks Four short red blinks One long red blink One long and one short red blinks One long and two short red blinks One long and three short red blinks One long and four short red blinks English 38
User Guide
Page 41
... green heartbeat. You can do so before entering Programming Mode or at any time during the Programming Mode by turning the Channel Selector Knob to the desired channel To read two digits as RDX Series™ radios have entered 'Idle' Programming Mode (*).The LED Indicator will be able to ...read the Frequencies, Codes and Auto-Scan setting by long pressing both the PTT and the SB1 button simultaneously while turning ON the radio for UHF. Reading Frequencies Values ...
... green heartbeat. You can do so before entering Programming Mode or at any time during the Programming Mode by turning the Channel Selector Knob to the desired channel To read two digits as RDX Series™ radios have entered 'Idle' Programming Mode (*).The LED Indicator will be able to ...read the Frequencies, Codes and Auto-Scan setting by long pressing both the PTT and the SB1 button simultaneously while turning ON the radio for UHF. Reading Frequencies Values ...
User Guide
Page 42
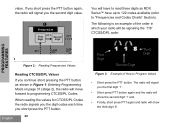
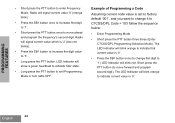
... is an example of How to read three digits as shown in which your radio will be signaling the '118' CTCSS/DPL code: PROGRAMMING FEATURES PTT Long PTT Long PTT Mode Idle PTT Programming Figure 2: Reading Frequencies Values Reading CTCSS/DPL Values If you continue short pressing ...the PTT button as RDX Series™ have up to 122 codes available (refer to programming CTCSS/PL Codes. value. ...
... is an example of How to read three digits as shown in which your radio will be signaling the '118' CTCSS/DPL code: PROGRAMMING FEATURES PTT Long PTT Long PTT Mode Idle PTT Programming Figure 2: Reading Frequencies Values Reading CTCSS/DPL Values If you continue short pressing ...the PTT button as RDX Series™ have up to 122 codes available (refer to programming CTCSS/PL Codes. value. ...
User Guide
Page 43
...generate a 'roll-over' chirp and it will then signal the new setting it by default. The radio will start blinking a green heartbeat Programming Frequencies, Codes and Auto-Scan Each time your radio signals and beeps the current setting you can either increasing it by short pressing SB1 or decreasing it... reading the CTCSS/DPL codes, short press the PTT button and the radio will take you to Auto-Scan (refer to the normal radio operation. Saving Settings If you are satisfied with the setting, you just programmed, turn radio OFF or change this setting by either : • short press PTT...
...generate a 'roll-over' chirp and it will then signal the new setting it by default. The radio will start blinking a green heartbeat Programming Frequencies, Codes and Auto-Scan Each time your radio signals and beeps the current setting you can either increasing it by short pressing SB1 or decreasing it... reading the CTCSS/DPL codes, short press the PTT button and the radio will take you to Auto-Scan (refer to the normal radio operation. Saving Settings If you are satisfied with the setting, you just programmed, turn radio OFF or change this setting by either : • short press PTT...
User Guide
Page 44
...you 'roll-over and took me back to value '0'. What should I am trying to the beginning at when programming). It rolled over ' to enter the Programming Mode but the radio would not do it . English 42 Return to let you know the specific stage you can: • ...thing will be able to return to the Programming Mode (the radio does not provide further way to 'Idle' Programming Mode and start blinking green again. For example, if you are programming a valid number. 3. I was programming. All values that are at Idle Programming Mode you will start over, as the...
...you 'roll-over and took me back to value '0'. What should I am trying to the beginning at when programming). It rolled over ' to enter the Programming Mode but the radio would not do it . English 42 Return to let you know the specific stage you can: • ...thing will be able to return to the Programming Mode (the radio does not provide further way to 'Idle' Programming Mode and start blinking green again. For example, if you are programming a valid number. 3. I was programming. All values that are at Idle Programming Mode you will start over, as the...
User Guide
Page 45
... the desired value or, • Turn OFF the radio and start-over (and generates a 'wraparound' sound) each time it to Frequency Number = '13' (which is set to Channel 1, with the UHF default frequency '02' (equivalent to change it reaches a maximum (9) or minimum (0) value. PROGRAMMING FEATURES 4. How can exit by using the Channel Selector...
... the desired value or, • Turn OFF the radio and start-over (and generates a 'wraparound' sound) each time it to Frequency Number = '13' (which is set to Channel 1, with the UHF default frequency '02' (equivalent to change it reaches a maximum (9) or minimum (0) value. PROGRAMMING FEATURES 4. How can exit by using the Channel Selector...
User Guide
Page 46
... Mode). The LED Indicator will blink orange to move ahead and program the frequency's second digit. • Short press the PTT button to exit Programming Mode or turn radio OFF. LED Indicator will signal current value which is '0'. Radio will show a green heartbeat to indicate 'Idle' state. • Long press the PTT button to...
... Mode). The LED Indicator will blink orange to move ahead and program the frequency's second digit. • Short press the PTT button to exit Programming Mode or turn radio OFF. LED Indicator will signal current value which is '0'. Radio will show a green heartbeat to indicate 'Idle' state. • Long press the PTT button to...
User Guide
Page 47
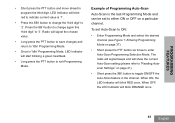
... and return to enter Auto-Scan Programming Selection Mode. Radio will blink red to indicate current value is the last Programming Mode and can be set Auto-Scan to ON: • Enter Programming Mode and select the desired channel (see Figure 1: Entering Programming Mode on page 37). •... Press the SB1 button to change again this 'third digit' to '3'. PROGRAMMING FEATURES • Short press the PTT button and move ahead to '2'. When ON, the LED Indicator will blink ORANGE once. 45 English The radio will signal beeps and will start blinking a green heartbeat. • Long...
... and return to enter Auto-Scan Programming Selection Mode. Radio will blink red to indicate current value is the last Programming Mode and can be set Auto-Scan to ON: • Enter Programming Mode and select the desired channel (see Figure 1: Entering Programming Mode on page 37). •... Press the SB1 button to change again this 'third digit' to '3'. PROGRAMMING FEATURES • Short press the PTT button and move ahead to '2'. When ON, the LED Indicator will blink ORANGE once. 45 English The radio will signal beeps and will start blinking a green heartbeat. • Long...
User Guide
Page 48
...If you want to scan a channel without Interference Eliminator Codes (CTCSS/DPL), set up in Channel 1, the radio waits for the channels to '0' in the CTCSS/DPL Programming Selection Mode. You can talk to the person(s) transmitting without having to switch channels by pressing PTT. &#...to listen and talk to people on that channel until the activity ends. PROGRAMMING FEATURES OTHER PROGRAMMING FEATURES Scan Scan allows you to monitor other function different from the default. When the radio detects channel activity, it automatically. If no transmission occurs within five seconds...
...If you want to scan a channel without Interference Eliminator Codes (CTCSS/DPL), set up in Channel 1, the radio waits for the channels to '0' in the CTCSS/DPL Programming Selection Mode. You can talk to the person(s) transmitting without having to switch channels by pressing PTT. &#...to listen and talk to people on that channel until the activity ends. PROGRAMMING FEATURES OTHER PROGRAMMING FEATURES Scan Scan allows you to monitor other function different from the default. When the radio detects channel activity, it automatically. If no transmission occurs within five seconds...


