
User Guide
Page 1
Available applications and services are subject to change at any time.
Available applications and services are subject to change at any time.

User Guide
Page 2
... Your Phone Number 17 Touchscreen Navigation 17 App List 17 Search 19 Google Now 19 Voice Search on the Home Screen 20 Voice Commands 21 Moto Assist and Moto Display 22 Enter Text 23 Touchscreen Keyboard 23 Text Entry Settings and Dictionary 25 Tips for Editing Text 25 Voice Typing 26 i
... Your Phone Number 17 Touchscreen Navigation 17 App List 17 Search 19 Google Now 19 Voice Search on the Home Screen 20 Voice Commands 21 Moto Assist and Moto Display 22 Enter Text 23 Touchscreen Keyboard 23 Text Entry Settings and Dictionary 25 Tips for Editing Text 25 Voice Typing 26 i

User Guide
Page 3
Your Phone Interface 27 Your Home Screen 27 Status Bar 28 Status Bar Notifications 29 Phone App 31 Make Phone Calls 31 Call Using the Phone Dialer 31 Call from History 32 Call from Contacts 32 Call a Number in a Text Message or Email Message 33 Call from Favorites 33 Call Emergency Numbers 33 Receive Phone Calls 34 Voicemail 35 Activate Your Voicemail 35 Voicemail Notification 36 Visual Voicemail 36 Set Up Visual Voicemail 36 Retrieve Voicemails in Visual Voicemail 37 Visual Voicemail Options 39 Change Your Greeting or Password 40 Phone Call Options ...
Your Phone Interface 27 Your Home Screen 27 Status Bar 28 Status Bar Notifications 29 Phone App 31 Make Phone Calls 31 Call Using the Phone Dialer 31 Call from History 32 Call from Contacts 32 Call a Number in a Text Message or Email Message 33 Call from Favorites 33 Call Emergency Numbers 33 Receive Phone Calls 34 Voicemail 35 Activate Your Voicemail 35 Voicemail Notification 36 Visual Voicemail 36 Set Up Visual Voicemail 36 Retrieve Voicemails in Visual Voicemail 37 Visual Voicemail Options 39 Change Your Greeting or Password 40 Phone Call Options ...

User Guide
Page 4
Email 50 Add an Email Account (POP or IMAP) 50 Add a Corporate Sync Account 51 Compose and Send Email 52 Virtual Private Networks (VPN) 52 Prepare Your Phone for VPN Connection 52 Add a VPN Connection 52 Connect to or Disconnect from a VPN 53 Share Your Phone 53 Text and Multimedia Messaging 54 Send a Text Message 55 Send a Multimedia Message (MMS) 56 Save and Resume a Draft Message 56 New Messages Notification 56 Message Options 56 Chat Using Hangouts 57 Download Apps from the Web 58 Wireless Emergency Alerts 59 Your Cloud 59 Chrome Browser 59 Camera ...
Email 50 Add an Email Account (POP or IMAP) 50 Add a Corporate Sync Account 51 Compose and Send Email 52 Virtual Private Networks (VPN) 52 Prepare Your Phone for VPN Connection 52 Add a VPN Connection 52 Connect to or Disconnect from a VPN 53 Share Your Phone 53 Text and Multimedia Messaging 54 Send a Text Message 55 Send a Multimedia Message (MMS) 56 Save and Resume a Draft Message 56 New Messages Notification 56 Message Options 56 Chat Using Hangouts 57 Download Apps from the Web 58 Wireless Emergency Alerts 59 Your Cloud 59 Chrome Browser 59 Camera ...

User Guide
Page 5
Request a Refund for a Paid App 76 Manage or Remove Apps 76 Google Maps 77 Google Play Music 79 Get Music 80 Tips and Tricks 81 Watch on Google Play 82 Google+ 82 Google Play Games 82 Google Play Books 83 Google Play Newsstand 84 FM Radio 84 YouTube 85 Update Your Phone 85 Update Your Profile 85 Connectivity 87 Wi-Fi 87 Turn Wi-Fi On or Off 87 Wi-Fi Search and Connect 88 Wi-Fi Modes 88 Bluetooth Connections 88 Turn Bluetooth On or Off 89 Connect New Devices 89 Reconnect Devices 90 Disconnect Devices 90 Rename the Phone 90 Rename a Paired ...
Request a Refund for a Paid App 76 Manage or Remove Apps 76 Google Maps 77 Google Play Music 79 Get Music 80 Tips and Tricks 81 Watch on Google Play 82 Google+ 82 Google Play Games 82 Google Play Books 83 Google Play Newsstand 84 FM Radio 84 YouTube 85 Update Your Phone 85 Update Your Profile 85 Connectivity 87 Wi-Fi 87 Turn Wi-Fi On or Off 87 Wi-Fi Search and Connect 88 Wi-Fi Modes 88 Bluetooth Connections 88 Turn Bluetooth On or Off 89 Connect New Devices 89 Reconnect Devices 90 Disconnect Devices 90 Rename the Phone 90 Rename a Paired ...

User Guide
Page 6
Emergency Broadcasts 96 Moto Settings 96 Display Settings 96 Sound and Notification Settings 98 Volume 98 Audio Effects 98 Volume adjustments 98 Also vibrate for calls 99 Interruptions 99 ...
Emergency Broadcasts 96 Moto Settings 96 Display Settings 96 Sound and Notification Settings 98 Volume 98 Audio Effects 98 Volume adjustments 98 Also vibrate for calls 99 Interruptions 99 ...

User Guide
Page 7
... and Input Method Settings 113 Voice Input 115 Voice Search 115 Text-to-speech Output 115 Mouse/Trackpad 115 Motorola Privacy Settings 116 Backup and Reset Settings 116 Reset Your Phone 116 Motorola ID Settings 117 Activate Device Settings 117 System Update 117 Date and Time Settings 117 Accessibility Settings 118 TalkBack...
... and Input Method Settings 113 Voice Input 115 Voice Search 115 Text-to-speech Output 115 Mouse/Trackpad 115 Motorola Privacy Settings 116 Backup and Reset Settings 116 Reset Your Phone 116 Motorola ID Settings 117 Activate Device Settings 117 System Update 117 Date and Time Settings 117 Accessibility Settings 118 TalkBack...

User Guide
Page 8
About Phone 125 Copyright Information 126 For Assistance 128 Troubleshooting 128 Sprint Account Information and Help 129 Sprint Account Passwords 129 Manage Your Account 130 Sprint Support Services 131 Motorola Mobility LLC Global Limited Warranty 131 Safety, Regulatory & Legal 146 Index 158 vii
About Phone 125 Copyright Information 126 For Assistance 128 Troubleshooting 128 Sprint Account Information and Help 129 Sprint Account Passwords 129 Manage Your Account 130 Sprint Support Services 131 Motorola Mobility LLC Global Limited Warranty 131 Safety, Regulatory & Legal 146 Index 158 vii

User Guide
Page 9
Introduction Your Moto E™ is built to get help. Note: Motorola Bands and Grip Shells are sold separately. Unless otherwise noted, instructions begin from home, tap Apps > Settings > Motorola Privacy > Enhanced Device support. Help Get help files. n View the Google Help Centers online at the time of the phone. n From home, tap Apps > Help...
Introduction Your Moto E™ is built to get help. Note: Motorola Bands and Grip Shells are sold separately. Unless otherwise noted, instructions begin from home, tap Apps > Settings > Motorola Privacy > Enhanced Device support. Help Get help files. n View the Google Help Centers online at the time of the phone. n From home, tap Apps > Help...

User Guide
Page 10
... or down. To return to the call screen and search or look at other screens and settings. n For online Sprint assistance, from home, tap Apps > Moto . Start finding your phone features, from home, tap Apps > SprintZone . n Close keyboard: To close a touchscreen keyboard, tap . Introduction 2 Tip: During a call, you can leave the...
... or down. To return to the call screen and search or look at other screens and settings. n For online Sprint assistance, from home, tap Apps > Moto . Start finding your phone features, from home, tap Apps > SprintZone . n Close keyboard: To close a touchscreen keyboard, tap . Introduction 2 Tip: During a call, you can leave the...

User Guide
Page 11
... from the body. The SAR guideline includes a considerable safety margin designed to assure the safety of all the information you need to set up your Moto E™ and Sprint service the first time. Note: Your phone may look a little different. Caution: Before using your phone, please read the safety, regulatory and...
... from the body. The SAR guideline includes a considerable safety margin designed to assure the safety of all the information you need to set up your Moto E™ and Sprint service the first time. Note: Your phone may look a little different. Caution: Before using your phone, please read the safety, regulatory and...

User Guide
Page 12
Customer is lost /stolen. For details, contact Customer Service. If necessary wipe it before inserting/removing SIM Card. The company is not responsible for damages from stored information that is responsible for SIM cards or an optional memory card (microSD). Remove the band to the company when cancelling your phone covers the SIM and memory card slots. Get Started 4 n Avoid applying labels as this may change without notice. n Always power off phone before turning on SIM Card. Put your finger in the bottom corner of the band around the edge of your ...
Customer is lost /stolen. For details, contact Customer Service. If necessary wipe it before inserting/removing SIM Card. The company is not responsible for damages from stored information that is responsible for SIM cards or an optional memory card (microSD). Remove the band to the company when cancelling your phone covers the SIM and memory card slots. Get Started 4 n Avoid applying labels as this may change without notice. n Always power off phone before turning on SIM Card. Put your finger in the bottom corner of the band around the edge of your ...

User Guide
Page 13
With the gold contacts facing up , push the card into the top slot. n Memory card (microSD) - Then slide it 's not already in) and an optional, for memory expanding, microSD card. Install SIM and Memory Cards Put in to remove the band-doing so may damage your SIM card. 2. With the writing facing up , push the SIM card into bottom slot until you use the correct size SIM card, and don't use tools to release it in the SIM card (if it out. Get Started 5 Note: To remove a card from a slot, push it . Caution: Don't use adapters with your phone. n SIM - Pry the band ...
With the gold contacts facing up , push the card into the top slot. n Memory card (microSD) - Then slide it 's not already in) and an optional, for memory expanding, microSD card. Install SIM and Memory Cards Put in to remove the band-doing so may damage your SIM card. 2. With the writing facing up , push the SIM card into bottom slot until you use the correct size SIM card, and don't use tools to release it in the SIM card (if it out. Get Started 5 Note: To remove a card from a slot, push it . Caution: Don't use adapters with your phone. n SIM - Pry the band ...

User Guide
Page 14
Snap on . Fully charging a battery may already be partly charged. 1. Replace the Band Replace the band and power on the bottom then press around the whole edge until the band is normal. Match up to three hours. Your phone may take up the band's Power and Volume keys with the phone 2. Get Started 6 Align the top of your phone. Plug the AC adapter into the charger/accessory jack on . To replace the band: 1. Press and hold the Power key to turn the phone on the bottom of the band with the phone. 3. Note: Your phone's battery should fully charge the battery...
Snap on . Fully charging a battery may already be partly charged. 1. Replace the Band Replace the band and power on the bottom then press around the whole edge until the band is normal. Match up to three hours. Your phone may take up the band's Power and Volume keys with the phone 2. Get Started 6 Align the top of your phone. Plug the AC adapter into the charger/accessory jack on . To replace the band: 1. Press and hold the Power key to turn the phone on the bottom of the band with the phone. 3. Note: Your phone's battery should fully charge the battery...
User Guide
Page 15
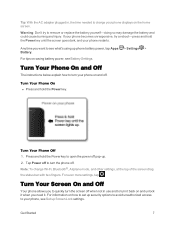
Turn Your Phone On n Press and hold the Power key until the screen goes dark, and your phone restarts. Note: To change Wi-Fi, Bluetooth®, Airplane mode, and other settings, at the top of the screen drag the status bar with two fingers. Get Started 7 Any time you want to see what's using up Screen Lock settings. Turn Your Screen On and Off Your phone allows you need it back on saving battery power, see Set up phone battery power, tap Apps > Settings > Battery. Tap Power off to turn your phone, see Battery Settings. For information on how to set up security ...
Turn Your Phone On n Press and hold the Power key until the screen goes dark, and your phone restarts. Note: To change Wi-Fi, Bluetooth®, Airplane mode, and other settings, at the top of the screen drag the status bar with two fingers. Get Started 7 Any time you want to see what's using up Screen Lock settings. Turn Your Screen On and Off Your phone allows you need it back on saving battery power, see Set up phone battery power, tap Apps > Settings > Battery. Tap Power off to turn your phone, see Battery Settings. For information on how to set up security ...

User Guide
Page 16
To turn the screen on how to unlock the screen. Swipe up to adjust the time before the screen turns off , press the Power key. Note: During a call, your screen might stay dark if the sensor just above the top of the screen is off the screen after a certain period of time when you will turn on how to activate your phone screen and show the lock screen. Pressing the Power key again will be able to draw the pattern or enter the password or PIN. See Set Up Screen Lock. You will still be prompted to receive messages and calls while the phone's screen is covered. Note: For ...
To turn the screen on how to unlock the screen. Swipe up to adjust the time before the screen turns off , press the Power key. Note: During a call, your screen might stay dark if the sensor just above the top of the screen is off the screen after a certain period of time when you will turn on how to activate your phone screen and show the lock screen. Pressing the Power key again will be able to draw the pattern or enter the password or PIN. See Set Up Screen Lock. You will still be prompted to receive messages and calls while the phone's screen is covered. Note: For ...

User Guide
Page 17
Choose an activation option and click Next. Follow the instructions to activate automatically. Once you see the "Congrats" page, your computer, visit sprint.com/prepaidactivate. 2. l Your phone is designed to continue. If you will see a Hands Free Activation screen, which may be followed by a PRL Update screen and a Firmware Update screen. Once your phone has been turned on . You can then complete the setup process. Welcome screen: Select a language (if prompted) and tap to the Internet, call Sprint Customer Service at 1-855-639-4644 from another phone ...
Choose an activation option and click Next. Follow the instructions to activate automatically. Once you see the "Congrats" page, your computer, visit sprint.com/prepaidactivate. 2. l Your phone is designed to continue. If you will see a Hands Free Activation screen, which may be followed by a PRL Update screen and a Firmware Update screen. Once your phone has been turned on . You can then complete the setup process. Welcome screen: Select a language (if prompted) and tap to the Internet, call Sprint Customer Service at 1-855-639-4644 from another phone ...

User Guide
Page 18
For secured Wi-Fi networks, you don't have a Google account, follow the prompts - The following options may apply depending on to an available Wi-Fi network. 2. If you will need it later. Tap Remind me later and tap Next. About your password and tap Next. Enter your Gmail address and then your privacy: Tap Privacy Settings to sign up a new Google Account. Tap Next between each screen. Tap a payment choice, Add credit or debit card or Redeem, and follow the instructions to see the privacy options, then tap ACCEPT AND CONTINUE. Select Wi-Fi: Sign on your ...
For secured Wi-Fi networks, you don't have a Google account, follow the prompts - The following options may apply depending on to an available Wi-Fi network. 2. If you will need it later. Tap Remind me later and tap Next. About your password and tap Next. Enter your Gmail address and then your privacy: Tap Privacy Settings to sign up a new Google Account. Tap Next between each screen. Tap a payment choice, Add credit or debit card or Redeem, and follow the instructions to see the privacy options, then tap ACCEPT AND CONTINUE. Select Wi-Fi: Sign on your ...

User Guide
Page 19
... Old Phone Moving your photos, music, text and call history, photos, contacts and more from your phone. l Google Services - o Tap Yes, I'm in the list to motorola.com/TransferContacts. Tap NEXT. Follow the prompts or see Retrieve Data from Your Old Phone or go to turn them off. By default, these services...
... Old Phone Moving your photos, music, text and call history, photos, contacts and more from your phone. l Google Services - o Tap Yes, I'm in the list to motorola.com/TransferContacts. Tap NEXT. Follow the prompts or see Retrieve Data from Your Old Phone or go to turn them off. By default, these services...

User Guide
Page 20
Get Started 12 On your new phone, tap Apps > Motorola Migrate 2. On your new phone, tap Apps > Motorola Migrate > Send data to this device. l Hold the Scan screen on your new phone with the QR code opposite the blue square. 3. l Tap Select your ... Google Play Store™. l Tap NEXT. l If Transfer from this phone is displayed, touch Start or touch Want to complete the transfer. > iPhone. l Download the Motorola Migrate app from this phone instead?
Get Started 12 On your new phone, tap Apps > Motorola Migrate 2. On your new phone, tap Apps > Motorola Migrate > Send data to this device. l Hold the Scan screen on your new phone with the QR code opposite the blue square. 3. l Tap Select your ... Google Play Store™. l Tap NEXT. l If Transfer from this phone is displayed, touch Start or touch Want to complete the transfer. > iPhone. l Download the Motorola Migrate app from this phone instead?
