User Manual
Page 5
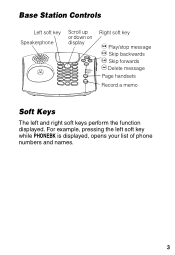
For example, pressing the left and right soft keys perform the function displayed. Base Station Controls Left soft key Speakerphone Scroll up or down on display del in use/ voice mail charge/ page page memo Right soft key i Play/stop message h Skip backwards g Skip forwards f Delete message Page handsets Record a memo Soft Keys The left soft key while PHONEBK is displayed, opens your list of phone numbers and names. 3
For example, pressing the left and right soft keys perform the function displayed. Base Station Controls Left soft key Speakerphone Scroll up or down on display del in use/ voice mail charge/ page page memo Right soft key i Play/stop message h Skip backwards g Skip forwards f Delete message Page handsets Record a memo Soft Keys The left soft key while PHONEBK is displayed, opens your list of phone numbers and names. 3
User Manual
Page 6
... is designed to be used to connect this equipment to the premises wiring and telephone network must , upon request, provide this cordless phone does not disable your telephone company. The digits represented by the REN, contact your telephone number is provided with this equipment is useful in the product identifier indicate the Ringer...
... is designed to be used to connect this equipment to the premises wiring and telephone network must , upon request, provide this cordless phone does not disable your telephone company. The digits represented by the REN, contact your telephone number is provided with this equipment is useful in the product identifier indicate the Ringer...
User Manual
Page 9
...kitchen sink, or swimming pool). 4. Do not disassemble this product from the wall outlet before cleaning. Avoid using your cordless phone to reduce the risk of the phone unblocked. Never insert objects of fire, use this user's guide. 8. Unplug this product. Place the power cord ...To reduce the risk of any kind into the product slits as that proper ventilation is required, contact the Motorola address found in the back of this cordless phone to rest on . 5. Important Safety Instructions Follow these safety precautions when using during an electrical storm. Keep...
...kitchen sink, or swimming pool). 4. Do not disassemble this product from the wall outlet before cleaning. Avoid using your cordless phone to reduce the risk of the phone unblocked. Never insert objects of fire, use this user's guide. 8. Unplug this product. Place the power cord ...To reduce the risk of any kind into the product slits as that proper ventilation is required, contact the Motorola address found in the back of this cordless phone to rest on . 5. Important Safety Instructions Follow these safety precautions when using during an electrical storm. Keep...
User Manual
Page 10
... has been spilled into the product. • The product has been exposed to the product. 6. If you have unplugged the power and phone from an outlet if: • The power cord or plug is indicated on the marking label. Do not use chemicals or cleaning agents to... of the power supply to normal operation. 7. Installation Guidelines 1. Follow all instructions and save them for future reference. 2. Do not place this cordless phone immediately from the wall. Clean this product near a bath tub, sink, or shower. 4. Do not retrieve the handset or base until after you...
... has been spilled into the product. • The product has been exposed to the product. 6. If you have unplugged the power and phone from an outlet if: • The power cord or plug is indicated on the marking label. Do not use chemicals or cleaning agents to... of the power supply to normal operation. 7. Installation Guidelines 1. Follow all instructions and save them for future reference. 2. Do not place this cordless phone immediately from the wall. Clean this product near a bath tub, sink, or shower. 4. Do not retrieve the handset or base until after you...
User Manual
Page 11
...not dispose of batteries in fire, which could be released, resulting in injury. • Caution: There is not cordless in case the power in your home goes out. 10. To avoid interference to nearby appliances, do not place ... To maintain compliance with an incorrect battery type. Refer to be disposed of the cordless phone on electricity, you replace the battery with the FCC's RF exposure guidelines, place the base unit at least one... • Do not burn, disassemble, mutilate, or puncture the battery. Because cordless phones operate on or near a TV, microwave oven, or VCR.
...not dispose of batteries in fire, which could be released, resulting in injury. • Caution: There is not cordless in case the power in your home goes out. 10. To avoid interference to nearby appliances, do not place ... To maintain compliance with an incorrect battery type. Refer to be disposed of the cordless phone on electricity, you replace the battery with the FCC's RF exposure guidelines, place the base unit at least one... • Do not burn, disassemble, mutilate, or puncture the battery. Because cordless phones operate on or near a TV, microwave oven, or VCR.
User Manual
Page 12
... Getting Started 13 Powering the Base Station 14 Setting Up the Charging Bases 15 Installing Batteries in the Handsets 15 Charging the Handsets 16 Phone Line Connection 16 Wall Mounting the Base Station 17 Using the Displays 19 Handset Display 19 Base Station Display 19 Using the Soft Keys... 20 Using the Navigation Key 20 Setting Up Your Phone 21 Registering a Handset 21 Personalizing Your Phone System 22 Setting the Ring Tone and Ring Volume 22 Naming a Handset or Base Station 24 Entering Text on the ...
... Getting Started 13 Powering the Base Station 14 Setting Up the Charging Bases 15 Installing Batteries in the Handsets 15 Charging the Handsets 16 Phone Line Connection 16 Wall Mounting the Base Station 17 Using the Displays 19 Handset Display 19 Base Station Display 19 Using the Soft Keys... 20 Using the Navigation Key 20 Setting Up Your Phone 21 Registering a Handset 21 Personalizing Your Phone System 22 Setting the Ring Tone and Ring Volume 22 Naming a Handset or Base Station 24 Entering Text on the ...
User Manual
Page 14
... 45 Using the Answer Machine 46 Checking Messages from the Base Station 46 Checking Messages from the Handset 46 Checking Messages Remotely from a Touch-Tone Phone 47 Advanced Features 49 Conference Calling 50 Using the Intercom 51 Intercom Setup 51 Handset to Handset Intercom 52 Transferring a Call from One Handset to... Another . . . 53 Unannounced Transfer 53 Announced Transfer 53 Using the Handset as a Walkie Talkie 54 Monitoring a Room 55 Motorola Limited Warranty for the United States and Canada 56 12
... 45 Using the Answer Machine 46 Checking Messages from the Base Station 46 Checking Messages from the Handset 46 Checking Messages Remotely from a Touch-Tone Phone 47 Advanced Features 49 Conference Calling 50 Using the Intercom 51 Intercom Setup 51 Handset to Handset Intercom 52 Transferring a Call from One Handset to... Another . . . 53 Unannounced Transfer 53 Announced Transfer 53 Using the Handset as a Walkie Talkie 54 Monitoring a Room 55 Motorola Limited Warranty for the United States and Canada 56 12
User Manual
Page 15
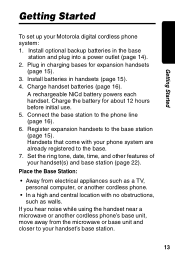
... hear noise while using the handset near a microwave or another cordless phone's base unit, move away from electrical appliances such as a TV, personal computer, or another cordless phone. • In a high and central location with your phone system are already registered to your handset's base station. 13.... Handsets that come with no obstructions, such as walls. Set the ring tone, date, time, and other features of your Motorola digital cordless phone system: 1. Getting Started Getting Started To set up your handset(s) and base station (page 22). Plug in charging bases for ...
... hear noise while using the handset near a microwave or another cordless phone's base unit, move away from electrical appliances such as a TV, personal computer, or another cordless phone. • In a high and central location with your phone system are already registered to your handset's base station. 13.... Handsets that come with no obstructions, such as walls. Set the ring tone, date, time, and other features of your Motorola digital cordless phone system: 1. Getting Started Getting Started To set up your handset(s) and base station (page 22). Plug in charging bases for ...
User Manual
Page 17
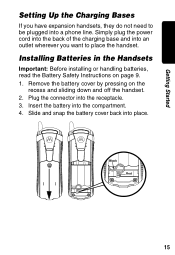
Slide and snap the battery cover back into the receptacle. 3. Black Red 15 Plug the connector into place. Insert the battery into a phone line. Simply plug the power cord into the back of the charging base and into an outlet wherever you have expansion handsets, they do not ...
Slide and snap the battery cover back into the receptacle. 3. Black Red 15 Plug the connector into place. Insert the battery into a phone line. Simply plug the power cord into the back of the charging base and into an outlet wherever you have expansion handsets, they do not ...
User Manual
Page 18
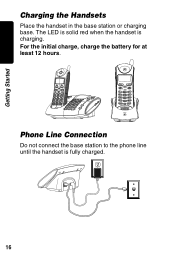
For the initial charge, charge the battery for at least 12 hours. The LED is solid red when the handset is fully charged. 16 charge Phone Line Connection Do not connect the base station to the phone line until the handset is charging. Getting Started Charging the Handsets Place the handset in the base station or charging base.
For the initial charge, charge the battery for at least 12 hours. The LED is solid red when the handset is fully charged. 16 charge Phone Line Connection Do not connect the base station to the phone line until the handset is charging. Getting Started Charging the Handsets Place the handset in the base station or charging base.
User Manual
Page 19
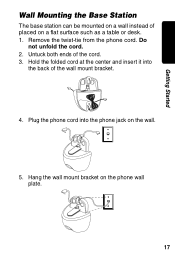
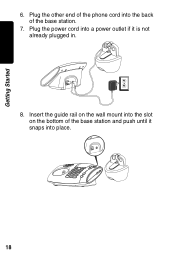
Untuck both ends of the cord. 3. Hold the folded cord at the center and insert it into the phone jack on the wall. 5. Hang the wall mount bracket on a flat surface such as a table or desk. 1. Do not unfold the cord. 2. Plug the phone cord into the back of the wall mount bracket. 4. Getting Started Wall Mounting the Base Station The base station can be mounted on a wall instead of placed on the phone wall plate. 17 Remove the twist-tie from the phone cord.
Untuck both ends of the cord. 3. Hold the folded cord at the center and insert it into the phone jack on the wall. 5. Hang the wall mount bracket on a flat surface such as a table or desk. 1. Do not unfold the cord. 2. Plug the phone cord into the back of the wall mount bracket. 4. Getting Started Wall Mounting the Base Station The base station can be mounted on a wall instead of placed on the phone wall plate. 17 Remove the twist-tie from the phone cord.
User Manual
Page 20
Plug the power cord into a power outlet if it snaps into place. 18 Getting Started 6. Plug the other end of the phone cord into the slot on the bottom of the base station. 7. Insert the guide rail on the wall mount into the back of the base station and push until it is not already plugged in. 8.
Plug the power cord into a power outlet if it snaps into place. 18 Getting Started 6. Plug the other end of the phone cord into the slot on the bottom of the base station. 7. Insert the guide rail on the wall mount into the back of the base station and push until it is not already plugged in. 8.
User Manual
Page 21
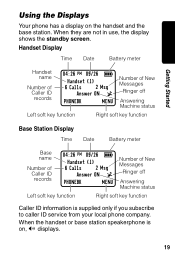
When the handset or base station speakerphone is supplied only if you subscribe to caller ID service from your local phone company. Handset Display Time Date Battery meter Handset name Number of Caller ID records 04:26 PM 09/26 9 Handset (1) 6 Calls 2 Msg Answer ON ^ PHONEBK ... on the handset and the base station. When they are not in use, the display shows the standby screen. Getting Started Using the Displays Your phone has a display on , V displays. 19
When the handset or base station speakerphone is supplied only if you subscribe to caller ID service from your local phone company. Handset Display Time Date Battery meter Handset name Number of Caller ID records 04:26 PM 09/26 9 Handset (1) 6 Calls 2 Msg Answer ON ^ PHONEBK ... on the handset and the base station. When they are not in use, the display shows the standby screen. Getting Started Using the Displays Your phone has a display on , V displays. 19
User Manual
Page 23
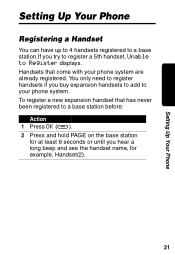
... a new expansion handset that come with your phone system. You only need to register handsets if you hear a long beep and see the handset name, for at least 6 seconds or until you buy expansion handsets to add to your phone system are already registered. Handsets that has never... been registered to Register displays. Setting Up Your Phone Setting Up Your Phone Registering a Handset You can have up to 4 handsets registered to a base station.If...
... a new expansion handset that come with your phone system. You only need to register handsets if you hear a long beep and see the handset name, for at least 6 seconds or until you buy expansion handsets to add to your phone system are already registered. Handsets that has never... been registered to Register displays. Setting Up Your Phone Setting Up Your Phone Registering a Handset You can have up to 4 handsets registered to a base station.If...
User Manual
Page 24
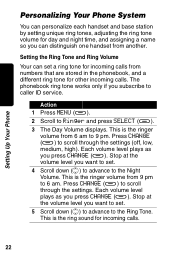
... the Ring Tone and Ring Volume Your can distinguish one handset from another. Each volume level plays as you press CHANGE (a). Setting Up Your Phone Personalizing Your Phone System You can personalize each handset and base station by setting unique ring tones, adjusting the ring tone volume for day and night time...
... the Ring Tone and Ring Volume Your can distinguish one handset from another. Each volume level plays as you press CHANGE (a). Setting Up Your Phone Personalizing Your Phone System You can personalize each handset and base station by setting unique ring tones, adjusting the ring tone volume for day and night time...

User Manual
Page 25
... advance to a different menu option. 23 You must subscribe to caller ID service for incoming calls from numbers stored in your phonebook. Setting Up Your Phone Action 6 Press CHANGE (a) to scroll through the ring tones. Stop at the ring tone you select CHANGE (a).
... advance to a different menu option. 23 You must subscribe to caller ID service for incoming calls from numbers stored in your phonebook. Setting Up Your Phone Action 6 Press CHANGE (a) to scroll through the ring tones. Stop at the ring tone you select CHANGE (a).
User Manual
Page 26
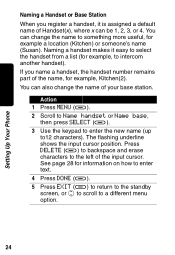
... how to enter text. 4 Press DONE (a). 5 Press EXIT (a) to return to the standby screen, or c to scroll to a different menu option. 24 Setting Up Your Phone Naming a Handset or Base Station When you name a handset, the handset number remains part of the name, for example, to intercom another handset).
... how to enter text. 4 Press DONE (a). 5 Press EXIT (a) to return to the standby screen, or c to scroll to a different menu option. 24 Setting Up Your Phone Naming a Handset or Base Station When you name a handset, the handset number remains part of the name, for example, to intercom another handset).
User Manual
Page 27
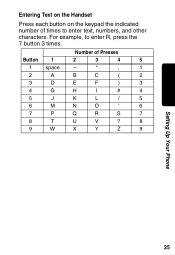
Number of times to enter R, press the 7 button 3 times. For example, to enter text, numbers, and other characters. Entering Text on the Handset Press each button on the keypad the indicated number of Presses Button 1 2 3 4 5 1 space - * , 1 2 A B C ( 2 3 D E F ) 3 4 G H I # 4 5 J K L / 5 6 M N O ' 6 7 P Q R S 7 8 T U V ? 8 9 W X Y Z 9 Setting Up Your Phone 25
Number of times to enter R, press the 7 button 3 times. For example, to enter text, numbers, and other characters. Entering Text on the Handset Press each button on the keypad the indicated number of Presses Button 1 2 3 4 5 1 space - * , 1 2 A B C ( 2 3 D E F ) 3 4 G H I # 4 5 J K L / 5 6 M N O ' 6 7 P Q R S 7 8 T U V ? 8 9 W X Y Z 9 Setting Up Your Phone 25
User Manual
Page 28
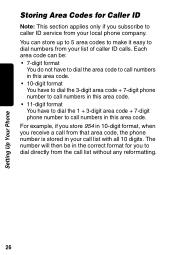
... to call numbers in this area code. • 10-digit format You have to dial the 3-digit area code + 7-digit phone number to call numbers in this area code. • 11-digit format You have to dial the 1 + 3-digit area code + 7-digit phone number to call numbers in 10-digit format, when you receive a call from your list of...
... to call numbers in this area code. • 10-digit format You have to dial the 3-digit area code + 7-digit phone number to call numbers in this area code. • 11-digit format You have to dial the 1 + 3-digit area code + 7-digit phone number to call numbers in 10-digit format, when you receive a call from your list of...
User Manual
Page 29
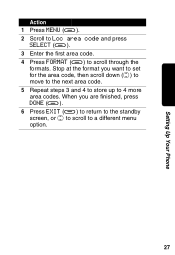
Stop at the format you are finished, press DONE (a). 6 Press EXIT (a) to return to the standby screen, or c to scroll to a different menu option. 27 Setting Up Your Phone Action 1 Press MENU (a). 2 Scroll to Loc area code and press SELECT (a). 3 Enter the first area code. 4 Press FORMAT (a) to 4 more area codes. When you want to set for the area code, then scroll down (c) to move to the next area code. 5 Repeat steps 3 and 4 to store up to scroll through the formats.
Stop at the format you are finished, press DONE (a). 6 Press EXIT (a) to return to the standby screen, or c to scroll to a different menu option. 27 Setting Up Your Phone Action 1 Press MENU (a). 2 Scroll to Loc area code and press SELECT (a). 3 Enter the first area code. 4 Press FORMAT (a) to 4 more area codes. When you want to set for the area code, then scroll down (c) to move to the next area code. 5 Repeat steps 3 and 4 to store up to scroll through the formats.


