
User Guide
Page 1
USER'S GUIDE MBP35 BABY MONITOR USER'S GUIDE The features described in this user's guide are subject to modifications without prior notice.
USER'S GUIDE MBP35 BABY MONITOR USER'S GUIDE The features described in this user's guide are subject to modifications without prior notice.

User Guide
Page 2
... the MBP35. For product related questions, please call: +49 (0) 1805 938 802 in the event of your product. Before you can use , so that the unit continues to insert and fully charge the battery on page 6 before use the baby monitor, you'll need to work in Europe Email: motorola@telemarcom....eu On the Web: www.motorola.com This User's Guide provides you will need to get the most from your dated sales receipt to provide a copy of a ...
... the MBP35. For product related questions, please call: +49 (0) 1805 938 802 in the event of your product. Before you can use , so that the unit continues to insert and fully charge the battery on page 6 before use the baby monitor, you'll need to work in Europe Email: motorola@telemarcom....eu On the Web: www.motorola.com This User's Guide provides you will need to get the most from your dated sales receipt to provide a copy of a ...
User Guide
Page 3
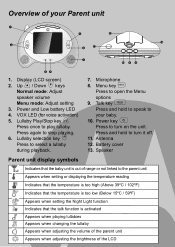
Power key p Press to turn it off. 11. Overview of the LCD Power and Low battery LED 4. 5. your Parent unit 1 5 12 13 2 6 11 TALK MENU 7 10 9 8 3 4 1. 2. Speaker Parent unit display symbols Indicates that the baby unit is out of range or not linked to 10. Antenna 12. DUpispcreekne)ys Normal mode: Adjust speaker volume Menu mode: Adjust setting 3. MMiecnroupkheoynm e Press to play lullaby. 6. Press and hold to speak to the parent unit Appears when setting or displaying the temperature reading Indicates that the temperature is too high (...
Power key p Press to turn it off. 11. Overview of the LCD Power and Low battery LED 4. 5. your Parent unit 1 5 12 13 2 6 11 TALK MENU 7 10 9 8 3 4 1. 2. Speaker Parent unit display symbols Indicates that the baby unit is out of range or not linked to 10. Antenna 12. DUpispcreekne)ys Normal mode: Adjust speaker volume Menu mode: Adjust setting 3. MMiecnroupkheoynm e Press to play lullaby. 6. Press and hold to speak to the parent unit Appears when setting or displaying the temperature reading Indicates that the temperature is too high (...
User Guide
Page 4
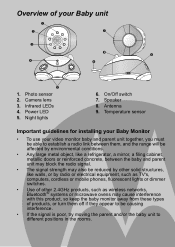
Photo sensor 2. Camera lens 3. Power LED 5. On/Off switch 7. Temperature sensor Important guidelines for installing your Baby Monitor • To use your Baby unit 1 2 7 3 8 6 4 9 5 1. Speaker 8. Infrared LEDs 4. Night lights 6. Antenna 9. Overview of products, or turn them off if they appear to be causing interference. • If the signal is poor, try moving the parent and/or the baby unit to establish a radio link between them, and the range will be affected by environmental conditions. • Any large metal object, like a refrigerator, a mirror, a filing ...
Photo sensor 2. Camera lens 3. Power LED 5. On/Off switch 7. Temperature sensor Important guidelines for installing your Baby Monitor • To use your Baby unit 1 2 7 3 8 6 4 9 5 1. Speaker 8. Infrared LEDs 4. Night lights 6. Antenna 9. Overview of products, or turn them off if they appear to be causing interference. • If the signal is poor, try moving the parent and/or the baby unit to establish a radio link between them, and the range will be affected by environmental conditions. • Any large metal object, like a refrigerator, a mirror, a filing ...

User Guide
Page 5
... vision 11 3.3 Talk function 11 3.4 Adjusting the volume of the device (environment 15 6. Disposal of the parent unit 11 3.5 Playing a lullaby for your baby 12 4. MBP35 Parent Unit Menu Options 13 4.1 Brightness 13 4.2 Temperature display (ºC or ºF 13 4.3 Night Light 13 4.4 Voice Activation 14 5. General Information 18 Table of contents...
... vision 11 3.3 Talk function 11 3.4 Adjusting the volume of the device (environment 15 6. Disposal of the parent unit 11 3.5 Playing a lullaby for your baby 12 4. MBP35 Parent Unit Menu Options 13 4.1 Brightness 13 4.2 Temperature display (ºC or ºF 13 4.3 Night Light 13 4.4 Voice Activation 14 5. General Information 18 Table of contents...
User Guide
Page 6
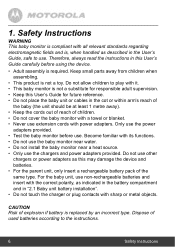
For the baby unit, use extension cords with sharp or metal objects. Do not allow children to play with it. • This baby monitor is , when handled as this User's Guide carefully before use other chargers or power adapters as described in the User's Guide, safe to the instructions. 6 Safety Instructions Dispose of explosion if battery is not a toy. 1. Therefore, always read the instructions in "2.1 Baby unit battery installation". • Do not touch the charger or plug contacts with power adapters. Become familiar with all relevant standards regarding ...
For the baby unit, use extension cords with sharp or metal objects. Do not allow children to play with it. • This baby monitor is , when handled as this User's Guide carefully before use other chargers or power adapters as described in the User's Guide, safe to the instructions. 6 Safety Instructions Dispose of explosion if battery is not a toy. 1. Therefore, always read the instructions in "2.1 Baby unit battery installation". • Do not touch the charger or plug contacts with power adapters. Become familiar with all relevant standards regarding ...
User Guide
Page 7
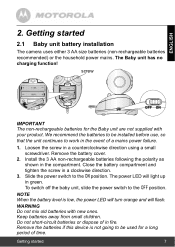
screw IMPORTANT The non-rechargeable batteries for a long period of time. Install the 3 AA non-rechargeable batteries following the polarity as shown in a counterclockwise direction using a small screwdriver. Slide the power switch to the OFF position. Getting started 2.1 Baby unit battery installation The camera uses either 3 AA size batteries (non-rechargeable batteries recommended) or the household power mains. ENGLISH 2. We recommend the batteries to work in the event of in fire. The Baby unit has no charging function! Loosen the screw in the compartment. Remove ...
screw IMPORTANT The non-rechargeable batteries for a long period of time. Install the 3 AA non-rechargeable batteries following the polarity as shown in a counterclockwise direction using a small screwdriver. Slide the power switch to the OFF position. Getting started 2.1 Baby unit battery installation The camera uses either 3 AA size batteries (non-rechargeable batteries recommended) or the household power mains. ENGLISH 2. We recommend the batteries to work in the event of in fire. The Baby unit has no charging function! Loosen the screw in the compartment. Remove ...
User Guide
Page 8
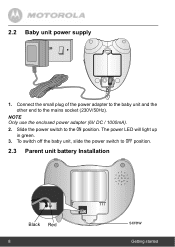
The power LED will light up in green. 3. Connect the small plug of the power adapter to the baby unit and the other end to the ON position. 2.2 Baby unit power supply 1. NOTE Only use the enclosed power adapter (6V DC / 1000mA). 2. Slide the power switch to the mains socket (230V/50Hz). To switch off the baby unit, slide the power switch to OFF position. 2.3 Parent unit battery Installation Black Red 8 screw Getting started
The power LED will light up in green. 3. Connect the small plug of the power adapter to the baby unit and the other end to the ON position. 2.2 Baby unit power supply 1. NOTE Only use the enclosed power adapter (6V DC / 1000mA). 2. Slide the power switch to the mains socket (230V/50Hz). To switch off the baby unit, slide the power switch to OFF position. 2.3 Parent unit battery Installation Black Red 8 screw Getting started
User Guide
Page 9
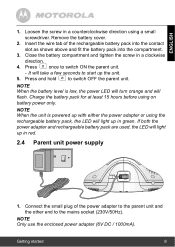
once to the mains socket (230V/50Hz). Connect the small plug of the rechargeable battery pack into the contact slot as shown above and fit the battery pack into the compartment. 3. dPirreescstiop n. Remove the battery cover. 2. NOTE When the battery level is powered up with either the power adapter or using the rechargeable battery pack, the LED will light up in red. 2.4 Parent unit power supply 1. If both the power adapter and rechargeable battery pack are used, the LED will flash. Close the battery compartment and tighten the screw in a counterclockwise direction ...
once to the mains socket (230V/50Hz). Connect the small plug of the rechargeable battery pack into the contact slot as shown above and fit the battery pack into the compartment. 3. dPirreescstiop n. Remove the battery cover. 2. NOTE When the battery level is powered up with either the power adapter or using the rechargeable battery pack, the LED will light up in red. 2.4 Parent unit power supply 1. If both the power adapter and rechargeable battery pack are used, the LED will flash. Close the battery compartment and tighten the screw in a counterclockwise direction ...

User Guide
Page 10
2. You do not need to search and establish the link. 5. The parent unit is no connection or out of range, the icon on the LCD display will flash and the parent unit will light up 3. Wait for the 2 units to register it on the baby unit with a black cloth or bag and then switch it again unless the baby unit loses its link with the parent unit. When there is then in green. To re-register your purchase. tSPhwreeistm cshaonfhdf ebhlodotlhdfotm rhme ob,raeabntyhdaatnhned5npspaerrceeosnnstdup sniatsft.eornitthsewpitacrheenst unit, keeping on, until the link is re-established. ...
2. You do not need to search and establish the link. 5. The parent unit is no connection or out of range, the icon on the LCD display will flash and the parent unit will light up 3. Wait for the 2 units to register it on the baby unit with a black cloth or bag and then switch it again unless the baby unit loses its link with the parent unit. When there is then in green. To re-register your purchase. tSPhwreeistm cshaonfhdf ebhlodotlhdfotm rhme ob,raeabntyhdaatnhned5npspaerrceeosnnstdup sniatsft.eornitthsewpitacrheenst unit, keeping on, until the link is re-established. ...

User Guide
Page 11
... there is activated. 3.4 Adjusting the volume of the parent unit Press < and > to monitor. • Tilt the head of the baby. Using the Baby Monitor MBP35 3.1 Setting up • Place the camera in the dark. NOTE The lullaby will display in black and white. 3.3 Talk function Press and hold t on the...
... there is activated. 3.4 Adjusting the volume of the parent unit Press < and > to monitor. • Tilt the head of the baby. Using the Baby Monitor MBP35 3.1 Setting up • Place the camera in the dark. NOTE The lullaby will display in black and white. 3.3 Talk function Press and hold t on the...
User Guide
Page 12
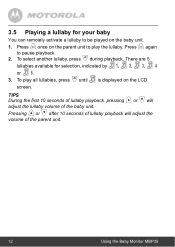
Pressing < or > after 10 seconds of lullaby playback will adjust the lullaby volume of the parent unit. 12 Using the Baby Monitor MBP35 3.5 Playing a lullaby for selection, indicated by 1, 2, 3, 4 or 5. 3. Press i again 2. TIPS During the first 10 seconds of lullaby playback, pressing < or > will adjust the volume of ...
Pressing < or > after 10 seconds of lullaby playback will adjust the lullaby volume of the parent unit. 12 Using the Baby Monitor MBP35 3.5 Playing a lullaby for selection, indicated by 1, 2, 3, 4 or 5. 3. Press i again 2. TIPS During the first 10 seconds of lullaby playback, pressing < or > will adjust the volume of ...
User Guide
Page 13
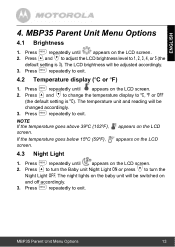
... the temperature goes below 15ºC (59ºF), screen. The night lights on the baby unit will be switched on the LCD temperature display screen. MBP35 Parent Unit Menu Options 13 Press < and > to adjust the LCD brightness level to ºC, ºF or OFF (the default setting is ºC). Press Press... on the LCD 4.3 Night Light 1. 2. Pderefasusltm settinregpisea3)te. The temperature unit and reading will be 3. ENGLISH 4. appears on the LCD appears on the LCD screen. 2. MBP35 Parent Unit Menu Options 4.1 Brightness 1.
... the temperature goes below 15ºC (59ºF), screen. The night lights on the baby unit will be switched on the LCD temperature display screen. MBP35 Parent Unit Menu Options 13 Press < and > to adjust the LCD brightness level to ºC, ºF or OFF (the default setting is ºC). Press Press... on the LCD 4.3 Night Light 1. 2. Pderefasusltm settinregpisea3)te. The temperature unit and reading will be 3. ENGLISH 4. appears on the LCD appears on the LCD screen. 2. MBP35 Parent Unit Menu Options 4.1 Brightness 1.
User Guide
Page 14
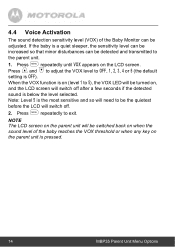
... Activation The sound detection sensitivity level (VOX) of the baby reaches the VOX threshold or when any key on the parent unit is pressed. 14 MBP35 Parent Unit Menu Options or 5 (the default setting is a quiet sleeper, the sensitivity level can be increased so that minor disturbances can be switched back...
... Activation The sound detection sensitivity level (VOX) of the baby reaches the VOX threshold or when any key on the parent unit is pressed. 14 MBP35 Parent Unit Menu Options or 5 (the default setting is a quiet sleeper, the sensitivity level can be increased so that minor disturbances can be switched back...

User Guide
Page 15
ENGLISH 5. Disposal of electrical and electronic equipment. Disposal of the device (environment) At the end of the product lifecycle, you make an important contribution to a recycling point. By reusing some parts or raw materials from used if you need more information on the product, user's guide and/or box indicates this product with normal household waste, but take them to the protection of this . Some of the product materials can be re-used products you should not dispose of the environment. Dispose of the batteries in case you take the product to your area...
ENGLISH 5. Disposal of electrical and electronic equipment. Disposal of the device (environment) At the end of the product lifecycle, you make an important contribution to a recycling point. By reusing some parts or raw materials from used if you need more information on the product, user's guide and/or box indicates this product with normal household waste, but take them to the protection of this . Some of the product materials can be re-used products you should not dispose of the environment. Dispose of the batteries in case you take the product to your area...

User Guide
Page 16
... to ensure high standards of the product with an anti-static cloth. contact Customer Service for your MBP35 away from hot, humid areas or strong sunlight, and don't let it yourself -- Cleaning Clean the MBP35 with a slightly damp cloth or with thinners or other solvents and chemicals -- However, if something does go...
... to ensure high standards of the product with an anti-static cloth. contact Customer Service for your MBP35 away from hot, humid areas or strong sunlight, and don't let it yourself -- Cleaning Clean the MBP35 with a slightly damp cloth or with thinners or other solvents and chemicals -- However, if something does go...
User Guide
Page 17
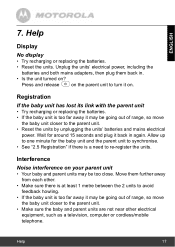
on the parent unit to re-register the units. Interference Noise interference on . Move them back in again. Unplug the units' electrical power, including the batteries and both mains adapters, then plug them further away from each other electrical equipment, such as a television, computer or cordless/mobile telephone. Wait for the baby unit and the parent unit to synchronise. • See "2.5 Registration" if there is a need to turn it on your parent unit • Your baby and parent units may be going out of range, so move the baby unit closer to avoid feedback howling....
on the parent unit to re-register the units. Interference Noise interference on . Move them back in again. Unplug the units' electrical power, including the batteries and both mains adapters, then plug them further away from each other electrical equipment, such as a television, computer or cordless/mobile telephone. Wait for the baby unit and the parent unit to synchronise. • See "2.5 Registration" if there is a need to turn it on your parent unit • Your baby and parent units may be going out of range, so move the baby unit closer to avoid feedback howling....

User Guide
Page 18
...is not transferable. 18 General Information 8. Contact Customer Service at +49 (0) 1805 938 802 in Europe. Visit our website: www.motorola.com 3. This limited warranty is a consumer's exclusive remedy, and only applies as follows to the exclusions and limitations contained below ... is covered? General Information If your product is not working properly.... 1. Read this Warranty Cover? Subject to new Motorola branded Products and Accessories manufactured by Binatone Electronics International LTD., and purchased by consumers in materials and workmanship under normal ...
...is not transferable. 18 General Information 8. Contact Customer Service at +49 (0) 1805 938 802 in Europe. Visit our website: www.motorola.com 3. This limited warranty is a consumer's exclusive remedy, and only applies as follows to the exclusions and limitations contained below ... is covered? General Information If your product is not working properly.... 1. Read this Warranty Cover? Subject to new Motorola branded Products and Accessories manufactured by Binatone Electronics International LTD., and purchased by consumers in materials and workmanship under normal ...
User Guide
Page 19
..., OR REFUND AS PROVIDED UNDER THIS EXPRESS LIMITED WARRANTY IS THE EXCLUSIVE REMEDY OF THE CONSUMER, AND IS PROVIDED IN LIEU OF ALL WARRANTIES AND MOTOROLA AND BINATONE ELECTRONICS INTERNATIONAL LTD. Binatone Electronics International LTD. may use functionally equivalent reconditioned/ refurbished/ pre-owned or new Products, Accessories or parts in such... LTD. do? BINATONE ELECTRONICS INTERNATIONAL LTD., at no charge repair, replace or refund the purchase price of Binatone Electronics International LTD. IN NO EVENT SHALL MOTOROLA OR BINATONE ELECTRONICS INTERNATIONAL LTD.
..., OR REFUND AS PROVIDED UNDER THIS EXPRESS LIMITED WARRANTY IS THE EXCLUSIVE REMEDY OF THE CONSUMER, AND IS PROVIDED IN LIEU OF ALL WARRANTIES AND MOTOROLA AND BINATONE ELECTRONICS INTERNATIONAL LTD. Binatone Electronics International LTD. may use functionally equivalent reconditioned/ refurbished/ pre-owned or new Products, Accessories or parts in such... LTD. do? BINATONE ELECTRONICS INTERNATIONAL LTD., at no charge repair, replace or refund the purchase price of Binatone Electronics International LTD. IN NO EVENT SHALL MOTOROLA OR BINATONE ELECTRONICS INTERNATIONAL LTD.

User Guide
Page 20
SHALL UNDER NO CIRCUMSTANCES BE LIABLE FOR ANY CLAIMS OR DEMANDS MADE BY ANY THIRD PARTY OR MADE BY YOU ON BEHALF OF ANY THIRD PARTY TO THE FULL EXTENT THESE DAMAGES OR CLAIMS MAY BE DISCLAIMED BY LAW. Some states, countries or jurisdictions do not allow the limitation or exclusion of incidental or consequential damages, or limitation on the length of the accessory. Products or Accessories Covered Consumer Products Consumer Accessories Consumer Products and Accessories that are Repaired or Replaced Length of Coverage Two (2) years from the date of purchase by the first consumer purchaser of...
SHALL UNDER NO CIRCUMSTANCES BE LIABLE FOR ANY CLAIMS OR DEMANDS MADE BY ANY THIRD PARTY OR MADE BY YOU ON BEHALF OF ANY THIRD PARTY TO THE FULL EXTENT THESE DAMAGES OR CLAIMS MAY BE DISCLAIMED BY LAW. Some states, countries or jurisdictions do not allow the limitation or exclusion of incidental or consequential damages, or limitation on the length of the accessory. Products or Accessories Covered Consumer Products Consumer Accessories Consumer Products and Accessories that are Repaired or Replaced Length of Coverage Two (2) years from the date of purchase by the first consumer purchaser of...
