
User Guide
Page 2
... Instructions on page 6 before you for your product. to get the most from the mains power to carry it continues to work if you can see and hear your baby sleeping in Europe Email: motorola@telemarcom.eu On the Web: www.motorola.com This User's Guide provides you with all the information you will need to provide a copy of your Motorola...
... Instructions on page 6 before you for your product. to get the most from the mains power to carry it continues to work if you can see and hear your baby sleeping in Europe Email: motorola@telemarcom.eu On the Web: www.motorola.com This User's Guide provides you with all the information you will need to provide a copy of your Motorola...

User Guide
Page 3
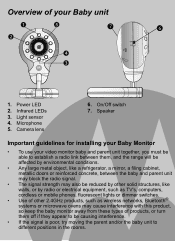
Battery cover 6. Parent unit menu icons Adjust brightness level of your Parent unit 10 1 11 12 8 2 7 3 6 9 13 4 5 1. Display 9. Belt clip 3. Up/Talk key 8. Speaker 4. Power/Channel*/Enter key *This function is only available for multi-pack version with more than one camera. Overview of the LCD Turn the night vision on or off Adjust the voice activation level Pair Parent unit to a Camera key 11. Right / Vol + key 7. Menu key ( ) 10. Microphone 12. Down key 13. Left / Vol - Power adapter connector 2. Battery cover screw 5.
Battery cover 6. Parent unit menu icons Adjust brightness level of your Parent unit 10 1 11 12 8 2 7 3 6 9 13 4 5 1. Display 9. Belt clip 3. Up/Talk key 8. Speaker 4. Power/Channel*/Enter key *This function is only available for multi-pack version with more than one camera. Overview of the LCD Turn the night vision on or off Adjust the voice activation level Pair Parent unit to a Camera key 11. Right / Vol + key 7. Menu key ( ) 10. Microphone 12. Down key 13. Left / Vol - Power adapter connector 2. Battery cover screw 5.
User Guide
Page 4
On/Off switch 7. Microphone 5. Camera lens 6. Power LED 2. Light sensor 4. Overview of products, or turn them off if they appear to be reduced by other solid structures, like walls, or by radio or electrical equipment, such as TV's, computers, cordless or mobile phones, fluorescent lights or dimmer switches. • Use of other 2.4GHz products, such as wireless networks, Bluetooth® systems or microwave ovens may also...
On/Off switch 7. Microphone 5. Camera lens 6. Power LED 2. Light sensor 4. Overview of products, or turn them off if they appear to be reduced by other solid structures, like walls, or by radio or electrical equipment, such as TV's, computers, cordless or mobile phones, fluorescent lights or dimmer switches. • Use of other 2.4GHz products, such as wireless networks, Bluetooth® systems or microwave ovens may also...

User Guide
Page 5
... camera channels 12 3.4 Night vision 12 3.5 Talk function 12 3.6 Adjusting the volume of contents 1. MBP30 Parent Unit Menu Options 13 4.1 Brightness 13 4.2 Night Vision 13 4.3 Voice Activation 14 5. General Information 17 9. ENGLISH Table of the parent unit 12 4. Cleaning 15 7. Wall mounting instructions 23 Table of the device (environment 15 6. Disposal of contents 5 Safety Instructions 6 2. Help 16 8. Getting started 7 2.1 Baby unit power supply 7 2.2 Parent unit battery installation 8 2.3 Parent unit power supply...
... camera channels 12 3.4 Night vision 12 3.5 Talk function 12 3.6 Adjusting the volume of contents 1. MBP30 Parent Unit Menu Options 13 4.1 Brightness 13 4.2 Night Vision 13 4.3 Voice Activation 14 5. General Information 17 9. ENGLISH Table of the parent unit 12 4. Cleaning 15 7. Wall mounting instructions 23 Table of the device (environment 15 6. Disposal of contents 5 Safety Instructions 6 2. Help 16 8. Getting started 7 2.1 Baby unit power supply 7 2.2 Parent unit battery installation 8 2.3 Parent unit power supply...

User Guide
Page 6
... unit or cables in the User's Guide, safe to play with it . • This baby monitor is replaced by an incorrect type. Dispose of used batteries according to actual use. • Do not use the baby monitor near water. • Do not install the baby monitor near a heat source. • Only use the chargers and power adapters provided. Only use . Do not allow children to use the power adapters...
... unit or cables in the User's Guide, safe to play with it . • This baby monitor is replaced by an incorrect type. Dispose of used batteries according to actual use. • Do not use the baby monitor near water. • Do not install the baby monitor near a heat source. • Only use the chargers and power adapters provided. Only use . Do not allow children to use the power adapters...

User Guide
Page 7
Getting started 7 Connect the small plug of the power adapter to the baby unit and the other end to turn the baby unit off. Getting started 2.1 Baby unit power supply 1. Slide the switch to OFF to the mains socket (230V/50Hz). NOTE Only use the enclosed power adapter (5V DC / 500mA). 2. Switch the unit to ON and a green light will display. 3. ENGLISH 2.
Getting started 7 Connect the small plug of the power adapter to the baby unit and the other end to turn the baby unit off. Getting started 2.1 Baby unit power supply 1. Slide the switch to OFF to the mains socket (230V/50Hz). NOTE Only use the enclosed power adapter (5V DC / 500mA). 2. Switch the unit to ON and a green light will display. 3. ENGLISH 2.

User Guide
Page 8
... direction using a small screwdriver. NOTE When the main power is connected, the charge icon is displayed and the battery icon also displays while the battery is in the hanging position. 2. Loosen the screw in a F clockwise direction. 5. Remove the battery cover. 3. The battery pack takes about 16 hours to be ready. 6. 2.2 Parent unit battery installation screw Red Black 1. Turn the...
... direction using a small screwdriver. NOTE When the main power is connected, the charge icon is displayed and the battery icon also displays while the battery is in the hanging position. 2. Loosen the screw in a F clockwise direction. 5. Remove the battery cover. 3. The battery pack takes about 16 hours to be ready. 6. 2.2 Parent unit battery installation screw Red Black 1. Turn the...

User Guide
Page 9
... fully before use the enclosed power adapter (5V DC / 1000mA). 2. NOTE Once the baby and parent units are out of range, the video display will go off, the icon on battery in the event of the power adapter to the parent unit and the other end to the baby unit until the link is recommended. Connect the small plug of a power failure. 1. The LCD screen illuminates...
... fully before use the enclosed power adapter (5V DC / 1000mA). 2. NOTE Once the baby and parent units are out of range, the video display will go off, the icon on battery in the event of the power adapter to the parent unit and the other end to the baby unit until the link is recommended. Connect the small plug of a power failure. 1. The LCD screen illuminates...
User Guide
Page 10
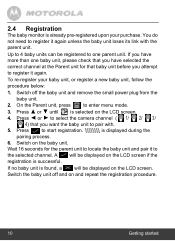
... registered to pair with the parent unit. If no baby unit is successful. Switch on the LCD screen. Switch the baby unit off the baby unit and remove the small power plug from the baby unit. 2. You do not need to the selected channel. Press to enter menu mode. ( ) 3. Wait 16 seconds for that you attempt to 4 baby units can be displayed on the baby...
... registered to pair with the parent unit. If no baby unit is successful. Switch on the LCD screen. Switch the baby unit off the baby unit and remove the small power plug from the baby unit. 2. You do not need to the selected channel. Press to enter menu mode. ( ) 3. Wait 16 seconds for that you attempt to 4 baby units can be displayed on the baby...
User Guide
Page 11
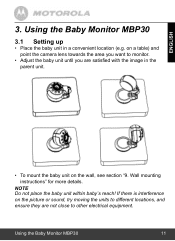
... camera lens towards the area you want to other electrical equipment. Wall mounting instructions" for more details. If there is interference on the wall, see section "9. NOTE Do not place the baby unit within baby's reach! Using the Baby Monitor MBP30 11 Using the Baby Monitor MBP30 3.1 Setting up • Place the baby unit in the parent unit. • To mount the baby unit on the picture or sound...
... camera lens towards the area you want to other electrical equipment. Wall mounting instructions" for more details. If there is interference on the wall, see section "9. NOTE Do not place the baby unit within baby's reach! Using the Baby Monitor MBP30 11 Using the Baby Monitor MBP30 3.1 Setting up • Place the baby unit in the parent unit. • To mount the baby unit on the picture or sound...
User Guide
Page 12
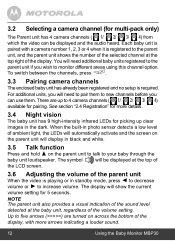
... F parent unit if you wish to monitor different areas using this channel option. 3.2 Selecting a camera channel (for multi-pack only) The Parent unit has 4 camera channels ( 1/ 2/ 3/ 4) from which the video can use them to new channels before you can be displayed at the baby unit, regardless of the volume setting. See section "2.4 Registration" for more arrows indicating a louder sound. 12 Using the Baby Monitor MBP30
... F parent unit if you wish to monitor different areas using this channel option. 3.2 Selecting a camera channel (for multi-pack only) The Parent unit has 4 camera channels ( 1/ 2/ 3/ 4) from which the video can use them to new channels before you can be displayed at the baby unit, regardless of the volume setting. See section "2.4 Registration" for more arrows indicating a louder sound. 12 Using the Baby Monitor MBP30
User Guide
Page 13
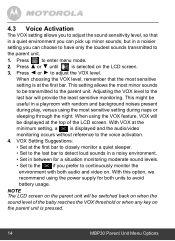
... off accordingly. Press to turn the Baby Unit Night Vision On or Off. Press + - 3. or to enter menu mode. Press + - 3. The LCD brightness will be adjusted accordingly. 4.2 Night Vision When activated, this function automatically switches the camera to night vision when the brightness level of the LCD. 1. ENGLISH 4. MBP30 Parent Unit Menu Options 4.1 Brightness This option lets you change the brightness of the room...
... off accordingly. Press to turn the Baby Unit Night Vision On or Off. Press + - 3. or to enter menu mode. Press + - 3. The LCD brightness will be adjusted accordingly. 4.2 Night Vision When activated, this function automatically switches the camera to night vision when the brightness level of the LCD. 1. ENGLISH 4. MBP30 Parent Unit Menu Options 4.1 Brightness This option lets you change the brightness of the room...
User Guide
Page 14
... detect loud sounds in a noisy environment. • Set in between for both audio and video on the parent unit will be displayed at the top of the baby reaches the VOX threshold or when any key on the LCD screen. Press + - 3. This might be transmitted to avoid battery usage. NOTE The LCD screen on . When using the power supply for a situation monitoring moderate sound...
... detect loud sounds in a noisy environment. • Set in between for both audio and video on the parent unit will be displayed at the top of the baby reaches the VOX threshold or when any key on the LCD screen. Press + - 3. This might be transmitted to avoid battery usage. NOTE The LCD screen on . When using the power supply for a situation monitoring moderate sound...
User Guide
Page 16
... unit. • Make sure the baby and parent units are not near other . • Make sure there is at least 1 metre between the 2 units to avoid audio feedback. • If the baby unit is a need to turn it may be going out of the parent unit and unplug both units by unplugging their batteries and mains electrical power. Change the camera channel number...
... unit. • Make sure the baby and parent units are not near other . • Make sure there is at least 1 metre between the 2 units to avoid audio feedback. • If the baby unit is a need to turn it may be going out of the parent unit and unplug both units by unplugging their batteries and mains electrical power. Change the camera channel number...

User Guide
Page 17
... to be free from defects in Europe, which are accompanied by this Warranty Cover? This warranty covers only the first consumer purchaser, and is not working properly.... 1. Read this User's Guide or the Quick Start Guide. 2. Consumer Products and Accessories purchased in Europe. General Information 17 Email: motorola@telemarcom.eu To order a replacement battery pack, contact customer service or visit...
... to be free from defects in Europe, which are accompanied by this Warranty Cover? This warranty covers only the first consumer purchaser, and is not working properly.... 1. Read this User's Guide or the Quick Start Guide. 2. Consumer Products and Accessories purchased in Europe. General Information 17 Email: motorola@telemarcom.eu To order a replacement battery pack, contact customer service or visit...

User Guide
Page 19
... you specific legal rights, and you in battery capacity with time or use are ... Accessories Covered Consumer Products Two (2) years from coverage. Periodic maintenance, repair and replacement of parts due to you may not apply to normal wear and tear are ... charged capacity falls below 80% of the product. Battery life and the changes in such states, countries or jurisdictions. SHALL UNDER NO CIRCUMSTANCES BE LIABLE... ENGLISH OTHER FINANCIAL LOSS ARISING OUT OF OR IN CONNECTION WITH THE ABILITY OR INABILITY TO USE THE PRODUCTS OR ACCESSORIES AND BINATONE ELECTRONICS INTERNATIONAL LTD....
... you specific legal rights, and you in battery capacity with time or use are ... Accessories Covered Consumer Products Two (2) years from coverage. Periodic maintenance, repair and replacement of parts due to you may not apply to normal wear and tear are ... charged capacity falls below 80% of the product. Battery life and the changes in such states, countries or jurisdictions. SHALL UNDER NO CIRCUMSTANCES BE LIABLE... ENGLISH OTHER FINANCIAL LOSS ARISING OUT OF OR IN CONNECTION WITH THE ABILITY OR INABILITY TO USE THE PRODUCTS OR ACCESSORIES AND BINATONE ELECTRONICS INTERNATIONAL LTD....

User Guide
Page 20
... from coverage. Communication Services. or (d) nonconforming or non-Motorola branded housings, or parts, are excluded from : (a) improper or unreasonable use, operation, storage, misuse or abuse, accident or neglect or other peripheral equipment are excluded from the use of tampering; (c) mismatched board serial numbers; Defects or damages resulting from service, testing, adjustment, installation, maintenance, alteration, or modification in the user instructions that came with the...
... from coverage. Communication Services. or (d) nonconforming or non-Motorola branded housings, or parts, are excluded from : (a) improper or unreasonable use, operation, storage, misuse or abuse, accident or neglect or other peripheral equipment are excluded from the use of tampering; (c) mismatched board serial numbers; Defects or damages resulting from service, testing, adjustment, installation, maintenance, alteration, or modification in the user instructions that came with the...

User Guide
Page 21
... made in any literature publications or promotional materials issued by any agent employee or staff of BINATONE ELECTRONICS INTERNATIONAL LTD., that may have been made in connection with the said purchase. To obtain service, you must include: (a) a copy of ...address and telephone number. regarding the Products or Accessories purchased by you and BINATONE ELECTRONICS INTERNATIONAL LTD. General Information 21 ENGLISH How to a BINATONE ELECTRONICS INTERNATIONAL LTD. To obtain service or information, please call: +49 (0) 1805 938 802 in Europe You will receive instructions...
... made in any literature publications or promotional materials issued by any agent employee or staff of BINATONE ELECTRONICS INTERNATIONAL LTD., that may have been made in connection with the said purchase. To obtain service, you must include: (a) a copy of ...address and telephone number. regarding the Products or Accessories purchased by you and BINATONE ELECTRONICS INTERNATIONAL LTD. General Information 21 ENGLISH How to a BINATONE ELECTRONICS INTERNATIONAL LTD. To obtain service or information, please call: +49 (0) 1805 938 802 in Europe You will receive instructions...
User Guide
Page 22
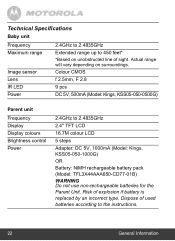
... explosion if battery is replaced by an incorrect type. Risk of sight. Colour CMOS f 2.5mm, F 2.8 9 pcs DC 5V, 500mA (Model: Kings, KSS05-050-0500G) Parent unit Frequency Display Display colours Brightness control Power 2.4GHz to the instructions. 22 General Information Technical Specifications Baby unit Frequency Maximum range Image sensor Lens IR LED Power 2.4GHz to 2.4835GHz Extended range up to 450 feet* *Based on surroundings.
... explosion if battery is replaced by an incorrect type. Risk of sight. Colour CMOS f 2.5mm, F 2.8 9 pcs DC 5V, 500mA (Model: Kings, KSS05-050-0500G) Parent unit Frequency Display Display colours Brightness control Power 2.4GHz to the instructions. 22 General Information Technical Specifications Baby unit Frequency Maximum range Image sensor Lens IR LED Power 2.4GHz to 2.4835GHz Extended range up to 450 feet* *Based on surroundings.
User Guide
Page 25
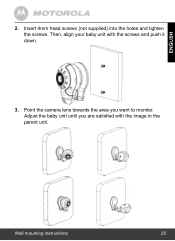
Point the camera lens towards the area you are satisfied with the screws and push it down. 3. Wall mounting instructions 25 Adjust the baby unit until you want to monitor. Insert 4mm head screws (not supplied) into the holes and tighten the screws. Then, align your baby unit with the image in the parent unit. ENGLISH 2.
Point the camera lens towards the area you are satisfied with the screws and push it down. 3. Wall mounting instructions 25 Adjust the baby unit until you want to monitor. Insert 4mm head screws (not supplied) into the holes and tighten the screws. Then, align your baby unit with the image in the parent unit. ENGLISH 2.


