
User Manual
Page 3
...-in Charging Tray 1-6 Charging using the Plug-in Charger 1-6 Charging a Radio and Battery using a Multi-Unit Charger 1-7 Battery Meter ...1-7 Attaching the Battery ...1-7 Swivel Belt Holster...1-8 Mini Keyboard...1-8 Attaching the Mini Keyboard to the Radio 1-8 Disconnecting the Mini Keyboard from Your Radio 1-8 Entering Text with the Mini Keyboard 1-9 Yellow/Lock Key Functionality ...1-9 Green/Lock Key Functionality...1-9 CAPS Key...
...-in Charging Tray 1-6 Charging using the Plug-in Charger 1-6 Charging a Radio and Battery using a Multi-Unit Charger 1-7 Battery Meter ...1-7 Attaching the Battery ...1-7 Swivel Belt Holster...1-8 Mini Keyboard...1-8 Attaching the Mini Keyboard to the Radio 1-8 Disconnecting the Mini Keyboard from Your Radio 1-8 Entering Text with the Mini Keyboard 1-9 Yellow/Lock Key Functionality ...1-9 Green/Lock Key Functionality...1-9 CAPS Key...
User Manual
Page 4
......2-5 Reading from the Inbox...2-5 Replying to a Received Message 2-6 Sending a Text Message ...2-7 Composing a Message Using the Mini Keyboard 2-8 Deleting a Message ...2-9 Accessing the Main Menu...2-10 Main Menu Navigation Chart ...2-10 Recent Calls ...2-11 Viewing a Recent ......2-18 Chapter 3 Advanced Radio Operations 3-1 Accessing the Advanced Menu ...3-1 Managing Your Scroll List ...3-1 Enabling Call Forwarding...3-2 Remote Disabling (DTR650 Models Only 3-3 Remote Monitoring (DTR650 Models Only 3-4 Remote Time (DTR650 Models Only 3-4 Chapter 4 Radio Programming 4-1 Program Menu...
......2-5 Reading from the Inbox...2-5 Replying to a Received Message 2-6 Sending a Text Message ...2-7 Composing a Message Using the Mini Keyboard 2-8 Deleting a Message ...2-9 Accessing the Main Menu...2-10 Main Menu Navigation Chart ...2-10 Recent Calls ...2-11 Viewing a Recent ......2-18 Chapter 3 Advanced Radio Operations 3-1 Accessing the Advanced Menu ...3-1 Managing Your Scroll List ...3-1 Enabling Call Forwarding...3-2 Remote Disabling (DTR650 Models Only 3-3 Remote Monitoring (DTR650 Models Only 3-4 Remote Time (DTR650 Models Only 3-4 Chapter 4 Radio Programming 4-1 Program Menu...
User Manual
Page 12
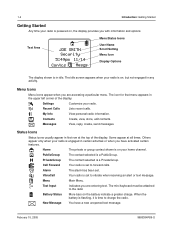
..., store, edit contacts. Recent Calls Lists recent calls. My Info View personal radio information. Others appear only when your radio. Menu Icons Menu icons appear when you have a new unopened text message. The mini keyboard must be attached to charge the radio. When the battery is flashing, it is set to vibrate when receiving...
..., store, edit contacts. Recent Calls Lists recent calls. My Info View personal radio information. Others appear only when your radio. Menu Icons Menu icons appear when you have a new unopened text message. The mini keyboard must be attached to charge the radio. When the battery is flashing, it is set to vibrate when receiving...
User Manual
Page 16
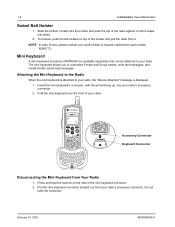
To remove, push the tab located on the side of your radio. 550 Accessory Connector Keyboard Connector Disconnecting the Mini Keyboard from your radio's accessory connector. 1-8 Introduction: Swivel Belt Holster Swivel Belt Holster 1. Mini Keyboard A mini keyboard accessory (NNTN5491) is available separately that can be attached to request replacement part number RLN5713. Do not twist the connector...
To remove, push the tab located on the side of your radio. 550 Accessory Connector Keyboard Connector Disconnecting the Mini Keyboard from your radio's accessory connector. 1-8 Introduction: Swivel Belt Holster Swivel Belt Holster 1. Mini Keyboard A mini keyboard accessory (NNTN5491) is available separately that can be attached to request replacement part number RLN5713. Do not twist the connector...
User Manual
Page 17
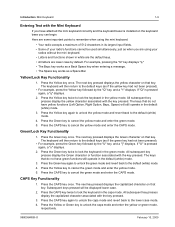
...begin. The next key pressed displays the yellow character on the keyboard base you are using the mini keyboard. • Your radio accepts a maximum of 512 characters in its largest input fields. • Some of your radio's functions cannot be displayed lower case. 2. The keys that ... a "u" displays. 2. Press the Yellow key to cancel the green mode and enter the CAPS mode. The keyboard will then return to remember when using your radios without the mini keyboard. • Letters and functions shown in the default (white) mode. 3. All subsequent key presses display the ...
...begin. The next key pressed displays the yellow character on the keyboard base you are using the mini keyboard. • Your radio accepts a maximum of 512 characters in its largest input fields. • Some of your radio's functions cannot be displayed lower case. 2. The keys that ... a "u" displays. 2. Press the Yellow key to cancel the green mode and enter the CAPS mode. The keyboard will then return to remember when using your radios without the mini keyboard. • Letters and functions shown in the default (white) mode. 3. All subsequent key presses display the ...
User Manual
Page 19
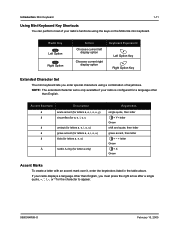
...; umlaut (for letters a, e, i, o, u) à grave accent (for letters a, e, i, o, u) ã tilde (for letters a, n, o) Å nordic A-ring (for a language other than English. If your radio displays a language other than English, you enter special characters using the keys on the Motorola mini keyboard. Introduction: Mini Keyboard 1-11 Using Mini Keyboard Key Shortcuts You can perform most of your...
...; umlaut (for letters a, e, i, o, u) à grave accent (for letters a, e, i, o, u) ã tilde (for letters a, n, o) Å nordic A-ring (for a language other than English. If your radio displays a language other than English, you enter special characters using the keys on the Motorola mini keyboard. Introduction: Mini Keyboard 1-11 Using Mini Keyboard Key Shortcuts You can perform most of your...
User Manual
Page 20
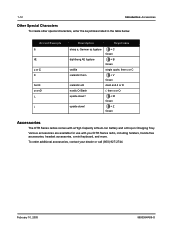
...k Green + B L o c k Green single quote, then c or C + V L o c k Green dash and d or D /, then o or O + M L o c k Green + Z L o c k Green Accessories The DTR Series radios comes with your dealer or call (800) 927-2744. Various accessories are available for use with a High Capacity Lithium-Ion battery and a Drop-in the ... diphthong AE ligature cedilla icelandic thom icelandic eth nordic O-Slash upside down ! To order additional accessories, contact your DTR Series radio, including holsters, hands-free accessories, headset accessories, a mini keyboard, and more. upside down ?
...k Green + B L o c k Green single quote, then c or C + V L o c k Green dash and d or D /, then o or O + M L o c k Green + Z L o c k Green Accessories The DTR Series radios comes with your dealer or call (800) 927-2744. Various accessories are available for use with a High Capacity Lithium-Ion battery and a Drop-in the ... diphthong AE ligature cedilla icelandic thom icelandic eth nordic O-Slash upside down ! To order additional accessories, contact your DTR Series radio, including holsters, hands-free accessories, headset accessories, a mini keyboard, and more. upside down ?
User Manual
Page 26
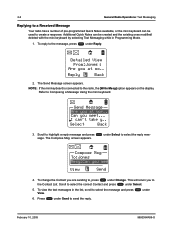
...: Text Messaging Replying to a Received Message Your radio has a number of pre-programmed Quick Notes available, or the mini keyboard can be created and the existing ones modified/ deleted with the mini keyboard by selecting Text Messaging while in the list, scroll to create a response. Reply Back 2.... The Send Message screen appears. Can you mee View Send 4. under Change. under Send to the radio, the [Write Mesg] option appears on the display. NOTE: If the mini keyboard is connected to send the reply. Press under Select to the Contact List. Detailed View From:Jones Are...
...: Text Messaging Replying to a Received Message Your radio has a number of pre-programmed Quick Notes available, or the mini keyboard can be created and the existing ones modified/ deleted with the mini keyboard by selecting Text Messaging while in the list, scroll to create a response. Reply Back 2.... The Send Message screen appears. Can you mee View Send 4. under Change. under Send to the radio, the [Write Mesg] option appears on the display. NOTE: If the mini keyboard is connected to send the reply. Press under Select to the Contact List. Detailed View From:Jones Are...
User Manual
Page 27
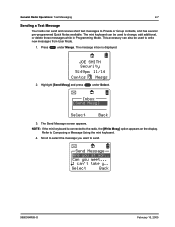
... to write new messages from User Mode. 1. The message inbox is connected to Composing a Message Using the mini keyboard. 4. The Send Message screen appears. NOTE: If the mini keyboard is displayed. Refer to the radio, the [Write Mesg] option appears on the display. Scroll to send. Select Back 9980384R89-O February 10, 2005 Inbox... to Private or Group contacts, and has several pre-programmed Quick Notes available. Press under Select. JOE SMITH Security 5:49pm 11/14 Contcs Mesgs 2. General Radio Operations: Text Messaging 2-7 Sending a Text Message Your...
... to write new messages from User Mode. 1. The message inbox is connected to Composing a Message Using the mini keyboard. 4. The Send Message screen appears. NOTE: If the mini keyboard is displayed. Refer to the radio, the [Write Mesg] option appears on the display. Scroll to send. Select Back 9980384R89-O February 10, 2005 Inbox... to Private or Group contacts, and has several pre-programmed Quick Notes available. Press under Select. JOE SMITH Security 5:49pm 11/14 Contcs Mesgs 2. General Radio Operations: Text Messaging 2-7 Sending a Text Message Your...
User Manual
Page 28
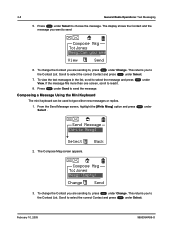
... you to read it. If the message fills more than one screen, scroll to the Contact List. Composing a Message Using the Mini Keyboard The mini keyboard can be used to select the message and press View. From the Send Message screen, highlight the [Write Mesg] option and press Select... . Scroll to , press under Select. 2-8 General Radio Operations: Text Messaging 5. To change the Contact you are sending to, press under Select to send ...
... you to read it. If the message fills more than one screen, scroll to the Contact List. Composing a Message Using the Mini Keyboard The mini keyboard can be used to select the message and press View. From the Send Message screen, highlight the [Write Mesg] option and press Select... . Scroll to , press under Select. 2-8 General Radio Operations: Text Messaging 5. To change the Contact you are sending to, press under Select to send ...
User Manual
Page 29
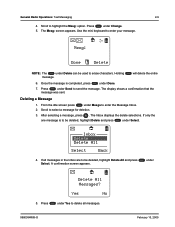
... Message Inbox. 2. under Send to select a message for deletion. 3. Deleting a Message 1. Inbox Delete Delete All Select Back 4. Scroll to enter your message. Use the mini keyboard to highlight the Mesg: option. Press under 5. Scroll to send the message. The Inbox displays the delete selections. A confirmation screen appears. Yes No under Delete...
... Message Inbox. 2. under Send to select a message for deletion. 3. Deleting a Message 1. Inbox Delete Delete All Select Back 4. Scroll to enter your message. Use the mini keyboard to highlight the Mesg: option. Press under 5. Scroll to send the message. The Inbox displays the delete selections. A confirmation screen appears. Yes No under Delete...
User Manual
Page 38
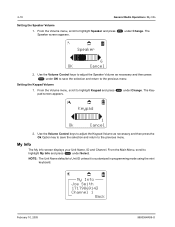
... displays your Unit Name, ID and Channel. From the Volume menu, scroll to Unit ID unless it is customized in programming mode using the mini keyboard. Use the Volume Control keys to the previous menu. 2-18 General Radio Operations: My Info Setting the Speaker Volume 1.
... displays your Unit Name, ID and Channel. From the Volume menu, scroll to Unit ID unless it is customized in programming mode using the mini keyboard. Use the Volume Control keys to the previous menu. 2-18 General Radio Operations: My Info Setting the Speaker Volume 1.
User Manual
Page 44
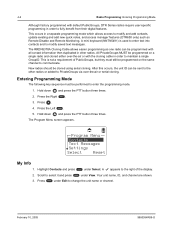
... communicate. Scroll to modify and add contacts, update existing and add new quick notes, and access manager features (DTR650 only) such as one radio can be programmed on a single radio and cloned either over -the-air or serial cloning. Your unit name, ID, and channel are shown. 3....or channel. Hold down and press the PTT button three times. 2. A mini keyboard (NNTN5491) is not a requirement of the display. 2. After this occurs, the unit ID can be performed to fully benefit from their digital features. Press the Right . 3. A appears to the right of PublicGroups, but...
... communicate. Scroll to modify and add contacts, update existing and add new quick notes, and access manager features (DTR650 only) such as one radio can be programmed on a single radio and cloned either over -the-air or serial cloning. Your unit name, ID, and channel are shown. 3....or channel. Hold down and press the PTT button three times. 2. A mini keyboard (NNTN5491) is not a requirement of the display. 2. After this occurs, the unit ID can be performed to fully benefit from their digital features. Press the Right . 3. A appears to the right of PublicGroups, but...
User Manual
Page 46
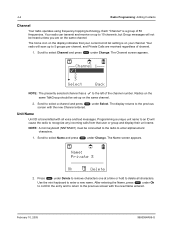
.... Scroll to the previous Unit Name Unit ID is on the display indicates that user or group and display their unit name. Use the mini keyboard to the left of the channel number. The home icon on your current scroll list setting is transmitted with all characters. Channel 1 !1 2... 2. Programming a unique unit name to an ID will scan up to select Channel and press under Change. NOTE: A mini keyboard (NNTN5491) must be connected to the radio to select a channel and press screen with the new Name entered. After entering the Name, press under Delete to remove characters ...
.... Scroll to the previous Unit Name Unit ID is on the display indicates that user or group and display their unit name. Use the mini keyboard to the left of the channel number. The home icon on your current scroll list setting is transmitted with all characters. Channel 1 !1 2... 2. Programming a unique unit name to an ID will scan up to select Channel and press under Change. NOTE: A mini keyboard (NNTN5491) must be connected to the radio to select a channel and press screen with the new Name entered. After entering the Name, press under Delete to remove characters ...
User Manual
Page 47
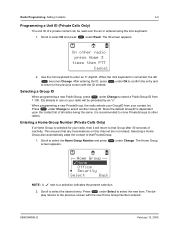
...times then PTT Cancel 2. Since the default GroupID is dependent upon the contact list of all radios being the same, it will be read over the air or entered using the mini keyboard. 1. Radio Programming: Adding Contacts 4-5 Programming a Unit ID (Private Calls Only) The unit ID of ...2. This ensures that Group after 30 seconds of a private contact can be preceded by an "x". When the mini keyboard is recommended to clone PrivateGroups to enter an 11 digit ID. Scroll to select another Group ID. After entering the ID, press under Change. The ID screen appears.
...times then PTT Cancel 2. Since the default GroupID is dependent upon the contact list of all radios being the same, it will be read over the air or entered using the mini keyboard. 1. Radio Programming: Adding Contacts 4-5 Programming a Unit ID (Private Calls Only) The unit ID of ...2. This ensures that Group after 30 seconds of a private contact can be preceded by an "x". When the mini keyboard is recommended to clone PrivateGroups to enter an 11 digit ID. Scroll to select another Group ID. After entering the ID, press under Change. The ID screen appears.
User Manual
Page 49
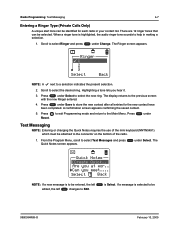
... Press under Text Messaging NOTE: Entering or changing the Quick Notes requires the use of the radio. 1. Select Back NOTE: If a new message is highlighted, the audio ringer tone sounds to... the left changes to Edit. under Save to store the new contact after all entries for each radio in making a selection. 1. When a ringer tone is to be 9980384R89-O February 10, 2005 Are...previous screen with the new Ringer entered. 4. Can you meet.... If a message is Select. Radio Programming: Text Messaging 4-7 Entering a Ringer Type (Private Calls Only) A unique alert tone can be...
... Press under Text Messaging NOTE: Entering or changing the Quick Notes requires the use of the radio. 1. Select Back NOTE: If a new message is highlighted, the audio ringer tone sounds to... the left changes to Edit. under Save to store the new contact after all entries for each radio in making a selection. 1. When a ringer tone is to be 9980384R89-O February 10, 2005 Are...previous screen with the new Ringer entered. 4. Can you meet.... If a message is Select. Radio Programming: Text Messaging 4-7 Entering a Ringer Type (Private Calls Only) A unique alert tone can be...
User Manual
Page 50
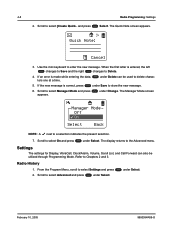
... message. 6. From the Program Menu, scroll to enter the new message. February 10, 2005 9980384R89-O Use the mini keyboard to select Settings and press 2. under Select. The Manager Mode screen Manager Mode Off ! Radio History 1. 4-8 Radio Programming: Settings 2. A C B Quick Note: Cancel 3. If an error is correct, press under Select. Scroll to Chapters 2 and...
... message. 6. From the Program Menu, scroll to enter the new message. February 10, 2005 9980384R89-O Use the mini keyboard to select Settings and press 2. under Select. The Manager Mode screen Manager Mode Off ! Radio History 1. 4-8 Radio Programming: Settings 2. A C B Quick Note: Cancel 3. If an error is correct, press under Select. Scroll to Chapters 2 and...
User Manual
Page 63
... a Group ID 4-5 Selecting Group Only 4-6 Unit Name 4-4 Adjusting the Speaker Volume 2-1 Alerting a Recent Caller 2-11 Alerts 2-4 Receiving an Alert 2-4 Sending an Alert 2-4 Attaching the Mini Keyboard to the Radio 1-8 Attaching the Battery 1-6 .
... a Group ID 4-5 Selecting Group Only 4-6 Unit Name 4-4 Adjusting the Speaker Volume 2-1 Alerting a Recent Caller 2-11 Alerts 2-4 Receiving an Alert 2-4 Sending an Alert 2-4 Attaching the Mini Keyboard to the Radio 1-8 Attaching the Battery 1-6 .
User Manual
Page 64
... using the Drop-in Charging Tray 1-6 Charging using the Plug-in Charger 1-6 Composing a Message Using the Mini Keyboard 2-8 Contacts, Adding 4-1 D Deleting a Message 2-9 Deleting a Recent Call 2-12 Disconnecting the Mini Keyboard from the Radio 1-8 Display Options 1-4 Drop-in Charging Tray Charging 1-6 E Enabling Call Forwarding 3-2 Entering a Home Group Number (Private Calls Only 4-5 Entering a Ringer Type...
... using the Drop-in Charging Tray 1-6 Charging using the Plug-in Charger 1-6 Composing a Message Using the Mini Keyboard 2-8 Contacts, Adding 4-1 D Deleting a Message 2-9 Deleting a Recent Call 2-12 Disconnecting the Mini Keyboard from the Radio 1-8 Display Options 1-4 Drop-in Charging Tray Charging 1-6 E Enabling Call Forwarding 3-2 Entering a Home Group Number (Private Calls Only 4-5 Entering a Ringer Type...
User Manual
Page 65
... to a Received Message 2-6 Sending 2-7 Messages 2-5 Accessing the Message Inbox 2-5 Composing a Message Using the Mini Keyboard 2-8 Deleting a Message 2-9 Receiving Messages 2-5 Replying to a Received Message 2-6 Sending a Message 2-7 Message Composing Using the Mini Keyboard 2- 8 Mini Keyboard 1-8 Entering Text with the Mini Keyboard 1-9 Yellow/Lock Key Functionality 1-9 Green/Lock Key Functionality 1-9 CAPS Key Functionality 1-9 Standard Yellow Function Green...
... to a Received Message 2-6 Sending 2-7 Messages 2-5 Accessing the Message Inbox 2-5 Composing a Message Using the Mini Keyboard 2-8 Deleting a Message 2-9 Receiving Messages 2-5 Replying to a Received Message 2-6 Sending a Message 2-7 Message Composing Using the Mini Keyboard 2- 8 Mini Keyboard 1-8 Entering Text with the Mini Keyboard 1-9 Yellow/Lock Key Functionality 1-9 Green/Lock Key Functionality 1-9 CAPS Key Functionality 1-9 Standard Yellow Function Green...