User Manual
Page 3
... ...1-4 Status Icons ...1-4 Text Area ...1-5 Display Options...1-5 Menu Key...1-5 Menus and Lists...1-5 Battery ...1-5 Battery Life...1-5 Charging the Radio...1-6 Charging using the Drop-in Charging Tray 1-6 Charging using the Plug-in Charger 1-6 Charging a Radio and Battery using a Multi-Unit Charger 1-7 Battery Meter ...1-7 Attaching the Battery ...1-7 Swivel Belt Holster...1-8 Mini Keyboard...1-8 Attaching the Mini Keyboard to the...
... ...1-4 Status Icons ...1-4 Text Area ...1-5 Display Options...1-5 Menu Key...1-5 Menus and Lists...1-5 Battery ...1-5 Battery Life...1-5 Charging the Radio...1-6 Charging using the Drop-in Charging Tray 1-6 Charging using the Plug-in Charger 1-6 Charging a Radio and Battery using a Multi-Unit Charger 1-7 Battery Meter ...1-7 Attaching the Battery ...1-7 Swivel Belt Holster...1-8 Mini Keyboard...1-8 Attaching the Mini Keyboard to the...
User Manual
Page 13
...;F (25°C) (room temperature), whenever possible. The battery should be at the bottom of discharge with a Motorola charger and vice versa. Charging a hot battery (above . To charge the battery, place the battery (with or without the radio) in a fire. Menu Key Many features provide context-sensitive menus that batteries are arranged in non...
...;F (25°C) (room temperature), whenever possible. The battery should be at the bottom of discharge with a Motorola charger and vice versa. Charging a hot battery (above . To charge the battery, place the battery (with or without the radio) in a fire. Menu Key Many features provide context-sensitive menus that batteries are arranged in non...
User Manual
Page 14
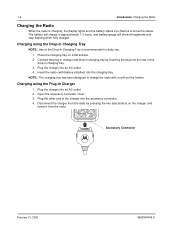
...other end of the Drop-in charging tray by pressing the two side buttons on a flat surface. 2. Disconnect the charger from the radio. Plug the charger into the accessory connector. 4. Open the accessory connector cover. 3. Accessory Connector February 15, 2005 9980384R89-O The battery will...stop flashing when fully charged. Charging using the Drop-in Charging Tray NOTE: Use of the charger into an AC outlet. 4. 1-6 Introduction: Charging the Radio Charging the Radio While the radio is recommended for daily use. 1. Charging using the Plug-in approximately 1-3 hours, and ...
...other end of the Drop-in charging tray by pressing the two side buttons on a flat surface. 2. Disconnect the charger from the radio. Plug the charger into the accessory connector. 4. Open the accessory connector cover. 3. Accessory Connector February 15, 2005 9980384R89-O The battery will...stop flashing when fully charged. Charging using the Drop-in Charging Tray NOTE: Use of the charger into an AC outlet. 4. 1-6 Introduction: Charging the Radio Charging the Radio While the radio is recommended for daily use. 1. Charging using the Plug-in approximately 1-3 hours, and ...
User Manual
Page 15
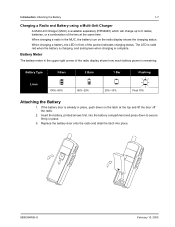
Introduction: Attaching the Battery 1-7 Charging a Radio and Battery using a Multi-Unit Charger A Multi-Unit Charger (MUC) is remaining: Battery Type 3 Bars 2 Bars 1 Bar Flashing Li-Ion 100%-85% 85%-25% 25%-10% Final 10% Attaching the Battery 1. Battery Meter...green when charging is already in place, push down to secure firmly in the upper right corner of the radio display shows how much battery power is available separately (RPN4040) which will charge up to 6 radios, batteries, or a combination of the pocket indicates charging status. Replace the battery door onto the...
Introduction: Attaching the Battery 1-7 Charging a Radio and Battery using a Multi-Unit Charger A Multi-Unit Charger (MUC) is remaining: Battery Type 3 Bars 2 Bars 1 Bar Flashing Li-Ion 100%-85% 85%-25% 25%-10% Final 10% Attaching the Battery 1. Battery Meter...green when charging is already in place, push down to secure firmly in the upper right corner of the radio display shows how much battery power is available separately (RPN4040) which will charge up to 6 radios, batteries, or a combination of the pocket indicates charging status. Replace the battery door onto the...
User Manual
Page 63
... Group Only 4-6 Unit Name 4-4 Adjusting the Speaker Volume 2-1 Alerting a Recent Caller 2-11 Alerts 2-4 Receiving an Alert 2-4 Sending an Alert 2-4 Attaching the Mini Keyboard to the Radio 1-8 Attaching the Battery 1-6 . B Battery 1-5 Battery, Attaching 1-7 Battery Charging using a Multi-Unit Charger 1-7 Battery Life 1-5 Battery Meter 1-7 C CAPS Key Functionality 1-9 Cloning 5-1
... Group Only 4-6 Unit Name 4-4 Adjusting the Speaker Volume 2-1 Alerting a Recent Caller 2-11 Alerts 2-4 Receiving an Alert 2-4 Sending an Alert 2-4 Attaching the Mini Keyboard to the Radio 1-8 Attaching the Battery 1-6 . B Battery 1-5 Battery, Attaching 1-7 Battery Charging using a Multi-Unit Charger 1-7 Battery Life 1-5 Battery Meter 1-7 C CAPS Key Functionality 1-9 Cloning 5-1
User Manual
Page 64
... the Cloning Cable 5-1 Sending a Contact 5-3 Charging Using the 1-7 Drop-in Charging Tray 1-6 Multi-Unit Charger 1-7 Plug-in Charger 1-6 Charging a Radio and Battery using a Multi-Unit Charger 1-7 Charging the Radio 1-6 Charging using the Drop-in Charging Tray 1-6 Charging using the Plug-in Charger 1-6 Composing a Message Using the Mini Keyboard 2-8 Contacts, Adding 4-1 D Deleting a Message 2-9 Deleting a Recent Call 2-12...
... the Cloning Cable 5-1 Sending a Contact 5-3 Charging Using the 1-7 Drop-in Charging Tray 1-6 Multi-Unit Charger 1-7 Plug-in Charger 1-6 Charging a Radio and Battery using a Multi-Unit Charger 1-7 Charging the Radio 1-6 Charging using the Drop-in Charging Tray 1-6 Charging using the Plug-in Charger 1-6 Composing a Message Using the Mini Keyboard 2-8 Contacts, Adding 4-1 D Deleting a Message 2-9 Deleting a Recent Call 2-12...
User Manual
Page 66
4 INDEX: N Navigation Keys 1-5 Notations Used in This Manual 1-1 O Other Special Characters 1-12 P Patent Notice 5-9 Plug-in Charger 1-6 Products and Accessories 5-7 Program Menu Navigation Chart 4-1 Q R Radio History 4-8 Receiving and Making a Call 2-3 Making a Call 2-3 Receiving a Call 2-3 Receiving a Call 2-3 Receiving an Alert 2-4 Receiving and Making Calls 2-3 Receiving Messages 2-5 Recent Calls 2-11 Alerting a Recent ...
4 INDEX: N Navigation Keys 1-5 Notations Used in This Manual 1-1 O Other Special Characters 1-12 P Patent Notice 5-9 Plug-in Charger 1-6 Products and Accessories 5-7 Program Menu Navigation Chart 4-1 Q R Radio History 4-8 Receiving and Making a Call 2-3 Making a Call 2-3 Receiving a Call 2-3 Receiving a Call 2-3 Receiving an Alert 2-4 Receiving and Making Calls 2-3 Receiving Messages 2-5 Recent Calls 2-11 Alerting a Recent ...


