Operating manual
Page 3
... INSTRUCTIONS Guide to the vacuum cleaner Before using the vacuum cleaner Using the included accessories Operation Power cord 14 Turning the vacuum on and off 15 Adjusting the suction 16 Opening the air inlet valve 17 Park-System 17 Maintenance and care Purchasing new dustbags and filters 18 Which dustbags and filters are the right ones 18 When to change the dustbag 19 Replacing the dustbag 20 Replacing the exhaust filter 21 Replacing the "Air Clean" filter 21 Replacing...
... INSTRUCTIONS Guide to the vacuum cleaner Before using the vacuum cleaner Using the included accessories Operation Power cord 14 Turning the vacuum on and off 15 Adjusting the suction 16 Opening the air inlet valve 17 Park-System 17 Maintenance and care Purchasing new dustbags and filters 18 Which dustbags and filters are the right ones 18 When to change the dustbag 19 Replacing the dustbag 20 Replacing the exhaust filter 21 Replacing the "Air Clean" filter 21 Replacing...
Operating manual
Page 4
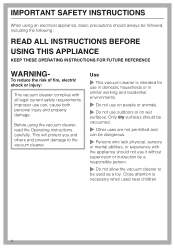
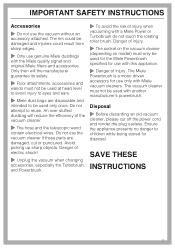
... vacuum cleaner to the vacuum cleaner. IMPORTANT SAFETY INSTRUCTIONS When using the vacuum cleaner, read the Operating Instructions carefully. Use ~ This vacuum cleaner is necessary when used as a toy. This will protect you and others and prevent damage to be followed, including the following: READ ALL INSTRUCTIONS BEFORE USING THIS APPLIANCE KEEP THESE OPERATING INSTRUCTIONS FOR FUTURE REFERENCE WARNING- To reduce the risk of fire, electric shock or injury: This vacuum cleaner...
... vacuum cleaner to the vacuum cleaner. IMPORTANT SAFETY INSTRUCTIONS When using the vacuum cleaner, read the Operating Instructions carefully. Use ~ This vacuum cleaner is necessary when used as a toy. This will protect you and others and prevent damage to be followed, including the following: READ ALL INSTRUCTIONS BEFORE USING THIS APPLIANCE KEEP THESE OPERATING INSTRUCTIONS FOR FUTURE REFERENCE WARNING- To reduce the risk of fire, electric shock or injury: This vacuum cleaner...

Operating manual
Page 5
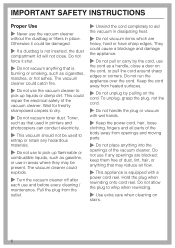
.... Your power source should be replaced along with a new cable reel by Miele Technical Service. ~ The electrical outlet must only be dangerous. Connecting the vacuum cleaner to install the proper outlet. Clean only with the voltage rating plate located on the underside of your hand remains around this appliance has a polarized plug (one way. Check the packaging, vacuum cleaner and accessories for unauthorized work. 5 Never use a damaged appliance. ~ Check the...
.... Your power source should be replaced along with a new cable reel by Miele Technical Service. ~ The electrical outlet must only be dangerous. Connecting the vacuum cleaner to install the proper outlet. Clean only with the voltage rating plate located on the underside of your hand remains around this appliance has a polarized plug (one way. Check the packaging, vacuum cleaner and accessories for unauthorized work. 5 Never use a damaged appliance. ~ Check the...
Operating manual
Page 6
... a handle, close . The vacuum cleaner could catch fire. ~ Do not use to whip when rewinding. ~ Use extra care when cleaning on the cord. Toner, such as that is equipped with wet hands. ~ Keep the power cord, hair, loose clothing, fingers and all parts of the vacuum cleaner. Do not allow the plug to pick up liquids or damp dirt. Do not force it could explode. ~ Turn the vacuum cleaner off after each use the vacuum cleaner...
... a handle, close . The vacuum cleaner could catch fire. ~ Do not use to whip when rewinding. ~ Use extra care when cleaning on the cord. Toner, such as that is equipped with wet hands. ~ Keep the power cord, hair, loose clothing, fingers and all parts of the vacuum cleaner. Do not allow the plug to pick up liquids or damp dirt. Do not force it could explode. ~ Turn the vacuum cleaner off after each use the vacuum cleaner...
Operating manual
Page 7
.... ~ Only use with a Miele Power or Turbobrush do not touch the rotating roller brush. An over stuffed dustbag will the manufacturer guarantee its safety. ~ Floor attachments, accessories and wands must not be used at head level to avoid injury to eyes and ears. ~ Miele dust bags are damaged, cut off the power cord and render the plug useless. Danger of electric shock! ~ Unplug the vacuum when changing accessories, especially...
.... ~ Only use with a Miele Power or Turbobrush do not touch the rotating roller brush. An over stuffed dustbag will the manufacturer guarantee its safety. ~ Floor attachments, accessories and wands must not be used at head level to avoid injury to eyes and ears. ~ Miele dust bags are damaged, cut off the power cord and render the plug useless. Danger of electric shock! ~ Unplug the vacuum when changing accessories, especially...
Operating manual
Page 9
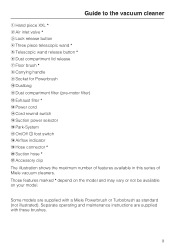
...). Guide to the vacuum cleaner a Hand piece XXL * b Air inlet valve * c Lock release button d Three piece telescopic wand * e Telescopic wand release button * f Dust compartment lid release g Floor brush * h Carrying handle i Socket for Powerbrush j Dustbag k Dust compartment filter (pre-motor filter) l Exhaust filter * m Power cord n Cord rewind switch o Suction power selector p Park-System q On/Off s foot switch r Airflow indicator s Hose connector * t Suction hose * u Accessory clip The illustration shows the maximum number of features available in this series of Miele vacuum cleaners...
...). Guide to the vacuum cleaner a Hand piece XXL * b Air inlet valve * c Lock release button d Three piece telescopic wand * e Telescopic wand release button * f Dust compartment lid release g Floor brush * h Carrying handle i Socket for Powerbrush j Dustbag k Dust compartment filter (pre-motor filter) l Exhaust filter * m Power cord n Cord rewind switch o Suction power selector p Park-System q On/Off s foot switch r Airflow indicator s Hose connector * t Suction hose * u Accessory clip The illustration shows the maximum number of features available in this series of Miele vacuum cleaners...
Operating manual
Page 10
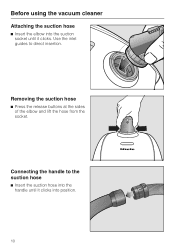
Before using the vacuum cleaner Attaching the suction hose ^ Insert the elbow into position. 10 Removing the suction hose ^ Press the release buttons at the sides of the elbow and lift the hose from the socket. Use the inlet guides to the suction hose ^ Insert the suction hose into the handle until it clicks into the suction socket until it clicks. Connecting the handle to direct insertion.
Before using the vacuum cleaner Attaching the suction hose ^ Insert the elbow into position. 10 Removing the suction hose ^ Press the release buttons at the sides of the elbow and lift the hose from the socket. Use the inlet guides to the suction hose ^ Insert the suction hose into the handle until it clicks into the suction socket until it clicks. Connecting the handle to direct insertion.
Operating manual
Page 11
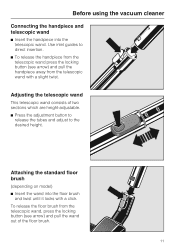
... adjustment button to release the tubes and adjust to direct insertion. ^ To release the handpiece from the telescopic wand with a click. Adjusting the telescopic wand This telescopic wand consists of the floor brush. 11 Attaching the standard floor brush (depending on model) ^ Insert the wand into the telescopic wand. Use inlet guides to the desired height. Before using the vacuum cleaner Connecting the handpiece and telescopic wand ^ Insert the handpiece into the floor brush...
... adjustment button to release the tubes and adjust to direct insertion. ^ To release the handpiece from the telescopic wand with a click. Adjusting the telescopic wand This telescopic wand consists of the floor brush. 11 Attaching the standard floor brush (depending on model) ^ Insert the wand into the telescopic wand. Use inlet guides to the desired height. Before using the vacuum cleaner Connecting the handpiece and telescopic wand ^ Insert the handpiece into the floor brush...
Operating manual
Page 12
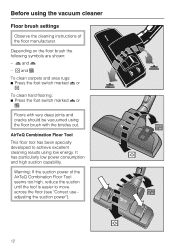
Before using the vacuum cleaner Floor brush settings Observe the cleaning instructions of the AirTeQ Combination Floor Tool seems too high, reduce the suction until the tool is easier to achieve excellent cleaning results using the floor brush with the bristles out. Depending on the floor brush the following symbols are shown: - ö and ä - % and ) To clean carpets and area rugs: ^ Press the foot switch marked ö or %. To clean hard flooring: ^ Press...
Before using the vacuum cleaner Floor brush settings Observe the cleaning instructions of the AirTeQ Combination Floor Tool seems too high, reduce the suction until the tool is easier to achieve excellent cleaning results using the floor brush with the bristles out. Depending on the floor brush the following symbols are shown: - ö and ä - % and ) To clean carpets and area rugs: ^ Press the foot switch marked ö or %. To clean hard flooring: ^ Press...
Operating manual
Page 13
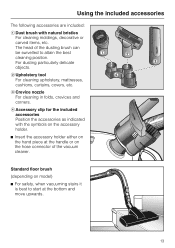
Standard floor brush (depending on the hose connector of the dusting brush can be swivelled to start at the handle or on model) ^ For safety, when vacuuming stairs it is best to attain the best cleaning position. b Upholstery tool For cleaning upholstery, mattresses, cushions, curtains, covers, etc. The head of the vacuum cleaner. c Crevice nozzle For cleaning in folds, crevices and corners. d Accessory clip for the included accessories...
Standard floor brush (depending on the hose connector of the dusting brush can be swivelled to start at the handle or on model) ^ For safety, when vacuuming stairs it is best to attain the best cleaning position. b Upholstery tool For cleaning upholstery, mattresses, cushions, curtains, covers, etc. The head of the vacuum cleaner. c Crevice nozzle For cleaning in folds, crevices and corners. d Accessory clip for the included accessories...

Operating manual
Page 16
... the suction power the floor brush can be pushed easier. The symbols on the underside of carpets When using the AirTeQ Combination Floor Tool, if the suction seems too high, reduce the suction until the tool is easier to move across the floor. 16 To further prevent static discharge, pull the vacuum along by the hose with low noise level ( low pile carpets ) hard flooring and intensive cleaning of the vacuum hand...
... the suction power the floor brush can be pushed easier. The symbols on the underside of carpets When using the AirTeQ Combination Floor Tool, if the suction seems too high, reduce the suction until the tool is easier to move across the floor. 16 To further prevent static discharge, pull the vacuum along by the hose with low noise level ( low pile carpets ) hard flooring and intensive cleaning of the vacuum hand...
Operating manual
Page 17
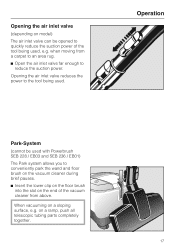
... on the floor brush into the slot on the end of the tool being used. on a sloping surface, e.g. Opening the air inlet valve (depending on model) The air inlet valve can be used with Powerbrush SEB 228 / EB03 and SEB 236 / EB01) The Park system allows you to quickly reduce the suction power of the vacuum cleaner from a carpet to an area rug. ^ Open the air inlet...
... on the floor brush into the slot on the end of the tool being used. on a sloping surface, e.g. Opening the air inlet valve (depending on model) The air inlet valve can be used with Powerbrush SEB 228 / EB03 and SEB 236 / EB01) The Park system allows you to quickly reduce the suction power of the vacuum cleaner from a carpet to an area rug. ^ Open the air inlet...

Operating manual
Page 18
... vacuum dealer or Miele, please quote the model number of these components must be changed periodically to ensure correct parts are also available to the vacuum cleaner and possibly voiding the warranty, just as with a cardboard retaining plate can the suction power of Original Miele filter (see "Exchanging exhaust filters"). 18 This vacuum cleaner uses Original Miele dustbags Type F/J/M and an Original Miele filters, the "Original Miele" Logo will appear on the packaging or directly...
... vacuum dealer or Miele, please quote the model number of these components must be changed periodically to ensure correct parts are also available to the vacuum cleaner and possibly voiding the warranty, just as with a cardboard retaining plate can the suction power of Original Miele filter (see "Exchanging exhaust filters"). 18 This vacuum cleaner uses Original Miele dustbags Type F/J/M and an Original Miele filters, the "Original Miele" Logo will appear on the packaging or directly...

Operating manual
Page 19
... changed . Checking the airflow indicator ^ Attach the standard floor brush (depending on and select the highest power setting. ^ Lift the floor brush slightly off the floor. Normal household dust is not. the indicator may become blocked. Miele dustbags are disposable and made to be changed . 19 If the bag is because the air flow of air flow through the dustbag. Perform this test with pet fur, hair, carpet...
... changed . Checking the airflow indicator ^ Attach the standard floor brush (depending on and select the highest power setting. ^ Lift the floor brush slightly off the floor. Normal household dust is not. the indicator may become blocked. Miele dustbags are disposable and made to be changed . 19 If the bag is because the air flow of air flow through the dustbag. Perform this test with pet fur, hair, carpet...
Operating manual
Page 21
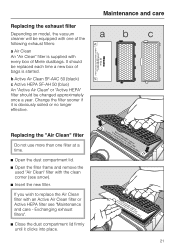
... Miele dustbags. If you wish to replace the Air Clean filter with an Active Air Clean filter or Active HEPA filter see arrow). ^ Insert the new filter. Replacing the exhaust filter Depending on model, the vacuum cleaner will be equipped with one filter at a time. ^ Open the dust compartment lid. ^ Open the filter frame and remove the used "Air Clean" filter with the clean corner (see "Maintenance and care - Exchanging exhaust filters". ^ Close the dust compartment lid firmly until it is started. Change...
... Miele dustbags. If you wish to replace the Air Clean filter with an Active Air Clean filter or Active HEPA filter see arrow). ^ Insert the new filter. Replacing the exhaust filter Depending on model, the vacuum cleaner will be equipped with one filter at a time. ^ Open the dust compartment lid. ^ Open the filter frame and remove the used "Air Clean" filter with the clean corner (see "Maintenance and care - Exchanging exhaust filters". ^ Close the dust compartment lid firmly until it is started. Change...

Operating manual
Page 22
If you wish to replace the Active Air Clean filter or the Active Hepa filter with an Air Clean filter see "Maintenance and care Exchanging exhaust filters". ^ Close the dust compartment lid firmly until it clicks into place. 22 Maintenance and care Replacing the "Active Air Clean" filter and the "Active HEPA" filter Do not use more than one filter at a time. ^ Open the dust compartment lid. ^ Remove the exhaust filter. ^ Insert the new filter.
If you wish to replace the Active Air Clean filter or the Active Hepa filter with an Air Clean filter see "Maintenance and care Exchanging exhaust filters". ^ Close the dust compartment lid firmly until it clicks into place. 22 Maintenance and care Replacing the "Active Air Clean" filter and the "Active HEPA" filter Do not use more than one filter at a time. ^ Open the dust compartment lid. ^ Remove the exhaust filter. ^ Insert the new filter.
Operating manual
Page 24
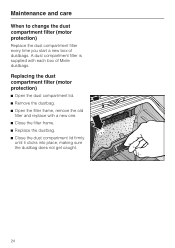
Maintenance and care When to change the dust compartment filter (motor protection) Replace the dust compartment filter every time you start a new box of Miele dustbags. A dust compartment filter is supplied with a new one. ^ Close the filter frame. ^ Replace the dustbag. ^ Close the dust compartment lid firmly until it clicks into place, making sure the dustbag does not get caught. 24 Replacing the dust compartment filter (motor protection) ^ Open the dust compartment lid. ^ Remove the dustbag. ^ Open the filter frame, remove the old filter and replace with each box of dustbags.
Maintenance and care When to change the dust compartment filter (motor protection) Replace the dust compartment filter every time you start a new box of Miele dustbags. A dust compartment filter is supplied with a new one. ^ Close the filter frame. ^ Replace the dustbag. ^ Close the dust compartment lid firmly until it clicks into place, making sure the dustbag does not get caught. 24 Replacing the dust compartment filter (motor protection) ^ Open the dust compartment lid. ^ Remove the dustbag. ^ Open the filter frame, remove the old filter and replace with each box of dustbags.
Operating manual
Page 25
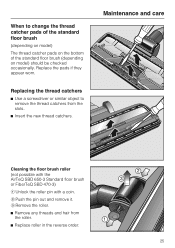
... the new thread catchers. Replacing the thread catchers ^ Use a screwdriver or similar object to change the thread catcher pads of the standard floor brush (depending on model) The thread catcher pads on the bottom of the standard floor brush (depending on model) should be checked occasionally. Replace the pads if they appear worn. b Push the pin out and remove it. Maintenance and care Cleaning the floor brush roller...
... the new thread catchers. Replacing the thread catchers ^ Use a screwdriver or similar object to change the thread catcher pads of the standard floor brush (depending on model) The thread catcher pads on the bottom of the standard floor brush (depending on model) should be checked occasionally. Replace the pads if they appear worn. b Push the pin out and remove it. Maintenance and care Cleaning the floor brush roller...
Operating manual
Page 26
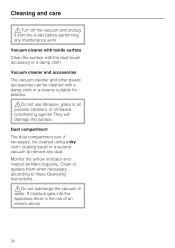
Vacuum cleaner and accessories The vacuum cleaner and other plastic accessories can , if necessary, be cleaned with the dust brush accessory or a damp cloth. They will damage the surface. Vacuum cleaner with textile surface Clean the surface with a damp cloth or a cleaner suitable for plastics. ,Do not use abrasive, glass or all filters regularly. Clean or replace them when necessary according to remove any maintenance work. Cleaning and care ,Turn off...
Vacuum cleaner and accessories The vacuum cleaner and other plastic accessories can , if necessary, be cleaned with the dust brush accessory or a damp cloth. They will damage the surface. Vacuum cleaner with textile surface Clean the surface with a damp cloth or a cleaner suitable for plastics. ,Do not use abrasive, glass or all filters regularly. Clean or replace them when necessary according to remove any maintenance work. Cleaning and care ,Turn off...
Operating manual
Page 28
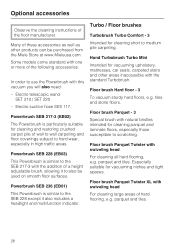
... flooring, e.g. Some models come standard with swiveling head For cleaning large areas of the following accessories. Floor brush Parquet - 3 Special brush with the addition of wall to wall carpeting and floor coverings subject to medium pile carpeting. Powerbrush SEB 228 (EB03) This Powerbrush is particularly suitable for vacuuming upholstery, mattresses, car seats, carpeted stairs and other products can be used on smooth floor surfaces. Hand Turbobrush Turbo...
... flooring, e.g. Some models come standard with swiveling head For cleaning large areas of the following accessories. Floor brush Parquet - 3 Special brush with the addition of wall to wall carpeting and floor coverings subject to medium pile carpeting. Powerbrush SEB 228 (EB03) This Powerbrush is particularly suitable for vacuuming upholstery, mattresses, car seats, carpeted stairs and other products can be used on smooth floor surfaces. Hand Turbobrush Turbo...


