Operating manual
Page 3
Contents IMPORTANT SAFETY INSTRUCTIONS 4 Guide to the vacuum cleaner 8 Before using the vacuum cleaner 10 Using the included accessories 12 Operation 14 Power cord 14 Turning the vacuum On/Off 15 Adjusting the suction 16 Opening the air inlet valve 16 Transport and storage 17 Maintenance and care 18 Purchasing new dustbags and filters 18 Which dustbags and filters are the right ones 18 When to change the dustbag 19 Replacing the dustbag...
Contents IMPORTANT SAFETY INSTRUCTIONS 4 Guide to the vacuum cleaner 8 Before using the vacuum cleaner 10 Using the included accessories 12 Operation 14 Power cord 14 Turning the vacuum On/Off 15 Adjusting the suction 16 Opening the air inlet valve 16 Transport and storage 17 Maintenance and care 18 Purchasing new dustbags and filters 18 Which dustbags and filters are the right ones 18 When to change the dustbag 19 Replacing the dustbag...
Operating manual
Page 4
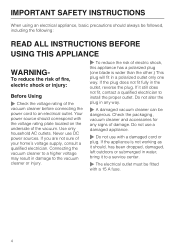
... install the proper outlet. Never use with a damaged cord or plug. Do not use a damaged appliance. ~ Do not use DC power sources. Check the packaging, vacuum cleaner and accessories for any way. ~ A damaged vacuum cleaner can be fitted with a 15 A fuse. 4 Do not alter the plug in the outlet, reverse the plug. IMPORTANT SAFETY INSTRUCTIONS When using an electrical appliance, basic precautions should correspond with the voltage rating plate located...
... install the proper outlet. Never use with a damaged cord or plug. Do not use a damaged appliance. ~ Do not use DC power sources. Check the packaging, vacuum cleaner and accessories for any way. ~ A damaged vacuum cleaner can be fitted with a 15 A fuse. 4 Do not alter the plug in the outlet, reverse the plug. IMPORTANT SAFETY INSTRUCTIONS When using an electrical appliance, basic precautions should correspond with the voltage rating plate located...
Operating manual
Page 5
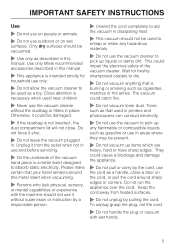
... mental capabilities or experience with wet hands. 5 Do not run the appliance over the cord. They could be used near children. ~ Never use the vacuum cleaner without supervision or instruction by the cord, use and before servicing. ~ On the underside of the vacuum cleaner. To unplug grasp the plug, not the cord. ~ Do not handle the plug or vacuum with the machine should not use it from heated surfaces. ~ Do...
... mental capabilities or experience with wet hands. 5 Do not run the appliance over the cord. They could be used near children. ~ Never use the vacuum cleaner without supervision or instruction by the cord, use and before servicing. ~ On the underside of the vacuum cleaner. To unplug grasp the plug, not the cord. ~ Do not handle the plug or vacuum with the machine should not use it from heated surfaces. ~ Do...
Operating manual
Page 6
... Miele Powerbrush is a motor-driven accessory for use only with another manufacturer's Powerbrush. ~ Do not use the vacuum without an accessory attached. Do not attempt to whip when rewinding. ~ Turn off this appliance before unplugging. ~ Use caution when vacuuming on the vacuum cleaner is equipped with the Miele quality signet and original Miele filters and accessories. Do not use genuine Miele dustbags with a power cord reel. Hold the plug when rewinding...
... Miele Powerbrush is a motor-driven accessory for use only with another manufacturer's Powerbrush. ~ Do not use the vacuum without an accessory attached. Do not attempt to whip when rewinding. ~ Turn off this appliance before unplugging. ~ Use caution when vacuuming on the vacuum cleaner is equipped with the Miele quality signet and original Miele filters and accessories. Do not use genuine Miele dustbags with a power cord reel. Hold the plug when rewinding...
Operating manual
Page 7
... may void the warranty. Pull the plug from the mains supply. A temperature limiter automatically switches the vacuum cleaner off after each use and before every cleaning / maintenance. Clean only with national and local safety regulations. IMPORTANT SAFETY INSTRUCTIONS Cleaning, maintenance and repairs ~ Turn the vacuum cleaner off if it gets too hot, see "Maintenance and Care - Disposing of electrical shock. ~ Monitor the dustbag change indicator and inspect all filters regularly.
... may void the warranty. Pull the plug from the mains supply. A temperature limiter automatically switches the vacuum cleaner off after each use and before every cleaning / maintenance. Clean only with national and local safety regulations. IMPORTANT SAFETY INSTRUCTIONS Cleaning, maintenance and repairs ~ Turn the vacuum cleaner off if it gets too hot, see "Maintenance and Care - Disposing of electrical shock. ~ Monitor the dustbag change indicator and inspect all filters regularly.

Operating manual
Page 9
... to the vacuum cleaner a Hand piece b Air inlet valve c Lock release button d Telescopic wand e Hose connector f Telescopic wand release button g Dust compartment lid release h Suction power selector i Floor brush * j Carrying handle k Socket for Powerbrush l Dustbag m Dust compartment filter (pre-motor filter) n Exhaust filter o On/Off s foot switch p Park-System q Power cord r Cord rewind switch s Airflow indicator t Accessory clip with three tools u Suction hose The features marked * may vary or not be available on your Miele dealer or Miele.com 9 Optional accessories are available from...
... to the vacuum cleaner a Hand piece b Air inlet valve c Lock release button d Telescopic wand e Hose connector f Telescopic wand release button g Dust compartment lid release h Suction power selector i Floor brush * j Carrying handle k Socket for Powerbrush l Dustbag m Dust compartment filter (pre-motor filter) n Exhaust filter o On/Off s foot switch p Park-System q Power cord r Cord rewind switch s Airflow indicator t Accessory clip with three tools u Suction hose The features marked * may vary or not be available on your Miele dealer or Miele.com 9 Optional accessories are available from...
Operating manual
Page 10
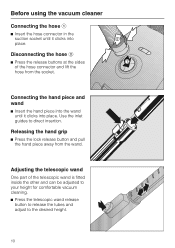
... the wand. Disconnecting the hose b ^ Press the release buttons at the sides of the telescopic wand is fitted inside the other and can be adjusted to your height for comfortable vacuum cleaning. ^ Press the telescopic wand release button to release the tubes and adjust to direct insertion. Use the inlet guides to the desired height. 10 Before using the vacuum cleaner Connecting the hose a ^ Insert the hose connector in the suction...
... the wand. Disconnecting the hose b ^ Press the release buttons at the sides of the telescopic wand is fitted inside the other and can be adjusted to your height for comfortable vacuum cleaning. ^ Press the telescopic wand release button to release the tubes and adjust to direct insertion. Use the inlet guides to the desired height. 10 Before using the vacuum cleaner Connecting the hose a ^ Insert the hose connector in the suction...
Operating manual
Page 11
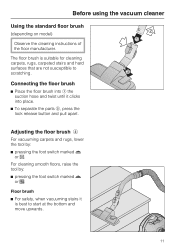
... move upwards. 11 Before using the vacuum cleaner Using the standard floor brush (depending on model) Observe the cleaning instructions of the floor manufacturer. For cleaning smooth floors, raise the tool by : ^ pressing the foot switch marked ö or %. The floor brush is best to scratching. Connecting the floor brush ^ Place the floor brush into place. ^ To separate the parts b, press the lock release button and pull apart. Adjusting the floor brush c For vacuuming carpets and rugs, lower...
... move upwards. 11 Before using the vacuum cleaner Using the standard floor brush (depending on model) Observe the cleaning instructions of the floor manufacturer. For cleaning smooth floors, raise the tool by : ^ pressing the foot switch marked ö or %. The floor brush is best to scratching. Connecting the floor brush ^ Place the floor brush into place. ^ To separate the parts b, press the lock release button and pull apart. Adjusting the floor brush c For vacuuming carpets and rugs, lower...
Operating manual
Page 13
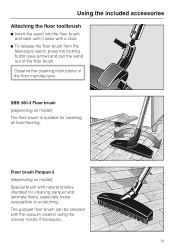
... susceptible to scratching. Using the included accessories Attaching the floor tool/brush ^ Insert the wand into the floor brush and twist until it locks with the vacuum cleaner using the crevice nozzle if necessary. 13 The parquet floor brush can be cleaned with a click. ^ To release the floor brush from the telescopic wand, press the locking button (see arrow) and pull the wand out of the floor manufacturer. Observe the cleaning instructions of the floor brush.
... susceptible to scratching. Using the included accessories Attaching the floor tool/brush ^ Insert the wand into the floor brush and twist until it locks with the vacuum cleaner using the crevice nozzle if necessary. 13 The parquet floor brush can be cleaned with a click. ^ To release the floor brush from the telescopic wand, press the locking button (see arrow) and pull the wand out of the floor manufacturer. Observe the cleaning instructions of the floor brush.
Operating manual
Page 14
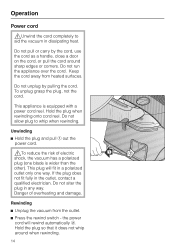
... not unplug by the cord, use the cord as a handle, close a door on the cord, or pull the cord around when rewinding. 14 Do not allow plug to aid the vacuum in a polarized outlet only one blade is equipped with a power cord reel. Keep the cord away from the outlet. ^ Press the rewind switch - Operation Power cord ,Unwind the cord completely to whip when rewinding. Rewinding ^ Unplug the vacuum from heated surfaces.
... not unplug by the cord, use the cord as a handle, close a door on the cord, or pull the cord around when rewinding. 14 Do not allow plug to aid the vacuum in a polarized outlet only one blade is equipped with a power cord reel. Keep the cord away from the outlet. ^ Press the rewind switch - Operation Power cord ,Unwind the cord completely to whip when rewinding. Rewinding ^ Unplug the vacuum from heated surfaces.
Operating manual
Page 16
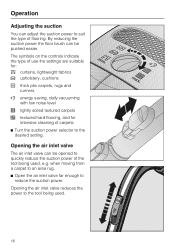
... vacuuming with low noise level ( lightly soiled textured carpets ) textured hard flooring, and for intensive cleaning of carpets ^ Turn the suction power selector to reduce the suction power. Operation Adjusting the suction You can be opened to suit the type of flooring. when moving from a carpet to an area rug. ^ Open the air inlet valve far enough to the desired setting. Opening the air inlet valve reduces the power to the tool being used . 16 Opening the air inlet...
... vacuuming with low noise level ( lightly soiled textured carpets ) textured hard flooring, and for intensive cleaning of carpets ^ Turn the suction power selector to reduce the suction power. Operation Adjusting the suction You can be opened to suit the type of flooring. when moving from a carpet to an area rug. ^ Open the air inlet valve far enough to the desired setting. Opening the air inlet valve reduces the power to the tool being used . 16 Opening the air inlet...
Operating manual
Page 18
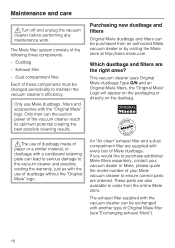
... online Miele store. Dust compartment filter Each of Miele dustbags. These parts are supplied with another type of the vacuum cleaner reach its optimum potential creating the best possible cleaning results. Only use Miele dustbags, filters and accessories with the use of dustbags made of paper or a similar material, or dustbags with a cardboard retaining plate can the suction power of Original Miele filter (see "Exchanging exhaust filters"). 18 This vacuum cleaner uses Original Miele...
... online Miele store. Dust compartment filter Each of Miele dustbags. These parts are supplied with another type of the vacuum cleaner reach its optimum potential creating the best possible cleaning results. Only use Miele dustbags, filters and accessories with the use of dustbags made of paper or a similar material, or dustbags with a cardboard retaining plate can the suction power of Original Miele filter (see "Exchanging exhaust filters"). 18 This vacuum cleaner uses Original Miele...
Operating manual
Page 19
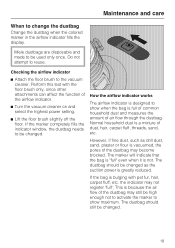
..., the dustbag needs to reuse. Normal household dust is a mixture of the airflow indicator. ^ Turn the vacuum cleaner on and select the highest power setting. ^ Lift the floor brush slightly off the floor. Do not attempt to be changed as drill dust, sand, plaster or flour is not. The dustbag should still be used only once. This is because the air flow of the...
..., the dustbag needs to reuse. Normal household dust is a mixture of the airflow indicator. ^ Turn the vacuum cleaner on and select the highest power setting. ^ Lift the floor brush slightly off the floor. Do not attempt to be changed as drill dust, sand, plaster or flour is not. The dustbag should still be used only once. This is because the air flow of the...
Operating manual
Page 21
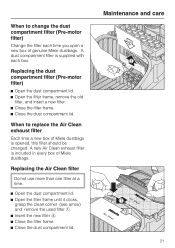
A new Air Clean exhaust filter is opened, this filter should be changed. Maintenance and care 21 When to change the dust compartment filter (Pre-motor filter) Change the filter each box. Replacing the Air Clean filter Do not use more than one filter at a time. ^ Open the dust compartment lid. ^ Open the filter frame until it clicks, grasp the clean corner (see arrow) and remove the used filter a. ^ Insert the new filter b. ^ Close the filter frame. ^ Close the dust compartment lid. Replacing the dust compartment filter (Pre...
A new Air Clean exhaust filter is opened, this filter should be changed. Maintenance and care 21 When to change the dust compartment filter (Pre-motor filter) Change the filter each box. Replacing the Air Clean filter Do not use more than one filter at a time. ^ Open the dust compartment lid. ^ Open the filter frame until it clicks, grasp the clean corner (see arrow) and remove the used filter a. ^ Insert the new filter b. ^ Close the filter frame. ^ Close the dust compartment lid. Replacing the dust compartment filter (Pre...
Operating manual
Page 22
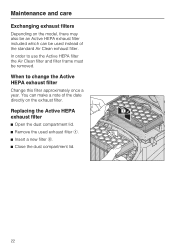
Replacing the Active HEPA exhaust filter ^ Open the dust compartment lid. ^ Remove the used instead of the date directly on the model, there may also be an Active HEPA exhaust filter included which can make a note of the standard Air Clean exhaust filter. You can be removed. In order to change the Active HEPA exhaust filter Change this filter approximately once a year. Maintenance and care Exchanging exhaust filters Depending on the exhaust filter. When...
Replacing the Active HEPA exhaust filter ^ Open the dust compartment lid. ^ Remove the used instead of the date directly on the model, there may also be an Active HEPA exhaust filter included which can make a note of the standard Air Clean exhaust filter. You can be removed. In order to change the Active HEPA exhaust filter Change this filter approximately once a year. Maintenance and care Exchanging exhaust filters Depending on the exhaust filter. When...
Operating manual
Page 23
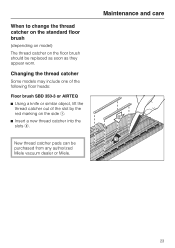
Changing the thread catcher Some models may include one of the following floor heads: Floor brush SBD 350-3 or AIRTEQ ^ Using a knife or similar object, lift the thread catcher out of the slot by the red marking on the floor brush should be purchased from any authorized Miele vacuum dealer or Miele. Maintenance and care 23 When to change the thread catcher on the standard floor brush (depending on model) The thread catcher on the side a. ^ Insert a new thread catcher into the slots b. New thread catcher pads can be replaced as soon as they appear worn.
Changing the thread catcher Some models may include one of the following floor heads: Floor brush SBD 350-3 or AIRTEQ ^ Using a knife or similar object, lift the thread catcher out of the slot by the red marking on the floor brush should be purchased from any authorized Miele vacuum dealer or Miele. Maintenance and care 23 When to change the thread catcher on the standard floor brush (depending on model) The thread catcher on the side a. ^ Insert a new thread catcher into the slots b. New thread catcher pads can be replaced as soon as they appear worn.
Operating manual
Page 24
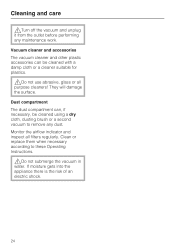
..., be cleaned with a damp cloth or a cleaner suitable for plastics. ,Do not use abrasive, glass or all filters regularly. Monitor the airflow indicator and inspect all purpose cleaners! They will damage the surface. Dust compartment The dust compartment can be cleaned using a dry cloth, dusting brush or a second vacuum to these Operating Instructions. ,Do not submerge the vacuum in water. Clean or replace them when necessary according to remove any maintenance work.
..., be cleaned with a damp cloth or a cleaner suitable for plastics. ,Do not use abrasive, glass or all filters regularly. Monitor the airflow indicator and inspect all purpose cleaners! They will damage the surface. Dust compartment The dust compartment can be cleaned using a dry cloth, dusting brush or a second vacuum to these Operating Instructions. ,Do not submerge the vacuum in water. Clean or replace them when necessary according to remove any maintenance work.
Operating manual
Page 26
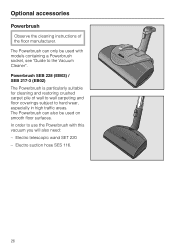
... models containing a Powerbrush socket, see "Guide to hard wear, especially in high traffic areas. Electro telescopic wand SET 220 - The Powerbrush can only be used with this vacuum you will also need: - Powerbrush SEB 228 (EB03) / SEB 217-3 (EB02) The Powerbrush is particularly suitable for cleaning and restoring crushed carpet pile of the floor manufacturer. Optional accessories Powerbrush Observe the cleaning instructions...
... models containing a Powerbrush socket, see "Guide to hard wear, especially in high traffic areas. Electro telescopic wand SET 220 - The Powerbrush can only be used with this vacuum you will also need: - Powerbrush SEB 228 (EB03) / SEB 217-3 (EB02) The Powerbrush is particularly suitable for cleaning and restoring crushed carpet pile of the floor manufacturer. Optional accessories Powerbrush Observe the cleaning instructions...
Operating manual
Page 27
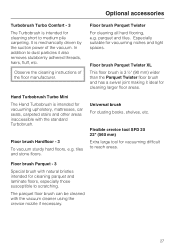
... tool for vacuuming upholstery, mattresses, car seats, carpeted stairs and other areas inaccessible with the vacuum cleaner using the crevice nozzle if necessary. 27 Floor brush Parquet Twister XL This floor brush is 3 ½" (90 mm) wider than the Parquet Twister floor brush and has a swivel joint making it also removes stubbornly adhered threads, hairs, fluff, etc. Floor brush Hardfloor - 3 To vacuum sturdy hard floors, e.g. Optional accessories Turbobrush Turbo...
... tool for vacuuming upholstery, mattresses, car seats, carpeted stairs and other areas inaccessible with the vacuum cleaner using the crevice nozzle if necessary. 27 Floor brush Parquet Twister XL This floor brush is 3 ½" (90 mm) wider than the Parquet Twister floor brush and has a swivel joint making it also removes stubbornly adhered threads, hairs, fluff, etc. Floor brush Hardfloor - 3 To vacuum sturdy hard floors, e.g. Optional accessories Turbobrush Turbo...
Operating manual
Page 28
Technical Service After sales service In the event of a fault which you cannot fix yourself please contact the Miele Service Department at the phone number listed on the bottom of your appliance. This can be found on the data plate on the back of this booklet. ^ Please quote the model type of the vacuum. 28
Technical Service After sales service In the event of a fault which you cannot fix yourself please contact the Miele Service Department at the phone number listed on the bottom of your appliance. This can be found on the data plate on the back of this booklet. ^ Please quote the model type of the vacuum. 28


