Operating and Installation manual
Page 1
US, CA M.-Nr. 09 169 670 Operating and Installation Instructions Refrigerator K 1801 Vi, K 1811 Vi K 1901 Vi, K 1911 Vi To prevent accidents and appliance damage read these instructions before installation or use. en -
US, CA M.-Nr. 09 169 670 Operating and Installation Instructions Refrigerator K 1801 Vi, K 1811 Vi K 1901 Vi, K 1911 Vi To prevent accidents and appliance damage read these instructions before installation or use. en -
Operating and Installation manual
Page 2
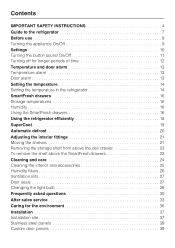
Contents IMPORTANT SAFETY INSTRUCTIONS 4 Guide to the refrigerator 7 Before use 9 Turning the appliance On/Off 9 Settings 10 Turning the button sound On/Off 11 Turning off for longer periods of time 12 Temperature ... alarm 13 Temperature alarm 13 Door alarm 13 Setting the temperature 14 Setting the temperature in the refrigerator 14 SmartFresh drawers 16 Storage temperatures 16 Humidity 16 Using the SmartFresh drawers 16 Using the refrigerator efficiently 18 SuperCool 19 Automatic defrost 20 Adjusting the interior fittings 21 Moving the shelves 21 Removing...
Contents IMPORTANT SAFETY INSTRUCTIONS 4 Guide to the refrigerator 7 Before use 9 Turning the appliance On/Off 9 Settings 10 Turning the button sound On/Off 11 Turning off for longer periods of time 12 Temperature ... alarm 13 Temperature alarm 13 Door alarm 13 Setting the temperature 14 Setting the temperature in the refrigerator 14 SmartFresh drawers 16 Storage temperatures 16 Humidity 16 Using the SmartFresh drawers 16 Using the refrigerator efficiently 18 SuperCool 19 Automatic defrost 20 Adjusting the interior fittings 21 Moving the shelves 21 Removing...

Operating and Installation manual
Page 5
...and state laws. ~ Do not operate any oils or grease on or near the appliance, especially in the door hinge area. ~ After your refrigerator is in operation, do not allow children to the appliance switching off for outdoor use. ~ Persons who lack physical, sensory or mental abilities,... or experience with a damaged cord or plug, or if the appliance has been damaged in the vicinity of tipping forward. Contact Miele's Technical Service Department. ~ This appliance must not be dangerous and may lead to play in compliance with time. 5 Keep the door closed ...
...and state laws. ~ Do not operate any oils or grease on or near the appliance, especially in the door hinge area. ~ After your refrigerator is in operation, do not allow children to the appliance switching off for outdoor use. ~ Persons who lack physical, sensory or mental abilities,... or experience with a damaged cord or plug, or if the appliance has been damaged in the vicinity of tipping forward. Contact Miele's Technical Service Department. ~ This appliance must not be dangerous and may lead to play in compliance with time. 5 Keep the door closed ...
Operating and Installation manual
Page 6
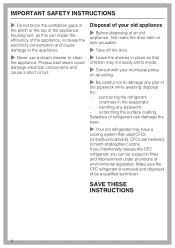
...damage to the appliance. ~ Never use a steam cleaner to clean the appliance. CFCs are believed to harm stratospheric ozone. puncturing the refrigerant channels in the evaporator. - Disposal of your municipal policy on recycling. ~ Be careful not to damage any pipework. - bending any... INSTRUCTIONS ~ Do not block the ventilation gaps in the plinth or the top of the appliance housing unit, as this CFC refrigerant, you intentionally release this can be subject to fines and imprisonment under provisions of environmental legislation. Pressurized steam could damage electrical components...
...damage to the appliance. ~ Never use a steam cleaner to clean the appliance. CFCs are believed to harm stratospheric ozone. puncturing the refrigerant channels in the evaporator. - Disposal of your municipal policy on recycling. ~ Be careful not to damage any pipework. - bending any... INSTRUCTIONS ~ Do not block the ventilation gaps in the plinth or the top of the appliance housing unit, as this CFC refrigerant, you intentionally release this can be subject to fines and imprisonment under provisions of environmental legislation. Pressurized steam could damage electrical components...
Operating and Installation manual
Page 7
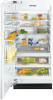
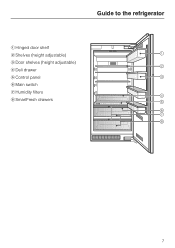
Guide to the refrigerator a Hinged door shelf b Shelves (height adjustable) c Door shelves (height adjustable) d Deli drawer e Control panel f Main switch g Humidity filters h SmartFresh drawers 7
Guide to the refrigerator a Hinged door shelf b Shelves (height adjustable) c Door shelves (height adjustable) d Deli drawer e Control panel f Main switch g Humidity filters h SmartFresh drawers 7
Operating and Installation manual
Page 8
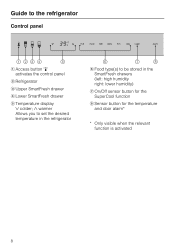
Guide to be stored in the refrigerator f Food type(s) to the refrigerator Control panel a Access button "p" activates the control panel b Refrigerator c Upper SmartFresh drawer d Lower SmartFresh drawer e Temperature display X colder; Y warmer Allows you to set the desired temperature in the SmartFresh drawers (left: high humidity right: lower humidity) g On/Off sensor button for the SuperCool function h Sensor button for the temperature and door alarm* * Only visible when the relevant function is activated 8
Guide to be stored in the refrigerator f Food type(s) to the refrigerator Control panel a Access button "p" activates the control panel b Refrigerator c Upper SmartFresh drawer d Lower SmartFresh drawer e Temperature display X colder; Y warmer Allows you to set the desired temperature in the SmartFresh drawers (left: high humidity right: lower humidity) g On/Off sensor button for the SuperCool function h Sensor button for the temperature and door alarm* * Only visible when the relevant function is activated 8
Operating and Installation manual
Page 11
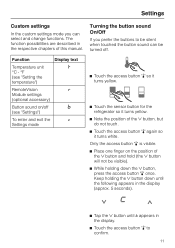
...; °C - °F (see "Settings") To enter and exit the c Settings mode ^ Touch the access button "p" so it turns yellow. ^ Touch the sensor button for the refrigerator so it turns white. Only the access button "p" is visible. ^ Place one finger on /off . Keep holding down until the following appears in the display...
...; °C - °F (see "Settings") To enter and exit the c Settings mode ^ Touch the access button "p" so it turns yellow. ^ Touch the sensor button for the refrigerator so it turns white. Only the access button "p" is visible. ^ Place one finger on /off . Keep holding down until the following appears in the display...

Operating and Installation manual
Page 14
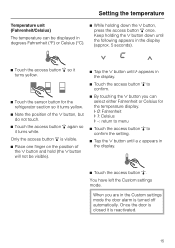
...Y sensor buttons to raise/lower the temperature 1°, or hold it down to 8°C) A temperature of 37°F (4°C) in the refrigerator section is recommended. If the room temperature is too high, it may not be selected within the following ranges: - The room temperature and the .... Temperature display The temperature display on the operating panel always shows the required temperature. Setting the temperature Setting the temperature in the refrigerator The loss of coldness is no cause for concern if it is due to the door being set the temperature warmer or colder....
...Y sensor buttons to raise/lower the temperature 1°, or hold it down to 8°C) A temperature of 37°F (4°C) in the refrigerator section is recommended. If the room temperature is too high, it may not be selected within the following ranges: - The room temperature and the .... Temperature display The temperature display on the operating panel always shows the required temperature. Setting the temperature Setting the temperature in the refrigerator The loss of coldness is no cause for concern if it is due to the door being set the temperature warmer or colder....
Operating and Installation manual
Page 15
... do not touch. ^ Touch the access button "p" again so it is closed it turns white. When you can select either Fahrenheit or Celsius for the refrigerator section so it turns yellow. ^ Note the position of the X button and hold (the X button will not be displayed in the display. ^ Touch the access...
... do not touch. ^ Touch the access button "p" again so it is closed it turns white. When you can select either Fahrenheit or Celsius for the refrigerator section so it turns yellow. ^ Note the position of the X button and hold (the X button will not be displayed in the display. ^ Touch the access...
Operating and Installation manual
Page 16
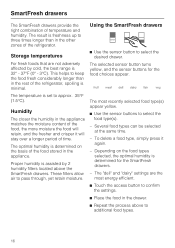
...the food stored in the appliance matches the moisture content of the food, the more moisture the food will stay over a longer period of the refrigerator, spoiling is 32° - 37°F (0° - 3°C). The selected sensor button turns yellow, and the sensor buttons for the ... three times longer than in the other zones of temperature and humidity. SmartFresh drawers The SmartFresh drawers provide the right combination of the refrigerator. The result is determined for the food choices appear. For fresh foods that are the most recently selected food type(s) appear yellow....
...the food stored in the appliance matches the moisture content of the food, the more moisture the food will stay over a longer period of the refrigerator, spoiling is 32° - 37°F (0° - 3°C). The selected sensor button turns yellow, and the sensor buttons for the ... three times longer than in the other zones of temperature and humidity. SmartFresh drawers The SmartFresh drawers provide the right combination of the refrigerator. The result is determined for the food choices appear. For fresh foods that are the most recently selected food type(s) appear yellow....
Operating and Installation manual
Page 18
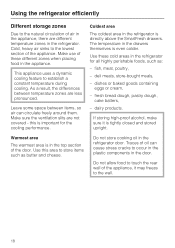
... or cream, - dairy products. Do not store cooking oil in the door. Make sure the ventilation slits are different temperature zones in the refrigerator. Traces of oil can circulate freely around them. this area to store items such as : - Make use of these cold areas in the... If storing high-proof alcohol, make sure it may freeze to the wall. 18 Use this is directly above the SmartFresh drawers. Using the refrigerator efficiently Different storage zones Due to the natural circulation of air in the appliance, there are not covered - The temperature in the top section of...
... or cream, - dairy products. Do not store cooking oil in the door. Make sure the ventilation slits are different temperature zones in the refrigerator. Traces of oil can circulate freely around them. this area to store items such as : - Make use of these cold areas in the... If storing high-proof alcohol, make sure it may freeze to the wall. 18 Use this is directly above the SmartFresh drawers. Using the refrigerator efficiently Different storage zones Due to the natural circulation of air in the appliance, there are not covered - The temperature in the top section of...
Operating and Installation manual
Page 19
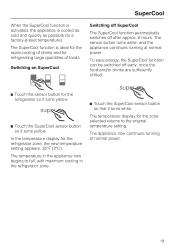
In the temperature display for refrigerating large quantities of drinks and for the refrigerator zone, the new temperature setting appears, 35°F (2°C). The appliance now continues running at normal power. 19 The sensor button turns white, and the ... cooled as cold and quickly as possible (to fall, with maximum cooling in the appliance now begins to a factory-preset temperature). The temperature in the refrigerator zone. ^ Touch the SuperCool sensor button so that it turns yellow. To save energy, the SuperCool function can be switched off after approx. 6 hours. The...
In the temperature display for refrigerating large quantities of drinks and for the refrigerator zone, the new temperature setting appears, 35°F (2°C). The appliance now continues running at normal power. 19 The sensor button turns white, and the ... cooled as cold and quickly as possible (to fall, with maximum cooling in the appliance now begins to a factory-preset temperature). The temperature in the refrigerator zone. ^ Touch the SuperCool sensor button so that it turns yellow. To save energy, the SuperCool function can be switched off after approx. 6 hours. The...
Operating and Installation manual
Page 20
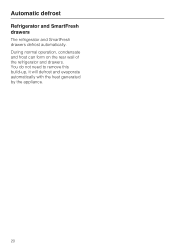
You do not need to remove this build-up, it will defrost and evaporate automatically with the heat generated by the appliance. 20 Automatic defrost Refrigerator and SmartFresh drawers The refrigerator and SmartFresh drawers defrost automatically. During normal operation, condensate and frost can form on the rear wall of the refrigerator and drawers.
You do not need to remove this build-up, it will defrost and evaporate automatically with the heat generated by the appliance. 20 Automatic defrost Refrigerator and SmartFresh drawers The refrigerator and SmartFresh drawers defrost automatically. During normal operation, condensate and frost can form on the rear wall of the refrigerator and drawers.
Operating and Installation manual
Page 21
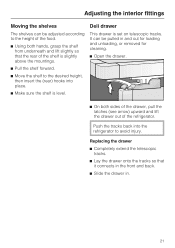
... drawer This drawer is slightly above the mountings. ^ Pull the shelf forward. ^ Move the shelf to avoid injury. Push the tracks back into the refrigerator to the desired height, then insert the (rear) hooks into place. ^ Make sure the shelf is level. Adjusting the interior fittings Moving the shelves The ...
... drawer This drawer is slightly above the mountings. ^ Pull the shelf forward. ^ Move the shelf to avoid injury. Push the tracks back into the refrigerator to the desired height, then insert the (rear) hooks into place. ^ Make sure the shelf is level. Adjusting the interior fittings Moving the shelves The ...
Operating and Installation manual
Page 22
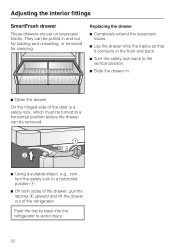
... tracks so that it connects in the front and back. ^ Turn the safety lock back to avoid injury. 22 Push the tracks back into the refrigerator to the vertical position. ^ Slide the drawer in and out for loading and unloading, or removed for cleaning. They can be pulled in . ^ Open the..., e.g., coin, turn the safety lock to a horizontal position a. ^ On both sides of the drawer, pull the latches b upward and lift the drawer out of the refrigerator. Adjusting the interior fittings SmartFresh drawer These drawers are set on telescopic tracks.
... tracks so that it connects in the front and back. ^ Turn the safety lock back to avoid injury. 22 Push the tracks back into the refrigerator to the vertical position. ^ Slide the drawer in and out for loading and unloading, or removed for cleaning. They can be pulled in . ^ Open the..., e.g., coin, turn the safety lock to a horizontal position a. ^ On both sides of the drawer, pull the latches b upward and lift the drawer out of the refrigerator. Adjusting the interior fittings SmartFresh drawer These drawers are set on telescopic tracks.
Operating and Installation manual
Page 27
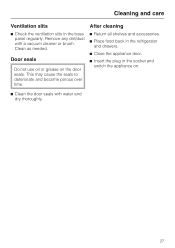
This may cause the seals to deteriorate and become porous over time. After cleaning ^ Return all shelves and accessories. ^ Place food back in the refrigerator and drawers. ^ Close the appliance door. ^ Insert the plug in the base panel regularly. Cleaning and care Ventilation slits ^ Check the ventilation slits in the socket and switch the appliance on the door seals. Clean as needed. Door seals Do not use oil or grease on . ^ Clean the door seals with a vacuum cleaner or brush. Remove any dirt/dust with water and dry thoroughly. 27
This may cause the seals to deteriorate and become porous over time. After cleaning ^ Return all shelves and accessories. ^ Place food back in the refrigerator and drawers. ^ Close the appliance door. ^ Insert the plug in the base panel regularly. Cleaning and care Ventilation slits ^ Check the ventilation slits in the socket and switch the appliance on the door seals. Clean as needed. Door seals Do not use oil or grease on . ^ Clean the door seals with a vacuum cleaner or brush. Remove any dirt/dust with water and dry thoroughly. 27
Operating and Installation manual
Page 30
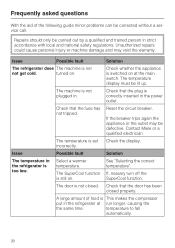
Issue Possible fault Solution The refrigerator does The machine is switched on at run longer, causing the the same time. Check whether the appliance is not not get cold. Contact Miele or a qualified electrician. The door is set Check the display. Check that the plug is too low. The temperature display must be...
Issue Possible fault Solution The refrigerator does The machine is switched on at run longer, causing the the same time. Check whether the appliance is not not get cold. Contact Miele or a qualified electrician. The door is set Check the display. Check that the plug is too low. The temperature display must be...
Vi Refrigerators (36 inch)
Page 1
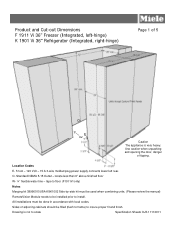
Product and Cut-out Dimensions F 1911 Vi 36" Freezer (Integrated, left rear. Standard NEMA 5-15 Outlet - O- locate less than 9" above finished floor W- ¼" flexible water line - tape to floor (F1911Vi only) Notes .... (Please review the manual) RemoteVision Module needs to install. Location Codes E- 5 foot - 120 Volt - 15 A 3-wire molded plug power supply connects lower left -hinge) K 1901 Vi 36" Refrigerator (Integrated, right-hinge) Page 1 of adjoining cabinets should be filled (flush to frame) to scale Specification Sheets OJS 11112011
Product and Cut-out Dimensions F 1911 Vi 36" Freezer (Integrated, left rear. Standard NEMA 5-15 Outlet - O- locate less than 9" above finished floor W- ¼" flexible water line - tape to floor (F1911Vi only) Notes .... (Please review the manual) RemoteVision Module needs to install. Location Codes E- 5 foot - 120 Volt - 15 A 3-wire molded plug power supply connects lower left -hinge) K 1901 Vi 36" Refrigerator (Integrated, right-hinge) Page 1 of adjoining cabinets should be filled (flush to frame) to scale Specification Sheets OJS 11112011
Vi Refrigerators (36 inch)
Page 2
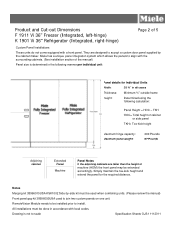
...units. (Please review the manual) Front panel gap kit 38996050USA used to install. Product and Cut-out Dimensions F 1911 Vi 36" Freezer (Integrated, left-hinge) K 1901 Vi 36" Refrigerator (Integrated, right-hinge) Page 2 of machine (HOM) the front panel may be extended accordingly. They are ...the following manner per individual unit: Panel details for the required distance. RemoteVision Module needs to scale Specification Sheets OJS 11112011 Miele has a unique panel integration system which allows the panels to align with local codes. Simply maintain the toe-kick height and...
...units. (Please review the manual) Front panel gap kit 38996050USA used to install. Product and Cut-out Dimensions F 1911 Vi 36" Freezer (Integrated, left-hinge) K 1901 Vi 36" Refrigerator (Integrated, right-hinge) Page 2 of machine (HOM) the front panel may be extended accordingly. They are ...the following manner per individual unit: Panel details for the required distance. RemoteVision Module needs to scale Specification Sheets OJS 11112011 Miele has a unique panel integration system which allows the panels to align with local codes. Simply maintain the toe-kick height and...

Vi Refrigerators (36 inch)
Page 3
Drawing is not to each individual kitchen. Product and Cut-out Dimensions F 1911 Vi 36" Freezer (Integrated, left-hinge) K 1901 Vi 36" Refrigerator (Integrated, right-hinge) Page 3 of the door fronts and handles will vary according to scale Specification Sheets OJS 11112011 Refrigeration only. Greater door swing lower cabinet front thickness Notes The dimensions of 5 Door hinge cabinet front and door panel thickness dimensions, stop pinned at 90° (refrigeration only) and fully opened at 115°.
Drawing is not to each individual kitchen. Product and Cut-out Dimensions F 1911 Vi 36" Freezer (Integrated, left-hinge) K 1901 Vi 36" Refrigerator (Integrated, right-hinge) Page 3 of the door fronts and handles will vary according to scale Specification Sheets OJS 11112011 Refrigeration only. Greater door swing lower cabinet front thickness Notes The dimensions of 5 Door hinge cabinet front and door panel thickness dimensions, stop pinned at 90° (refrigeration only) and fully opened at 115°.

