Operating and Installation manual
Page 2
... Temperature alarm 13 Door alarm 13 Setting the temperature 14 Setting the temperature in the refrigerator 14 SmartFresh drawers 16 Storage temperatures 16 Humidity 16 Using the SmartFresh drawers 16 Using the refrigerator efficiently 18 SuperCool 19 Automatic defrost 20 Adjusting the interior fittings 21 Moving the shelves 21 Removing the storage shelf from above the deli drawer 23 To remove the shelf above the SmartFresh drawers 23 Cleaning and care 24 Cleaning the interior and accessories 25 Humidity filters...
... Temperature alarm 13 Door alarm 13 Setting the temperature 14 Setting the temperature in the refrigerator 14 SmartFresh drawers 16 Storage temperatures 16 Humidity 16 Using the SmartFresh drawers 16 Using the refrigerator efficiently 18 SuperCool 19 Automatic defrost 20 Adjusting the interior fittings 21 Moving the shelves 21 Removing the storage shelf from above the deli drawer 23 To remove the shelf above the SmartFresh drawers 23 Cleaning and care 24 Cleaning the interior and accessories 25 Humidity filters...
Operating and Installation manual
Page 4
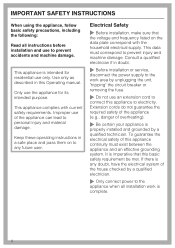
... or removing the fuse. ~ Do not use an extension cord to connect this appliance continuity must correspond to any doubt, have the electrical system of overheating). ~ Be certain your appliance is complete. 4 This appliance complies with the household electrical supply. Only use the appliance for residential use only. Use only as described in doubt. ~ Before installation or service, disconnect the power supply to electricity...
... or removing the fuse. ~ Do not use an extension cord to connect this appliance continuity must correspond to any doubt, have the electrical system of overheating). ~ Be certain your appliance is complete. 4 This appliance complies with the household electrical supply. Only use the appliance for residential use only. Use only as described in doubt. ~ Before installation or service, disconnect the power supply to electricity...

Operating and Installation manual
Page 5
... in the door hinge area. ~ After your refrigerator is in operation, do not allow children to the appliance switching off for commercial use in domestic households and in hotels, motels, Bed & Breakfasts or similar residential environments. ~ This appliance is not intended for use . Contact Miele's Technical Service Department. ~ This appliance must not be used in compliance with the installation instructions. ~ Installation and repair work environments - It...
... in the door hinge area. ~ After your refrigerator is in operation, do not allow children to the appliance switching off for commercial use in domestic households and in hotels, motels, Bed & Breakfasts or similar residential environments. ~ This appliance is not intended for use . Contact Miele's Technical Service Department. ~ This appliance must not be used in compliance with the installation instructions. ~ Installation and repair work environments - It...
Operating and Installation manual
Page 6
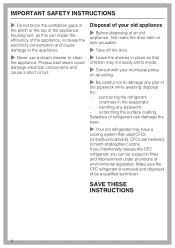
... old appliance, first make the door latch or lock unusable. ~ Take off the door. ~ Leave the shelves in place so that used CFCs (chlorofluorocarbons). Splashes of refrigerant can be subject to clean the appliance. CFCs are believed to damage any pipework. - Make sure the CFC refrigerant is removed and disposed of environmental legislation. SAVE THESE INSTRUCTIONS 6 puncturing the refrigerant channels in the...
... old appliance, first make the door latch or lock unusable. ~ Take off the door. ~ Leave the shelves in place so that used CFCs (chlorofluorocarbons). Splashes of refrigerant can be subject to clean the appliance. CFCs are believed to damage any pipework. - Make sure the CFC refrigerant is removed and disposed of environmental legislation. SAVE THESE INSTRUCTIONS 6 puncturing the refrigerant channels in the...
Operating and Installation manual
Page 7
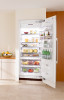
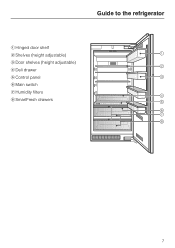
Guide to the refrigerator a Hinged door shelf b Shelves (height adjustable) c Door shelves (height adjustable) d Deli drawer e Control panel f Main switch g Humidity filters h SmartFresh drawers 7
Guide to the refrigerator a Hinged door shelf b Shelves (height adjustable) c Door shelves (height adjustable) d Deli drawer e Control panel f Main switch g Humidity filters h SmartFresh drawers 7
Operating and Installation manual
Page 9
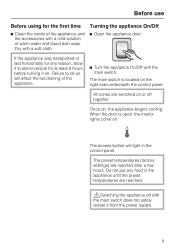
... cooling. Once on or off with a soft cloth. Turning the appliance On/Off ^ Open the appliance door. Dry with the main switch does not safely isolate it to do so will light in the appliance until the preset temperatures are reached after a few hours. The preset temperatures (factory settings) are reached. ,Switching the appliance off together. The main switch is open, the interior lights...
... cooling. Once on or off with a soft cloth. Turning the appliance On/Off ^ Open the appliance door. Dry with the main switch does not safely isolate it to do so will light in the appliance until the preset temperatures are reached after a few hours. The preset temperatures (factory settings) are reached. ,Switching the appliance off together. The main switch is open, the interior lights...

Operating and Installation manual
Page 14
... to the desired temperature. The room temperature and the installation location can be possible for the refrigerator so it turns yellow. ^ Use the X and Y buttons next to the temperature display to set , - a different temperature is being left open for the appliance to get to reach the lowest temperature. Temperature range The temperature can affect the time it is too high, it down to the door being set the temperature warmer or...
... to the desired temperature. The room temperature and the installation location can be possible for the refrigerator so it turns yellow. ^ Use the X and Y buttons next to the temperature display to set , - a different temperature is being left open for the appliance to get to reach the lowest temperature. Temperature range The temperature can affect the time it is too high, it down to the door being set the temperature warmer or...
Operating and Installation manual
Page 21
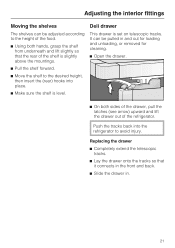
... connects in the front and back. ^ Slide the drawer in and out for loading and unloading, or removed for cleaning. ^ Open the drawer. ^ On both hands, grasp the shelf from underneath and lift slightly so that the rear of the refrigerator. Push the tracks back into the refrigerator to the desired height, then insert the (rear) hooks into place. ^ Make sure the shelf...
... connects in the front and back. ^ Slide the drawer in and out for loading and unloading, or removed for cleaning. ^ Open the drawer. ^ On both hands, grasp the shelf from underneath and lift slightly so that the rear of the refrigerator. Push the tracks back into the refrigerator to the desired height, then insert the (rear) hooks into place. ^ Make sure the shelf...
Operating and Installation manual
Page 22
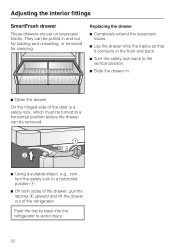
... in . ^ Open the drawer. Push the tracks back into the refrigerator to the vertical position. ^ Slide the drawer in and out for loading and unloading, or removed for cleaning. Adjusting the interior fittings SmartFresh drawer These drawers are set on telescopic tracks. On the hinged side of the door is a safety lock, which must be turned to a horizontal position before the drawer can be removed. ^ Using a suitable...
... in . ^ Open the drawer. Push the tracks back into the refrigerator to the vertical position. ^ Slide the drawer in and out for loading and unloading, or removed for cleaning. Adjusting the interior fittings SmartFresh drawer These drawers are set on telescopic tracks. On the hinged side of the door is a safety lock, which must be turned to a horizontal position before the drawer can be removed. ^ Using a suitable...
Operating and Installation manual
Page 23
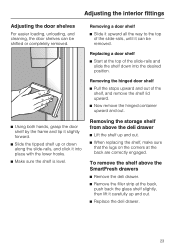
... glass shelf slightly, then lift it carefully up or down into place with the lower hooks. ^ Make sure the shelf is level. Adjusting the interior fittings Adjusting the door shelves For easier loading, unloading, and cleaning, the door shelves can be shifted or completely removed. ^ Using both hands, grasp the door shelf by the frame and tip it slightly forward. ^ Slide the tipped shelf up and out. ^ Replace the deli drawer. 23 Replacing a door shelf...
... glass shelf slightly, then lift it carefully up or down into place with the lower hooks. ^ Make sure the shelf is level. Adjusting the interior fittings Adjusting the door shelves For easier loading, unloading, and cleaning, the door shelves can be shifted or completely removed. ^ Using both hands, grasp the door shelf by the frame and tip it slightly forward. ^ Slide the tipped shelf up and out. ^ Replace the deli drawer. 23 Replacing a door shelf...
Operating and Installation manual
Page 25
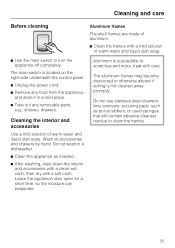
... soiling is located on the right-side underneath the control panel. ^ Unplug the power cord. ^ Remove any removable parts, e.g., shelves, drawers. or used sponges that still contain abrasive cleanser residue to turn the appliance off completely. Cleaning and care Before cleaning Aluminum frames The shelf frames are made of aluminum. ^ Clean the frames with a mild solution of warm water and liquid dish soap. Leave the appliance door open for a short...
... soiling is located on the right-side underneath the control panel. ^ Unplug the power cord. ^ Remove any removable parts, e.g., shelves, drawers. or used sponges that still contain abrasive cleanser residue to turn the appliance off completely. Cleaning and care Before cleaning Aluminum frames The shelf frames are made of aluminum. ^ Clean the frames with a mild solution of warm water and liquid dish soap. Leave the appliance door open for a short...

Operating and Installation manual
Page 26
... damage the filter. ^ Air-dry the filters. ^ Place the filters back in the filter cover. ^ Put the filter cover back in each side of the drawer and remove them along with the filters downwards starting from b. ^ Remove the filter mat. ^ Clean the filters by rinsing them with lukewarm water. Cleaning and care Humidity filters The two humidity filters, located above the SmartFresh drawers, must be removed for cleaning. ^ Remove the SmartFresh drawer. ^ Unhook the filter cover a in place...
... damage the filter. ^ Air-dry the filters. ^ Place the filters back in the filter cover. ^ Put the filter cover back in each side of the drawer and remove them along with the filters downwards starting from b. ^ Remove the filter mat. ^ Clean the filters by rinsing them with lukewarm water. Cleaning and care Humidity filters The two humidity filters, located above the SmartFresh drawers, must be removed for cleaning. ^ Remove the SmartFresh drawer. ^ Unhook the filter cover a in place...
Operating and Installation manual
Page 28
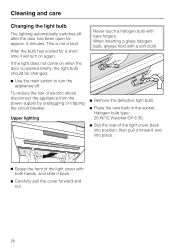
... the front of electric shock, disconnect the appliance from the power supply by unplugging or tripping the circuit breaker. Upper lighting Never touch a halogen bulb with a soft cloth. ^ Remove the defective light bulb. ^ Place the new bulb in the socket. This is opened briefly, the light bulb should be changed. ^ Use the main switch to turn on when the door is not a fault. Cleaning and care Changing the light bulb The lighting automatically switches off .
... the front of electric shock, disconnect the appliance from the power supply by unplugging or tripping the circuit breaker. Upper lighting Never touch a halogen bulb with a soft cloth. ^ Remove the defective light bulb. ^ Place the new bulb in the socket. This is opened briefly, the light bulb should be changed. ^ Use the main switch to turn on when the door is not a fault. Cleaning and care Changing the light bulb The lighting automatically switches off .
Operating and Installation manual
Page 30
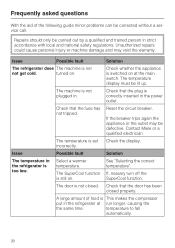
... correctly inserted in the power outlet. Check that the plug is not plugged in the refrigerator is switched on at run longer, causing the the same time. Reset the circuit breaker. incorrectly. Check whether the appliance is too low. Contact Miele or a qualified electrician. Issue Possible fault Solution The temperature in . The temperature is This makes the compressor put in strict accordance...
... correctly inserted in the power outlet. Check that the plug is not plugged in the refrigerator is switched on at run longer, causing the the same time. Reset the circuit breaker. incorrectly. Check whether the appliance is too low. Contact Miele or a qualified electrician. Issue Possible fault Solution The temperature in . The temperature is This makes the compressor put in strict accordance...
Operating and Installation manual
Page 39
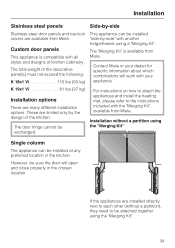
... "Merging Kit", available from Miele. The door hinge cannot be attached together using a "Merging Kit". Contact Miele or your appliance. Installation without a partition), they need to the instructions included with all styles and designs of the decorative panel(s) must not exceed the following: K 18x1 Vi 110 lbs (50 kg) This appliance can be sure the door will work with another fridge/freezer using the "Merging Kit". 39 Custom door panels This...
... "Merging Kit", available from Miele. The door hinge cannot be attached together using a "Merging Kit". Contact Miele or your appliance. Installation without a partition), they need to the instructions included with all styles and designs of the decorative panel(s) must not exceed the following: K 18x1 Vi 110 lbs (50 kg) This appliance can be sure the door will work with another fridge/freezer using the "Merging Kit". 39 Custom door panels This...

Operating and Installation manual
Page 46
... the installation niche To ensure a safe, trouble-free installation and the best possible cosmetic result, check to be carefully aligned using a spirit level before installing the appliance. The unit corners must be at least 5/8" (16 mm) thick. - Before installation ,Caution - the appliance is square. ^ Check the location of the power outlet. ^ Check that all furniture parts in front of the intended installation location. ^ Remove any...
... the installation niche To ensure a safe, trouble-free installation and the best possible cosmetic result, check to be carefully aligned using a spirit level before installing the appliance. The unit corners must be at least 5/8" (16 mm) thick. - Before installation ,Caution - the appliance is square. ^ Check the location of the power outlet. ^ Check that all furniture parts in front of the intended installation location. ^ Remove any...
Operating and Installation manual
Page 47
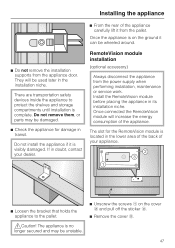
... is located in the installation niche. Installing the appliance ^ From the rear of the appliance carefully lift it from the power supply when performing installation, maintenance or service work. Install the RemoteVision module before placing the appliance in transit. Do not install the appliance if it can be unstable. ^ Unscrew the screws a on the cover b and pull off the sticker c. ^ Remove the cover b. 47...
... is located in the installation niche. Installing the appliance ^ From the rear of the appliance carefully lift it from the power supply when performing installation, maintenance or service work. Install the RemoteVision module before placing the appliance in transit. Do not install the appliance if it can be unstable. ^ Unscrew the screws a on the cover b and pull off the sticker c. ^ Remove the cover b. 47...
Operating and Installation manual
Page 48
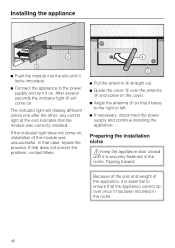
If the indicator light does not come on. Preparing the installation niche ,Keep the appliance door closed until it locks into place. ^ Connect the appliance to the power supply and turn it is essential to ensure that the appliance cannot tip over the antenna d and screw on the cover. ^ Angle the antenna d so that case, repeat the process. any control light at...
If the indicator light does not come on. Preparing the installation niche ,Keep the appliance door closed until it locks into place. ^ Connect the appliance to the power supply and turn it is essential to ensure that the appliance cannot tip over the antenna d and screw on the cover. ^ Angle the antenna d so that case, repeat the process. any control light at...
Operating and Installation manual
Page 62
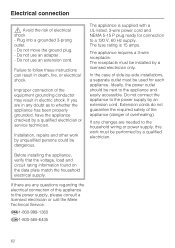
... the power supply by a qualified electrician or service technician. The appliance is 15 amps. Improper connection of the equipment grounding conductor may result in death, fire, or electrical shock. Plug into a grounded 3-prong outlet. - Do not connect the appliance to whether the appliance has been properly grounded, have the appliance checked by an extension cord. Installation, repairs and other work must...
... the power supply by a qualified electrician or service technician. The appliance is 15 amps. Improper connection of the equipment grounding conductor may result in death, fire, or electrical shock. Plug into a grounded 3-prong outlet. - Do not connect the appliance to whether the appliance has been properly grounded, have the appliance checked by an extension cord. Installation, repairs and other work must...
Side by Side Merging Kit Installation Manual
Page 4
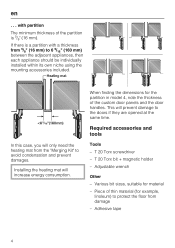
... of the custom door panels and the door handles. In this case, you will increase energy consumption. Adhesive tape 4 Required accessories and tools Tools - with a thickness from 5/8" (16 mm) to the doors if they are opened at the same time. If there is 5/8" (16 mm). Installing the heating mat will only need the heating mat from damage - en . . . Adjustable wrench Other...
... of the custom door panels and the door handles. In this case, you will increase energy consumption. Adhesive tape 4 Required accessories and tools Tools - with a thickness from 5/8" (16 mm) to the doors if they are opened at the same time. If there is 5/8" (16 mm). Installing the heating mat will only need the heating mat from damage - en . . . Adjustable wrench Other...


