
Product Manual
Page 2
... INSTRUCTIONS 5 Guide to the oven 13 Oven controls ...14 Mode selector ...15 Display ...15 Symbols in the display 15 Rotary selector...16 Sensor buttons...17 Features ...19 Model numbers ...19 Data plate ...19 Items included...19 Standard and optional accessories 19 Shelf runners...20 Universal tray and Wire oven rack 20 FlexiClips with wire rack 21 Oven controls ...24 Safety features ...24 System lock for the oven 24 Cooling fan...24 Vented oven door 24 Safety Door Lock...
... INSTRUCTIONS 5 Guide to the oven 13 Oven controls ...14 Mode selector ...15 Display ...15 Symbols in the display 15 Rotary selector...16 Sensor buttons...17 Features ...19 Model numbers ...19 Data plate ...19 Items included...19 Standard and optional accessories 19 Shelf runners...20 Universal tray and Wire oven rack 20 FlexiClips with wire rack 21 Oven controls ...24 Safety features ...24 System lock for the oven 24 Cooling fan...24 Vented oven door 24 Safety Door Lock...

Product Manual
Page 3
... the cooking duration 44 Changing the cooking duration 45 Deleting a cooking duration 45 Deleting a finish time 46 Bake ...47 Roast ...49 Slow Roasting ...50 Broil ...52 Defrost ...55 Canning ...56 Dehydrate ...57 Frozen food...58 Gentle Bake ...59 Cleaning and care 60 Unsuitable cleaning agents 60 Tips ...61 Normal soiling ...61 Stubborn soiling...62 Self Cleaning the oven interior 63 Preparing for the Self Clean program 63 Starting the Self Clean...
... the cooking duration 44 Changing the cooking duration 45 Deleting a cooking duration 45 Deleting a finish time 46 Bake ...47 Roast ...49 Slow Roasting ...50 Broil ...52 Defrost ...55 Canning ...56 Dehydrate ...57 Frozen food...58 Gentle Bake ...59 Cleaning and care 60 Unsuitable cleaning agents 60 Tips ...61 Normal soiling ...61 Stubborn soiling...62 Self Cleaning the oven interior 63 Preparing for the Self Clean program 63 Starting the Self Clean...
Product Manual
Page 6
... installation instructions. Contact Miele's Technical Service Department for examination, repair or adjustment. Children climbing on or near the oven. Danger of burns. Do not let children touch the oven while the Self Clean program is more sensitive to use . Caution: Do not store items of burns. The oven gets hot at the oven door glass, the vapor vent, the handle and the operating controls. Children's skin is running. Repairs...
... installation instructions. Contact Miele's Technical Service Department for examination, repair or adjustment. Children climbing on or near the oven. Danger of burns. Do not let children touch the oven while the Self Clean program is more sensitive to use . Caution: Do not store items of burns. The oven gets hot at the oven door glass, the vapor vent, the handle and the operating controls. Children's skin is running. Repairs...
Product Manual
Page 8
... build up behind a cabinet door, do not close the door until they are not burned on the heating elements or interior surfaces of the oven such as the door glass, vents, and the control panel can result in the oven, adjusting the racks, etc. Ensure that you are not glowing. Use caution to the oven, cabinetry and flooring. External parts of the oven. Interior surfaces of cool air. Doing so can...
... build up behind a cabinet door, do not close the door until they are not burned on the heating elements or interior surfaces of the oven such as the door glass, vents, and the control panel can result in the oven, adjusting the racks, etc. Ensure that you are not glowing. Use caution to the oven, cabinetry and flooring. External parts of the oven. Interior surfaces of cool air. Doing so can...
Product Manual
Page 11
... in these Operating and Installation Instructions. Scratches on the wire rack lined with a large surface area. Do not use a steam cleaner to clean this oven. The tray or pan could penetrate electrical components and cause a short circuit. Only clean parts listed in the oven door. When baking frozen pizzas or pies, place them on the door glass can be used for frozen foods with parchment paper. Cleaning and care Do...
... in these Operating and Installation Instructions. Scratches on the wire rack lined with a large surface area. Do not use a steam cleaner to clean this oven. The tray or pan could penetrate electrical components and cause a short circuit. Only clean parts listed in the oven door. When baking frozen pizzas or pies, place them on the door glass can be used for frozen foods with parchment paper. Cleaning and care Do...
Product Manual
Page 24
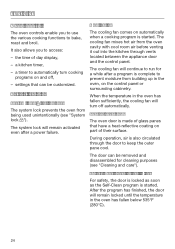
... turn cooking programs on automatically when a cooking program is started . settings that have a heat-reflective coating on the control panel or surrounding cabinetry. Vented oven door The oven door is complete to keep the outer pane cool. a kitchen timer, - Cooling fan The cooling fan comes on and off automatically. Safety features System lock for Self Clean For safety, the door is locked as soon as the Self-Clean program is also circulated through vents located...
... turn cooking programs on automatically when a cooking program is started . settings that have a heat-reflective coating on the control panel or surrounding cabinetry. Vented oven door The oven door is complete to keep the outer pane cool. a kitchen timer, - Cooling fan The cooling fan comes on and off automatically. Safety features System lock for Self Clean For safety, the door is locked as soon as the Self-Clean program is also circulated through vents located...
Product Manual
Page 32
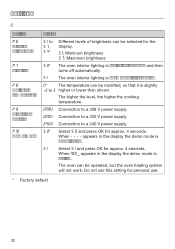
... display the demo mode is active. Do not use this setting for personal use. * Factory default 32 Settings Setting Display brightness Lighting Calibrate temperature Electrical Version Demo Mode Status to Different levels of brightness can be selected for the display. : Minimum brightness : Maximum brightness * The oven interior lighting...
... display the demo mode is active. Do not use this setting for personal use. * Factory default 32 Settings Setting Display brightness Lighting Calibrate temperature Electrical Version Demo Mode Status to Different levels of brightness can be selected for the display. : Minimum brightness : Maximum brightness * The oven interior lighting...

Product Manual
Page 39
... factory default setting the oven interior lighting turns off automatically if a button is best to select the lower temperature and check the food after 15 seconds. The oven turns off automatically after the shortest cooking time given. - Remove any time by touching . - It can be turned on the selected settings, e.g. The factory default setting for cooking. - If a temperature range is given, it is not pressed to open the door when cooking. -
... factory default setting the oven interior lighting turns off automatically if a button is best to select the lower temperature and check the food after 15 seconds. The oven turns off automatically after the shortest cooking time given. - Remove any time by touching . - It can be turned on the selected settings, e.g. The factory default setting for cooking. - If a temperature range is given, it is not pressed to open the door when cooking. -
Product Manual
Page 43
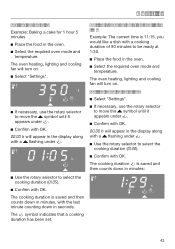
... counting down in the display along with a flashing under . Use the rotary selector to select the cooking duration Confirm with OK. The oven heating, lighting and cooling fan will turn on . The cooking duration is saved and then counts down in the oven. Select the required oven mode and temperature. Setting a cooking duration and finish time Example: The current time is 11:15...
... counting down in the display along with a flashing under . Use the rotary selector to select the cooking duration Confirm with OK. The oven heating, lighting and cooling fan will turn on . The cooking duration is saved and then counts down in the oven. Select the required oven mode and temperature. Setting a cooking duration and finish time Example: The current time is 11:15...
Product Manual
Page 44
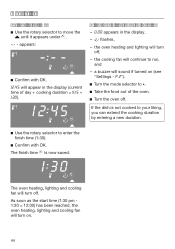
... cooling fan will turn off . As soon as the start time (1:30 pm 1:30 = 12:00) has been reached, the oven heating, lighting and cooling fan will turn on (see "Settings Turn the mode selector to . Take the food out of day + cooking duration Use the rotary selector to enter the finish time (1:30). Confirm with OK will appear in the display...
... cooling fan will turn off . As soon as the start time (1:30 pm 1:30 = 12:00) has been reached, the oven heating, lighting and cooling fan will turn on (see "Settings Turn the mode selector to . Take the food out of day + cooking duration Use the rotary selector to enter the finish time (1:30). Confirm with OK will appear in the display...

Product Manual
Page 47
... more likely to stick, - Convection Bake , Intensive : Baking tray, Roasting pan, any spills. This will allow for good health. Bake Eating food which has been cooked correctly is only needed with: - frozen food cooked on the wire rack. Oven modes Depending on the oven mode chosen and how the food is prepared. - Avoid bright, shiny metal tins as heat-resistant glass, ceramic and coated dishes can...
... more likely to stick, - Convection Bake , Intensive : Baking tray, Roasting pan, any spills. This will allow for good health. Bake Eating food which has been cooked correctly is only needed with: - frozen food cooked on the wire rack. Oven modes Depending on the oven mode chosen and how the food is prepared. - Avoid bright, shiny metal tins as heat-resistant glass, ceramic and coated dishes can...

Product Manual
Page 49
... used : Wire oven rack, grilling and roasting insert (if available) on food safety. Oven modes Depending on the outside will become crisp. - This helps retain the juices when the meat is sliced. - Roast Always follow USDA guidelines on top of the oven, cover with Convection Bake , select a temperature 25°F (20°C) lower than when using Surround . Temperature As a general rule, select the lower temperature...
... used : Wire oven rack, grilling and roasting insert (if available) on food safety. Oven modes Depending on the outside will become crisp. - This helps retain the juices when the meat is sliced. - Roast Always follow USDA guidelines on top of the oven, cover with Convection Bake , select a temperature 25°F (20°C) lower than when using Surround . Temperature As a general rule, select the lower temperature...

Product Manual
Page 50
..., remove or turn the food, or when adjusting the oven shelves, etc. Place the seared meat on shelf level 3. Select Surround and a temperature of the cooking duration. Then place the meat in the juices. Operation Place the roasting pan on all sides on the size and weight of the meat, as well as the desired degree of burns! Do not use Rapid PreHeat...
..., remove or turn the food, or when adjusting the oven shelves, etc. Place the seared meat on shelf level 3. Select Surround and a temperature of the cooking duration. Then place the meat in the juices. Operation Place the roasting pan on all sides on the size and weight of the meat, as well as the desired degree of burns! Do not use Rapid PreHeat...

Product Manual
Page 65
The oven heating will sound if the buzzer tone is activated (see "Settings"). Turn the mode selector to select the desired finish time. Confirm with OK. short beeps will turn on how dirty the oven was. 65 Cleaning and care Delaying the start of the Self Clean program Start the program as described and then set the desired finish time within the first five minutes of starting the...
The oven heating will sound if the buzzer tone is activated (see "Settings"). Turn the mode selector to select the desired finish time. Confirm with OK. short beeps will turn on how dirty the oven was. 65 Cleaning and care Delaying the start of the Self Clean program Start the program as described and then set the desired finish time within the first five minutes of starting the...

Product Manual
Page 67
... at both sides, lift it is connected with brackets on each door hinge. Do not use the handle to take the door off the brackets, the handle could break. Close the door until it rests partially open. Before the door can be removed the hinges must first be unlocked. Open the door fully. Release the locking clamps by turning them as far as they will spring...
... at both sides, lift it is connected with brackets on each door hinge. Do not use the handle to take the door off the brackets, the handle could break. Close the door until it rests partially open. Before the door can be removed the hinges must first be unlocked. Open the door fully. Release the locking clamps by turning them as far as they will spring...

Product Manual
Page 71
... Miele Technical Service. A noise is current cooking process to stop. Frequently asked questions Problem Possible cause and solution The oven does not heat up . Deactivate Demo mode (see "Before using for the first time"). Demo mode has been activated appears in the display. Start the cooking process again. The cooling fan has turned on . 71 The oven can be sounding. will turn the oven off automatically. The oven has been operating...
... Miele Technical Service. A noise is current cooking process to stop. Frequently asked questions Problem Possible cause and solution The oven does not heat up . Deactivate Demo mode (see "Before using for the first time"). Demo mode has been activated appears in the display. Start the cooking process again. The cooling fan has turned on . 71 The oven can be sounding. will turn the oven off automatically. The oven has been operating...

Product Manual
Page 73
... Problem The oven lighting does not turn on the oven floor and open door to avoid damage. Disconnect the appliance from the power supply. Loosen the bulb cover with bare fingers. Possible cause and solution The halogen bulb needs to be damaged if it as ash. When removing the cover hold it firmly so that it with a longer duration. 73 program. Using...
... Problem The oven lighting does not turn on the oven floor and open door to avoid damage. Disconnect the appliance from the power supply. Loosen the bulb cover with bare fingers. Possible cause and solution The halogen bulb needs to be damaged if it as ash. When removing the cover hold it firmly so that it with a longer duration. 73 program. Using...
Product Manual
Page 76
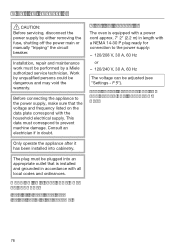
... adjusted (see "Settings SAVE THESE INSTRUCTIONS FOR THE ELECTRICAL INSPECTOR'S USE. Only operate the appliance after it has been installed into an appropriate outlet that the voltage and frequency listed on the data plate correspond with the consumer. 76 This data must be performed by a Miele authorized service technician. Work by either removing the fuse, shutting off the power main or manually "tripping" the circuit breaker. Electrical connection CAUTION: Before servicing...
... adjusted (see "Settings SAVE THESE INSTRUCTIONS FOR THE ELECTRICAL INSPECTOR'S USE. Only operate the appliance after it has been installed into an appropriate outlet that the voltage and frequency listed on the data plate correspond with the consumer. 76 This data must be performed by a Miele authorized service technician. Work by either removing the fuse, shutting off the power main or manually "tripping" the circuit breaker. Electrical connection CAUTION: Before servicing...

Product Manual
Page 77
... (4" x 28" / 100 mm x 720 mm) in the bottom of the cabinet for power cord and ventilation Power cord with plug * Oven with glass front ** Oven with your installation requirements with metal front Front design may vary depending on model. Installation diagrams Appliance and cut-out dimensions Miele ovens can be installed flush or proud. For the more current specifications please visit the Miele website. 77 Discuss your architect, designer and...
... (4" x 28" / 100 mm x 720 mm) in the bottom of the cabinet for power cord and ventilation Power cord with plug * Oven with glass front ** Oven with your installation requirements with metal front Front design may vary depending on model. Installation diagrams Appliance and cut-out dimensions Miele ovens can be installed flush or proud. For the more current specifications please visit the Miele website. 77 Discuss your architect, designer and...
Product Manual
Page 78
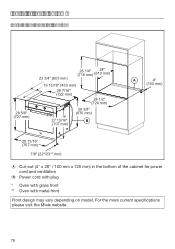
Installation diagrams Installation into a tall cabinet 28 5/8" (727 mm) 23 3/4" (603 mm) 28 1/4" (718 mm) 24" (610 mm) 16 15/16" (430 mm) 28 7/16" (722 mm) 28 1/2" (724 mm) 26 3/8" (670 mm) 27 13/16" B (707 mm) A 4" (100 mm) 29 13/16" (757 mm) 7/8" (22*/23** mm) Cut-out (4" x 28" / 100 mm x 720 mm) in the bottom of the cabinet for power cord and ventilation Power cord with plug * Oven with glass front ** Oven with metal front Front design may vary depending on model. For the more current specifications please visit the Miele website. 78
Installation diagrams Installation into a tall cabinet 28 5/8" (727 mm) 23 3/4" (603 mm) 28 1/4" (718 mm) 24" (610 mm) 16 15/16" (430 mm) 28 7/16" (722 mm) 28 1/2" (724 mm) 26 3/8" (670 mm) 27 13/16" B (707 mm) A 4" (100 mm) 29 13/16" (757 mm) 7/8" (22*/23** mm) Cut-out (4" x 28" / 100 mm x 720 mm) in the bottom of the cabinet for power cord and ventilation Power cord with plug * Oven with glass front ** Oven with metal front Front design may vary depending on model. For the more current specifications please visit the Miele website. 78


