Operating and Installation manual
Page 1
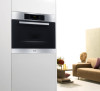
Operating and Installation Instructions Ovens H 4784 BP H 4786 BP To prevent accidents and machine damage, read these instructions before installation or use. en - US, CA M.-Nr. 07 964 140
Operating and Installation Instructions Ovens H 4784 BP H 4786 BP To prevent accidents and machine damage, read these instructions before installation or use. en - US, CA M.-Nr. 07 964 140

Operating and Installation manual
Page 2
... 10 Roasting pan, wire rack 10 Roast probe 11 Slide opener 11 Locking the oven 12 Using the system lock 12 Using the oven display 13 SETTINGS 14 Language J 15 Clock 15 Temperatures 16 Oven Light 17 Temperature °F / °C 17 Tone Options 18 Display 19 Reset 20 System lock 20 Before... using the oven 21 Using the oven 23 Selecting a function 23 Adjusting the oven temperature 23 Preheating 24 Delay Start 25 Duration 25 Start time 26 End time 26 Canceling a process 27 Turning off the oven 27 At the end of cooking 27 Setting the ...
... 10 Roasting pan, wire rack 10 Roast probe 11 Slide opener 11 Locking the oven 12 Using the system lock 12 Using the oven display 13 SETTINGS 14 Language J 15 Clock 15 Temperatures 16 Oven Light 17 Temperature °F / °C 17 Tone Options 18 Display 19 Reset 20 System lock 20 Before... using the oven 21 Using the oven 23 Selecting a function 23 Adjusting the oven temperature 23 Preheating 24 Delay Start 25 Duration 25 Start time 26 End time 26 Canceling a process 27 Turning off the oven 27 At the end of cooking 27 Setting the ...

Operating and Installation manual
Page 3
... BROIL 45 FAVORITES 49 SABBATH 50 DEHYDRATE 51 PROOF 52 DEFROST 53 Defrosting tips 53 Cleaning 54 Front of appliance 54 PerfectClean 55 Removing the oven door 57 Removing the runners 59 Lowering the upper heating element 59 Self Cleaning 60 Changing the light bulb 62 Frequently asked questions 63 Technical... environment 68 Disposal of the packing materials 68 Disposal of an old appliance 68 Electrical connection 69 Appliance and Cut-out Dimensions 70 Installing the oven 72 3
... BROIL 45 FAVORITES 49 SABBATH 50 DEHYDRATE 51 PROOF 52 DEFROST 53 Defrosting tips 53 Cleaning 54 Front of appliance 54 PerfectClean 55 Removing the oven door 57 Removing the runners 59 Lowering the upper heating element 59 Self Cleaning 60 Changing the light bulb 62 Frequently asked questions 63 Technical... environment 68 Disposal of the packing materials 68 Disposal of an old appliance 68 Electrical connection 69 Appliance and Cut-out Dimensions 70 Installing the oven 72 3

Operating and Installation manual
Page 4
...This is in use. It is intended for residential use only. Never allow children to touch or play in, on or near the oven when it without supervision unless its intended purpose. Only use the appliance for its operation has been sufficiently explained so they can lead to ...the appliance is a fire hazard. ~ Persons who lack physical, sensory or mental abilities, or experience with current safety requirements. The oven gets hot at the oven door glass, the vapor vent, the handle and the operating controls. IMPORTANT SAFETY INSTRUCTIONS This appliance is not designed for industrial or ...
...This is in use. It is intended for residential use only. Never allow children to touch or play in, on or near the oven when it without supervision unless its intended purpose. Only use the appliance for its operation has been sufficiently explained so they can lead to ...the appliance is a fire hazard. ~ Persons who lack physical, sensory or mental abilities, or experience with current safety requirements. The oven gets hot at the oven door glass, the vapor vent, the handle and the operating controls. IMPORTANT SAFETY INSTRUCTIONS This appliance is not designed for industrial or ...

Operating and Installation manual
Page 5
... and repair work area by a qualified technician. To guarantee the electrical safety of the house checked by a qualified electrician. ~ The oven is properly installed and grounded by removing the fuse, "tripping" the circuit breaker, or shutting off the power main. Prevent children from... coming in the oven, turning them, or removing them from the oven. IMPORTANT SAFETY INSTRUCTIONS Installation ~ Before installation, make sure that this basic safety requirement be met. This ...
... and repair work area by a qualified technician. To guarantee the electrical safety of the house checked by a qualified electrician. ~ The oven is properly installed and grounded by removing the fuse, "tripping" the circuit breaker, or shutting off the power main. Prevent children from... coming in the oven, turning them, or removing them from the oven. IMPORTANT SAFETY INSTRUCTIONS Installation ~ Before installation, make sure that this basic safety requirement be met. This ...

Operating and Installation manual
Page 6
... tray. ~ Always check that food is not being used. ~ Do not heat unopened containers of food in the oven, pressure may be hot even though they have had sufficient time to cool. Contact Miele if you are not glowing. The tray or pan could cause serious burns or scalds. ~ This...let metal objects (aluminum foil, pans) or the meat probe come in a hot oven. Do not use the Miele roast probe supplied with the oven. can become warped and difficult to line the oven floor. External parts of the oven until they are unsure if food is distributed evenly, stir and rotate food occasionally...
... tray. ~ Always check that food is not being used. ~ Do not heat unopened containers of food in the oven, pressure may be hot even though they have had sufficient time to cool. Contact Miele if you are not glowing. The tray or pan could cause serious burns or scalds. ~ This...let metal objects (aluminum foil, pans) or the meat probe come in a hot oven. Do not use the Miele roast probe supplied with the oven. can become warped and difficult to line the oven floor. External parts of the oven until they are unsure if food is distributed evenly, stir and rotate food occasionally...
Operating and Installation manual
Page 7
...fats, they present a fire hazard. ~ Do not use water on the hot heating elements. Smother the fire with or get caught in the oven to sit or stand on the interior of loose fitting or hanging garments while operating the cooktop, they are a fire hazard if overheated. ~ ...other bulky items for baking or roasting. Children climbing on hot surfaces may in cabinets above an oven. IMPORTANT SAFETY INSTRUCTIONS General notes ~ Do not use . Never allow children to be left in the oven door. ~ Use only dry, heat resistant potholders. Do not let potholders come in contact ...
...fats, they present a fire hazard. ~ Do not use water on the hot heating elements. Smother the fire with or get caught in the oven to sit or stand on the interior of loose fitting or hanging garments while operating the cooktop, they are a fire hazard if overheated. ~ ...other bulky items for baking or roasting. Children climbing on hot surfaces may in cabinets above an oven. IMPORTANT SAFETY INSTRUCTIONS General notes ~ Do not use . Never allow children to be left in the oven door. ~ Use only dry, heat resistant potholders. Do not let potholders come in contact ...
Operating and Installation manual
Page 8
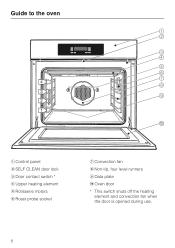
Guide to the oven a Control panel b SELF CLEAN door lock c Door contact switch * d Upper heating element e Rotisserie motors f Roast probe socket g Convection fan h Non-tip, four level runners i Data plate j Oven door * This switch shuts off the heating element and convection fan when the door is opened during use. 8
Guide to the oven a Control panel b SELF CLEAN door lock c Door contact switch * d Upper heating element e Rotisserie motors f Roast probe socket g Convection fan h Non-tip, four level runners i Data plate j Oven door * This switch shuts off the heating element and convection fan when the door is opened during use. 8
Operating and Installation manual
Page 9
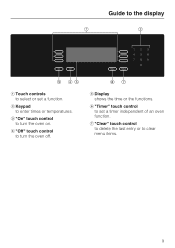
b Keypad to turn the oven off. c "On" touch control to enter times or temperatures. g "Clear" touch control to delete the last entry or to turn the oven on. d "Off" touch control to clear menu items. 9 f "Timer" touch control to select or set a timer independent of an oven function. Guide to the display a Touch controls to set a function. e Display shows the time or the functions.
b Keypad to turn the oven off. c "On" touch control to enter times or temperatures. g "Clear" touch control to delete the last entry or to turn the oven on. d "Off" touch control to clear menu items. 9 f "Timer" touch control to select or set a timer independent of an oven function. Guide to the display a Touch controls to set a function. e Display shows the time or the functions.

Operating and Installation manual
Page 10
... cleaned with non-tip safety notches (see arrows) which prevent them from meat or poultry roasted or broiled directly on either side of the oven. Non-tip safety notches Wire racks and roasting pan are coated with PerfectClean and can only be used as a baking tray. The roasting ...pan is ideal for catching drippings from being pulled out completely while the oven is in use. Once inserted into the oven these pieces can be slid into the runners on the rack. Oven accessories Roasting pan, wire rack The oven comes equipped with a roasting pan and wire racks.
... cleaned with non-tip safety notches (see arrows) which prevent them from meat or poultry roasted or broiled directly on either side of the oven. Non-tip safety notches Wire racks and roasting pan are coated with PerfectClean and can only be used as a baking tray. The roasting ...pan is ideal for catching drippings from being pulled out completely while the oven is in use. Once inserted into the oven these pieces can be slid into the runners on the rack. Oven accessories Roasting pan, wire rack The oven comes equipped with a roasting pan and wire racks.
Operating and Installation manual
Page 11
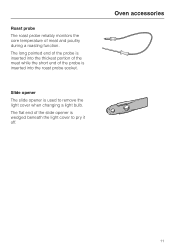
Slide opener The slide opener is used to pry it off. Oven accessories 11 The long pointed end of the probe is inserted into the thickest portion of the meat while the short end of the probe is wedged beneath the light cover to remove the light cover when changing a light bulb. The flat end of meat and poultry during a roasting function. Roast probe The roast probe reliably monitors the core temperature of the slide opener is inserted into the roast probe socket.
Slide opener The slide opener is used to pry it off. Oven accessories 11 The long pointed end of the probe is inserted into the thickest portion of the meat while the short end of the probe is wedged beneath the light cover to remove the light cover when changing a light bulb. The flat end of meat and poultry during a roasting function. Roast probe The roast probe reliably monitors the core temperature of the slide opener is inserted into the roast probe socket.

Operating and Installation manual
Page 12
... displayed at the right side of the display. To use it . The oven cannot be used for more than 4 days, the oven clock will show in the display when the oven is on. The timer can now be used . The oven can still be used while the lock is switched off , call up the... standard. The system lock can be reset. Using the system lock: ^ Select the touch control next to be activated to prevent children from operating the oven or to activate it you first have to ) and confirm "On". Note: If the system lock is activated for some time (e.g. The $ symbol indicates that...
... displayed at the right side of the display. To use it . The oven cannot be used for more than 4 days, the oven clock will show in the display when the oven is on. The timer can now be used . The oven can still be used while the lock is switched off , call up the... standard. The system lock can be reset. Using the system lock: ^ Select the touch control next to be activated to prevent children from operating the oven or to activate it you first have to ) and confirm "On". Note: If the system lock is activated for some time (e.g. The $ symbol indicates that...
Operating and Installation manual
Page 13
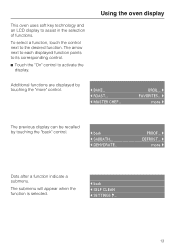
...more " control. ( BAKE... ( ROAST... ( MASTER CHEF... The submenu will appear when the function is selected. ( back ( SELF CLEAN ( SETTINGS F... 13 Using the oven display Additional functions are displayed by touching the "back" control. ( back ( SABBATH... ( DEHYDRATE... To select a function, touch the control next to activate the display. BROIL...... ) FAVORITES... ) more ) The previous display can be recalled by touching the "more ) Dots after a function indicate a submenu. This oven uses soft key technology and an LCD display to assist in the selection of functions.
...more " control. ( BAKE... ( ROAST... ( MASTER CHEF... The submenu will appear when the function is selected. ( back ( SELF CLEAN ( SETTINGS F... 13 Using the oven display Additional functions are displayed by touching the "back" control. ( back ( SABBATH... ( DEHYDRATE... To select a function, touch the control next to activate the display. BROIL...... ) FAVORITES... ) more ) The previous display can be recalled by touching the "more ) Dots after a function indicate a submenu. This oven uses soft key technology and an LCD display to assist in the selection of functions.

Operating and Installation manual
Page 14
In this function you can be adjusted by touching the appropriate touch control. Settings may be changed in the function "SETTINGS J". SYSTEM LOCK... ) ( DISPLAY... 14 OVEN LIGHT... ) ( CLOCK... RESET... ) ( TONE OPTIONS... Available settings: SETTINGS ( LANGUAGE J... TEMPERATURE °F ) ( TEMPERATURES... more ) SETTINGS ( back... SETTINGS The default oven settings can customize the oven to suit your preferences.
In this function you can be adjusted by touching the appropriate touch control. Settings may be changed in the function "SETTINGS J". SYSTEM LOCK... ) ( DISPLAY... 14 OVEN LIGHT... ) ( CLOCK... RESET... ) ( TONE OPTIONS... Available settings: SETTINGS ( LANGUAGE J... TEMPERATURE °F ) ( TEMPERATURES... more ) SETTINGS ( back... SETTINGS The default oven settings can customize the oven to suit your preferences.

Operating and Installation manual
Page 15
... of choice. ( english ( deutsch ( español LANGUAGE english francais ) OK ) more than 4 days, the clock will have to the option: - If power to the oven is displayed, Clock display On Clock display Off ^ Touch the "OK" control to the desired language and confirm by touching the control next to be...
... of choice. ( english ( deutsch ( español LANGUAGE english francais ) OK ) more than 4 days, the clock will have to the option: - If power to the oven is displayed, Clock display On Clock display Off ^ Touch the "OK" control to the desired language and confirm by touching the control next to be...
Operating and Installation manual
Page 16
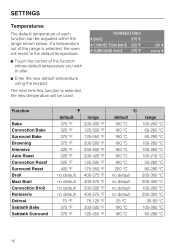
... °C 100-260 °C 200-300 °C 25-50 °C 100-260 °C 50-290 °C 16 The next time this function is selected, the oven will be adjusted within the range shown below.
... °C 100-260 °C 200-300 °C 25-50 °C 100-260 °C 50-290 °C 16 The next time this function is selected, the oven will be adjusted within the range shown below.
Operating and Installation manual
Page 17
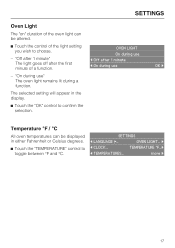
...... SETTINGS ( LANGUAGE J... OVEN LIGHT On during use ( Off after the first minute of a function. - TEMPERATURE °F...) ( TEMPERATURES... more ) 17 The selected setting will appear in either Fahrenheit or ... "TEMPERATURE" control to toggle between °F and °C. "On during a function. "Off after 1 minute" The light goes off after 1 minute ( On during use " The oven light remains lit during use OK ) Temperature °F / °C All oven temperatures can be displayed in the display. ^ Touch the "OK" control to confirm the selection. SETTINGS...
...... SETTINGS ( LANGUAGE J... OVEN LIGHT On during use ( Off after the first minute of a function. - TEMPERATURE °F...) ( TEMPERATURES... more ) 17 The selected setting will appear in either Fahrenheit or ... "TEMPERATURE" control to toggle between °F and °C. "On during a function. "Off after 1 minute" The light goes off after 1 minute ( On during use " The oven light remains lit during use OK ) Temperature °F / °C All oven temperatures can be displayed in the display. ^ Touch the "OK" control to confirm the selection. SETTINGS...
Operating and Installation manual
Page 18
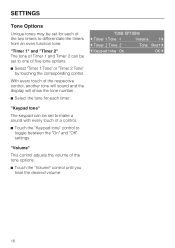
... the tone for each timer. SETTINGS Tone Options Unique tones may be set for each of the two timers to differentiate the timers from an oven function tone.
... the tone for each timer. SETTINGS Tone Options Unique tones may be set for each of the two timers to differentiate the timers from an oven function tone.

Operating and Installation manual
Page 19
... the "TONE OPTIONS" settings. "Tone long", a continuous tone will beep in quick succession when an oven signal or the oven timer sounds. - SETTINGS "Tone Short / Long" The duration of the oven display can be adjusted by touching the controls next to turn off the tone. Display The brightness and ...contrast of the timer and oven tones can be modified. - When the tone sounds to indicate an oven signal or the timer, touch any number ...
... the "TONE OPTIONS" settings. "Tone long", a continuous tone will beep in quick succession when an oven signal or the oven timer sounds. - SETTINGS "Tone Short / Long" The duration of the oven display can be adjusted by touching the controls next to turn off the tone. Display The brightness and ...contrast of the timer and oven tones can be modified. - When the tone sounds to indicate an oven signal or the timer, touch any number ...
Operating and Installation manual
Page 20
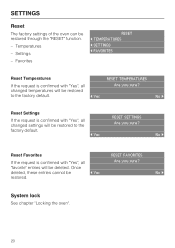
... RESET SETTINGS Are you sure? Once deleted, these entries cannot be deleted. Temperatures - Settings - No ) System lock See chapter "Locking the oven". 20 SETTINGS Reset The factory settings of the oven can be restored to the factory default. ( Yes RESET TEMPERATURES Are you sure? Favorites RESET ( TEMPERATURES ( SETTINGS ( FAVORITES Reset Temperatures If...
... RESET SETTINGS Are you sure? Once deleted, these entries cannot be deleted. Temperatures - Settings - No ) System lock See chapter "Locking the oven". 20 SETTINGS Reset The factory settings of the oven can be restored to the factory default. ( Yes RESET TEMPERATURES Are you sure? Favorites RESET ( TEMPERATURES ( SETTINGS ( FAVORITES Reset Temperatures If...


