Operating and Installation manual
Page 1
en - US, CA M.-Nr. 07 979 400 Operating and Installation Instructions Convection microwave oven H 4084 BM H 4086 BM To prevent accidents and machine damage read these instructions before installation or use.
en - US, CA M.-Nr. 07 979 400 Operating and Installation Instructions Convection microwave oven H 4084 BM H 4086 BM To prevent accidents and machine damage read these instructions before installation or use.
Operating and Installation manual
Page 3
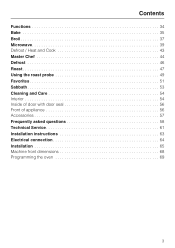
Contents Functions 34 Bake 35 Broil 37 Microwave 39 Defrost / Heat and Cook 43 Master Chef 44 Defrost 46 Roast 47 Using the roast probe 49 Favorites 51 Sabbath 53 Cleaning and Care 54 Interior 54 Inside of door with door seal 56 Front of appliance 56 Accessories 57 Frequently asked questions 58 Technical Service 61 Installation instructions 63 Electrical connection 64 Installation 65 Machine front dimensions 68 Programming the oven 69 3
Contents Functions 34 Bake 35 Broil 37 Microwave 39 Defrost / Heat and Cook 43 Master Chef 44 Defrost 46 Roast 47 Using the roast probe 49 Favorites 51 Sabbath 53 Cleaning and Care 54 Interior 54 Inside of door with door seal 56 Front of appliance 56 Accessories 57 Frequently asked questions 58 Technical Service 61 Installation instructions 63 Electrical connection 64 Installation 65 Machine front dimensions 68 Programming the oven 69 3
Operating and Installation manual
Page 4
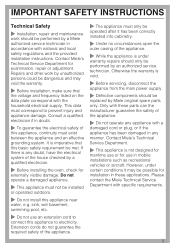
... not use . IMPORTANT SAFETY INSTRUCTIONS When using the oven. Keep these operating instructions in use the appliance to excessive microwave energy: Read all instructions before installing or using electrical appliances always observe basic safety precautions, including the following: WARNING - Read and follow the specific, "PRECAUTIONS TO AVOID POSSIBLE EXPOSURE TO EXCESSIVE...
... not use . IMPORTANT SAFETY INSTRUCTIONS When using the oven. Keep these operating instructions in use the appliance to excessive microwave energy: Read all instructions before installing or using electrical appliances always observe basic safety precautions, including the following: WARNING - Read and follow the specific, "PRECAUTIONS TO AVOID POSSIBLE EXPOSURE TO EXCESSIVE...
Operating and Installation manual
Page 5
... the main power supply. ~ Defective components should be installed or operated outdoors. ~ Do not install this appliance to prevent injury and appliance damage. Contact Miele's Technical Service Department for installation in accordance with the household electrical supply. This data .... 5 IMPORTANT SAFETY INSTRUCTIONS Technical Safety ~ Installation, repair and maintenance work by unauthorized persons could be met. Repairs and other work should only be possible for examination, repair or adjustment. Contact Miele's Technical Service Department. ~ This appliance is...
... the main power supply. ~ Defective components should be installed or operated outdoors. ~ Do not install this appliance to prevent injury and appliance damage. Contact Miele's Technical Service Department for installation in accordance with the household electrical supply. This data .... 5 IMPORTANT SAFETY INSTRUCTIONS Technical Safety ~ Installation, repair and maintenance work by unauthorized persons could be met. Repairs and other work should only be possible for examination, repair or adjustment. Contact Miele's Technical Service Department. ~ This appliance is...
Operating and Installation manual
Page 61
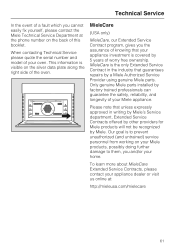
... data plate along the right side of the oven. Only genuine Miele parts installed by a Miele Authorized Service Provider using genuine Miele parts. Our goal is the only Extended Service Contract in writing by Miele's Service department, Extended Service Contracts offered by other providers for Miele products will not be recognized by 5 years of worry free...
... data plate along the right side of the oven. Only genuine Miele parts installed by a Miele Authorized Service Provider using genuine Miele parts. Our goal is the only Extended Service Contract in writing by Miele's Service department, Extended Service Contracts offered by other providers for Miele products will not be recognized by 5 years of worry free...
Operating and Installation manual
Page 63
Installation Instructions Information is subject to obtain the most current product specification, technical & warranty information. Please refer to our website to change.
Installation Instructions Information is subject to obtain the most current product specification, technical & warranty information. Please refer to our website to change.
Operating and Installation manual
Page 64
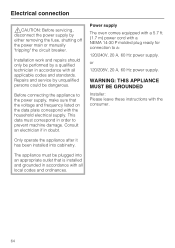
...if in order to prevent machine damage. or 120/208V, 20 A, 60 Hz power supply. WARNING: THIS APPLIANCE MUST BE GROUNDED Installer: Please leave these instructions with all applicable codes and standards. The appliance must correspond in doubt. This data must be plugged into ...cabinetry. Electrical connection ,CAUTION: Before servicing, disconnect the power supply by unqualified persons could be dangerous. Installation work and repairs should only be performed by a qualified technician in accordance with the consumer. Only operate the appliance after it has...
...if in order to prevent machine damage. or 120/208V, 20 A, 60 Hz power supply. WARNING: THIS APPLIANCE MUST BE GROUNDED Installer: Please leave these instructions with all applicable codes and standards. The appliance must correspond in doubt. This data must be plugged into ...cabinetry. Electrical connection ,CAUTION: Before servicing, disconnect the power supply by unqualified persons could be dangerous. Installation work and repairs should only be performed by a qualified technician in accordance with the consumer. Only operate the appliance after it has...
Operating and Installation manual
Page 65
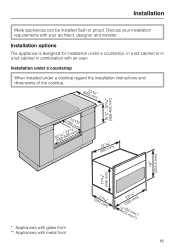
Installation under a countertop When installed under a countertop, in a tall cabinet or in a tall cabinet in combination with an oven. Discuss your architect, designer and installer. Installation Miele appliances can be installed flush or proud. Installation options The appliance is designed for installation under a cooktop regard the installation instructions and dimensions of the cooktop. * Appliances with glass front ** Appliances with your installation requirements with metal front 65
Installation under a countertop When installed under a countertop, in a tall cabinet or in a tall cabinet in combination with an oven. Discuss your architect, designer and installer. Installation Miele appliances can be installed flush or proud. Installation options The appliance is designed for installation under a cooktop regard the installation instructions and dimensions of the cooktop. * Appliances with glass front ** Appliances with your installation requirements with metal front 65
Operating and Installation manual
Page 66
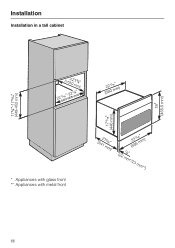
Installation Installation in a tall cabinet * Appliances with glass front ** Appliances with metal front 66
Installation Installation in a tall cabinet * Appliances with glass front ** Appliances with metal front 66
Operating and Installation manual
Page 67
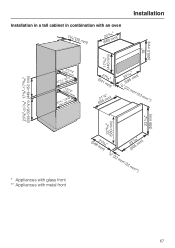
Installation in a tall cabinet in combination with an oven Installation * Appliances with glass front ** Appliances with metal front 67
Installation in a tall cabinet in combination with an oven Installation * Appliances with glass front ** Appliances with metal front 67
Operating and Installation manual
Page 68
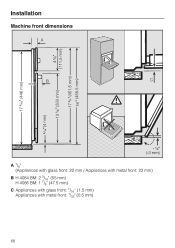
Installation Machine front dimensions A 7/8" (Appliances with glass front: 22 mm / Appliances with metal front: 23 mm) B H 4084 BM: 2 3/16" (55 mm) H 4086 BM: 1 7/8" (47.5 mm) C Appliances with glass front: 1/16'' (1.5 mm) Appliances with metal front: 1/32" (0.5 mm) 68
Installation Machine front dimensions A 7/8" (Appliances with glass front: 22 mm / Appliances with metal front: 23 mm) B H 4084 BM: 2 3/16" (55 mm) H 4086 BM: 1 7/8" (47.5 mm) C Appliances with glass front: 1/16'' (1.5 mm) Appliances with metal front: 1/32" (0.5 mm) 68
Operating and Installation manual
Page 69
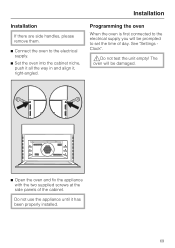
Do not use the appliance until it , right-angled. The oven will be damaged. ^ Open the oven and fix the appliance with the two supplied screws at the side panels of day. See "Settings Clock". ,Do not test the unit empty! Installation Installation If there are side handles, please remove them. ^ Connect the oven to set the time of the cabinet. Programming the oven When the oven is first connected to the electrical supply you will be prompted to the electrical supply. ^ Set the oven into the cabinet niche, push it all the way in and align it has been properly installed. 69
Do not use the appliance until it , right-angled. The oven will be damaged. ^ Open the oven and fix the appliance with the two supplied screws at the side panels of day. See "Settings Clock". ,Do not test the unit empty! Installation Installation If there are side handles, please remove them. ^ Connect the oven to set the time of the cabinet. Programming the oven When the oven is first connected to the electrical supply you will be prompted to the electrical supply. ^ Set the oven into the cabinet niche, push it all the way in and align it has been properly installed. 69
H4084BM+H4086BM
Page 1
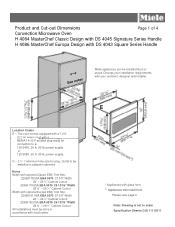
... Classic Design with DS 4045 Signature Series Handle H 4086 MasterChef Europa Design with a NEMA 14-30 P molded plug ready for plug. The oven comes equipped with a 7.2 ft. (2.2 m) power cord with DS 4043 Square Series Handle Miele appliances can be done in accordance with metal front ...Please view page 4 Note: Drawing is not to a: 120/240V, 20 A, 60 Hz power supply or 120/208V, 20 A, 60 Hz power supply. Discuss your installation requirements with your architect, designer and...
... Classic Design with DS 4045 Signature Series Handle H 4086 MasterChef Europa Design with a NEMA 14-30 P molded plug ready for plug. The oven comes equipped with a 7.2 ft. (2.2 m) power cord with DS 4043 Square Series Handle Miele appliances can be done in accordance with metal front ...Please view page 4 Note: Drawing is not to a: 120/240V, 20 A, 60 Hz power supply or 120/208V, 20 A, 60 Hz power supply. Discuss your installation requirements with your architect, designer and...

H4084BM+H4086BM
Page 2
... m) power cord with a NEMA 14-30 P molded plug ready for plug. Product and Cut-out Dimensions Page 2 of the cooktop Miele appliances can be done in adjacent cabinetry Notes Width with optional Classic EBA Trim Kits: 22996178USA EBA 5470 27 3/8" Width 26" - 26...Appliances with glass front ** Appliances with DS 4043 Square Series Handle When installed under a cooktop regard the installation instructions and dimensions of 4 Convection Microwave Oven H 4084 Classic Design with DS 4045 Signature Series Handle H 4086 Europa Design with metal front Please view page 4 Note: Drawing is...
... m) power cord with a NEMA 14-30 P molded plug ready for plug. Product and Cut-out Dimensions Page 2 of the cooktop Miele appliances can be done in adjacent cabinetry Notes Width with optional Classic EBA Trim Kits: 22996178USA EBA 5470 27 3/8" Width 26" - 26...Appliances with glass front ** Appliances with DS 4043 Square Series Handle When installed under a cooktop regard the installation instructions and dimensions of 4 Convection Microwave Oven H 4084 Classic Design with DS 4045 Signature Series Handle H 4086 Europa Design with metal front Please view page 4 Note: Drawing is...
H4084BM+H4086BM
Page 3
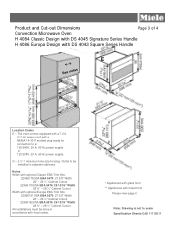
...5570 27 3/8" Width 26" - 26 ¼" Cabinet Cutout 22996192USA EBA 5576 29 13/16" Width 28 ¾" - 28 ½" Cabinet Cutout All installations must be done in accordance with local codes. * Appliances with glass front ** Appliances with DS 4043 Square Series Handle E Location Codes E - Product and... Cut-out Dimensions Page 3 of 4 Convection Microwave Oven H 4084 Classic Design with DS 4045 Signature Series Handle H 4086 Europa Design with metal front Please view page 4 Note: Drawing is not to a: 120/240V, 20 A, 60 Hz power supply or 120/208V, 20...
...5570 27 3/8" Width 26" - 26 ¼" Cabinet Cutout 22996192USA EBA 5576 29 13/16" Width 28 ¾" - 28 ½" Cabinet Cutout All installations must be done in accordance with local codes. * Appliances with glass front ** Appliances with DS 4043 Square Series Handle E Location Codes E - Product and... Cut-out Dimensions Page 3 of 4 Convection Microwave Oven H 4084 Classic Design with DS 4045 Signature Series Handle H 4086 Europa Design with metal front Please view page 4 Note: Drawing is not to a: 120/240V, 20 A, 60 Hz power supply or 120/208V, 20...
