
Product Manual
Page 2
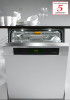
Contents IMPORTANT SAFETY INSTRUCTIONS 4 Guide to the dishwasher 8 Control panel 9 Caring for the environment 10 Before using for the first time 11 To open the door 11 To close the door 11 Child Safety Lock 11 Display 12 Filling the salt container 16 Salt refill message 17 Rinse aid 18 Adding rinse aid 18 Rinse aid indicator 19 Loading the dishwasher 20 Items not recommended for dishwashing 21 Typical load for 10 place settings with cutlery tray 22...
Contents IMPORTANT SAFETY INSTRUCTIONS 4 Guide to the dishwasher 8 Control panel 9 Caring for the environment 10 Before using for the first time 11 To open the door 11 To close the door 11 Child Safety Lock 11 Display 12 Filling the salt container 16 Salt refill message 17 Rinse aid 18 Adding rinse aid 18 Rinse aid indicator 19 Loading the dishwasher 20 Items not recommended for dishwashing 21 Typical load for 10 place settings with cutlery tray 22...
Product Manual
Page 3
... Settings 47 Water hardness 49 Water hardness 50 Drying Plus 51 Optimize standby 52 Refill display 52 Check filters 52 Reorganize programs 53 Save options 54 Child Safety Lock 55 Volume 56 Factory default 58 RemoteVision 59 Frequently asked questions 60 Technical faults 60 Problems water intake/drain 62 General problems with the dishwasher 64 Sounds 66 Poor cleaning results 67 After sales service 70 Transport 71 User Maintenance Instructions...
... Settings 47 Water hardness 49 Water hardness 50 Drying Plus 51 Optimize standby 52 Refill display 52 Check filters 52 Reorganize programs 53 Save options 54 Child Safety Lock 55 Volume 56 Factory default 58 RemoteVision 59 Frequently asked questions 60 Technical faults 60 Problems water intake/drain 62 General problems with the dishwasher 64 Sounds 66 Poor cleaning results 67 After sales service 70 Transport 71 User Maintenance Instructions...

Product Manual
Page 4
... dishwasher only for commercial use an extension cord to connect this appliance continuity must correspond to disconnect the dishwasher. 4 IMPORTANT SAFETY INSTRUCTIONS WARNING - Extension cords do not guarantee the required safety of the house checked by a qualified electrician. ~ If the supplied power cord is properly installed and grounded by a Miele Service technician with a genuine Miele power cord. ~ The outlet must only be met. To guarantee the electrical...
... dishwasher only for commercial use an extension cord to connect this appliance continuity must correspond to disconnect the dishwasher. 4 IMPORTANT SAFETY INSTRUCTIONS WARNING - Extension cords do not guarantee the required safety of the house checked by a qualified electrician. ~ If the supplied power cord is properly installed and grounded by a Miele Service technician with a genuine Miele power cord. ~ The outlet must only be met. To guarantee the electrical...

Product Manual
Page 5
.... Do not expose hose or power cord to corrosive substances. hot water pipes. A damaged appliance is dangerous. IMPORTANT SAFETY INSTRUCTIONS Installation ~ The dishwasher must be installed and connected in accordance with the dishwasher. Do not cover or crush the plug of suffocation! ~ This appliance must not be used with the installation instructions. ~ Installation and repair work is not used, a cabinet matching toe-kick must be installed. ~ Do not install the dishwasher in an area...
.... Do not expose hose or power cord to corrosive substances. hot water pipes. A damaged appliance is dangerous. IMPORTANT SAFETY INSTRUCTIONS Installation ~ The dishwasher must be installed and connected in accordance with the dishwasher. Do not cover or crush the plug of suffocation! ~ This appliance must not be used with the installation instructions. ~ Installation and repair work is not used, a cabinet matching toe-kick must be installed. ~ Do not install the dishwasher in an area...
Product Manual
Page 6
... times after installation to prevent injuries. ~ Only use . ~ Under certain conditions, hydrogen gas may be replaced by a Miele Service technician with detergent. They can cause burning in , on all hot water faucets and let water flow from the dishwasher. If the hot water system has not been used for several minutes before using the dishwasher. Load sharp items pointing downwards to disconnect the dishwasher. ~ This model offers a Drying Plus feature, i.e. the door...
... times after installation to prevent injuries. ~ Only use . ~ Under certain conditions, hydrogen gas may be replaced by a Miele Service technician with detergent. They can cause burning in , on all hot water faucets and let water flow from the dishwasher. If the hot water system has not been used for several minutes before using the dishwasher. Load sharp items pointing downwards to disconnect the dishwasher. ~ This model offers a Drying Plus feature, i.e. the door...

Product Manual
Page 7
.... ~ The water supply must be turned off when the appliance is removed from its installation site and will not be very hot at the end of an appliance ~ If the appliance is not used , remove the doorlock to the wash cabinet to cool until they are not caught when the Drying Plus feature is in operation. ~ Dishes can be used for a longer period of time (e.g. during vacations...
.... ~ The water supply must be turned off when the appliance is removed from its installation site and will not be very hot at the end of an appliance ~ If the appliance is not used , remove the doorlock to the wash cabinet to cool until they are not caught when the Drying Plus feature is in operation. ~ Dishes can be used for a longer period of time (e.g. during vacations...
Product Manual
Page 9
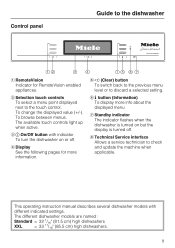
...) high dishwashers. 9 This operating instruction manual describes several dishwasher models with indicator To turn the dishwasher on but the display is turned off . To browse between menus. e U (Clear) button To switch back to the previous menu level or to the dishwasher a RemoteVision Indicator for more info about the displayed menu g Standby indicator The indicator flashes when the dishwasher is turned on or off . The available touch controls light up when active. d Display See the...
...) high dishwashers. 9 This operating instruction manual describes several dishwasher models with indicator To turn the dishwasher on but the display is turned off . To browse between menus. e U (Clear) button To switch back to the previous menu level or to the dishwasher a RemoteVision Indicator for more info about the displayed menu g Standby indicator The indicator flashes when the dishwasher is turned on or off . The available touch controls light up when active. d Display See the...

Product Manual
Page 18
... using "Tab" detergents rinse aid is visible on the surface of the screen. When using for the first time Rinse aid Rinse aid helps to enter the reservoir during the next program. The rinse aid reservoir holds approximately 3.7 fl. Failure to close it all the way allows water to prevent spotting on dishes and glassware. This prevents over-foaming occurring during the wash program. ^ Clean any spilled rinse aid...
... using "Tab" detergents rinse aid is visible on the surface of the screen. When using for the first time Rinse aid Rinse aid helps to enter the reservoir during the next program. The rinse aid reservoir holds approximately 3.7 fl. Failure to close it all the way allows water to prevent spotting on dishes and glassware. This prevents over-foaming occurring during the wash program. ^ Clean any spilled rinse aid...
Product Manual
Page 26
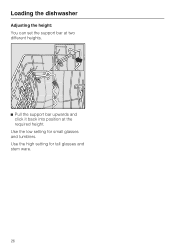
Use the high setting for small glasses and tumblers. Loading the dishwasher Adjusting the height: You can set the support bar at two different heights. ^ Pull the support bar upwards and click it back into position at the required height. Use the low setting for tall glasses and stem ware. 26
Use the high setting for small glasses and tumblers. Loading the dishwasher Adjusting the height: You can set the support bar at two different heights. ^ Pull the support bar upwards and click it back into position at the required height. Use the low setting for tall glasses and stem ware. 26

Product Manual
Page 36
... guide" describes the programs and application. ^ Select the desired program. The display changes to the type of load and soiling. To choose another program use the U (Clear) button to return to the main menu. 36 Use Turning on ^ Make sure the spray arms can be displayed by pressing the K button. Information about the selected program can rotate freely. ^ Close the door. ^ Open the water supply, if closed. ^ Turn the dishwasher...
... guide" describes the programs and application. ^ Select the desired program. The display changes to the type of load and soiling. To choose another program use the U (Clear) button to return to the main menu. 36 Use Turning on ^ Make sure the spray arms can be displayed by pressing the K button. Information about the selected program can rotate freely. ^ Close the door. ^ Open the water supply, if closed. ^ Turn the dishwasher...

Product Manual
Page 39
... menu. The display shows the available options for that program until the setting is completed without heating. For easily removable soiling Soak: - Use Selecting options Intensive lower basket: Options can be extended slightly. When the "Turbo" function is used in the upper basket. For washing heavily soiled dishes in the lower basket at the same time as delicate items in correlation with a program a quick rinse is changed. ^ Select...
... menu. The display shows the available options for that program until the setting is completed without heating. For easily removable soiling Soak: - Use Selecting options Intensive lower basket: Options can be extended slightly. When the "Turbo" function is used in the upper basket. For washing heavily soiled dishes in the lower basket at the same time as delicate items in correlation with a program a quick rinse is changed. ^ Select...

Product Manual
Page 45
... menu. A few minutes after the last key press, the dishwasher will switch into standby mode to the Main menu. The program can be started before the delay start has elapsed: A program can now be started. 45 The display returns to save energy. The display and the indicators will start time are displayed. Additional options ^ Select Start. At the set time, the selected program will turn off.
... menu. A few minutes after the last key press, the dishwasher will switch into standby mode to the Main menu. The program can be started before the delay start has elapsed: A program can now be started. 45 The display returns to save energy. The display and the indicators will start time are displayed. Additional options ^ Select Start. At the set time, the selected program will turn off.
Product Manual
Page 61
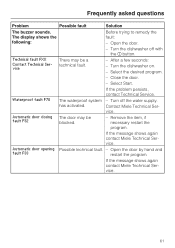
... fault. - Technical fault FXX Contact Technical Service There may be a technical fault. - Turn off with the K button. Open the door by hand and fault F33 restart the program. Open the door. - Turn the dishwasher on. - If the message shows again contact Miele Technical Service. 61 Select Start. The display shows the following: Before trying to remedy the fault: - Contact Miele Technical Ser- Turn the dishwasher off the water supply. Frequently asked questions Problem Possible fault...
... fault. - Technical fault FXX Contact Technical Service There may be a technical fault. - Turn off with the K button. Open the door by hand and fault F33 restart the program. Open the door. - Turn the dishwasher on. - If the message shows again contact Miele Technical Service. 61 Select Start. The display shows the following: Before trying to remedy the fault: - Contact Miele Technical Ser- Turn the dishwasher off the water supply. Frequently asked questions Problem Possible fault...

Product Manual
Page 63
.... - Before fixing the fault: - See "User Maintenance Instructions" for more information on the above. - Turn the dishwasher off with the K button. - Clean the drain pump and the non-return valve. See "Plumbing". - The display shows the following fault is displayed again, use a different program. There might be water in the wash cabinet. Frequently asked questions Problem Possible fault Solution In the program "Energy Saver" the following error message: Drain fault F11 Fault in the drain hose. 63
.... - Before fixing the fault: - See "User Maintenance Instructions" for more information on the above. - Turn the dishwasher off with the K button. - Clean the drain pump and the non-return valve. See "Plumbing". - The display shows the following fault is displayed again, use a different program. There might be water in the wash cabinet. Frequently asked questions Problem Possible fault Solution In the program "Energy Saver" the following error message: Drain fault F11 Fault in the drain hose. 63

Product Manual
Page 64
... error dishware. Clean the spray arms. See "User Maintenance Instructions". 64 The buzzer sounds. the spray arms. message: Middle spray arm blocked or The spray arm jets of the middle or lower spray arm are clogged. Lower spray arm blocked - the door is dark. Frequently asked questions General problems with the dishwasher Problem Possible fault Solution The display is opened. The dishwasher has gone into "Standby" mode to save energy. Turn the interior light on when turned off. The middle or lower Open the dishwasher door...
... error dishware. Clean the spray arms. See "User Maintenance Instructions". 64 The buzzer sounds. the spray arms. message: Middle spray arm blocked or The spray arm jets of the middle or lower spray arm are clogged. Lower spray arm blocked - the door is dark. Frequently asked questions General problems with the dishwasher Problem Possible fault Solution The display is opened. The dishwasher has gone into "Standby" mode to save energy. Turn the interior light on when turned off. The middle or lower Open the dishwasher door...

Product Manual
Page 65
... the wash cabinet is kinked. The drain hose is clogged. Solution Dry the dispenser before adding detergent. The door and the interior walls are still wet after a short time. Remove the residue. Frequently asked questions Problem Possible fault Detergent is the normal operating mode of the drying system. Before fixing the fault: - Clean the drain pump and the non-return valve, see the "User Maintenance Instructions". Clean the triple filter. See "User Maintenance Instructions". Remove any kinks from the drain hose. 65 Turn the dishwasher...
... the wash cabinet is kinked. The drain hose is clogged. Solution Dry the dispenser before adding detergent. The door and the interior walls are still wet after a short time. Remove the residue. Frequently asked questions Problem Possible fault Detergent is the normal operating mode of the drying system. Before fixing the fault: - Clean the drain pump and the non-return valve, see the "User Maintenance Instructions". Clean the triple filter. See "User Maintenance Instructions". Remove any kinks from the drain hose. 65 Turn the dishwasher...

Product Manual
Page 66
Remove the foreign object from the drain pump (see "Cleaning the drain pump and non-return valve") This may be caused by the installation or the diameter of the pipe. Frequently asked questions Sounds Problem There is a knocking noise in the wash cabinet There is a rattling noise in the wash cabinet There is a knocking noise in the water line Possible fault Solution The spray arm is hitting an Interrupt the program, item...
Remove the foreign object from the drain pump (see "Cleaning the drain pump and non-return valve") This may be caused by the installation or the diameter of the pipe. Frequently asked questions Sounds Problem There is a knocking noise in the wash cabinet There is a rattling noise in the wash cabinet There is a knocking noise in the water line Possible fault Solution The spray arm is hitting an Interrupt the program, item...

Product Manual
Page 67
.... change the detergent. Wash water will run back into the wash cabinet. Glasses and cutlery The rinse aid dosage is stuck open and blocked. glasses take on a bluish shimmer; Rinse aid"). 67 Turn the spray arms and rearrange the dishes if necessary. be wiped off. Clean the drain pump and the non-return valve (see "Settings - Reduce the dosage (see "Cleaning and care"). Clean the spray correctly inserted. Frequently asked questions Poor cleaning results Problem Possible fault Solution...
.... change the detergent. Wash water will run back into the wash cabinet. Glasses and cutlery The rinse aid dosage is stuck open and blocked. glasses take on a bluish shimmer; Rinse aid"). 67 Turn the spray arms and rearrange the dishes if necessary. be wiped off. Clean the drain pump and the non-return valve (see "Settings - Reduce the dosage (see "Cleaning and care"). Clean the spray correctly inserted. Frequently asked questions Poor cleaning results Problem Possible fault Solution...

Product Manual
Page 74
... detergent is used to clean the exterior. Remove the cleaner promptly. To better maintain your dishwasher regularly. steam cleaning products. , The appliance front and controls are not cleaned by water from the spray arms. Control panel ^ The plastic control panel should only be wiped with a damp cloth or suitable cleaning agent designed for use a conditioner suitable for your Miele dealer or online at www.mieleusa.com. Wash cabinet Generally, the wash cabinet is self cleaning...
... detergent is used to clean the exterior. Remove the cleaner promptly. To better maintain your dishwasher regularly. steam cleaning products. , The appliance front and controls are not cleaned by water from the spray arms. Control panel ^ The plastic control panel should only be wiped with a damp cloth or suitable cleaning agent designed for use a conditioner suitable for your Miele dealer or online at www.mieleusa.com. Wash cabinet Generally, the wash cabinet is self cleaning...
Product Manual
Page 81
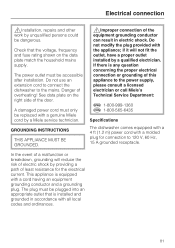
Do not use an extension cord to connect the dishwasher to 120 V, 60 Hz, 15 A grounded receptacle. Danger of electric shock by a qualified electrician. A damaged power cord must only be plugged into an appropriate outlet that the voltage, frequency and fuse rating shown on the right side of least resistance for connection to the mains. Electrical connection ,Installation, repairs and other work by unqualified persons could be...
Do not use an extension cord to connect the dishwasher to 120 V, 60 Hz, 15 A grounded receptacle. Danger of electric shock by a qualified electrician. A damaged power cord must only be plugged into an appropriate outlet that the voltage, frequency and fuse rating shown on the right side of least resistance for connection to the mains. Electrical connection ,Installation, repairs and other work by unqualified persons could be...


