
Product Manual
Page 1
US M.-Nr. 10 154 110 Operating Instructions Upright Vacuum Cleaner Dynamic U1 HS08 en -
US M.-Nr. 10 154 110 Operating Instructions Upright Vacuum Cleaner Dynamic U1 HS08 en -
Product Manual
Page 9
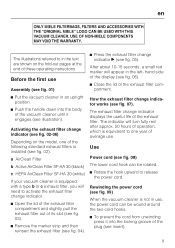
... indicator ~ (see fig. 05). a AirClean Filter b Active AirClean Filter SF-AA 30 (black) c HEPA AirClean Filter SF-HA 30 (white) If your vacuum cleaner is installed (see fig. 02). How the exhaust filter change indicator displays the useful life of the plug (see insert). 9 Use Power cord (see...(see fig. 06). ^ Close the lid of the exhaust filter compartment. ^ Put the vacuum cleaner in the left- The indicator will appear in an upright position. ^ Push the handle down into the body of the vacuum cleaner until it into the locking groove of the exhaust filter. Before the first use ....
... indicator ~ (see fig. 05). a AirClean Filter b Active AirClean Filter SF-AA 30 (black) c HEPA AirClean Filter SF-HA 30 (white) If your vacuum cleaner is installed (see fig. 02). How the exhaust filter change indicator displays the useful life of the plug (see insert). 9 Use Power cord (see...(see fig. 06). ^ Close the lid of the exhaust filter compartment. ^ Put the vacuum cleaner in the left- The indicator will appear in an upright position. ^ Push the handle down into the body of the vacuum cleaner until it into the locking groove of the exhaust filter. Before the first use ....

Product Manual
Page 12
...(see the upper illustration). Do not use Always follow the flooring manufacturer's cleaning and care instructions. Risk of injury. ^ Place the vacuum in an upright position. ^ Press the release button on the handle. ^ To increase the stability of the threads being pulled out. The Powerbrush is...floors with the floor and cause damage. 12 shag. en Vacuum hose (see fig. 19 + 20) ^ Place the vacuum in an upright position. ^ To unhook the telescopic wand from sharp edges. Powerbrush Recommended use the vacuum hose or telescopic wand without an accessory attached. Turn the ...
...(see the upper illustration). Do not use Always follow the flooring manufacturer's cleaning and care instructions. Risk of injury. ^ Place the vacuum in an upright position. ^ Press the release button on the handle. ^ To increase the stability of the threads being pulled out. The Powerbrush is...floors with the floor and cause damage. 12 shag. en Vacuum hose (see fig. 19 + 20) ^ Place the vacuum in an upright position. ^ To unhook the telescopic wand from sharp edges. Powerbrush Recommended use the vacuum hose or telescopic wand without an accessory attached. Turn the ...

Product Manual
Page 13
... are mounted on the rear of the following three components. - Dust brush with the "Original Miele" logo. Maintenance and care ,Turn off the Powerbrush while vacuuming, for example when moving from carpet to hard floors. The Powerbrush automatically shuts off . ^ ...upright position. ^ For best results, move the Powerbrush slowly back and forth over the area you wish to the handle on and off anytime the body of these components must be changed periodically to attain the optimal cleaning position. FilterBag - The indicator on . The Miele filter system consists of the vacuum...
... are mounted on the rear of the following three components. - Dust brush with the "Original Miele" logo. Maintenance and care ,Turn off the Powerbrush while vacuuming, for example when moving from carpet to hard floors. The Powerbrush automatically shuts off . ^ ...upright position. ^ For best results, move the Powerbrush slowly back and forth over the area you wish to the handle on and off anytime the body of these components must be changed periodically to attain the optimal cleaning position. FilterBag - The indicator on . The Miele filter system consists of the vacuum...
Product Manual
Page 14
... flow through the FilterBag. It also measures the amount of the vacuum cleaner into the full upright position. ^ Use the On/Off button (I / O) on the handle to purchase additional Miele filters separately, contact your Miele vacuum cleaner to ensure correct parts are ordered. en ,The use of... filter bags without the "Original Miele" logo. The electrobrush will appear on the ...
... flow through the FilterBag. It also measures the amount of the vacuum cleaner into the full upright position. ^ Use the On/Off button (I / O) on the handle to purchase additional Miele filters separately, contact your Miele vacuum cleaner to ensure correct parts are ordered. en ,The use of... filter bags without the "Original Miele" logo. The electrobrush will appear on the ...
Product Manual
Page 15
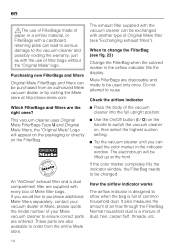
...be changed . the indicator may become blocked. Changing the FilterBag (see fig. 24, 25 + 26) ^ Place the body of the vacuum cleaner into the full upright position. ^ Lift the release button for the dust compartment lid and open until it clicks into place. ^ Pull the tab on the ...new box of the FilterBag may not register "full". Changing the dust compartment filter (see fig. 02): a AirClean Filter Whenever you start a new box of Miele FilterBags. 15 A new AirClean exhaust filter is included in the lid. When to remove the filter. ^ Insert a new filter. ^ Close the filter frame....
...be changed . the indicator may become blocked. Changing the FilterBag (see fig. 24, 25 + 26) ^ Place the body of the vacuum cleaner into the full upright position. ^ Lift the release button for the dust compartment lid and open until it clicks into place. ^ Pull the tab on the ...new box of the FilterBag may not register "full". Changing the dust compartment filter (see fig. 02): a AirClean Filter Whenever you start a new box of Miele FilterBags. 15 A new AirClean exhaust filter is included in the lid. When to remove the filter. ^ Insert a new filter. ^ Close the filter frame....
Product Manual
Page 17
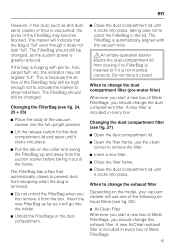
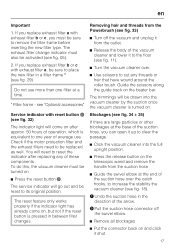
... you replace exhaust filter b or c with exhaust filter b or c, you replace exhaust filter a with exhaust filter a, be drawn into the full upright position. ^ Press the release button on the telescopic wand and remove the handle from the Powerbrush (see fig. 18). see "Optional accessories" Service ...indicator with reset button [ (see fig. 11). ^ Turn the vacuum cleaner over the catch hooks, to reset the indicator after approx. 50 hours of these components. The trimmings will come on, but not ...
... you replace exhaust filter b or c with exhaust filter b or c, you replace exhaust filter a with exhaust filter a, be drawn into the full upright position. ^ Press the release button on the telescopic wand and remove the handle from the Powerbrush (see fig. 18). see "Optional accessories" Service ...indicator with reset button [ (see fig. 11). ^ Turn the vacuum cleaner over the catch hooks, to reset the indicator after approx. 50 hours of these components. The trimmings will come on, but not ...
Product Manual
Page 21
...months from the date of merchantability or fitness for two (2) years. Effective Date: June 1, 2014 ©2014 Miele, Inc. 21 LIMITED WARRANTY - The structural integrity of the vacuum cleaner casing (body) of the S8990 will be warranted for a particular purpose is free of defects in the...than the RX1 Scout used upright vacuums will be null and void in material and workmanship. Special State Laws This Limited Warranty gives you may not apply to the term of purchase. The warranty period for the limited warranty provided herein, Miele disclaims any other commercially ...
...months from the date of merchantability or fitness for two (2) years. Effective Date: June 1, 2014 ©2014 Miele, Inc. 21 LIMITED WARRANTY - The structural integrity of the vacuum cleaner casing (body) of the S8990 will be warranted for a particular purpose is free of defects in the...than the RX1 Scout used upright vacuums will be null and void in material and workmanship. Special State Laws This Limited Warranty gives you may not apply to the term of purchase. The warranty period for the limited warranty provided herein, Miele disclaims any other commercially ...


