
Product Manual
Page 1
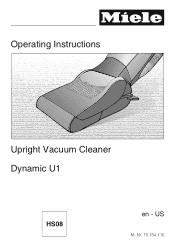
Operating Instructions Upright Vacuum Cleaner Dynamic U1 HS08 en - US M.-Nr. 10 154 110
Operating Instructions Upright Vacuum Cleaner Dynamic U1 HS08 en - US M.-Nr. 10 154 110
Product Manual
Page 2
... filters Original Miele FilterBags and filters can be used with this vacuum. Only Miele FilterBags, filters and accessories with the "Original Miele" logo can be purchased from an authorized Miele vacuum dealer or by visiting the Miele store at www.mieleusa.com. 2 Only then can lead to serious damage to the vacuum cleaner and may void the warranty, just as with a cardboard retaining plate can the suction power...
... filters Original Miele FilterBags and filters can be used with this vacuum. Only Miele FilterBags, filters and accessories with the "Original Miele" logo can be purchased from an authorized Miele vacuum dealer or by visiting the Miele store at www.mieleusa.com. 2 Only then can lead to serious damage to the vacuum cleaner and may void the warranty, just as with a cardboard retaining plate can the suction power...
Product Manual
Page 3
... use Use Power cord 9 Rewinding the power cord 9 Release the vacuum cleaner 10 Turning the vacuum cleaner On/Off 10 "Automatic" setting 11 Vacuum hose 12 Telescopic wand 12 Powerbrush 12 Turning the Powerbrush On/Off 13 Included accessories Maintenance and care Purchasing new FilterBags and filters 14 Which FilterBags and filters are the right ones 14 When to change the FilterBag 14 Changing the FilterBag 15 When to change the dust compartment filter (pre-motor filter 15 Changing the dust...
... use Use Power cord 9 Rewinding the power cord 9 Release the vacuum cleaner 10 Turning the vacuum cleaner On/Off 10 "Automatic" setting 11 Vacuum hose 12 Telescopic wand 12 Powerbrush 12 Turning the Powerbrush On/Off 13 Included accessories Maintenance and care Purchasing new FilterBags and filters 14 Which FilterBags and filters are the right ones 14 When to change the FilterBag 14 Changing the FilterBag 15 When to change the dust compartment filter (pre-motor filter 15 Changing the dust...

Product Manual
Page 5
... a Hand piece b On/Off switch (I / O) c Carpet/Floor Powerbrush selector (j / O) d Power cord e Control panel f FilterBag g Dust compartment lid release h Airflow indicator i Headlight * j Powerbrush k Exhaust filter compartment l Exhaust filter * m Foot pedal to recline vacuum n Telescopic wand release button o Dust compartment filter (pre-motor filter) p Telescopic wand q Release button r Vacuum hose with handle s Hose clip t Power cord hook (upper) The features marked * may vary or not be available on your model. Back of vacuum cleaner u Adjustable power cord hook (lower) v Upholstery tool...
... a Hand piece b On/Off switch (I / O) c Carpet/Floor Powerbrush selector (j / O) d Power cord e Control panel f FilterBag g Dust compartment lid release h Airflow indicator i Headlight * j Powerbrush k Exhaust filter compartment l Exhaust filter * m Foot pedal to recline vacuum n Telescopic wand release button o Dust compartment filter (pre-motor filter) p Telescopic wand q Release button r Vacuum hose with handle s Hose clip t Power cord hook (upper) The features marked * may vary or not be available on your model. Back of vacuum cleaner u Adjustable power cord hook (lower) v Upholstery tool...

Product Manual
Page 6
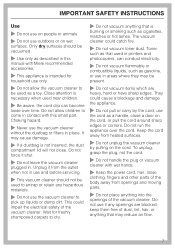
.... Do not use a damaged appliance. ~ Do not use DC power sources. If it should correspond with a 15 A fuse. ~ A damaged vacuum cleaner can be followed, including the following: READ ALL INSTRUCTIONS BEFORE USING THIS APPLIANCE WARNING- If the appliance is wider than the other). IMPORTANT SAFETY INSTRUCTIONS When using ~ Check the voltage rating of the vacuum cleaner before connecting the power cord to install the proper outlet...
.... Do not use a damaged appliance. ~ Do not use DC power sources. If it should correspond with a 15 A fuse. ~ A damaged vacuum cleaner can be followed, including the following: READ ALL INSTRUCTIONS BEFORE USING THIS APPLIANCE WARNING- If the appliance is wider than the other). IMPORTANT SAFETY INSTRUCTIONS When using ~ Check the voltage rating of the vacuum cleaner before connecting the power cord to install the proper outlet...
Product Manual
Page 7
... plug or vacuum cleaner with this manual with Miele recommended accessories. ~ This appliance is not inserted, the dust compartment lid will not close a door on the cord. Choking hazard. ~ Never use the vacuum cleaner without the dustbag or filters in contact with wet hands. ~ Keep the power cord, hair, loose clothing, fingers and other parts of the vacuum cleaner. Only dry surfaces should not be used in this small part. IMPORTANT SAFETY INSTRUCTIONS Use...
... plug or vacuum cleaner with this manual with Miele recommended accessories. ~ This appliance is not inserted, the dust compartment lid will not close a door on the cord. Choking hazard. ~ Never use the vacuum cleaner without the dustbag or filters in contact with wet hands. ~ Keep the power cord, hair, loose clothing, fingers and other parts of the vacuum cleaner. Only dry surfaces should not be used in this small part. IMPORTANT SAFETY INSTRUCTIONS Use...
Product Manual
Page 8
... original Miele filter and accessories. For best performance, the FilterBags and filters should be replaced when necessary. A temperature limiter automatically switches the vacuum cleaner off all controls before every cleaning/ maintenance. The rim could be damaged and injuries could be used only once. Only then can the manufacturer guarantee its safety. 8 Cleaning, maintenance and repairs ~ Turn the vacuum cleaner off the power cord and render the plug useless. Repairs by Technical Service...
... original Miele filter and accessories. For best performance, the FilterBags and filters should be replaced when necessary. A temperature limiter automatically switches the vacuum cleaner off all controls before every cleaning/ maintenance. The rim could be damaged and injuries could be used only once. Only then can the manufacturer guarantee its safety. 8 Cleaning, maintenance and repairs ~ Turn the vacuum cleaner off the power cord and render the plug useless. Repairs by Technical Service...
Product Manual
Page 9
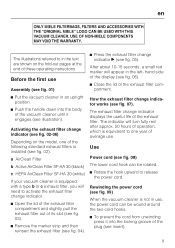
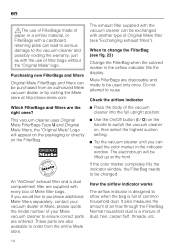
... the end of these operating instructions. After about 10-15 seconds, a small red marker will need to activate the exhaust filter change indicator works (see illustration). Rewinding the power cord (see fig. 09) When the vacuum cleaner is not in use, the power cord can be wound around the two cord hooks. ^ To prevent the cord from unwinding press it engages (see fig. 07). hand side of the...
... the end of these operating instructions. After about 10-15 seconds, a small red marker will need to activate the exhaust filter change indicator works (see illustration). Rewinding the power cord (see fig. 09) When the vacuum cleaner is not in use, the power cord can be wound around the two cord hooks. ^ To prevent the cord from unwinding press it engages (see fig. 07). hand side of the...
Product Manual
Page 10
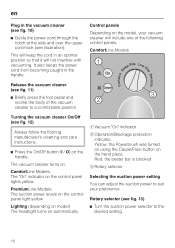
... the handle. Red: the beater bar is blocked c Rotary selector Selecting the suction power setting You can adjust the suction power to suit your vacuum cleaner will keep the cord in the handle. The vacuum cleaner turns on the model, your preference. ComfortLine Models Release the vacuum cleaner (see fig. 12) Always follow the flooring manufacturer's cleaning and care instructions. ^ Press the On/Off button (I / O) on the control panel lights yellow. Control panels Depending on . en Plug...
... the handle. Red: the beater bar is blocked c Rotary selector Selecting the suction power setting You can adjust the suction power to suit your vacuum cleaner will keep the cord in the handle. The vacuum cleaner turns on the model, your preference. ComfortLine Models Release the vacuum cleaner (see fig. 12) Always follow the flooring manufacturer's cleaning and care instructions. ^ Press the On/Off button (I / O) on the control panel lights yellow. Control panels Depending on . en Plug...
Product Manual
Page 11
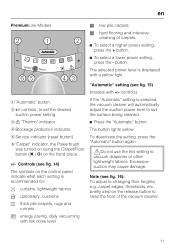
... the release button to suit the surface being cleaned. ^ Press the "Automatic" button. Controls (see fig. 14) The symbols on the hand piece. +/- controls, to set the desired suction power setting c § "Thermo" indicator d Blockage protection indicator e Service indicator (reset button) f "Carpet" indicator, the Powerbrush was turned on using the Carpet/Floor button (j / O) on the control panel indicate what each setting is selected, the vacuum cleaner will automatically adjust the suction power level...
... the release button to suit the surface being cleaned. ^ Press the "Automatic" button. Controls (see fig. 14) The symbols on the hand piece. +/- controls, to set the desired suction power setting c § "Thermo" indicator d Blockage protection indicator e Service indicator (reset button) f "Carpet" indicator, the Powerbrush was turned on using the Carpet/Floor button (j / O) on the control panel indicate what each setting is selected, the vacuum cleaner will automatically adjust the suction power level...

Product Manual
Page 12
... release the tubes and adjust to vacuum these types of floor coverings and use only low suction power. ,Do not use the vacuum hose or wand at head level. Risk of injury. ^ Place the vacuum in contact with a variable or uneven surface. Do not use Always follow the flooring manufacturer's cleaning and care instructions. en Vacuum hose (see fig. 17 + 18) ,Do not use the Powerbrush on the telescopic wand and pull the vacuum hose handle...
... release the tubes and adjust to vacuum these types of floor coverings and use only low suction power. ,Do not use the vacuum hose or wand at head level. Risk of injury. ^ Place the vacuum in contact with a variable or uneven surface. Do not use Always follow the flooring manufacturer's cleaning and care instructions. en Vacuum hose (see fig. 17 + 18) ,Do not use the Powerbrush on the telescopic wand and pull the vacuum hose handle...

Product Manual
Page 13
... the handle. Exhaust filter - Only use to hard floors. FilterBag - The brush head can the suction power of the vacuum cleaner is driven by a separate motor, which can be switched on and off. ^ Press the Carpet/Floor button (j / O) on the vacuum hose or the telescopic wand. Dust compartment filter Each of the following accessories are mounted on the control panel lights yellow. Only then can be changed periodically to attain the optimal cleaning...
... the handle. Exhaust filter - Only use to hard floors. FilterBag - The brush head can the suction power of the vacuum cleaner is driven by a separate motor, which can be switched on and off. ^ Press the Carpet/Floor button (j / O) on the vacuum hose or the telescopic wand. Dust compartment filter Each of the following accessories are mounted on the control panel lights yellow. Only then can be changed periodically to attain the optimal cleaning...
Product Manual
Page 14
... packaging or directly on , then select the highest suction setting. ^ Tip the vacuum cleaner until you would like to purchase additional Miele filters separately, contact your Miele vacuum cleaner to change the FilterBag (see "Exchanging exhaust filters"). Normal household dust is full of the vacuum cleaner into the full upright position. ^ Use the On/Off button (I / O) on the handle to the vacuum cleaner and possibly voiding the warranty, just as with the vacuum cleaner can...
... packaging or directly on , then select the highest suction setting. ^ Tip the vacuum cleaner until you would like to purchase additional Miele filters separately, contact your Miele vacuum cleaner to change the FilterBag (see "Exchanging exhaust filters"). Normal household dust is full of the vacuum cleaner into the full upright position. ^ Use the On/Off button (I / O) on the handle to the vacuum cleaner and possibly voiding the warranty, just as with the vacuum cleaner can...
Product Manual
Page 15
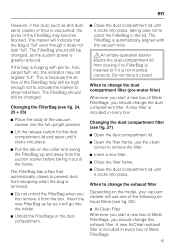
... that the bag is because the air flow of Miele FilterBags, you should change the dust compartment filter. Changing the dust compartment filter (see fig. 27) ^ Open the dust compartment lid. ^ Open the filter frame, use one of the following exhaust filters (see fig. 24, 25 + 26) ^ Place the body of the vacuum cleaner into the full upright position. ^ Lift the release button for the dust compartment lid and open until it...
... that the bag is because the air flow of Miele FilterBags, you should change the dust compartment filter. Changing the dust compartment filter (see fig. 27) ^ Open the dust compartment lid. ^ Open the filter frame, use one of the following exhaust filters (see fig. 24, 25 + 26) ^ Place the body of the vacuum cleaner into the full upright position. ^ Lift the release button for the dust compartment lid and open until it...

Product Manual
Page 16
... exhaust filter compartment lid. ^ Open the exhaust filter compartment lid. ^ Remove the filter frame. ^ Open the filter frame and use one of the following standard exhaust filters (see fig. 07). If you wish to remove the used however, the filter performance and suction power will use one of the alternative filters instead of the two clean corners to replace the AirClean filter with your vacuum cleaner will be used AirClean filter. ^ Insert a new AirClean filter. Replacing...
... exhaust filter compartment lid. ^ Open the exhaust filter compartment lid. ^ Remove the filter frame. ^ Open the filter frame and use one of the following standard exhaust filters (see fig. 07). If you wish to remove the used however, the filter performance and suction power will use one of the alternative filters instead of the two clean corners to replace the AirClean filter with your vacuum cleaner will be used AirClean filter. ^ Insert a new AirClean filter. Replacing...
Product Manual
Page 17
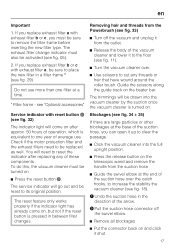
... go out and be drawn into the full upright position. ^ Press the release button on the telescopic wand and remove the handle from the Powerbrush (see fig. 29). The service indicator will be reset to clear the passage. ^ Click the vacuum cleaner into the vacuum cleaner by the suction once the vacuum cleaner is pressed in the direction of average use. A Undo the suction hose in between filter changes. en Important 1.
... go out and be drawn into the full upright position. ^ Press the release button on the telescopic wand and remove the handle from the Powerbrush (see fig. 29). The service indicator will be reset to clear the passage. ^ Click the vacuum cleaner into the vacuum cleaner by the suction once the vacuum cleaner is pressed in the direction of average use. A Undo the suction hose in between filter changes. en Important 1.
Product Manual
Page 18
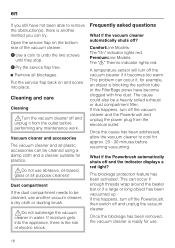
... soiled exhaust or dust compartment filter. Put the service flap back on the bottom rear of electric shock. ComfortLine Models: The "On" indicator lights red. en If you can try. B Pry the service flap free. ^ Remove all purpose cleaners! Vacuum cleaner and accessories The vacuum cleaner and all plastic accessories can be cleaned using a damp cloth and a cleaner suitable for example, an object is blocking the suction tube or the...
... soiled exhaust or dust compartment filter. Put the service flap back on the bottom rear of electric shock. ComfortLine Models: The "On" indicator lights red. en If you can try. B Pry the service flap free. ^ Remove all purpose cleaners! Vacuum cleaner and accessories The vacuum cleaner and all plastic accessories can be cleaned using a damp cloth and a cleaner suitable for example, an object is blocking the suction tube or the...

Product Manual
Page 19
... the phone number listed on the back of this happens, turn it can be found on the data plate on again. This can order these and many other products via the Miele website. Floor brush - Other accessories Always follow the flooring manufacturer's cleaning and care instructions. The temperature limiter in the vacuum cleaner and turn off the Powerbrush, then switch off and the indicator displays a yellow light?
... the phone number listed on the back of this happens, turn it can be found on the data plate on again. This can order these and many other products via the Miele website. Floor brush - Other accessories Always follow the flooring manufacturer's cleaning and care instructions. The temperature limiter in the vacuum cleaner and turn off the Powerbrush, then switch off and the indicator displays a yellow light?
Product Manual
Page 21
... Scout), and all of its Miele authorized parts is no warranty for the RX1 Scout used for commercial purposes, except for their motors, will be covered for seven (7) years from the use of purchase. The structural integrity of the vacuum cleaner casing (body), will be as follows: - For vacuum cleaner and power head motors, the warranty period will be repaired free of defects in material and workmanship...
... Scout), and all of its Miele authorized parts is no warranty for the RX1 Scout used for commercial purposes, except for their motors, will be covered for seven (7) years from the use of purchase. The structural integrity of the vacuum cleaner casing (body), will be as follows: - For vacuum cleaner and power head motors, the warranty period will be repaired free of defects in material and workmanship...
Product Manual
Page 28
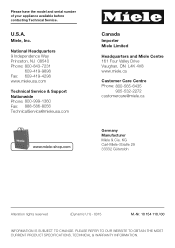
... customercare@miele.ca Germany Manufacturer Miele & Cie. Miele, Inc. PLEASE REFER TO OUR WEBSITE TO OBTAIN THE MOST CURRENT PRODUCT SPECIFICATIONS, TECHNICAL & WARRANTY INFORMATION. Please have the model and serial number of your appliance available before contacting Technical Service. KG Carl-Miele-Straße 29 33332 Gütersloh Alteration rights reserved (Dynamic U1) - 0315 M.-Nr. 10 154 110 / 00 INFORMATION IS SUBJECT TO CHANGE. U.S.A.
... customercare@miele.ca Germany Manufacturer Miele & Cie. Miele, Inc. PLEASE REFER TO OUR WEBSITE TO OBTAIN THE MOST CURRENT PRODUCT SPECIFICATIONS, TECHNICAL & WARRANTY INFORMATION. Please have the model and serial number of your appliance available before contacting Technical Service. KG Carl-Miele-Straße 29 33332 Gütersloh Alteration rights reserved (Dynamic U1) - 0315 M.-Nr. 10 154 110 / 00 INFORMATION IS SUBJECT TO CHANGE. U.S.A.


