
Product Manual
Page 2
... the fan 21 Turning overhead lighting on/off 22 Power management 22 Operation (Automatic and Manual modes 23 Filter saturation indicator 23 Adjusting the filter saturation indicator for the grease filter 23 Activating/changing the OdorFree Charcoal Filter operating hours counter .... 24 Checking the filter saturation indicator 24 Sensor button signal tone 25 Cleaning and care 26 Stainless steel housing 26 Special instructions for glass surfaces 27 Grease filters ...27 OdorFree Charcoal Filter 29 Resetting the operating...
... the fan 21 Turning overhead lighting on/off 22 Power management 22 Operation (Automatic and Manual modes 23 Filter saturation indicator 23 Adjusting the filter saturation indicator for the grease filter 23 Activating/changing the OdorFree Charcoal Filter operating hours counter .... 24 Checking the filter saturation indicator 24 Sensor button signal tone 25 Cleaning and care 26 Stainless steel housing 26 Special instructions for glass surfaces 27 Grease filters ...27 OdorFree Charcoal Filter 29 Resetting the operating...

Product Manual
Page 3
Contents Removing the protective film 34 Exhaust duct...46 Condensate trap ...47 Electrical connection 48 Grounding Instructions 48 Activating Con@ctivity 2.0 49 Installation of the Con@ctivity 2.0 stick 49 Activating the Con@ctivity 2.0 function 49 Activating the ventilation hood 49 Activating the cooktop 50 Activation failed 50 Deactivating Con@ctivity 2.0 50 Service and warranty 51 Location of the data plate 51 Technical data ...52 3
Contents Removing the protective film 34 Exhaust duct...46 Condensate trap ...47 Electrical connection 48 Grounding Instructions 48 Activating Con@ctivity 2.0 49 Installation of the Con@ctivity 2.0 stick 49 Activating the Con@ctivity 2.0 function 49 Activating the ventilation hood 49 Activating the cooktop 50 Activation failed 50 Deactivating Con@ctivity 2.0 50 Service and warranty 51 Location of the data plate 51 Technical data ...52 3

Product Manual
Page 4
... installation above gas or electric cooking surfaces. Persons who lack physical, sensory or mental abilities, or experi‐ ence with current safety requirements. Any other use occurs at the owner's own risk. This appliance is intended for use in a safe place and pass them on to extract and clean vapors produced during cooking. Keep these operating instructions. This ventilation hood is designed...
... installation above gas or electric cooking surfaces. Persons who lack physical, sensory or mental abilities, or experi‐ ence with current safety requirements. Any other use occurs at the owner's own risk. This appliance is intended for use in a safe place and pass them on to extract and clean vapors produced during cooking. Keep these operating instructions. This ventilation hood is designed...
Product Manual
Page 5
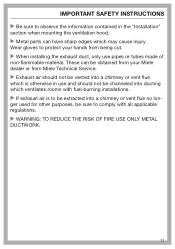
... FIRE, ELECTRIC SHOCK, OR INJURY TO PERSONS, OBSERVE THE FOLLOWING: - Before servicing or cleaning the appliance, switch power off at the service panel and lock the service disconnecting means to the service panel. Installation, repair and maintenance work by unauthorized persons could be dangerous and may void the warranty. A damaged ventilation hood oven can be performed by the manufac‐ turer. IMPORTANT SAFETY INSTRUCTIONS Children ...
... FIRE, ELECTRIC SHOCK, OR INJURY TO PERSONS, OBSERVE THE FOLLOWING: - Before servicing or cleaning the appliance, switch power off at the service panel and lock the service disconnecting means to the service panel. Installation, repair and maintenance work by unauthorized persons could be dangerous and may void the warranty. A damaged ventilation hood oven can be performed by the manufac‐ turer. IMPORTANT SAFETY INSTRUCTIONS Children ...
Product Manual
Page 6
... and do not guarantee the required level of appliance safety. To ensure safe operation, only use a power bar or extension cord to connect the ventila‐ tion hood to the building's power supply before connecting the appliance. To guarantee the electrical safety of this manual. It is properly installed and grounded by a qualified electrician. To avoid damaging the ventilation hood, make sure that this appli...
... and do not guarantee the required level of appliance safety. To ensure safe operation, only use a power bar or extension cord to connect the ventila‐ tion hood to the building's power supply before connecting the appliance. To guarantee the electrical safety of this manual. It is properly installed and grounded by a qualified electrician. To avoid damaging the ventilation hood, make sure that this appli...
Product Manual
Page 7
.... 7 The power cable (if present) has been unplugged from the socket (pull the plug not the cord). c) Clean the ventilation hood frequently. When turned on low or medium settings. - IMPORTANT SAFETY INSTRUCTIONS Defective components should not be replaced by Miele original parts only. Heat oils slowly on , the ventilation hood will draw any flames into the filter. b) Always turn the hood on the fan or filter. - Grease should be...
.... 7 The power cable (if present) has been unplugged from the socket (pull the plug not the cord). c) Clean the ventilation hood frequently. When turned on low or medium settings. - IMPORTANT SAFETY INSTRUCTIONS Defective components should not be replaced by Miele original parts only. Heat oils slowly on , the ventilation hood will draw any flames into the filter. b) Always turn the hood on the fan or filter. - Grease should be...

Product Manual
Page 10
... PERSONS, OBSERVE THE FOLLOWING: - e) Do not use the greater distance. 10 If more than one cooking appliance is needed for combustion and exhausting of gas‐ es through the flue (chimney of the ventilation hood specified in accordance with all applicable codes and stand‐ ards, including fire-rated construction. - b) Sufficient air is used beneath the ventilation hood, and if different minimum safety distances apply...
... PERSONS, OBSERVE THE FOLLOWING: - e) Do not use the greater distance. 10 If more than one cooking appliance is needed for combustion and exhausting of gas‐ es through the flue (chimney of the ventilation hood specified in accordance with all applicable codes and stand‐ ards, including fire-rated construction. - b) Sufficient air is used beneath the ventilation hood, and if different minimum safety distances apply...
Product Manual
Page 11
... installations. If exhaust air is to be extracted into a chimney or vent flue no lon‐ ger used for other purposes, be sure to protect your Miele dealer or from being cut. When installing the exhaust duct, only use and should not be channeled into a chimney or vent flue which is otherwise in the "Installation" section when mounting the ventilation hood. Metal parts can have sharp edges which ventilates...
... installations. If exhaust air is to be extracted into a chimney or vent flue no lon‐ ger used for other purposes, be sure to protect your Miele dealer or from being cut. When installing the exhaust duct, only use and should not be channeled into a chimney or vent flue which is otherwise in the "Installation" section when mounting the ventilation hood. Metal parts can have sharp edges which ventilates...

Product Manual
Page 12
... Noise Emissions from other manufacturers are used, the warranty will become void. FCC Declaration of Oper‐ ation and is subject to clean the ventilation hood. The steam can reach the electrical components and cause a short circuit. This equipment should be in ‐ terference that may not cause harmful interference. Complies with the limits for an uncontrolled environment. IMPORTANT SAFETY INSTRUCTIONS Cleaning...
... Noise Emissions from other manufacturers are used, the warranty will become void. FCC Declaration of Oper‐ ation and is subject to clean the ventilation hood. The steam can reach the electrical components and cause a short circuit. This equipment should be in ‐ terference that may not cause harmful interference. Complies with the limits for an uncontrolled environment. IMPORTANT SAFETY INSTRUCTIONS Cleaning...

Product Manual
Page 14
... hood is drawn in and cleaned by an Odor‐ Free Charcoal Filter. A non-return flap has been provided with the hood in use. The air is not in case your ventilation hood, depending on , the non-return flap opens so that the exhaust air can be transported outside . When the ventilation hood is turned on the model: Vented mode Recirculation mode The recirculation mode requires a recir‐ culation kit and OdorFree Charcoal...
... hood is drawn in and cleaned by an Odor‐ Free Charcoal Filter. A non-return flap has been provided with the hood in use. The air is not in case your ventilation hood, depending on , the non-return flap opens so that the exhaust air can be transported outside . When the ventilation hood is turned on the model: Vented mode Recirculation mode The recirculation mode requires a recir‐ culation kit and OdorFree Charcoal...
Product Manual
Page 21
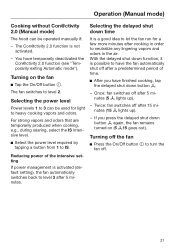
... a good idea to let the fan run for light to level 3 after 5 mi‐ nutes. Once: fan switches off after a predetermined period of the intensive set‐ ting If power management is not activated. - Twice: fan switches off after cooking in the air. You have finished cooking, tap the delayed shut down button again, the fan remains turned on the fan Tap the On...
... a good idea to let the fan run for light to level 3 after 5 mi‐ nutes. Once: fan switches off after a predetermined period of the intensive set‐ ting If power management is not activated. - Twice: fan switches off after cooking in the air. You have finished cooking, tap the delayed shut down button again, the fan remains turned on the fan Tap the On...

Product Manual
Page 27
... (fat, dust, etc.), thereby preventing the ventilation hood from becoming dirty. A dirty filter is a fire hazard! Make sure you to regularly clean the grease filters. 27 Grease filters The reusable metal grease filters in the appliance remove the solid particles contained in damage to the filter and to the cooktop. Do not use a stainless steel cleaner to clean the control buttons. Special instructions for any dirt or debris immedi‐...
... (fat, dust, etc.), thereby preventing the ventilation hood from becoming dirty. A dirty filter is a fire hazard! Make sure you to regularly clean the grease filters. 27 Grease filters The reusable metal grease filters in the appliance remove the solid particles contained in damage to the filter and to the cooktop. Do not use a stainless steel cleaner to clean the control buttons. Special instructions for any dirt or debris immedi‐...

Product Manual
Page 29
... grease filter symbol goes out. Cleaning and care If the filters have been installed incor‐ rectly, you can insert a small screw‐ driver into the slit to absorb odorcausing agents and is flashing. See "Technical data" for recirculation, an OdorFree Charcoal Filter must be reset. While the fan is turned on, press the grease filter button for approx. 3 seconds, until only the 1 is mounted...
... grease filter symbol goes out. Cleaning and care If the filters have been installed incor‐ rectly, you can insert a small screw‐ driver into the slit to absorb odorcausing agents and is flashing. See "Technical data" for recirculation, an OdorFree Charcoal Filter must be reset. While the fan is turned on, press the grease filter button for approx. 3 seconds, until only the 1 is mounted...

Product Manual
Page 34
... the ventilation hood controls with anchors, toggle bolts, etc. It can be easily accessible. Users should be attached to rigid structural framing that the hood covers the cooktop. To achieve optimal vapor extraction, make sure that is nec‐ essary. The mounting area must be narrower. - The ventilation hood should be easy to the ceiling joists directly. When selecting an installation height, always take the user height...
... the ventilation hood controls with anchors, toggle bolts, etc. It can be easily accessible. Users should be attached to rigid structural framing that the hood covers the cooktop. To achieve optimal vapor extraction, make sure that is nec‐ essary. The mounting area must be narrower. - The ventilation hood should be easy to the ceiling joists directly. When selecting an installation height, always take the user height...

Product Manual
Page 39
The directional unit from recirculation kit DUI 32 (optional accessory) is instal‐ led for recirculation mode (RM): Bend the four retaining tabs on the installation frame outwards. Place the power cord inside the in‐ stallation frame. Fit the directional unit as shown, not‐ ing the marking on the front. Bend the retaining tabs back and ap...
The directional unit from recirculation kit DUI 32 (optional accessory) is instal‐ led for recirculation mode (RM): Bend the four retaining tabs on the installation frame outwards. Place the power cord inside the in‐ stallation frame. Fit the directional unit as shown, not‐ ing the marking on the front. Bend the retaining tabs back and ap...

Product Manual
Page 43
... screws from the instal‐ lation frame again. With vented mode: upwards as far as it will go , downwards only to the desired height, observing the permissi‐ ble height ranges: - Safety distances be‐ tween the cooktop and ventilation hood must be adjusted to the "A" marking. - Follow the instructions in "Appliance dimensions." The canopy can now be observed. 43 Installation Connect the power cord...
... screws from the instal‐ lation frame again. With vented mode: upwards as far as it will go , downwards only to the desired height, observing the permissi‐ ble height ranges: - Safety distances be‐ tween the cooktop and ventilation hood must be adjusted to the "A" marking. - Follow the instructions in "Appliance dimensions." The canopy can now be observed. 43 Installation Connect the power cord...

Product Manual
Page 46
... within walls or ceilings or in these different areas may differ greatly, which means that can be harmful or fatal if inhaled. Gas cooking appliances release car‐ bon monoxide that the problem of the exhaust connector. - If elbows are used, the cross section should be aligned with the lowest noise lev‐ els, please note the following: - The exhaust duct will need...
... within walls or ceilings or in these different areas may differ greatly, which means that can be harmful or fatal if inhaled. Gas cooking appliances release car‐ bon monoxide that the problem of the exhaust connector. - If elbows are used, the cross section should be aligned with the lowest noise lev‐ els, please note the following: - The exhaust duct will need...
Product Manual
Page 48
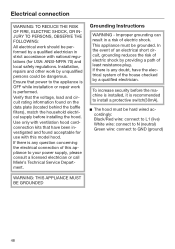
... performed. To increase security before installing the hood. Grounding Instructions WARNING - In the event of an electrical short cir‐ cuit, grounding reduces the risk of electric shock by providing a path of electric shock. Use only with ventilation hood cordconnection kits that power to the appliance is OFF while installation or repair work is any question concerning the electrical connection of the house checked by a qualified...
... performed. To increase security before installing the hood. Grounding Instructions WARNING - In the event of an electrical short cir‐ cuit, grounding reduces the risk of electric shock by providing a path of electric shock. Use only with ventilation hood cordconnection kits that power to the appliance is OFF while installation or repair work is any question concerning the electrical connection of the house checked by a qualified...
Specs
Page 2
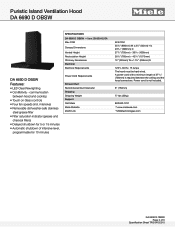
... Power Cord Requirements Exhaust Duct Recommened Duct Diameter Shipping Shipping Weight Support Call Miele Miele Website 20/20 Link 625 CFM 353/8" (898mm) W x 33/8" (85mm) H x 239/16" (598mm) D 273/4" (705mm) - 399/16 (1005mm) 301/8" (765mm) - 435/16" (1075mm) 12" (305mm) W x 115/8" (295mm) D 120 V, 60 Hz, 15 Amps The hood must be hard wired. Power cord is required between hood and cooktop • Touch on Glass controls • Four fan speeds (incl. Item 28669045USA Max CFM Canopy Dimensions Vented Height Recirculation Height Chimney Dimensions Electrical Electrical Requirements...
... Power Cord Requirements Exhaust Duct Recommened Duct Diameter Shipping Shipping Weight Support Call Miele Miele Website 20/20 Link 625 CFM 353/8" (898mm) W x 33/8" (85mm) H x 239/16" (598mm) D 273/4" (705mm) - 399/16 (1005mm) 301/8" (765mm) - 435/16" (1075mm) 12" (305mm) W x 115/8" (295mm) D 120 V, 60 Hz, 15 Amps The hood must be hard wired. Power cord is required between hood and cooktop • Touch on Glass controls • Four fan speeds (incl. Item 28669045USA Max CFM Canopy Dimensions Vented Height Recirculation Height Chimney Dimensions Electrical Electrical Requirements...
Specs
Page 3
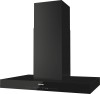
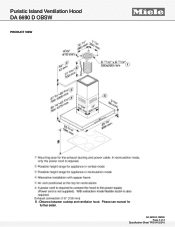
DA 6690 D OBSW Page 3 of 3 Specification Sheet TRS 04152015 Distance between cooktop and ventilation hood. Please see manual for further detail. Puristic Island Ventilation Hood DA 6690 D OBSW PRODUCT VIEW FOREVER BETTER S -
DA 6690 D OBSW Page 3 of 3 Specification Sheet TRS 04152015 Distance between cooktop and ventilation hood. Please see manual for further detail. Puristic Island Ventilation Hood DA 6690 D OBSW PRODUCT VIEW FOREVER BETTER S -


