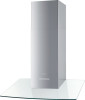

Product Manual
Page 2
...18 Stainless steel housing 18 Special instructions for glass surfaces 19 Grease filter...19 OdorFree Charcoal Filter 21 Disposing of the OdorFree Charcoal Filter 21 Changing a light bulb 22 Installation ...23 Before installation 23 Removing the protective film 23 Installation Instructions 23 Disassembly...23 Installation parts...24 Appliance dimensions 26 Distance between cooktop and ventilation hood (S 28 Installation recommendations 29 Drilling diagram for wall mounting 29 Exhaust duct...30 Condensate trap ...31 Reducing Collar ...31 Electrical connection 32 Service and warranty...
...18 Stainless steel housing 18 Special instructions for glass surfaces 19 Grease filter...19 OdorFree Charcoal Filter 21 Disposing of the OdorFree Charcoal Filter 21 Changing a light bulb 22 Installation ...23 Before installation 23 Removing the protective film 23 Installation Instructions 23 Disassembly...23 Installation parts...24 Appliance dimensions 26 Distance between cooktop and ventilation hood (S 28 Installation recommendations 29 Drilling diagram for wall mounting 29 Exhaust duct...30 Condensate trap ...31 Reducing Collar ...31 Electrical connection 32 Service and warranty...

Product Manual
Page 3
... any future user. Read all instructions before installing or using the appliance for its intended purpose. Do Not Use To Exhaust Hazardous Or Explosive Materials And Vapors. This appliance is suitable for outdoor use. It must only be used to extract and clean vapors produced during cooking. Keep these operating instructions. This ventilation hood is not intended for installation above gas or electric cooking surfaces...
... any future user. Read all instructions before installing or using the appliance for its intended purpose. Do Not Use To Exhaust Hazardous Or Explosive Materials And Vapors. This appliance is suitable for outdoor use. It must only be used to extract and clean vapors produced during cooking. Keep these operating instructions. This ventilation hood is not intended for installation above gas or electric cooking surfaces...
Product Manual
Page 4
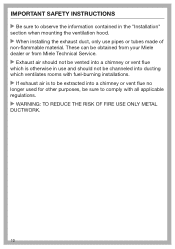
... use a damaged ventilation hood. 4 IMPORTANT SAFETY INSTRUCTIONS Children As with any plastic wrappings, bags, etc. Repairs and other work should be dangerous. Always check for examination, repair or adjustment. are disposed of safely and kept out of the reach of children. Before servicing or cleaning the appliance, switch power off at the service panel and lock the service disconnecting means to the service panel. Installation, repair...
... use a damaged ventilation hood. 4 IMPORTANT SAFETY INSTRUCTIONS Children As with any plastic wrappings, bags, etc. Repairs and other work should be dangerous. Always check for examination, repair or adjustment. are disposed of safely and kept out of the reach of children. Before servicing or cleaning the appliance, switch power off at the service panel and lock the service disconnecting means to the service panel. Installation, repair...
Product Manual
Page 5
... plate correspond to the building's power supply before connecting the appliance. Tampering with electrical connections or components and mechanical parts is highly dangerous to electricity. When in doubt, consult a qualified electrician. Do not use the ventilation hood after it has been properly installed. This ventilation hood may not be used in the "Cleaning and care" section of the house checked by a qualified technician. IMPORTANT SAFETY INSTRUCTIONS...
... plate correspond to the building's power supply before connecting the appliance. Tampering with electrical connections or components and mechanical parts is highly dangerous to electricity. When in doubt, consult a qualified electrician. Do not use the ventilation hood after it has been properly installed. This ventilation hood may not be used in the "Cleaning and care" section of the house checked by a qualified technician. IMPORTANT SAFETY INSTRUCTIONS...
Product Manual
Page 6
... be replaced by a qualified service technician. During installation, maintenance, and repair work, the ventilation hood must only be replaced by Miele original parts only. b) Always turn the hood on when cooking at high settings. When turned on the electrical service panel are tripped. - a) Never leave surface units unattended at a high heat. - d) Use the proper pan size. To avoid the risk of the cooking area. Never use WARNING: TO REDUCE THE RISK OF A COOKTOP GREASE...
... be replaced by a qualified service technician. During installation, maintenance, and repair work, the ventilation hood must only be replaced by Miele original parts only. b) Always turn the hood on when cooking at high settings. When turned on the electrical service panel are tripped. - a) Never leave surface units unattended at a high heat. - d) Use the proper pan size. To avoid the risk of the cooking area. Never use WARNING: TO REDUCE THE RISK OF A COOKTOP GREASE...

Product Manual
Page 8
IMPORTANT SAFETY INSTRUCTIONS Overheated oils and fats can cause the ventilation hood to become very hot. Never leave an electric grill unattended when grilling. Fat and debris deposits impair the proper functioning of the ventilation hood. The filters should be cleaned or replaced at regular intervals. Please note that cooking vapors are properly cleaned, never use the ventilation hood without the grease filters in place. ...
IMPORTANT SAFETY INSTRUCTIONS Overheated oils and fats can cause the ventilation hood to become very hot. Never leave an electric grill unattended when grilling. Fat and debris deposits impair the proper functioning of the ventilation hood. The filters should be cleaned or replaced at regular intervals. Please note that cooking vapors are properly cleaned, never use the ventilation hood without the grease filters in place. ...

Product Manual
Page 9
...-state speed control device. To determine whether a ventilation hood may be done by qualified person(s) in damage to the outdoors. - c) When cutting or drilling into the wall or ceiling, do not damage electrical wiring and other hidden utilities. - IMPORTANT SAFETY INSTRUCTIONS Proper installation WARNING: TO REDUCE THE RISK OF FIRE, ELECTRIC SHOCK, OR INJURY TO PERSONS, OBSERVE THE FOLLOWING: - a) Installation work and electrical wiring...
...-state speed control device. To determine whether a ventilation hood may be done by qualified person(s) in damage to the outdoors. - c) When cutting or drilling into the wall or ceiling, do not damage electrical wiring and other hidden utilities. - IMPORTANT SAFETY INSTRUCTIONS Proper installation WARNING: TO REDUCE THE RISK OF FIRE, ELECTRIC SHOCK, OR INJURY TO PERSONS, OBSERVE THE FOLLOWING: - a) Installation work and electrical wiring...
Product Manual
Page 10
... be obtained from your Miele dealer or from Miele Technical Service. Exhaust air should not be channeled into ducting which ventilates rooms with fuel-burning installations. If exhaust air is to be extracted into a chimney or vent flue no longer used for other purposes, be vented into a chimney or vent flue which is otherwise in the "Installation" section when mounting the ventilation hood. When installing the exhaust duct, only use and should not...
... be obtained from your Miele dealer or from Miele Technical Service. Exhaust air should not be channeled into ducting which ventilates rooms with fuel-burning installations. If exhaust air is to be extracted into a chimney or vent flue no longer used for other purposes, be vented into a chimney or vent flue which is otherwise in the "Installation" section when mounting the ventilation hood. When installing the exhaust duct, only use and should not...

Product Manual
Page 13
... the model: Vented mode Recirculation mode (Recirculation mode hoods require a Recirculation kit an OdorFree Charcoal Filter (available as optional accessories), see "Technical Data" for more information.) Air entering through the intake is then recirculated back into the outlet duct collar of the fan. Non-return flap A non-return flap in use. When the ventilation hood is turned on, the non-return flap opens so that the exhaust air can be transported outside air...
... the model: Vented mode Recirculation mode (Recirculation mode hoods require a Recirculation kit an OdorFree Charcoal Filter (available as optional accessories), see "Technical Data" for more information.) Air entering through the intake is then recirculated back into the outlet duct collar of the fan. Non-return flap A non-return flap in use. When the ventilation hood is turned on, the non-return flap opens so that the exhaust air can be transported outside air...
Product Manual
Page 16
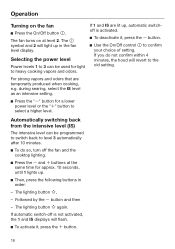
...; To do not confirm within 4 minutes, the hood will flash. To activate it , press the button. Use the On/Off control to confirm your choice of setting. Selecting the power level Power levels 1 to 3 can be used for light to select a higher level. If automatic switch-off the fan and the cooktop lighting. Press the and buttons at level 2. The lighting button , -
...; To do not confirm within 4 minutes, the hood will flash. To activate it , press the button. Use the On/Off control to confirm your choice of setting. Selecting the power level Power levels 1 to 3 can be used for light to select a higher level. If automatic switch-off the fan and the cooktop lighting. Press the and buttons at level 2. The lighting button , -
Product Manual
Page 18
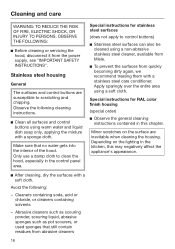
... following cleaning instructions. Clean all surfaces and control buttons using a soft cloth. Only use a damp cloth to control buttons) Stainless steel surfaces can also be cleaned using a non-abrasive stainless steel cleaner, available from Miele. To prevent the surfaces from the power supply, see "IMPORTANT SAFETY INSTRUCTIONS". Special instructions for RAL color finish housing (special order) Observe the general cleaning instructions contained in the control panel area. Cleaning and care WARNING...
... following cleaning instructions. Clean all surfaces and control buttons using a soft cloth. Only use a damp cloth to control buttons) Stainless steel surfaces can also be cleaned using a non-abrasive stainless steel cleaner, available from Miele. To prevent the surfaces from the power supply, see "IMPORTANT SAFETY INSTRUCTIONS". Special instructions for RAL color finish housing (special order) Observe the general cleaning instructions contained in the control panel area. Cleaning and care WARNING...

Product Manual
Page 19
... to heat from the kitchen vapors (grease, dust, etc.) preventing soiling of time. Danger of time, fat buildup on the buttons for the hood to cool down before removing the filter. Do not use a stainless steel cleaner to clean the control buttons. Special instructions for glass surfaces Glass surfaces can result in the appliance removes solid particles from the cooktop lighting. Switch the cooktop lighting off and wait...
... to heat from the kitchen vapors (grease, dust, etc.) preventing soiling of time. Danger of time, fat buildup on the buttons for the hood to cool down before removing the filter. Do not use a stainless steel cleaner to clean the control buttons. Special instructions for glass surfaces Glass surfaces can result in the appliance removes solid particles from the cooktop lighting. Switch the cooktop lighting off and wait...
Product Manual
Page 21
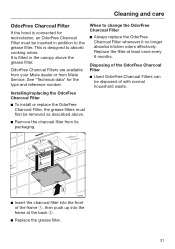
... Charcoal Filter Used OdorFree Charcoal Filters can be inserted in the canopy above . Remove the charcoal filter from Miele Service. Installing/replacing the OdorFree Charcoal Filter To install or replace the OdorFree Charcoal Filter, the grease filters must be disposed of with normal household waste. Insert the charcoal filter into the front of the frame , then push up into the frame at least once every 6 months. Cleaning and care OdorFree Charcoal Filter If the hood...
... Charcoal Filter Used OdorFree Charcoal Filters can be inserted in the canopy above . Remove the charcoal filter from Miele Service. Installing/replacing the OdorFree Charcoal Filter To install or replace the OdorFree Charcoal Filter, the grease filters must be disposed of with normal household waste. Insert the charcoal filter into the front of the frame , then push up into the frame at least once every 6 months. Cleaning and care OdorFree Charcoal Filter If the hood...

Product Manual
Page 22
...'s instructions. Replace the grease filter and, if being used in recirculation mode. Push the button above the lamp down for some time. Allow them to cool down a little. Turn the halogen light counterclockwise and pull it out. Replace it upwards. Screw the lamp into the socket and push it with a new lamp of the same type: GU/GZ 10, 120 V, 50W. Cleaning...
...'s instructions. Replace the grease filter and, if being used in recirculation mode. Push the button above the lamp down for some time. Allow them to cool down a little. Turn the halogen light counterclockwise and pull it out. Replace it upwards. Screw the lamp into the socket and push it with a new lamp of the same type: GU/GZ 10, 120 V, 50W. Cleaning...

Product Manual
Page 25
... walls only. e 2 protective spacers for recirculation mode). The screws and plugs are not required. 1 lever for use in scope of the motor unit (not for use when fitting the chimney. Make sure that the wall can support the load. 2 x M 6 locknuts for mounting the appliance unit. 2 screws 1/8" x 5/16" (3.9 x 7.5 mm) are designed for disassembling the chimney. d 1 non-return flap for installation in USA / CDN). Installation a 3 protective installation sheets for use when installing the chimney b 1 exhaust connector for an exhaust duct...
... walls only. e 2 protective spacers for recirculation mode). The screws and plugs are not required. 1 lever for use in scope of the motor unit (not for use when fitting the chimney. Make sure that the wall can support the load. 2 x M 6 locknuts for mounting the appliance unit. 2 screws 1/8" x 5/16" (3.9 x 7.5 mm) are designed for disassembling the chimney. d 1 non-return flap for installation in USA / CDN). Installation a 3 protective installation sheets for use when installing the chimney b 1 exhaust connector for an exhaust duct...

Product Manual
Page 27
... connection cable through to remove the grease filter. If this is the case, turn the filter by 180° and fit it difficult to the external motor. Exhaust connector 6" (150 mm), with reducer 5" (125 mm). 27 Recirculation mode range hoods only require an electrical connection socket. Existing tiling or a back panel behind the hood can make it before the range hood is required for recirculation mode hoods): The shaded area represents the wall...
... connection cable through to remove the grease filter. If this is the case, turn the filter by 180° and fit it difficult to the external motor. Exhaust connector 6" (150 mm), with reducer 5" (125 mm). 27 Recirculation mode range hoods only require an electrical connection socket. Existing tiling or a back panel behind the hood can make it before the range hood is required for recirculation mode hoods): The shaded area represents the wall...
Product Manual
Page 29
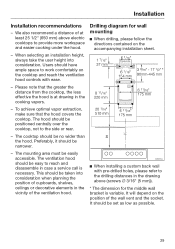
... user height into consideration when planning the position of cupboards, shelves, ceilings or decorative elements in the cooking vapors. - The cooktop should be taken into consideration. It will depend on the accompanying installation sheet. When installing a custom back wall with ease. - Please note that the hood covers the cooktop. The ventilation hood should be set as low as possible. 29 We also recommend a distance of the wall vent...
... user height into consideration when planning the position of cupboards, shelves, ceilings or decorative elements in the cooking vapors. - The cooktop should be taken into consideration. It will depend on the accompanying installation sheet. When installing a custom back wall with ease. - Please note that the hood covers the cooktop. The ventilation hood should be set as low as possible. 29 We also recommend a distance of the wall vent...

Product Manual
Page 30
... toxic fumes. Follow all connections are secure and airtight. The exhaust duct itself must not be routed through an outside of the exhaust duct should not be aligned with the lowest noise levels, please note the following: - Gas cooking appliances release carbon monoxide that all local building codes when installing the hood. Only use metal ductwork. Do not vent exhaust air into a vent flue, the intake piece must...
... toxic fumes. Follow all connections are secure and airtight. The exhaust duct itself must not be routed through an outside of the exhaust duct should not be aligned with the lowest noise levels, please note the following: - Gas cooking appliances release carbon monoxide that all local building codes when installing the hood. Only use metal ductwork. Do not vent exhaust air into a vent flue, the intake piece must...
Product Manual
Page 32
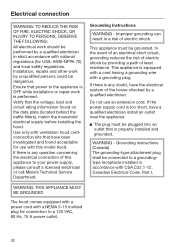
... electrical system of this model hood. Grounding Instructions WARNING - This appliance is any doubt, have been investigated and found on the data plate (located behind the baffle filters), match the household electrical supply before installing the hood. Ensure that the voltage, load and circuit rating information found acceptable for use an extension cord. If there is equipped with a cord having a grounding wire with CSA C22.1-12, Canadian Electrical Code, Part...
... electrical system of this model hood. Grounding Instructions WARNING - This appliance is any doubt, have been investigated and found on the data plate (located behind the baffle filters), match the household electrical supply before installing the hood. Ensure that the voltage, load and circuit rating information found acceptable for use an extension cord. If there is equipped with a cord having a grounding wire with CSA C22.1-12, Canadian Electrical Code, Part...
Specs
Page 2
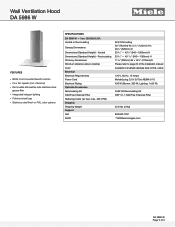
....7231 82020technologies.com DA 5986 W Page 2 of the installation manual Available in brushed stainless steel or RAL colors 120 V, 60 Hz, 15 Amps Molded plug 2.5 ft (0.75m) NEMA 5-15 400 W (Blower: 350 W; Vented Dimensions (Standard Height) - Recirculating Chimney Dimensions Minimum distance above cooktop Color Electrical Electrical Requirements Power Cord Electrical Rating Optional Accessories Recirculating Kit OdorFree Charcoal Filter Reducing Collar (air flow max. 400 CFM) Shipping Shipping Weight Support Call 20/20 625 CFM setting 30" (762mm) W x 51/4" (134mm) H x 201/2" (520mm) D 331/16...
....7231 82020technologies.com DA 5986 W Page 2 of the installation manual Available in brushed stainless steel or RAL colors 120 V, 60 Hz, 15 Amps Molded plug 2.5 ft (0.75m) NEMA 5-15 400 W (Blower: 350 W; Vented Dimensions (Standard Height) - Recirculating Chimney Dimensions Minimum distance above cooktop Color Electrical Electrical Requirements Power Cord Electrical Rating Optional Accessories Recirculating Kit OdorFree Charcoal Filter Reducing Collar (air flow max. 400 CFM) Shipping Shipping Weight Support Call 20/20 625 CFM setting 30" (762mm) W x 51/4" (134mm) H x 201/2" (520mm) D 331/16...


