
Operating and Installation manual
Page 1
Operating and Installation Instructions Ventilation System DA 5960 W DA 5980 W DA 5990 W To prevent accidents and appliance damage, read these instructions before installation or use. US, CA M.-Nr. 09 276 120 en -
Operating and Installation Instructions Ventilation System DA 5960 W DA 5980 W DA 5990 W To prevent accidents and appliance damage, read these instructions before installation or use. US, CA M.-Nr. 09 276 120 en -

Operating and Installation manual
Page 2
... and Care 13 Cleaning the casing 13 Grease filter 14 Active charcoal filter 16 Changing the light bulbs 17 After Sales Service 18 Installation instructions 19 Caring for the environment 21 Appliance dimensions 22 Installation accessories 26 Plywood backing 28 Installation 29 Dismantling 29 Air extraction 30 Electrical connection 32 Technical data 33 2
... and Care 13 Cleaning the casing 13 Grease filter 14 Active charcoal filter 16 Changing the light bulbs 17 After Sales Service 18 Installation instructions 19 Caring for the environment 21 Appliance dimensions 22 Installation accessories 26 Plywood backing 28 Installation 29 Dismantling 29 Air extraction 30 Electrical connection 32 Technical data 33 2

Operating and Installation manual
Page 3
...securely fasten a prominent warning device, such as a tag, to prevent power from being switched on to any doubt, have questions, contact Miele. ~ b) Before servicing or cleaning the appliance, switch power off at the service panel and lock the service disconnecting means to the ...instructions in the manner intended by a qualified technician. IMPORTANT SAFETY INSTRUCTIONS READ AND SAVE THESE INSTRUCTIONS Keep these instructions carefully before installing or using the Ventilation System. ~ This appliance is intended for residential use only. Do Not Use To Exhaust Hazardous Or Explosive...
...securely fasten a prominent warning device, such as a tag, to prevent power from being switched on to any doubt, have questions, contact Miele. ~ b) Before servicing or cleaning the appliance, switch power off at the service panel and lock the service disconnecting means to the ...instructions in the manner intended by a qualified technician. IMPORTANT SAFETY INSTRUCTIONS READ AND SAVE THESE INSTRUCTIONS Keep these instructions carefully before installing or using the Ventilation System. ~ This appliance is intended for residential use only. Do Not Use To Exhaust Hazardous Or Explosive...
Operating and Installation manual
Page 4
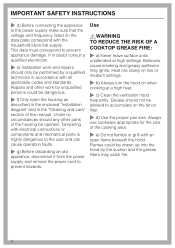
... leave surface units unattended at a high heat. ~ c) Clean the ventilation hood frequently. Tampering with an open the housing as described in the enclosed "Installation diagram" and in the "Cleaning and care" section of this manual. Flames could be allowed to accumulate on the fan or filter. ~ d) Use the.... Grease should any other work and repairs should only be performed by a qualified technician in doubt consult a qualified electrician. ~ e) Installation work by the suction and the grease filters may ignite. If in accordance with the household electrical supply.
... leave surface units unattended at a high heat. ~ c) Clean the ventilation hood frequently. Tampering with an open the housing as described in the enclosed "Installation diagram" and in the "Cleaning and care" section of this manual. Flames could be allowed to accumulate on the fan or filter. ~ d) Use the.... Grease should any other work and repairs should only be performed by a qualified technician in doubt consult a qualified electrician. ~ e) Installation work by the suction and the grease filters may ignite. If in accordance with the household electrical supply.
Operating and Installation manual
Page 6
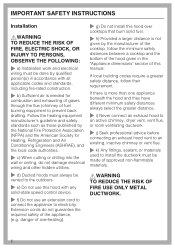
... ceiling, do not guarantee the required safety of the cooktop, follow their requirement. IMPORTANT SAFETY INSTRUCTIONS Installation ,WARNING TO REDUCE THE RISK OF FIRE, ELECTRIC SHOCK, OR INJURY TO PERSONS, OBSERVE THE FOLLOWING: ~ a) Installation work and electrical wiring must be done by qualified person(s) in the "Appliance dimensions" section of...other hidden utilities. ~ d) Ducted hoods must always be vented to the outdoors. ~ e) Do not use an extension cord to connect the appliance to install the ductwork must be made of fuel burning equipment to prevent back drafting.
... ceiling, do not guarantee the required safety of the cooktop, follow their requirement. IMPORTANT SAFETY INSTRUCTIONS Installation ,WARNING TO REDUCE THE RISK OF FIRE, ELECTRIC SHOCK, OR INJURY TO PERSONS, OBSERVE THE FOLLOWING: ~ a) Installation work and electrical wiring must be done by qualified person(s) in the "Appliance dimensions" section of...other hidden utilities. ~ d) Ducted hoods must always be vented to the outdoors. ~ e) Do not use an extension cord to connect the appliance to install the ductwork must be made of fuel burning equipment to prevent back drafting.
Operating and Installation manual
Page 7
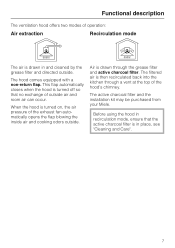
... Recirculation mode The air is then recirculated back into the kitchen through the grease filter and active charcoal filter. The active charcoal filter and the installation kit may be purchased from your Miele.
... Recirculation mode The air is then recirculated back into the kitchen through the grease filter and active charcoal filter. The active charcoal filter and the installation kit may be purchased from your Miele.

Operating and Installation manual
Page 15
...max. Use a wash program with a solution of fire. ^ When putting the grease filter back make sure that the spray arm is incorrectly installed, insert a small screwdriver into the slit along its edge to disengage it from the interior casing to air dry. ^ While the filter is... discoloration of 150°F (65°C). Depending on a towel to prevent the risk of warm water and mild detergent. In a Miele dishwasher use pure detergent, aggressive all purpose cleaners, oven sprays, abrasive cleaning agents or limescale removers. Use the recommended amount of dishwasher detergent...
...max. Use a wash program with a solution of fire. ^ When putting the grease filter back make sure that the spray arm is incorrectly installed, insert a small screwdriver into the slit along its edge to disengage it from the interior casing to air dry. ^ While the filter is... discoloration of 150°F (65°C). Depending on a towel to prevent the risk of warm water and mild detergent. In a Miele dishwasher use pure detergent, aggressive all purpose cleaners, oven sprays, abrasive cleaning agents or limescale removers. Use the recommended amount of dishwasher detergent...
Operating and Installation manual
Page 18
...you and/or your home. Only genuine Miele parts installed by a Miele Authorized Service Provider using genuine Miele parts. MieleCare is the only Extended Service Contract in writing by Miele's Service department, Extended Service Contracts offered by other providers for Miele products will not be recognized by 5 years...(and untrained) service personnel from working on the data plate which you cannot easily fix yourself, please contact the Miele Technical Service Department. ^ When contacting the Technical Service Department, please quote the model and serial number of your appliance investment ...
...you and/or your home. Only genuine Miele parts installed by a Miele Authorized Service Provider using genuine Miele parts. MieleCare is the only Extended Service Contract in writing by Miele's Service department, Extended Service Contracts offered by other providers for Miele products will not be recognized by 5 years...(and untrained) service personnel from working on the data plate which you cannot easily fix yourself, please contact the Miele Technical Service Department. ^ When contacting the Technical Service Department, please quote the model and serial number of your appliance investment ...

Operating and Installation manual
Page 19
The installation steps are described in the enclosed "Installation Diagram". Information is subject to obtain the most current product specification, technical & warranty information. Leave these instructions and the "Important Safety Instructions" before installing this ventilation system. Please refer to our website to change. Installation Instructions Read these instructions with the appliance for the consumer/user.
The installation steps are described in the enclosed "Installation Diagram". Information is subject to obtain the most current product specification, technical & warranty information. Leave these instructions and the "Important Safety Instructions" before installing this ventilation system. Please refer to our website to change. Installation Instructions Read these instructions with the appliance for the consumer/user.

Operating and Installation manual
Page 23
... difficulties when changing the filter, depending on the thickness and height of the tiles or panel. Appliance dimensions 1) Air extraction mode 2) Recirculation mode 3) Recirculation vent installed upwards 4) and 5) Installation area Wall/ceiling area respectively for vent hole and outlet...
... difficulties when changing the filter, depending on the thickness and height of the tiles or panel. Appliance dimensions 1) Air extraction mode 2) Recirculation mode 3) Recirculation vent installed upwards 4) and 5) Installation area Wall/ceiling area respectively for vent hole and outlet...

Operating and Installation manual
Page 24
.... - Appliance dimensions Distance between a cooktop and the bottom of the cooktop, follow the minimum safety distances between cooktop and hood (S) Do not install this exhaust hood over cooktops burning solid fuel. If local building codes require a greater safety distance, follow the minimum safety distances given by the ...cooktops < 43,000 BTU (12.6 KW) and no burner > 15,000 BTU (4.5 KW) Single burner (Wok) < 20,500 BTU (6 KW) All other gas cooktops Miele Cooktops Non-Miele Cooktops 24" (610 mm) 26" (660 mm) 26" (660 mm) 30" (760 mm) 26" (660 mm) 30" (760 mm) 30" (760 mm)...
.... - Appliance dimensions Distance between a cooktop and the bottom of the cooktop, follow the minimum safety distances between cooktop and hood (S) Do not install this exhaust hood over cooktops burning solid fuel. If local building codes require a greater safety distance, follow the minimum safety distances given by the ...cooktops < 43,000 BTU (12.6 KW) and no burner > 15,000 BTU (4.5 KW) Single burner (Wok) < 20,500 BTU (6 KW) All other gas cooktops Miele Cooktops Non-Miele Cooktops 24" (610 mm) 26" (660 mm) 26" (660 mm) 30" (760 mm) 26" (660 mm) 30" (760 mm) 30" (760 mm)...
Operating and Installation manual
Page 25
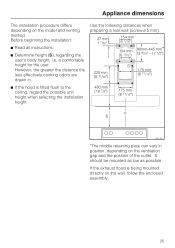
...position of the outlet. If the exhaust hood is fitted flush to the ceiling, regard the possible unit height when selecting the installation height. *The middle retaining plate can vary in position, depending on the wall, follow the enclosed assembly. 25 a comfortable... height for the user. Appliance dimensions The installation procedure differs depending on the model and venting method. It should be mounted as low as possible. Before beginning the installation: Use the following distances when preparing a rear wall (screw ø 5 mm...
...position of the outlet. If the exhaust hood is fitted flush to the ceiling, regard the possible unit height when selecting the installation height. *The middle retaining plate can vary in position, depending on the wall, follow the enclosed assembly. 25 a comfortable... height for the user. Appliance dimensions The installation procedure differs depending on the model and venting method. It should be mounted as low as possible. Before beginning the installation: Use the following distances when preparing a rear wall (screw ø 5 mm...

Operating and Installation manual
Page 27
... use with sharp edges during installation. contains diverter, hose and hose clips (optional accessory) 8 large headed screws 5 x 40 mm for securing the retaining plates and the canopy (S8 wall ...CAUTION To avoid risk of the chimney g Lower retaining plate secures the canopy and motor assembly. Installation accessories a 3 protective shields to prevent scratches to the chimney during the assembly and installation process. 1 lever for dismantling the chimney Installation instruction diagram 27 d 2 protective strips for chimney mounting e Upper retaining plate secures the chimney ...
... use with sharp edges during installation. contains diverter, hose and hose clips (optional accessory) 8 large headed screws 5 x 40 mm for securing the retaining plates and the canopy (S8 wall ...CAUTION To avoid risk of the chimney g Lower retaining plate secures the canopy and motor assembly. Installation accessories a 3 protective shields to prevent scratches to the chimney during the assembly and installation process. 1 lever for dismantling the chimney Installation instruction diagram 27 d 2 protective strips for chimney mounting e Upper retaining plate secures the chimney ...
Operating and Installation manual
Page 28
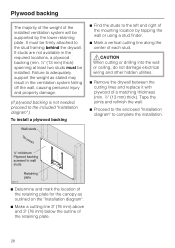
...ventilation system falling off the wall, causing personal injury and property damage. (If plywood backing is not needed, proceed to the included "Installation diagram".) To install a plywood backing ^ Find the studs to the left and right of the mounting location by the lower retaining plate. Failure to adequately... support the weight as outlined on the "Installation diagram". ^ Make a cutting line 3" (76 mm) above and 3" (76 mm) below the outline of the retaining plate for the canopy...
...ventilation system falling off the wall, causing personal injury and property damage. (If plywood backing is not needed, proceed to the included "Installation diagram".) To install a plywood backing ^ Find the studs to the left and right of the mounting location by the lower retaining plate. Failure to adequately... support the weight as outlined on the "Installation diagram". ^ Make a cutting line 3" (76 mm) above and 3" (76 mm) below the outline of the retaining plate for the canopy...

Operating and Installation manual
Page 29
Dismantling If the hood needs to be disassembled, follow the instructions on the chimney, slide the lever between the chimney and the chimney extension and gently apply pressure to prevent scratching during transport. ^ Peel off the film before installing the casing parts. A lever is covered with a protective film to ease the chimney from its hooks. 29 Installation Protective film The casing is enclosed for easier removal of the chimney extension. ^ After loosening both of the clamping screws on the installation diagram in the reverse order.
Dismantling If the hood needs to be disassembled, follow the instructions on the chimney, slide the lever between the chimney and the chimney extension and gently apply pressure to prevent scratching during transport. ^ Peel off the film before installing the casing parts. A lever is covered with a protective film to ease the chimney from its hooks. 29 Installation Protective film The casing is enclosed for easier removal of the chimney extension. ^ After loosening both of the clamping screws on the installation diagram in the reverse order.

Operating and Installation manual
Page 30
... risk of toxic fumes. To achieve the most efficient air extraction and quietest noise levels, consider the following: - Make sure all local building codes when installing the hood. Please read and follow the "IMPORTANT SAFETY INSTRUCTIONS" to prevent condensation dripping into spaces within walls or ceilings or in attics, crawl spaces...
... risk of toxic fumes. To achieve the most efficient air extraction and quietest noise levels, consider the following: - Make sure all local building codes when installing the hood. Please read and follow the "IMPORTANT SAFETY INSTRUCTIONS" to prevent condensation dripping into spaces within walls or ceilings or in attics, crawl spaces...

Operating and Installation manual
Page 31
When installing a condensate trap, ensure that it may occur. If the exhaust is positioned vertically and if possible directly above the exhaust outlet. 31 Never connect an ...
When installing a condensate trap, ensure that it may occur. If the exhaust is positioned vertically and if possible directly above the exhaust outlet. 31 Never connect an ...
Operating and Installation manual
Page 32
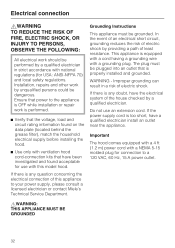
... kits that is any doubt, have a qualified electrician install an outlet near the appliance. Improper grounding can result in strict accordance with this appliance to your power supply, please consult a licensed electrician or contact Miele's Technical Service Department. Do not use with national regulations...there is equipped with a cord having a grounding wire with a NEMA 5-15 molded plug for connection to the appliance is OFF while installation or repair work is too short, have the electrical system of the house checked by providing a path of this model hood. WARNING -...
... kits that is any doubt, have a qualified electrician install an outlet near the appliance. Improper grounding can result in strict accordance with this appliance to your power supply, please consult a licensed electrician or contact Miele's Technical Service Department. Do not use with national regulations...there is equipped with a cord having a grounding wire with a NEMA 5-15 molded plug for connection to the appliance is OFF while installation or repair work is too short, have the electrical system of the house checked by providing a path of this model hood. WARNING -...

DA5990W
Page 1
Standard 110 Volt Outlet Notes • All installations must be done in accordance with local codes. • 6" duct connects to scale. SPECIFICATION SHEETS 010610 NOTE: Drawing is not to blower system inside chimney. Product Dimensions Decorator Wall Hood DA5990W E O 11 3/8" 10 5/8" 5 1/4" Front Perspective 30 5/16" - 42" 20 1/2" 35 1/4" Location Codes E - 110 Volt - 15 Amp 3-wire power supply connects through top or rear of chimney. O -
Standard 110 Volt Outlet Notes • All installations must be done in accordance with local codes. • 6" duct connects to scale. SPECIFICATION SHEETS 010610 NOTE: Drawing is not to blower system inside chimney. Product Dimensions Decorator Wall Hood DA5990W E O 11 3/8" 10 5/8" 5 1/4" Front Perspective 30 5/16" - 42" 20 1/2" 35 1/4" Location Codes E - 110 Volt - 15 Amp 3-wire power supply connects through top or rear of chimney. O -

DA5990W
Page 2
... electric surfaces - 24" for gas surfaces based on BTU output (see hood instructions for details ) • Area behind mounting plates MUST be affixed to scale. Installation Dimensions Decorator Wall Hoods DA5990W Structural member Ceiling Line Duct clearance Area must be reinforced with a minimum of 1/2" plywood.
... electric surfaces - 24" for gas surfaces based on BTU output (see hood instructions for details ) • Area behind mounting plates MUST be affixed to scale. Installation Dimensions Decorator Wall Hoods DA5990W Structural member Ceiling Line Duct clearance Area must be reinforced with a minimum of 1/2" plywood.
