
Miele DA 5321 W Support Question
Miele DA 5321 W Support Question
Find answers below for this question about Miele DA 5321 W.Need a Miele DA 5321 W manual? We have 3 online manuals for this item!
Question posted by parudolph10305 on August 1st, 2013
Where Is The Electrical Outlet Supposed To Be Installed? Where Do The Plug Go?
The person who posted this question about this Miele product did not include a detailed explanation. Please use the "Request More Information" button to the right if more details would help you to answer this question.
Current Answers
Related Miele DA 5321 W Manual Pages
Operating and Installation manual - Page 1
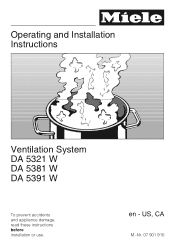
Operating and Installation Instructions
Ventilation System DA 5321 W DA 5381 W DA 5391 W
To prevent accidents and appliance damage, read these instructions before installation or use. US, CA
M.-Nr. 07 901 910 en -
Operating and Installation manual - Page 2
... 15 Cleaning and Care 17 Cleaning the casing 17 Grease filters 18 Active charcoal filter 19 Changing the light bulbs 20 After Sales Service 21 Installation instructions 23 Caring for the environment 25 Appliance dimensions 26 Plywood backing 29 Installation 30 Installation 32 Dismantling 32 Air extraction 33 Electrical connection 35 Technical data 36
2
Operating and Installation manual - Page 3
... Or Explosive Materials And Vapors.
~ This appliance is designed to vent
cooking smoke and odors only.
~ This appliance is suitable for
installation above gas or electric cooking surfaces.
~ This appliance is
properly installed and grounded by a qualified electrician.
3 If you have questions, contact Miele.
~ b) Before servicing or cleaning the
appliance, switch power off...
Operating and Installation manual - Page 4

... units
unattended at a high heat.
~ c) Clean the ventilation hood
frequently. Always
use cookware appropriate for the size of the cooking area.
~ e) Do not flambé or grill with an
open the housing as
described in the enclosed "Installation diagram" and in accordance with electrical connections or components and mechanical parts is highly dangerous...
Operating and Installation manual - Page 5
Do not overheat the cookware, e.g. Steam could penetrate electrical components and cause a short circuit.
5 a violent steam explosion will result.
~ d) Use a fire ...elderly or infirm.
~ Always turn off when not in place.
~ Do not use a steam cleaner to clean
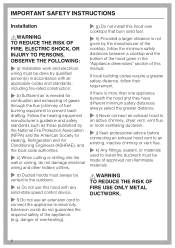
the hood. IMPORTANT SAFETY INSTRUCTIONS
,WARNING TO REDUCE THE RISK OF INJURY TO PERSONS IN THE EVENT OF A COOKTOP GREASE FIRE, ...
Operating and Installation manual - Page 6
... the required safety of the appliance, (e.g. IMPORTANT SAFETY INSTRUCTIONS
Installation
,WARNING TO REDUCE THE RISK OF FIRE, ELECTRIC SHOCK, OR INJURY TO PERSONS, OBSERVE THE FOLLOWING:
~ a) Installation work and electrical
wiring must be done by qualified person(s) in the "Appliance dimensions" section of this hood with all applicable codes and standards, including fire-rated construction...
Operating and Installation manual - Page 7
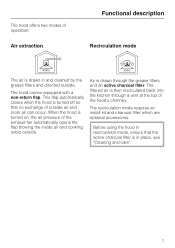
...hood is turned on, the air pressure of operation:
Air extraction
Functional description
Recirculation mode
The air is in recirculation mode, ensure that no exchange of the hood...charcoal filter.
This flap automatically closes when the hood is turned off so that the active charcoal ...air and room air can occur.
Before using the hood in place, see "Cleaning and care".
7 The filtered ...
Operating and Installation manual - Page 17
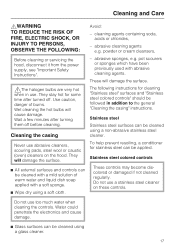
... damage.
^ Glass surfaces can be applied.
Never use a stainless steel cleaner on the hood.
cleaning agents containing soda, acids or chlorides,
-
To help prevent resoiling, a conditioner ...damaged if not cleaned regularly. Cleaning and Care
,WARNING TO REDUCE THE RISK OF FIRE, ELECTRIC SHOCK, OR INJURY TO PERSONS, OBSERVE THE FOLLOWING:
Avoid:
- pot scourers or sponges ...
Operating and Installation manual - Page 20
... power supply, see "Important Safety Instructions". Do not attempt to cool.
Cleaning and Care
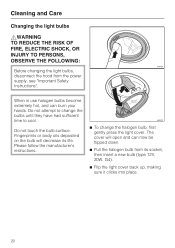
Changing the light bulbs
,WARNING TO REDUCE THE RISK OF FIRE, ELECTRIC SHOCK, OR INJURY TO PERSONS, OBSERVE THE FOLLOWING:
Before changing the light bulbs, disconnect the...
Operating and Installation manual - Page 25

...
Disposal of suffocation! Please contact your local recycling center about the possibility of recycling these materials.
They have been designed to prevent it from the electrical supply and cut off the power cord to be recycled.
Operating and Installation manual - Page 26
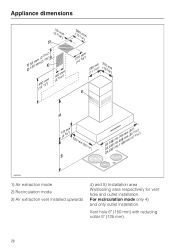
Vent hole 6" (150 mm) with reducing collar 5" (125 mm).
26 For recirculation mode only 4) and only outlet installation. Appliance dimensions
1) Air extraction mode 2) Recirculation mode 3) Air extraction vent installed upwards
4) and 5) Installation area Wall/ceiling area respectively for vent hole and outlet installation.
Operating and Installation manual - Page 27
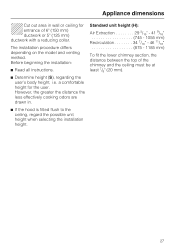
... less effectively cooking odors are drawn in wall or ceiling for the user. Before beginning the installation:
^ Read all instructions.
^ Determine height (S), regarding the user's body height, i.e. a... (20 mm).
^ If the hood is fitted flush to the ceiling, regard the possible unit height when selecting the installation height.
27 The installation procedure differs depending on the model and...
Operating and Installation manual - Page 28
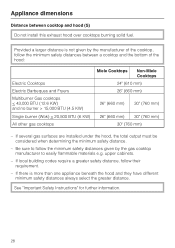
If several gas surfaces are installed under the hood, the total output must be considered when determining the minimum safety distance.
-
Be sure to follow the minimum safety distances given by the manufacturer of the hood:
Electric Cooktops Electric Barbeques and Fryers Multiburner Gas cooktops < 43,000 BTU (12.6 KW) and no burner > 15,000 BTU...
Operating and Installation manual - Page 29
...damage.
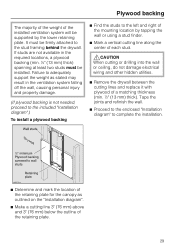
(If plywood backing is not needed, proceed to the included "Installation diagram".)
To install a plywood backing
^ Find the studs to the left and right ...installed ventilation system will be supported by tapping the wall or using a stud finder.
^ Mark a vertical cutting line along the center of each stud.
,CAUTION
When cutting or drilling into the wall or ceiling, do not damage electrical...
Operating and Installation manual - Page 32
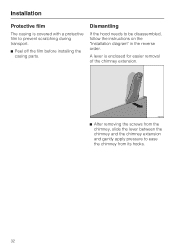
A lever is covered with a protective film to prevent scratching during transport.
^ Peel off the film before installing the casing parts.
Dismantling
If the hood needs to be disassembled, follow the instructions on the "Installation diagram" in the reverse order. Installation
Protective film
The casing is enclosed for easier removal of the chimney extension.
^ After removing...
Operating and Installation manual - Page 33
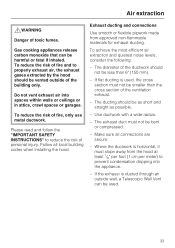
... and quietest noise levels, consider the following:
- Make sure all local building codes when installing the hood.
If flat ducting is ducted through an outside of personal injury. The exhaust duct must ... the ventilation exhaust.
- Exhaust ducting and connections
Use smooth or flexible pipwork made from the hood at least 1/8" per foot (1 cm per meter) to reduce the risk of the building...
Operating and Installation manual - Page 34
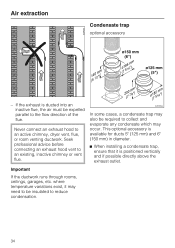
... is available for ducts 5" (125 mm) and 6" (150 mm) in diameter.
^ When installing a condensate trap, ensure that it may also be insulated to an existing, inactive chimney or vent...If the exhaust is positioned vertically and if possible directly above the exhaust outlet.
Never connect an exhaust hood to collect and evaporate any condensate which may occur. Air extraction
Condensate ...
Operating and Installation manual - Page 35
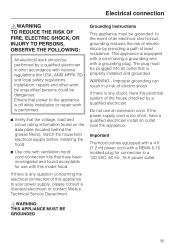
... on the data plate (located behind the grease filters), match the household electrical supply before installing the hood.
^ Use only with a grounding plug. Improper grounding can result in strict accordance with a NEMA 5-15 molded plug for connection to a 120 VAC, 60 Hz, 15 A power outlet.
,WARNING: THIS APPLIANCE MUST BE GROUNDED
35
Do not use with...
DA5321W - Page 1
SPECIFICATION SHEETS 151007 Standard 110 Volt Outlet
Notes
• All installations must be done in accordance with local codes.
• 6" duct connects to scale.
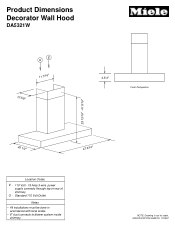
Product Dimensions Decorator Wall Hood
DA5321W
E O 11 7/16" 10 5/8"
4 3/4"
Front Perspective
25 13/16" - 41 9/16"
20 1/2"
47 3/16"
Location Codes
E - 110 Volt - 15 Amp 3-wire power supply connects through top...
DA5321W - Page 2

... should be reinforced with a minimum of 1/2" plywood. SPECIFICATION SHEETS 151007 Installation Dimensions Decorator Wall Hoods
DA5321W
Structural member
Ceiling Line
Duct clearance
Area must be affixed to structural wall members
Center Line
NOTE: Drawing is not to scale. Minimum distance "S" is: - 18" for electric surfaces - 30" for gas surfaces
• Area behind mounting plates...
Similar Questions

Downdraft Is Stuck In Up Position, Will Not Go Down When The Button Is Pressed
(Posted by mjb 3 years ago)

Are There Longer Than 3 Metre 6-pole Extension Cables For The External Blower?
When installing an external 1100 CFM blower with 6-pole connector, is the 3 metre 6-pole cable exten...
When installing an external 1100 CFM blower with 6-pole connector, is the 3 metre 6-pole cable exten...
(Posted by malmstrome 8 years ago)

Miele Da 249-2 Hood Touch Control Panel Broke
Hello, we use our Miele DA 249-2 hood and we're very happy with it. A short time ago the touch contr...
Hello, we use our Miele DA 249-2 hood and we're very happy with it. A short time ago the touch contr...
(Posted by avernov 8 years ago)

Automatic Switch Issue With Da3460
Our range hood is designed to switch on and off when the unit is pulled out and pushed back in. Ofte...
Our range hood is designed to switch on and off when the unit is pulled out and pushed back in. Ofte...
(Posted by kmunro52 9 years ago)

What Is The Shipping Weight Of The Miele Decorator Wall Hood Da-249-3
(Posted by carolync26246 10 years ago)