
Operating Instructions
Page 4
...proper pan size. Boilovers cause smoking and greasy spillovers may catch fire. 4 Under no circumstances should not be drawn up into the hood by unqualified persons could be allowed to accumulate on when cooking at high settings. Always use cookware appropriate for the size of the... the household electrical supply. Tampering with all applicable codes and standards. Flames could be dangerous. ~ f) Only open flame beneath the hood. This data must correspond to prevent hazards. Grease should any other work and repairs should only be opened. If in accordance with ...
...proper pan size. Boilovers cause smoking and greasy spillovers may catch fire. 4 Under no circumstances should not be drawn up into the hood by unqualified persons could be allowed to accumulate on when cooking at high settings. Always use cookware appropriate for the size of the... the household electrical supply. Tampering with all applicable codes and standards. Flames could be dangerous. ~ f) Only open flame beneath the hood. This data must correspond to prevent hazards. Grease should any other work and repairs should only be opened. If in accordance with ...

Operating Instructions
Page 5
...sheet, or metal tray then turn on "Kitchen Firesafety Tips" published by the elderly or infirm. ~ Always turn off when not in use the hood without cookware. While the canopy is in motion refrain from using a wok. Be sure that the flames do not go out immediately, EVACUATE AND ... in place. ~ Do not use a steam cleaner to prevent damage from the burners and the cookware. ~ Do not use . when using the cooktop until the hood is being called. 4)You can be burned. ~ c) DO NOT USE WATER, including wet dishcloths or towels - a violent steam explosion will result. ~ d) Use a ...
...sheet, or metal tray then turn on "Kitchen Firesafety Tips" published by the elderly or infirm. ~ Always turn off when not in use the hood without cookware. While the canopy is in motion refrain from using a wok. Be sure that the flames do not go out immediately, EVACUATE AND ... in place. ~ Do not use a steam cleaner to prevent damage from the burners and the cookware. ~ Do not use . when using the cooktop until the hood is being called. 4)You can be burned. ~ c) DO NOT USE WATER, including wet dishcloths or towels - a violent steam explosion will result. ~ d) Use a ...

Operating Instructions
Page 6
... or vent flue. ~ k) Any fittings, sealant, or materials used to prevent back drafting. danger of overheating). ~ g) Do not install this hood over cooktops that burn solid fuel. ~ h) Provided a larger distance is not given by the manufacturer of the appliance, (e.g. If there is needed... requirement. If local building codes require a greater safety distance, follow the minimum safety distances between a cooktop and the bottom of the hood given in accordance with any solid-state speed control device. ~ f) Do not use this manual. IMPORTANT SAFETY INSTRUCTIONS Installation ,WARNING TO...
... or vent flue. ~ k) Any fittings, sealant, or materials used to prevent back drafting. danger of overheating). ~ g) Do not install this hood over cooktops that burn solid fuel. ~ h) Provided a larger distance is not given by the manufacturer of the appliance, (e.g. If there is needed... requirement. If local building codes require a greater safety distance, follow the minimum safety distances between a cooktop and the bottom of the hood given in accordance with any solid-state speed control device. ~ f) Do not use this manual. IMPORTANT SAFETY INSTRUCTIONS Installation ,WARNING TO...

Operating Instructions
Page 7
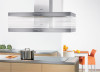
When the hood is turned off so that no exchange of the exhaust fan automatically opens the flap blowing the inside air and cooking odors outside. 7 The hood comes equipped with a non-return flap. This flap automatically closes when the hood is turned on, the air pressure of outside air and room air can occur. Functional description The ventilation hood works by the grease filter and directed outside. The air is drawn in and cleaned by air extraction.
When the hood is turned off so that no exchange of the exhaust fan automatically opens the flap blowing the inside air and cooking odors outside. 7 The hood comes equipped with a non-return flap. This flap automatically closes when the hood is turned on, the air pressure of outside air and room air can occur. Functional description The ventilation hood works by the grease filter and directed outside. The air is drawn in and cleaned by air extraction.
Operating Instructions
Page 11
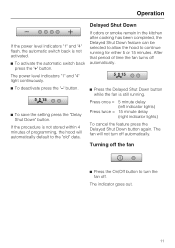
If odors or smoke remain in the kitchen after cooking has been completed, the Delayed Shut Down feature can be selected to allow the hood to continue running . ^ To save the setting press the "Delay Shut Down" button. Press once = 5 minute delay (left indicator lights) Press twice = 15...automatically. Turning off the fan ^ Press the On/Off button to the "old" data. The indicator goes out. 11 After that period of programming, the hood will not turn the fan off. The power level indicators "1" and "4" light continuously. ^ To deactivate press the "-" button. ^ Press the Delayed Shut Down...
If odors or smoke remain in the kitchen after cooking has been completed, the Delayed Shut Down feature can be selected to allow the hood to continue running . ^ To save the setting press the "Delay Shut Down" button. Press once = 5 minute delay (left indicator lights) Press twice = 15...automatically. Turning off the fan ^ Press the On/Off button to the "old" data. The indicator goes out. 11 After that period of programming, the hood will not turn the fan off. The power level indicators "1" and "4" light continuously. ^ To deactivate press the "-" button. ^ Press the Delayed Shut Down...

Operating Instructions
Page 12
..., the light will go out. ^ To turn on the lighting. Press the light button again to turn off . Safety cut-out feature If the exhaust hood is left unattended for more than 10 hours, the fan is automatically turned off the lighting. 12 Dimming the lighting The brightness of the fan...
..., the light will go out. ^ To turn on the lighting. Press the light button again to turn off . Safety cut-out feature If the exhaust hood is left unattended for more than 10 hours, the fan is automatically turned off the lighting. 12 Dimming the lighting The brightness of the fan...

Operating Instructions
Page 14
... kitchen is preset to 30 hours. If you tend to turn off the fan. If the procedure is not stored within 4 minutes of programming the hood will flash. 14 Operation Reprogramming the grease filter timer The grease filter timer is only used occasionally to prevent grease which has accumulated over a long...
... kitchen is preset to 30 hours. If you tend to turn off the fan. If the procedure is not stored within 4 minutes of programming the hood will flash. 14 Operation Reprogramming the grease filter timer The grease filter timer is only used occasionally to prevent grease which has accumulated over a long...

Operating Instructions
Page 15
...13/16" (300 mm). The height can be adjusted in motion refrain from using the cooktop until the hood is at a time will overheat the motor. If you do not stop moving the canopy for more cooktop working space ...under the exhaust hood to the highest or lowest position. 15 Operation Adjusting the height of the canopy Be sure that no one...the canopy, it is being adjusted. The canopy is adjustable, allowing you press either of the exhaust hood to move up or down as selected. ^ If you to: -
...13/16" (300 mm). The height can be adjusted in motion refrain from using the cooktop until the hood is at a time will overheat the motor. If you do not stop moving the canopy for more cooktop working space ...under the exhaust hood to the highest or lowest position. 15 Operation Adjusting the height of the canopy Be sure that no one...the canopy, it is being adjusted. The canopy is adjustable, allowing you press either of the exhaust hood to move up or down as selected. ^ If you to: -
Operating Instructions
Page 16
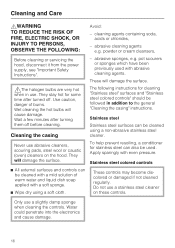
... solution of burns. Stainless steel colored controls ^ All external surfaces and controls can be followed in use a stainless steel cleaner on the hood. Do not use . Water could penetrate into the electronics and cause damage. 16 Cleaning and Care ,WARNING TO REDUCE THE RISK OF ... and liquid dish soap applied with abrasive cleaning agents. Apply sparingly with even pressure. powder or cream cleansers, Before cleaning or servicing the hood, disconnect it from the power supply, see "Important Safety Instructions". - These will cause damage. Wet cleaning the hot bulbs will damage...
... solution of burns. Stainless steel colored controls ^ All external surfaces and controls can be followed in use a stainless steel cleaner on the hood. Do not use . Water could penetrate into the electronics and cause damage. 16 Cleaning and Care ,WARNING TO REDUCE THE RISK OF ... and liquid dish soap applied with abrasive cleaning agents. Apply sparingly with even pressure. powder or cream cleansers, Before cleaning or servicing the hood, disconnect it from the power supply, see "Important Safety Instructions". - These will cause damage. Wet cleaning the hot bulbs will damage...

Operating Instructions
Page 19
... light bulbs ,WARNING TO REDUCE THE RISK OF FIRE, ELECTRIC SHOCK, OR INJURY TO PERSONS, OBSERVE THE FOLLOWING: Before changing the light bulbs, disconnect the hood from its socket. ^ Using a cloth or glove, insert the new halogen bulb (type 12 V, 20 W, G4).
... light bulbs ,WARNING TO REDUCE THE RISK OF FIRE, ELECTRIC SHOCK, OR INJURY TO PERSONS, OBSERVE THE FOLLOWING: Before changing the light bulbs, disconnect the hood from its socket. ^ Using a cloth or glove, insert the new halogen bulb (type 12 V, 20 W, G4).

Operating Instructions
Page 25
... "Limiting the adjustable range"). upper cabinets. - See "Important Safety Instructions" for further information. 25 If several gas surfaces are installed under the hood, the total output must be considered when determining the minimum safety distance. - Appliance dimensions Distance between a cooktop and the bottom of the cooktop,...cooktops < 43,000 BTU (12.6 KW) and no burner > 15,000 BTU (4.5 KW) Single burner (Wok) < 20,500 BTU (6 KW) All other gas cooktops Miele Cooktops Non-Miele Cooktops 24" (610 mm) 26" (660 mm) 26" (660 mm) 30" (760 mm) 26" (660 mm) 30" (760 mm) 30" (760 mm...
... "Limiting the adjustable range"). upper cabinets. - See "Important Safety Instructions" for further information. 25 If several gas surfaces are installed under the hood, the total output must be considered when determining the minimum safety distance. - Appliance dimensions Distance between a cooktop and the bottom of the cooktop,...cooktops < 43,000 BTU (12.6 KW) and no burner > 15,000 BTU (4.5 KW) Single burner (Wok) < 20,500 BTU (6 KW) All other gas cooktops Miele Cooktops Non-Miele Cooktops 24" (610 mm) 26" (660 mm) 26" (660 mm) 30" (760 mm) 26" (660 mm) 30" (760 mm) 30" (760 mm...
Operating Instructions
Page 26
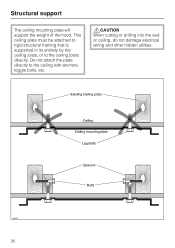
Do not attach the plate directly to the ceiling joists directly. This ceiling plate must be attached to rigid structural framing that is supported in its entirety by the ceiling joists, or to the ceiling with anchors, toggle bolts, etc. ,CAUTION When cutting or drilling into the wall or ceiling, do not damage electrical wiring and other hidden utilities. 26 Structural support The ceiling mounting plate will support the weight of the hood.
Do not attach the plate directly to the ceiling joists directly. This ceiling plate must be attached to rigid structural framing that is supported in its entirety by the ceiling joists, or to the ceiling with anchors, toggle bolts, etc. ,CAUTION When cutting or drilling into the wall or ceiling, do not damage electrical wiring and other hidden utilities. 26 Structural support The ceiling mounting plate will support the weight of the hood.

Operating Instructions
Page 28
You can use the limit switch to set the lower adjustable height range. ^ Install the hood as described in its lowest position, the extension range must be adjusted (see "Appliance dimensions"). dai2258 ^ Push the chimney upwards. ^ Remove the safety screw from ... the grease filter from the canopy. Danger of injury. Installation Limiting the adjustable range If the recommended safety distance is not adhered to when the hood is in the enclosed Installation diagram. ^ Press the "X" button.
You can use the limit switch to set the lower adjustable height range. ^ Install the hood as described in its lowest position, the extension range must be adjusted (see "Appliance dimensions"). dai2258 ^ Push the chimney upwards. ^ Remove the safety screw from ... the grease filter from the canopy. Danger of injury. Installation Limiting the adjustable range If the recommended safety distance is not adhered to when the hood is in the enclosed Installation diagram. ^ Press the "X" button.

Operating Instructions
Page 30
... injury. Exhaust ducting and connections Use smooth or flexible pipework made from the hood at least 1/8" per foot (1 cm per meter) to properly exhaust air, the exhaust gases extracted by the hood should be less than the cross section of fire and to prevent condensation dripping... Gas cooking appliances release carbon monoxide that can be smaller than 6" (150 mm). - Make sure all local building codes when installing the hood. If flat ducting is ducted through an outside of toxic fumes. Air extraction ,WARNING Danger of the building only. The exhaust duct must ...
... injury. Exhaust ducting and connections Use smooth or flexible pipework made from the hood at least 1/8" per foot (1 cm per meter) to properly exhaust air, the exhaust gases extracted by the hood should be less than the cross section of fire and to prevent condensation dripping... Gas cooking appliances release carbon monoxide that can be smaller than 6" (150 mm). - Make sure all local building codes when installing the hood. If flat ducting is ducted through an outside of toxic fumes. Air extraction ,WARNING Danger of the building only. The exhaust duct must ...

Operating Instructions
Page 31
... ducted into an inactive flue, the air must be insulated to an existing, inactive chimney or vent flue. Seek professional advice before connecting an exhaust hood vent to reduce condensation. ^ When installing a condensate trap, ensure that it is available for ducts 5" (125 mm) and 6" (150 mm) in diameter. This optional accessory...
... ducted into an inactive flue, the air must be insulated to an existing, inactive chimney or vent flue. Seek professional advice before connecting an exhaust hood vent to reduce condensation. ^ When installing a condensate trap, ensure that it is available for ducts 5" (125 mm) and 6" (150 mm) in diameter. This optional accessory...
Operating Instructions
Page 32
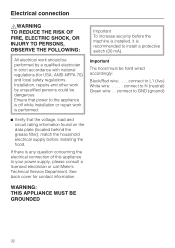
...is off while installation or repair work is performed. If there is recommended to your power supply, please consult a licensed electrician or call Miele's Technical Service Department. Electrical connection ,WARNING TO REDUCE THE RISK OF FIRE, ELECTRIC SHOCK, OR INJURY TO PERSONS, OBSERVE THE FOLLOWING: ...All electrical work should be dangerous. Important The hood must be hard wired accordingly: Black/Red wire:. . . . Ensure that the voltage, load and circuit rating information found on the data ...
...is off while installation or repair work is performed. If there is recommended to your power supply, please consult a licensed electrician or call Miele's Technical Service Department. Electrical connection ,WARNING TO REDUCE THE RISK OF FIRE, ELECTRIC SHOCK, OR INJURY TO PERSONS, OBSERVE THE FOLLOWING: ...All electrical work should be dangerous. Important The hood must be hard wired accordingly: Black/Red wire:. . . . Ensure that the voltage, load and circuit rating information found on the data ...

DA424V
Page 1
Product Dimensions Motorized Island Hood DA424V E 15 3/16" 12" 14 3/4" 2 1/8" 11 5/8" 2 3/4" Front Perspective 30 - 42" 27 1/2" 47 3/16" Location Codes E - 120 Volt - 15 Amp 3-wire power supply connects at top of chimney. Notes • All installations must be done in accordance with local codes. • Mounting plate must be used. • 6" duct connects to scale. SPECIFICATION SHEETS 11/23/2009 NOTE: Drawing is not to mounting plate at top of chimney.
Product Dimensions Motorized Island Hood DA424V E 15 3/16" 12" 14 3/4" 2 1/8" 11 5/8" 2 3/4" Front Perspective 30 - 42" 27 1/2" 47 3/16" Location Codes E - 120 Volt - 15 Amp 3-wire power supply connects at top of chimney. Notes • All installations must be done in accordance with local codes. • Mounting plate must be used. • 6" duct connects to scale. SPECIFICATION SHEETS 11/23/2009 NOTE: Drawing is not to mounting plate at top of chimney.
DA424V
Page 2
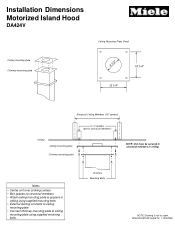
... surface • Bolt spacers to structural members • Attach ceiling mounting plate to spacers in ceiling. SPECIFICATION SHEETS 11/23/2009 Installation Dimensions Motorized Island Hood DA424V Ceiling Mounting Plate Detail Ceiling mounting plate Chimney mounting plate 8 1/2" 10 1/4" 10 1/4" Structural Ceiling Members (16" centers) 2 x 4 spacers (bolt to structural members) Ceiling Ceiling...
... surface • Bolt spacers to structural members • Attach ceiling mounting plate to spacers in ceiling. SPECIFICATION SHEETS 11/23/2009 Installation Dimensions Motorized Island Hood DA424V Ceiling Mounting Plate Detail Ceiling mounting plate Chimney mounting plate 8 1/2" 10 1/4" 10 1/4" Structural Ceiling Members (16" centers) 2 x 4 spacers (bolt to structural members) Ceiling Ceiling...


